Oreo Dirt Cake Recipe: There’s something magical about a dessert that requires no baking, tastes incredibly creamy, and looks fun at the same time. The Oreo Dirt Cake is one of those recipes that never goes out of style. Whether you’re making it for a kids’ birthday party, a casual family gathering, or simply because you’re craving something sweet and easy, this cake always delivers. It combines crushed Oreos, creamy layers of pudding and cream cheese, and the perfect amount of sweetness to leave everyone asking for seconds.
Introduction to Oreo Dirt Cake
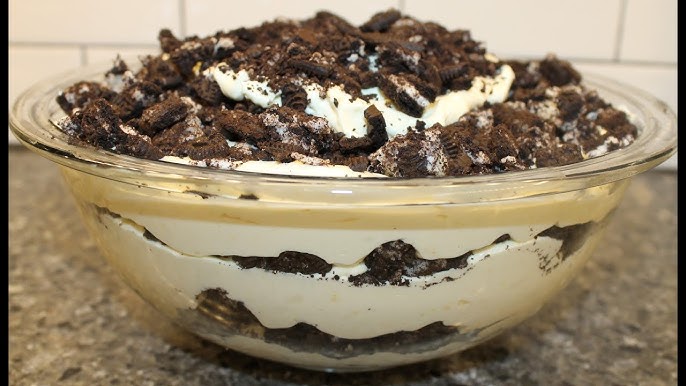
Oreo Dirt Cake isn’t just a dessert; it’s an experience. Imagine digging a spoon into a soft, rich layer of cream, only to hit the crunchy chocolatey goodness of Oreos—it’s like uncovering buried treasure. That’s why it’s often called “dirt cake.” The cake has a fun visual appeal, making it look like edible soil, which is perfect for kids’ parties or themed events.
Why Oreo Dirt Cake is Everyone’s Favorite Dessert
Oreo Dirt Cake has a universal appeal because it checks all the boxes—chocolate, creaminess, crunch, and nostalgia. The simplicity of ingredients makes it affordable and quick to whip up. Plus, you can serve it in a large dish for a crowd or in small cups for individual servings.
Origin and Popularity of Oreo Dirt Cake
While the exact origin of Oreo Dirt Cake is hard to pinpoint, it became widely popular in the 1980s and 1990s as a fun, no-bake dessert for families. It has remained a staple at potlucks, holidays, and casual gatherings ever since. Its ability to adapt with variations (like Halloween-themed or birthday-themed dirt cakes) has kept it alive in kitchens everywhere.
Ingredients You’ll Need
The beauty of Oreo Dirt Cake is its simplicity. Most of the ingredients are pantry staples or easy to find in any grocery store.
Main Ingredients for the Crust
- 1 package (14–15 oz) Oreo cookies (regular, not double-stuffed)
- ½ cup melted butter
Creamy Layer Ingredients
- 1 package (8 oz) cream cheese, softened
- 1 cup powdered sugar
- 2 cups whipped topping (like Cool Whip)
- 2 packages (3.4 oz each) instant vanilla pudding mix
- 3 cups cold milk
Toppings and Garnishing Options
- Crushed Oreos (for the “dirt” topping)
- Gummy worms (for a fun look)
- Shaved chocolate or mini chocolate chips
- Whipped cream for extra creaminess
Substitutions and Variations for Dietary Needs
- Use sugar-free pudding for a lower-calorie option.
- Substitute dairy-free cream cheese and almond milk for a vegan-friendly version.
- Try flavored Oreos (like mint or golden Oreos) for a unique twist.
Kitchen Tools You’ll Need
Making Oreo Dirt Cake doesn’t require any fancy tools, which makes it perfect for beginner bakers or kids who want to help.
Essential Tools for Preparation
- A food processor or rolling pin (to crush the Oreos)
- Mixing bowls
- Electric hand mixer or stand mixer
- Spatula
- 9×13-inch baking dish (or trifle bowl for presentation)
Optional Tools to Make the Process Easier
- Measuring cups and spoons
- Glass cups or mason jars (if making individual servings)
- Decorative toppings for themed events
Step-by-Step Guide to Making Oreo Dirt Cake
This is where the fun begins! Oreo Dirt Cake is all about layering, so patience is key to creating that perfect balance of creaminess and crunch.
Step 1 – Crush the Oreos
Start by crushing the Oreo cookies into fine crumbs. You can use a food processor for quick results or place the cookies in a ziplock bag and crush them with a rolling pin. Mix in the melted butter to form a crust-like base. Spread half of the crushed mixture into the bottom of your serving dish.
Step 2 – Prepare the Cream Cheese Mixture
In a bowl, beat the softened cream cheese until smooth. Add the powdered sugar and mix well. Fold in half of the whipped topping to create a creamy, fluffy texture.
Step 3 – Make the Pudding Layer
In another bowl, whisk the instant pudding mix with cold milk until thickened. Gently fold this pudding mixture into the cream cheese mixture. This forms the dreamy middle layer of your dirt cake.
Step 4 – Layer the Cake Perfectly
Spread the cream cheese–pudding mixture over the Oreo crust. Top it with the remaining crushed Oreos, making it look like “dirt.” If desired, add gummy worms or chocolate chips for extra fun.
Step 5 – Chill and Set for the Best Flavor
Refrigerate the cake for at least 3–4 hours before serving. This allows the layers to firm up and the flavors to blend beautifully. For best results, let it sit overnight.
Pro Tips for the Perfect Oreo Dirt Cake
Even though Oreo Dirt Cake is a simple no-bake dessert, there are a few tricks that can elevate it from “good” to “absolutely irresistible.” Paying attention to texture, layering, and presentation makes all the difference.
How to Prevent Sogginess
One common issue people face when making Oreo Dirt Cake is that the crust can turn mushy. To avoid this, make sure your Oreo crumbs are finely crushed and well-mixed with melted butter. This creates a solid base that holds up under the creamy layers. Another trick is to let the base chill in the refrigerator for about 15 minutes before adding the cream cheese mixture. This allows the crust to firm up and stay crunchy.
How to Achieve the Perfect Texture
The magic of Oreo Dirt Cake lies in the contrast between creamy and crunchy. For the cream cheese mixture, make sure the cream cheese is softened at room temperature before beating it. This ensures a smooth, lump-free mixture. Fold gently when mixing the pudding with the cream cheese so the mixture stays fluffy instead of dense. For the Oreos on top, avoid crushing them too finely; leaving small chunks creates a satisfying bite.
Presentation Tips for Parties
Since Oreo Dirt Cake is such a fun dessert, presentation is everything. Instead of making it in a regular dish, you can serve it in a clear trifle bowl to show off the beautiful layers. For kids’ parties, individual mason jars or plastic cups with gummy worms sticking out are always a hit. Want to make it look fancy? Sprinkle grated chocolate on top or add whipped cream swirls around the edges. A few decorative sprinkles can also make it festive for birthdays or holidays.
Fun Variations of Oreo Dirt Cake
One of the best things about Oreo Dirt Cake is its versatility. You can take the classic recipe and turn it into a themed dessert for different occasions.
Oreo Dirt Cups for Kids
Instead of making one big cake, divide the layers into small cups or mason jars. Add a gummy worm on top of each cup to make it fun and interactive for kids. This is also a great way to control portions and avoid messy servings.
Halloween-Themed Oreo Dirt Cake
This variation is perfect for spooky season. Use chocolate pudding instead of vanilla for a darker “soil.” Decorate with candy pumpkins, edible tombstones (made from cookies), and gummy worms crawling out of the “dirt.” A drizzle of red gel icing can give it an extra creepy vibe.
Birthday Oreo Dirt Cake with Candles
Who says birthday cakes have to be baked? You can turn Oreo Dirt Cake into a birthday centerpiece by layering it in a trifle bowl and topping it with colorful sprinkles, birthday candles, and even a drizzle of chocolate syrup. Kids love it because it’s playful and different from the usual frosted cake.
Healthy Twist with Sugar-Free Options
If you want a lighter version, use sugar-free pudding mix, light cream cheese, and a low-fat whipped topping. You can also opt for gluten-free Oreos if you’re serving guests with dietary restrictions. While it won’t be exactly the same as the original, it’s still delicious and guilt-free.
Storing and Serving Oreo Dirt Cake
Knowing how to properly store and serve Oreo Dirt Cake ensures that it stays fresh and tasty for days.
Refrigeration and Shelf Life
Since Oreo Dirt Cake is made with cream cheese, whipped topping, and pudding, it needs to be refrigerated. Cover the dish with plastic wrap or foil and store it in the refrigerator for up to 4 days. The flavors actually get better after a day or two as the layers blend together.
Freezing and Thawing Instructions
If you want to make Oreo Dirt Cake ahead of time, freezing is an option. Wrap the dish tightly in plastic wrap and aluminum foil, then freeze for up to 2 months. When ready to serve, thaw overnight in the refrigerator. Keep in mind that the texture may change slightly, with the Oreos becoming softer.
Best Ways to Serve at Parties
For casual gatherings, a 9×13-inch dish works perfectly because you can scoop and serve. For formal occasions, consider making it in a glass trifle dish to showcase the layers. If you’re serving outdoors in warm weather, keep the cake chilled in a cooler until it’s time to eat—it melts quickly in the heat.
Nutritional Information of Oreo Dirt Cake
While Oreo Dirt Cake is undeniably delicious, it’s also a dessert you’ll want to enjoy in moderation.
Calories and Macronutrient Breakdown
On average, one serving of Oreo Dirt Cake (about 1 cup) contains:
- Calories: 320–400 (depending on ingredients used)
- Carbohydrates: 35–40g
- Fat: 18–22g
- Protein: 4–5g
- Sugar: 28–32g
These numbers will vary depending on whether you use regular, sugar-free, or low-fat ingredients.
Possible Allergens and Substitutes
- Dairy: Contains cream cheese, pudding, and whipped topping. Substitute with dairy-free cream cheese and coconut whipped cream for a vegan version.
- Gluten: Oreos contain gluten, but gluten-free Oreos are widely available.
- Sugar: For those watching sugar intake, sugar-free pudding and reduced-sugar Oreos are good substitutes.
FAQs about Oreo Dirt Cake Recipe
Q1: Can I add fruit to Oreo Dirt Cake?
Yes! Bananas, strawberries, or raspberries pair wonderfully with the creamy filling and add freshness to the dessert. Just layer the fruit between the cream and Oreos.
Q2: How do I transport Oreo Dirt Cake to a party?
Make it in a sturdy dish with a lid. If it’s hot outside, place the dish in a cooler with ice packs to keep it firm until serving time.
Q3: Can I make Oreo Dirt Cake in layers like a trifle?
Yes, a trifle dish works beautifully to show off the layers of Oreo crumbs, pudding, and cream cheese mixture. It also adds a wow factor for parties.
Q4: Is Oreo Dirt Cake kid-friendly to make?
Definitely! Kids can crush the Oreos, help with layering, and add gummy worms or sprinkles on top. It’s a fun family activity.
Q5: Can I use homemade whipped cream instead of Cool Whip?
Of course! Fresh whipped cream gives the cake a lighter, less processed flavor. Just whip heavy cream with a little sugar until stiff peaks form, and fold it into the mixture.
Conclusion
Oreo Dirt Cake is more than just a dessert—it’s a no-bake masterpiece that combines fun, flavor, and creativity in every bite. With its creamy layers, crunchy Oreo topping, and endless customization options, it’s no wonder this cake has been a family favorite for decades. Whether you’re making it for a birthday, holiday, or just a cozy night in, it’s guaranteed to put smiles on faces.
The best part? You don’t need to be a baking expert to make it. With simple ingredients, minimal tools, and a little patience while it chills, you’ll have a dessert that looks impressive and tastes heavenly. Once you try this recipe, it’s bound to become one of your go-to treats for special occasions—or just because you’re craving something sweet.
So go ahead, crush those Oreos, whip up that creamy filling, and dig into a slice (or cup) of pure happiness. Oreo Dirt Cake never disappoints!