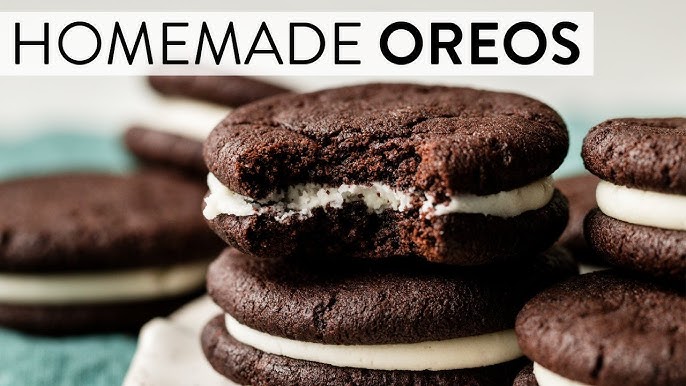
Oreo Cookie Recipe: Who doesn’t love Oreos? Those iconic black-and-white cookies have a nostalgic charm and a taste that’s universally loved. But did you know you can make them at home—and possibly even better than store-bought? If you’ve ever wondered how to create that perfect crunch and creamy center from scratch, you’re in the right place. Making Oreos at home isn’t just a fun weekend project; it also lets you control the ingredients, play with flavors, and make them as thick or thin as you want. Whether you like the original classic or want to stuff them with flavored filling, we’ve got you covered with this detailed, foolproof guide.
Why Make Oreos at Home?
Sure, it’s easy to grab a pack of Oreos at the store, but there’s something special about crafting your own batch. Homemade Oreos have a richer, more chocolaty flavor, and the cream filling? You can customize it to your liking—vanilla, mint, peanut butter, or even raspberry! Plus, you can adjust the sugar, choose high-quality ingredients, and avoid preservatives. This makes them a great choice for health-conscious snackers or parents wanting to control what their kids eat. And let’s be honest: who doesn’t want bragging rights for making homemade Oreos?
What Makes This Recipe Special?
This isn’t your average Oreo recipe. Our version has been tweaked for optimal flavor, crunch, and creaminess. The cookie is deeply chocolaty, slightly crisp on the outside, and just soft enough inside. The cream filling is smooth, sweet, and buttery without being cloying. You’ll only need pantry staples, and the process is straightforward—even if you’re not an expert baker. Whether you’re a beginner or seasoned home chef, this recipe brings a bakery-style experience right to your kitchen.
Ingredients Needed for Homemade Oreo Cookies
You won’t need any exotic ingredients—most are things you already have in your pantry. Here’s a complete list:
For the Chocolate Cookie
- 1 cup (125g) all-purpose flour
- ½ cup (45g) unsweetened cocoa powder (Dutch-processed works best)
- ½ tsp baking soda
- ¼ tsp salt
- ¾ cup (150g) granulated sugar
- 10 tbsp (140g) unsalted butter, softened
- 1 egg yolk
- 1 tsp vanilla extract
The chocolate cookies are the heart of the Oreo. Using high-quality cocoa powder makes all the difference, so don’t skimp on it. Dutch-process cocoa gives a deep, rich flavor and that classic dark Oreo color.
For the Cream Filling
- ¼ cup (60g) unsalted butter, softened
- ¼ cup (50g) vegetable shortening
- 1½ cups (180g) powdered sugar
- 1 tsp vanilla extract
- Pinch of salt
The filling is what binds the cookies together—literally and figuratively. A combination of butter and shortening makes it creamy and stable, so it doesn’t ooze out when you bite into the cookie.
Essential Kitchen Tools for Oreo Making
While the ingredients are simple, having the right tools will make the process smoother and more enjoyable.
Tools You’ll Need
- Mixing bowls
- Hand or stand mixer
- Measuring cups and spoons
- Rolling pin
- Baking sheets
- Parchment paper
- Cookie cutter (around 2-inch round)
You don’t need fancy gadgets. A hand mixer works fine, and if you don’t have a rolling pin, a clean bottle will do the trick. A round cookie cutter helps mimic the traditional Oreo shape, but any small round object like a glass will work.
Optional but Helpful Equipment
- Cookie scoop (for even filling portions)
- Offset spatula (to smooth the cream layer)
- Cooling rack (for faster cooling and crispier texture)
Having these tools isn’t mandatory, but they do make things quicker and help you achieve that bakery-style perfection.
Step-by-Step Instructions to Make Oreo Cookies
Now, let’s get to the fun part. Here’s exactly how you can make the best homemade Oreo cookies, step by step.
Step 1 – Preparing the Dough
Start by creaming the softened butter and sugar together in a large bowl until it’s light and fluffy—this takes about 2–3 minutes with a hand or stand mixer. Add the egg yolk and vanilla, and beat until combined.
In a separate bowl, whisk together the flour, cocoa powder, baking soda, and salt. Gradually add this dry mixture into the wet ingredients. Mix on low speed until a stiff dough forms. Don’t worry if it looks a little crumbly—just knead it gently with your hands until it comes together.
Wrap the dough in plastic wrap and chill for at least 30 minutes. This helps the dough firm up and makes it easier to roll out.
Step 2 – Shaping and Baking the Cookies
Preheat your oven to 350°F (175°C) and line two baking sheets with parchment paper.
On a lightly floured surface, roll out the chilled dough to about ¼ inch thick. Use your cookie cutter to punch out round shapes. Gather and re-roll the scraps to get as many cookies as possible.
Place the cookies on the baking sheets, spacing them an inch apart. Bake for 8–10 minutes. They’ll firm up as they cool, so don’t overbake. Let them cool completely on a wire rack before assembling.
Step 3 – Making the Cream Filling
While your cookies are cooling, it’s time to whip up that iconic Oreo cream filling. In a medium mixing bowl, beat together the softened butter and vegetable shortening until the mixture is smooth and fluffy—this should take around 2 minutes. You want the fat to be fully incorporated before adding the sugar.
Next, gradually add the powdered sugar. If you dump it all in at once, you’ll end up with a sugar cloud! Mix slowly at first, then increase the speed once it starts to combine. Add the vanilla extract and a pinch of salt to round out the flavor. Continue mixing until the filling is thick, smooth, and slightly stiff but still spreadable.
This cream filling is the star of the show. It’s soft enough to bite into but firm enough to hold its shape. If you want to get fancy, you can divide the filling and add food coloring or different extracts (like mint, almond, or lemon) for unique variations.
Step 4 – Assembling the Cookies
Now for the most satisfying part: sandwiching the cookies together.
Pair up your cookies so they’re roughly the same size. Flip one cookie from each pair over and pipe or spread about a teaspoon of cream filling onto the flat side. You can use a piping bag or a spoon—whatever works best for you.
Gently press the second cookie on top, flat side down, and give it a light squeeze to spread the filling evenly. Be careful not to press too hard or the cream will ooze out the sides.
Place your assembled Oreos on a tray and let them sit at room temperature for about 15–20 minutes. This allows the filling to firm up slightly, making the cookies easier to handle. For a firmer bite, you can pop them in the fridge for 10 minutes.
And voilà! You now have your very own batch of classic homemade Oreo cookies. They look just like the real thing—but taste even better.
Tips for the Perfect Homemade Oreos
Want to take your Oreo game to the next level? Here are some essential tips that will help your cookies turn out perfect every time.
Baking Tips
- Use quality cocoa powder – Dutch-processed cocoa gives that deep Oreo flavor and rich dark color. It’s worth the investment.
- Don’t overmix the dough – Overworking the dough can make the cookies tough. Mix just until the ingredients are combined.
- Chill the dough – Chilling makes the dough easier to roll and helps prevent the cookies from spreading too much in the oven.
- Watch your baking time – These cookies bake fast! Keep an eye on them, and pull them out once the edges start to firm up.
- Let them cool completely – Warm cookies are too soft and can break during assembly. Be patient and let them cool fully.
Storage and Shelf Life
Homemade Oreos can be stored in an airtight container at room temperature for up to 5 days. They’ll stay crisp and the filling will hold up well. If you prefer a softer texture, store them in the fridge—just remember to let them sit out for a few minutes before eating.
You can also freeze both the unbaked cookie dough and the assembled cookies. Freeze the dough wrapped tightly in plastic wrap for up to 2 months. Baked and assembled cookies can be frozen with parchment between layers to prevent sticking. They make great make-ahead treats for parties or lunchbox snacks.
Flavor Variations for Homemade Oreos
Want to jazz up your Oreos? Once you’ve mastered the classic recipe, there are endless possibilities for customizing the flavor. Here are some delicious twists to try:
Creative Cream Fillings
- Mint Chocolate: Add ¼ teaspoon of peppermint extract and a few drops of green food coloring to the cream filling. It’s like a Thin Mint cookie—but better.
- Peanut Butter: Replace half of the butter in the cream filling with creamy peanut butter for a sweet-and-salty combo.
- Strawberry: Mix in 1 tablespoon of freeze-dried strawberry powder for a fruity burst of flavor.
- Chocolate Fudge: Add 2 tablespoons of cocoa powder and a splash of milk to the filling for a rich, chocolate-on-chocolate experience.
Fun Cookie Additions
- Espresso Oreos: Add 1 teaspoon of instant espresso powder to the cookie dough to intensify the chocolate flavor and give it a coffee kick.
- Coconut Delight: Mix shredded coconut into the cream filling or roll the edges of the filling in toasted coconut for a tropical twist.
- Spiced Oreos: Add a pinch of cinnamon and nutmeg to the dough for a warm, spiced flavor perfect for the holidays.
These variations are perfect for parties, holidays, or just to keep things interesting. Get creative and make each batch your own!
Making Vegan or Gluten-Free Oreo Cookies
Have dietary needs? You can still enjoy delicious homemade Oreos with a few simple swaps:
Vegan Options
- Use vegan butter and a plant-based shortening like coconut oil.
- Replace the egg yolk with 1 tablespoon of ground flaxseed mixed with 3 tablespoons of water (let it sit for 10 minutes).
- Check your sugar to ensure it’s certified vegan.
Gluten-Free Adaptation
- Swap the all-purpose flour for a 1:1 gluten-free flour blend.
- Make sure all other ingredients (like cocoa powder and baking soda) are certified gluten-free.
These substitutions work beautifully and don’t sacrifice flavor or texture. You’ll still get that satisfying Oreo crunch and creamy center!
Serving Suggestions for Homemade Oreos
These cookies are a treat on their own, but why stop there? Here are some fun ways to serve your homemade Oreos:
- Dunk in milk: Just like the classic way. Cold milk + Oreo = magic.
- Oreo ice cream sandwiches: Add a scoop of vanilla ice cream between two cookies and freeze.
- Crumbled over desserts: Sprinkle crushed Oreos over ice cream, pudding, or cake for a decadent topping.
- Oreo milkshake: Blend cookies with vanilla ice cream and milk for a dreamy shake.
- DIY gift boxes: Pack a dozen in a cute box or jar, tie with a ribbon, and give them as thoughtful, homemade gifts.
Your Oreos will be a hit at any event—or as a late-night snack!
Troubleshooting Common Problems
Even the best bakers run into hiccups. Here’s how to fix the most common Oreo-making issues:
Problem 1: Cookies Too Hard
Fix: You may have overbaked them. Remember, they’ll firm up as they cool. Try reducing the baking time by a minute or two.
Problem 2: Filling Too Runny
Fix: If your cream is melting or too soft, add more powdered sugar or chill it for 10–15 minutes before assembling.
Problem 3: Cookies Spread Too Much
Fix: Make sure the dough is well-chilled before rolling and baking. Warm dough will spread and lose shape.
Problem 4: Cookie Cracks When Sandwiching
Fix: Let the cookies cool completely but don’t make them too dry. If needed, slightly soften the cookies by placing them in a sealed container with a slice of bread overnight.
With a little practice, you’ll be baking like a pro.
FAQs about Oreo Cookie Recipe
Q1: Can I make the Oreo dough in advance?
Yes! You can prepare the dough and refrigerate it for up to 3 days, or freeze it for up to 1 month. Just thaw before rolling and baking.
Q2: Can I use a food processor to make the dough?
Absolutely. A food processor can help mix the dry ingredients quickly and evenly. Just don’t overmix once the wet ingredients are added.
Q3: How do I get the cookies perfectly round?
Use a circular cookie cutter for uniform shapes. If you don’t have one, a glass cup or jar lid works too!
Q4: Can I make these cookies less sweet?
Yes. You can reduce the sugar in the filling slightly, though the cookies themselves need enough sugar for texture and structure.
Q5: What if I don’t have shortening for the filling?
You can substitute it with more butter, but your filling might be softer. Chill it longer to firm it up before assembling.
Conclusion
Making Oreo cookies at home is more than just baking—it’s a creative adventure. You start with a few humble ingredients and end up with something magical: dark, rich chocolate cookies hugging a velvety smooth cream filling. Whether you stick to the classic recipe or add your own twist, these homemade Oreos are sure to win hearts and satisfy cravings.
They’re fun to bake, even more fun to eat, and—let’s face it—people will think you’re a baking genius when you show up with a box of these at your next gathering.
So why settle for store-bought when you can make your own version of a classic, right in your kitchen?