Oreo Cake Recipe: Oreo cakes are a dream come true for cookie and chocolate lovers alike. They’re rich, creamy, and bursting with the iconic taste of Oreos. Whether you’re celebrating a birthday, an anniversary, or simply craving a decadent treat, an Oreo cake is the perfect go-to dessert. It’s no surprise that Oreo cakes have taken the baking world by storm — they blend the crunch and sweetness of Oreos with the soft, moist texture of a homemade cake. Trust me, once you take a bite, you’ll be hooked!
What really makes Oreo cake so special? It’s the beautiful balance between the cocoa-rich base and the creamy frosting that usually has crushed Oreos folded into it. Plus, Oreos themselves bring an extra layer of nostalgia and comfort to the mix, making every slice a small trip back to childhood. So why not learn to make your own Oreo cake at home? It’s easier than you think!
Ingredients Needed for Oreo Cake
Before you get your hands messy, let’s gather everything you need. Having all your ingredients ready and measured will make the process smooth and enjoyable.
Dry Ingredients
- 2 cups all-purpose flour
- 1 ½ cups granulated sugar
- ¾ cup cocoa powder (unsweetened)
- 1 ½ teaspoons baking powder
- 1 ½ teaspoons baking soda
- ½ teaspoon salt
- 15 crushed Oreo cookies
Wet Ingredients
- 2 large eggs
- 1 cup milk (preferably whole milk)
- ½ cup vegetable oil
- 2 teaspoons vanilla extract
- 1 cup boiling water
Optional Add-Ons
- Extra Oreos for decorating
- Chocolate chips for added richness
- Whipped cream for topping
Having these ingredients at hand not only makes the job easier but also ensures you don’t miss out on anything crucial while baking.
Tools and Equipment You’ll Need
Setting up the right tools is half the battle won. Imagine starting to bake only to realize you don’t have a whisk or a baking pan — total nightmare!
Essential Baking Tools
- Mixing bowls (one large, one medium)
- Measuring cups and spoons
- Electric mixer or hand whisk
- Rubber spatula
- Sifter (for dry ingredients)
- 8-inch or 9-inch round cake pans (preferably two)
Special Equipment for Decoration
- Offset spatula (for frosting)
- Cake stand (optional but helps)
- Piping bag and tips (if you want to get fancy with decorations)
Getting these ready before you begin baking will save a lot of time and hassle. Trust me, preparation is key when it comes to baking a masterpiece!
Step-by-Step Instructions to Make Oreo Cake
Now, onto the fun part — baking! Here’s a detailed, foolproof guide to making the best Oreo cake you’ve ever tasted.
Step 1: Preparing the Ingredients
First things first, preheat your oven to 350°F (175°C). Grease and flour your cake pans or line them with parchment paper to avoid any sticking. Sift the flour, sugar, cocoa powder, baking powder, baking soda, and salt together into a large mixing bowl. Sifting ensures your dry ingredients are well aerated and makes the final cake softer.
Meanwhile, in a separate bowl, beat the eggs lightly. Add the milk, oil, and vanilla extract and mix well. Once that’s done, slowly combine the wet ingredients into the dry mixture, stirring gently to avoid overmixing.
Finally, stir in the boiling water. The batter will be thin, but that’s exactly what you want for a moist cake! Fold in the crushed Oreos gently to keep those delightful cookie chunks intact.
Step 2: Mixing the Batter
Pour the batter evenly into your prepared pans. If you want a perfectly even bake, you can weigh the pans after filling them to ensure the batter is distributed equally.
Give the pans a little tap on the counter to remove any air bubbles trapped in the batter. This step might seem small, but it makes a big difference in the final texture of your cake.
Step 3: Baking the Cake
Place the pans in your preheated oven and bake for about 30 to 35 minutes. Insert a toothpick into the center of the cakes to check if they’re done — if it comes out clean or with just a few crumbs, you’re good to go!
Once baked, let the cakes cool in the pans for about 10 minutes before transferring them to a wire rack to cool completely. Never frost a warm cake unless you want a melty, sloppy mess.
Step 4: Preparing the Frosting
While the cake cools, you can whip up the frosting. For a simple Oreo frosting, beat 1 cup of softened butter until creamy. Add 3-4 cups of powdered sugar, 2 tablespoons of heavy cream, and a teaspoon of vanilla extract. Beat it until fluffy and light.
Crush 10 Oreos finely (you want a powdery texture here) and fold them into the frosting. This gives it a cookies-and-cream vibe that’s absolutely heavenly.
Step 5: Assembling the Cake
Finally, it’s time to put everything together. Place one cake layer on a serving plate or cake stand. Spread a generous layer of frosting on top. Add the second layer, then cover the top and sides with the remaining frosting.
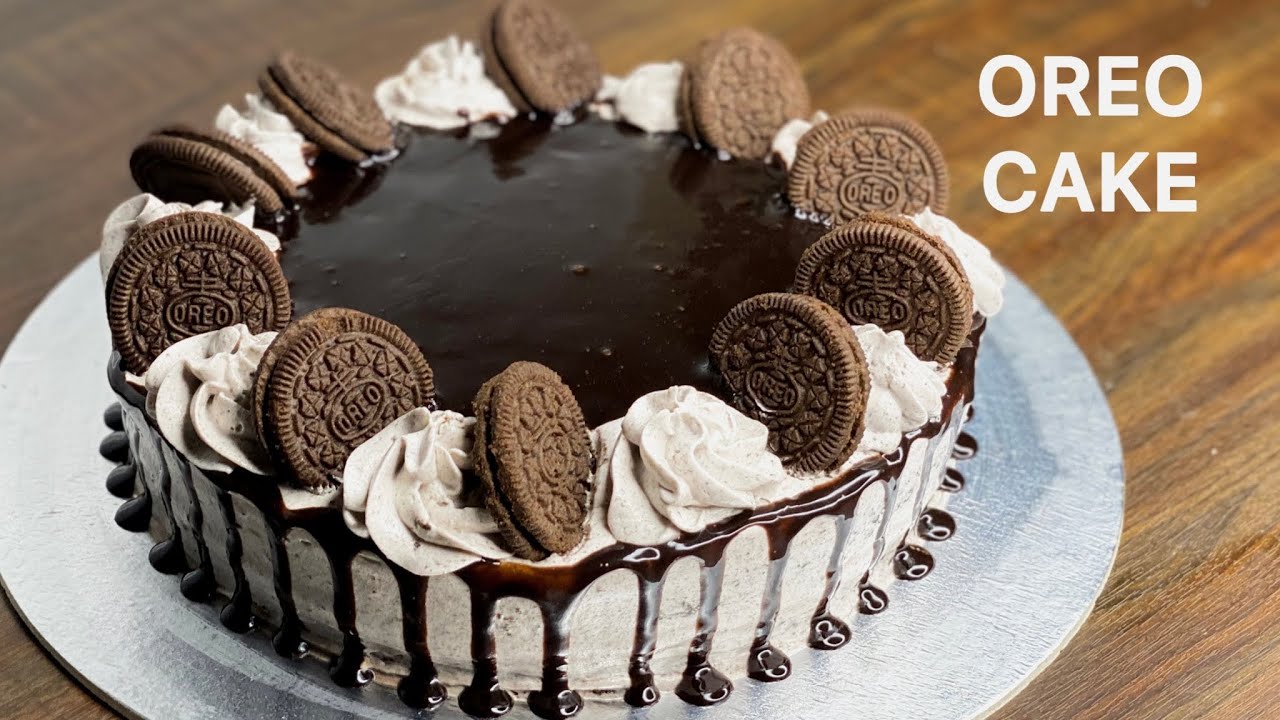
Use an offset spatula to smooth everything out beautifully. Decorate with crushed or whole Oreos on top. You can also pipe some extra frosting around the edges if you’re feeling fancy!
Tips for the Best Oreo Cake
Making an Oreo cake isn’t just about following a recipe—it’s also about knowing those little insider tips that make all the difference between a good cake and a mind-blowingly delicious one. Let’s dive into some of the most important ones.
Common Mistakes to Avoid
- Overmixing the batter: It’s easy to get carried away, but overmixing can lead to a dense, rubbery cake. Mix just until the ingredients are combined.
- Using cold ingredients: Always use room temperature eggs, milk, and butter. Cold ingredients don’t blend as well and can cause uneven baking.
- Skipping the sifting: If you don’t sift the dry ingredients, you risk ending up with a lumpy batter and an uneven cake texture.
- Opening the oven door too often: Every time you peek into the oven, you let out heat. This can make your cake fall in the center.
Secret Tips for Extra Moistness
- Add a tablespoon of sour cream or yogurt to the batter for an extra boost of moisture and richness.
- Don’t overbake! Keep a close eye on your cake towards the end of baking time. Even a few minutes too long can dry it out.
- Brush the cake layers lightly with simple syrup (equal parts sugar and water boiled together) before frosting. This trick locks in moisture and adds subtle sweetness.
Following these simple yet effective tips will bring your Oreo cake from “good” to “legendary” status!
Variations of Oreo Cake
Want to switch things up a bit? You’re going to love these awesome Oreo cake variations that can match any craving or occasion.
Oreo Ice Cream Cake
Perfect for summer birthdays or just when you’re craving something cold and sweet!
- Base: Crushed Oreos mixed with melted butter as a crust.
- Layers: Alternate between softened ice cream and crushed Oreos.
- Topping: Whipped cream and more Oreos.
Freeze for a few hours and you have an irresistibly cool dessert.
No-Bake Oreo Cake
Don’t want to turn on the oven? No problem!
- Layers: Alternate whipped cream and whole Oreos in a loaf pan.
- Chill: Let it sit in the fridge overnight to set.
- Serve: Slice and enjoy the creamy, dreamy layers.
These variations are perfect when you want the Oreo experience without the traditional baking steps!
How to Store and Preserve Oreo Cake
After all the hard work of baking and assembling your Oreo masterpiece, you’ll want to make sure it stays fresh and tasty for as long as possible.
Room Temperature Storage
- If you plan to eat the cake within 1–2 days, storing it at room temperature is perfectly fine.
- Keep it covered with a cake dome or an airtight container to prevent it from drying out.
Freezing for Longer Shelf Life
- Want to make it last longer? Freeze the cake!
- How to freeze: Wrap the cake tightly with plastic wrap and then with aluminum foil.
- Shelf life: It can stay fresh in the freezer for up to 2 months.
- Thawing: Move it to the refrigerator a day before you plan to eat it, then bring it to room temperature before serving.
Proper storage ensures that your cake remains as moist and delicious as the day you made it!
FAQs about Oreo Cake Recipe
1. Can I make an Oreo cake without an oven?
Yes! You can prepare a no-bake Oreo cake using a refrigerator. Simply use crushed Oreos, whipped cream, and cream cheese to layer your cake, then chill until set.
2. What frosting goes best with Oreo cake?
Classic options include whipped cream frosting, vanilla buttercream, or even a rich cream cheese frosting for a slightly tangy flavor that complements the Oreos.
3. How do I store Oreo cake?
Store your Oreo cake in an airtight container in the refrigerator. It will stay fresh for up to 4–5 days. Bring it to room temperature before serving for the best flavor.
4. Can I use different flavors of Oreos?
Absolutely! Feel free to get creative with flavors like mint, peanut butter, or golden Oreos for a unique twist on the traditional Oreo cake.
5. Is it possible to make a gluten-free Oreo cake?
Yes, you can substitute regular Oreos with gluten-free Oreos and use gluten-free flour (if baking from scratch) to enjoy a delicious gluten-free version.
Final Thoughts
Baking an Oreo cake at home might seem a little intimidating at first, but trust me, once you get started, you’ll see how simple and fun it actually is. Plus, the rewards are absolutely delicious—there’s nothing quite like a rich, moist, chocolatey cake speckled with those iconic Oreo cookie pieces.
Whether you’re baking it for a party, a family gathering, or just because you’re in the mood for something sweet, Oreo cake is bound to steal the spotlight. And remember, the secret ingredients are always a dash of patience and a whole lot of love.
Ready to whip out your apron and start baking? Go for it—you’re going to crush it (and those Oreos, too)!

