Orecchiette Pasta Recipe: Ever tried a pasta that looks like a tiny ear? That’s orecchiette—literally meaning “little ears” in Italian. This southern Italian gem is beloved for its chewy bite, cup-like shape that cradles sauces perfectly, and its rustic charm. Whether you’ve had it in Puglia or just seen it on a cooking show, there’s something satisfying about crafting this pasta by hand.
What makes orecchiette special is not just its shape, but its humble ingredients and traditional preparation. No eggs needed—just flour, water, and a little muscle. Whether you’re a beginner or a seasoned home cook, learning how to make orecchiette from scratch is like a culinary rite of passage.
Stick around, because you’re about to get a step-by-step, foolproof guide that walks you through everything from dough to sauce—and even how to store leftovers. Let’s get those hands floured and dive right in.
List of Ingredients You’ll Need
Let’s break down everything you need before we get cooking. The ingredient list is short and sweet, but each item plays a key role.
For the Pasta Dough:
- 2 cups semolina flour (preferably semolina rimacinata)
- ¾ cup warm water (you may need a tablespoon more or less)
- A pinch of salt (optional)
That’s it! Traditional orecchiette doesn’t require eggs or oil—keeping it authentically rustic.
For Classic Broccoli Rabe and Sausage Sauce:
- 1 bunch broccoli rabe (rapini), washed and chopped
- 2 Italian sausages (sweet or spicy), removed from casings
- 3 tablespoons olive oil
- 3 cloves garlic, sliced
- 1 pinch red pepper flakes
- Salt and pepper to taste
- Freshly grated Pecorino Romano (optional but highly recommended)
Optional Add-ons and Garnishes:
- Lemon zest for brightness
- Toasted breadcrumbs for crunch
- Fresh parsley or basil
- Extra virgin olive oil drizzle
With these simple ingredients, we’ll build layers of bold Italian flavor. Keep everything within reach—prep makes pasta day smoother.
Essential Tools Required
You don’t need a pasta machine for this one. In fact, you can go full traditional with just your hands and a knife.
Kitchen Equipment Checklist:
- Clean wooden board or countertop (for kneading)
- Mixing bowl
- Sharp paring knife or butter knife (for shaping)
- Clean kitchen towel (to cover the dough while it rests)
- Large pot (for boiling the pasta)
- Skillet (for making the sauce)
- Slotted spoon or strainer
Tips on Choosing the Best Tools:
Using a wooden surface can help the dough grip slightly, which is ideal when shaping orecchiette. If you’re planning on making this often, you might want to invest in a gnocchi board or small pasta paddle to add texture—but it’s optional.
How to Make Orecchiette Pasta from Scratch
Alright, let’s roll up our sleeves. Making orecchiette by hand is easier than it looks, and there’s something incredibly satisfying about shaping each piece yourself.
Step 1: Preparing the Dough
Pour the semolina flour onto a clean work surface or into a large bowl and make a well in the center. Slowly pour in the warm water, mixing with your fingers or a fork as you go. When the dough starts coming together, knead it with your hands for about 10 minutes until it’s smooth, firm, and elastic. If the dough feels too dry, add a little more water, one teaspoon at a time, until workable but not sticky.
Step 2: Resting the Dough
Wrap the dough tightly in plastic wrap or cover it with a damp kitchen towel. Let it rest at room temperature for 30 minutes. This step is important—it relaxes the gluten and makes the dough much easier to shape.
Step 3: Shaping the Orecchiette
Cut off a small portion of dough and roll it into a rope about ½ inch thick. Cut the rope into ½-inch pieces. Using the flat edge of a knife, press down on each piece and drag it gently toward you so it curls slightly. Then flip the piece inside out over your thumb to form the signature ear-like shape. Repeat until all the dough is shaped.
Step 4: Drying the Pasta
Arrange the orecchiette on a floured tray or clean kitchen towel. Let them dry for at least 30 minutes before cooking, or dry overnight if storing for later use.
Fresh, rustic, and totally worth it 🍝
Cooking the Orecchiette
Now that your little “ears” are shaped and slightly dried, it’s time to bring them to life in boiling water.
Boiling Instructions:
- Fill a large pot with water and bring it to a rolling boil.
- Add a generous amount of salt—like the sea, as Italians say. This is your only chance to season the pasta itself.
- Gently add the orecchiette, stirring immediately to prevent sticking.
Cooking Time and Texture Check:
Fresh orecchiette will cook in about 3–5 minutes, depending on their thickness and drying time. If you’re using fully dried orecchiette (left out overnight), they may take closer to 8–10 minutes.
- Taste a piece: it should be tender but with a satisfying chewy bite (al dente).
- Scoop them out with a slotted spoon and reserve some pasta water—this starchy liquid is gold for your sauce.
And just like that, your pasta is ready for the sauce of your dreams.
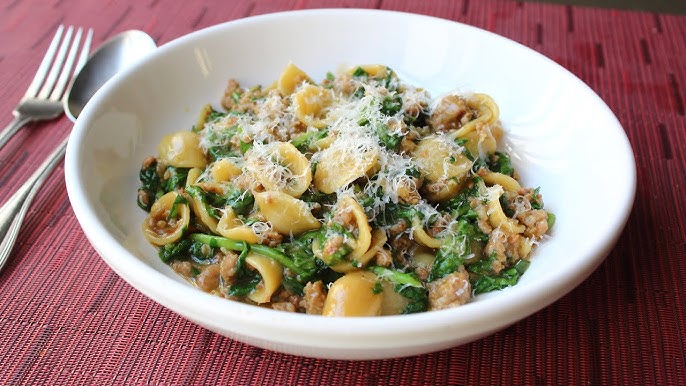
How to Make the Classic Broccoli Rabe and Sausage Sauce
This is the traditional pairing for orecchiette—spicy, savory sausage paired with the bitterness of broccoli rabe. It’s earthy, comforting, and full of southern Italian character.
Ingredient Preparation:
- Broccoli Rabe: Trim the tough ends and chop roughly.
- Sausage: Remove the casings and break the meat into small chunks.
- Garlic: Slice thin to infuse the oil.
- Red Pepper Flakes: Optional, but adds a nice kick.
Step-by-Step Cooking Instructions:
- Heat olive oil in a large skillet over medium heat.
- Add garlic and cook until fragrant but not browned.
- Add sausage and break it up with a spoon. Cook until browned and fully cooked.
- Toss in the red pepper flakes.
- Add the chopped broccoli rabe and a splash of pasta water. Cover the pan for 2–3 minutes to steam the greens.
- Uncover and sauté until tender and the water has mostly evaporated.
Combining Pasta with Sauce:
- Add the cooked orecchiette directly to the sauce pan.
- Toss everything together, adding more pasta water as needed to coat the pasta in the sauce.
- Finish with a drizzle of olive oil and a generous sprinkle of Pecorino Romano.
It’s rustic. It’s hearty. It’s unforgettable.
Alternative Sauces for Orecchiette
Not a fan of sausage or broccoli rabe? No worries. Orecchiette is super versatile and pairs well with tons of sauces.
Tomato-Based Sauce:
- Think rich marinara or a slow-simmered ragù.
- The little cups hold chunky sauces perfectly.
Pesto:
- Basil pesto with a handful of cherry tomatoes makes for a quick, fresh option.
- You can also try sun-dried tomato or arugula pesto for something different.
Creamy Mushroom Sauce:
- Sauté mushrooms in butter and garlic, then add cream or crème fraîche.
- Finish with Parmigiano for a rich, comforting bowl.
No matter what you choose, the shape of orecchiette enhances flavor by catching little bits of sauce in every bite.
Vegan and Vegetarian Variations
Want to skip the meat or dairy? You can still enjoy orecchiette at its best.
Vegan Dough Tips:
Good news: the base dough for orecchiette is already vegan! Just make sure your semolina flour is pure and unbleached.
Plant-Based Sauce Ideas:
- Vegan Broccoli Rabe Sauce: Omit sausage and add caramelized onions or mushrooms for a savory boost.
- Roasted Veggie Sauce: Blend roasted bell peppers, tomatoes, and garlic into a silky, naturally sweet sauce.
- Chickpea and Kale: Sautéed kale with garlic and canned chickpeas creates a protein-packed, plant-based meal.
These variations keep the flavor bold and the prep friendly for all diets.
Storing and Freezing Tips
Whether you’re prepping ahead or have leftovers, here’s how to keep orecchiette fresh.
How to Store Fresh and Cooked Orecchiette:
- Fresh Uncooked Pasta: Lay on a floured tray and refrigerate for up to 2 days.
- Cooked Pasta: Store in an airtight container in the fridge for up to 3 days. Toss with a little olive oil to prevent sticking.
Freezing Instructions:
- Lay shaped orecchiette on a baking sheet in a single layer.
- Freeze for 2–3 hours, then transfer to a zip-lock bag.
- Cook straight from frozen—just add a couple extra minutes to the boil time.
Making big batches and freezing them can save you time on busy nights.
Tips for Perfect Orecchiette Every Time
Want your orecchiette to taste like it came from an Italian kitchen? Here’s how to master the craft.
Common Mistakes to Avoid:
- Too much water in the dough: Makes it sticky and hard to shape.
- Skipping the resting step: The dough will be tough and elastic, making shaping difficult.
- Undercooking broccoli rabe: Needs to be tender, not crunchy.
Expert Tricks from Italian Nonnas:
- Use your thumb for shaping, not just a knife.
- Dust the dough with semolina as you go—it prevents sticking.
- Shape while sitting at the table with a coffee. It’s not a chore; it’s a ritual.
Pairing Ideas for Orecchiette Pasta
Orecchiette is satisfying on its own, but pairing it with the right wine, sides, or accompaniments can elevate your entire meal into something unforgettable.
Best Wines to Serve With Orecchiette:
Whether you’re going with the sausage and broccoli rabe combo or a lighter vegetarian sauce, there’s a perfect wine for every version:
- With Sausage & Broccoli Rabe: A bold, dry red like Primitivo or Chianti balances the richness of the sausage and the bitterness of the greens.
- With Tomato Sauces: A medium-bodied Barbera or Montepulciano d’Abruzzo complements the acidity.
- With Creamy or Pesto Sauces: A crisp Vermentino or Sauvignon Blanc refreshes the palate and adds a citrusy contrast.
Not into wine? A cold sparkling water with lemon or even a light craft beer works beautifully too.
Side Dish Suggestions:
- Garlic Bread or Focaccia: Perfect for soaking up leftover sauce.
- Italian-Style Salad: Mixed greens with olives, cherry tomatoes, and balsamic vinaigrette.
- Antipasto Platter: Think marinated artichokes, roasted peppers, cured meats, and cheese.
A few thoughtful pairings go a long way in creating a restaurant-level experience at home.
Serving and Presentation Tips
They say we eat with our eyes first—and that definitely applies to orecchiette. A little care in plating goes a long way, especially if you’re serving guests or sharing your dish online.
Plating Like a Pro:
- Use a shallow pasta bowl or wide-rimmed plate.
- Neatly twirl or scoop the pasta to the center.
- Wipe the edges for a clean, professional look.
Garnish Ideas for Visual Appeal:
- Fresh Herbs: A sprinkle of parsley or basil adds color and freshness.
- Cheese Shavings: Use a vegetable peeler to create beautiful curls of Parmesan or Pecorino.
- Olive Oil Drizzle: A touch of golden oil adds shine and a luxurious finish.
- Toasted Breadcrumbs: For a crunchy, golden topping that adds texture.
Even the simplest dish can feel elegant with a few finishing touches.
Nutritional Information
While exact values depend on the sauce and portion size, here’s a general estimate for one serving of orecchiette pasta with sausage and broccoli rabe:
| Nutrient | Amount per Serving |
|---|---|
| Calories | ~450-550 kcal |
| Protein | 20–25g |
| Carbohydrates | 50–60g |
| Fat | 18–22g |
| Fiber | 5–7g |
| Sugar | 2–4g |
| Sodium | 600–800mg |
To lighten it up, you can use turkey sausage, reduce the oil, or go with a veggie-only sauce.
FAQs Orecchiette Pasta Recipe
1. Can I use regular flour instead of semolina?
You can, but semolina gives the pasta its firm texture and authentic chew. All-purpose flour will make the dough softer and may affect shaping.
2. Can I dry orecchiette and store it long-term?
Yes! Let the shaped pasta air-dry for 24–48 hours, then store it in an airtight container. It will keep for several months in a cool, dry place.
3. Why is my dough too sticky or too dry?
Weather and humidity can affect your dough. If it’s sticky, dust with more semolina. If it’s dry and cracking, add a teaspoon of water and knead again.
4. How do I make gluten-free orecchiette?
Use a gluten-free flour blend designed for pasta making, preferably with xanthan gum for elasticity. The dough will be trickier, but manageable.
5. Can I make orecchiette in advance for a dinner party?
Absolutely. Shape and dry the pasta a day or two before. Store it in an airtight container and cook just before serving. You can also prep the sauce ahead.
Conclusion
Making orecchiette pasta from scratch is more than a recipe—it’s an experience. From kneading dough with your hands to forming those signature “little ears,” this process connects you to generations of Italian tradition. And the best part? You don’t need fancy gadgets or years of experience—just simple ingredients, a little time, and the joy of cooking.
Pair it with your favorite sauce, gather some friends or family, and share the love one bite at a time. Whether you’re going traditional with sausage and broccoli rabe or exploring new flavor paths, orecchiette is the perfect canvas for creativity.
So go ahead—flour your board, roll some dough, and start shaping delicious memories.