Orange Marmalade Recipe: Have you ever spread a generous layer of orange marmalade on a warm piece of toast and wondered how that sweet-tangy magic was made? Orange marmalade, with its bright citrusy flavor and just the right amount of bitterness, is a kitchen classic that brings the sunshine of oranges straight to your breakfast table. Let’s dive into everything you need to know about making your own marmalade at home—easy, fun, and so satisfying!
A Brief History
Orange marmalade has a charming backstory rooted in Scotland, where the first commercial marmalade factory opened in the 18th century. Legend has it that a ship carrying Seville oranges found itself stranded in the port of Dundee, and rather than waste the bitter fruit, locals turned it into a sweet preserve. Today, marmalade is enjoyed worldwide, often associated with the quintessential British breakfast but just as beloved elsewhere.
Why Make Your Own Marmalade?
Sure, you can buy marmalade at any grocery store, but making your own is a whole different experience. First, homemade marmalade tastes fresher and more vibrant than anything mass-produced. You can control the sweetness, bitterness, and even tweak it with unique flavor additions. Plus, there’s something deeply satisfying about crafting a beautiful jar of marmalade from scratch—an old-world craft that makes your kitchen feel extra special.
Ingredients Needed for Homemade Orange Marmalade
Before we start cooking, let’s make sure your pantry is stocked with everything you’ll need. Good preparation makes the whole process smoother and more enjoyable.
Essential Ingredients List
Here’s a simple list for a classic orange marmalade:
- 4 large Seville oranges (or substitute with regular oranges + one lemon)
- 1 lemon (for extra pectin and tang)
- 8 cups water
- 6 to 8 cups granulated sugar (depending on your taste)
Simple, right? That’s the beauty of it—just fruit, water, and sugar working together to create something spectacular.
Tips for Choosing the Best Oranges
The quality of your marmalade starts with the fruit. If you can find them, Seville oranges are the traditional choice due to their natural bitterness and high pectin content. If they’re out of season (typically available only in winter), you can mix regular sweet oranges with a lemon or two to mimic the flavor profile.
When selecting oranges:
- Look for firm fruits with bright, unblemished skin.
- Avoid overly soft or dull-skinned oranges.
- Heavier oranges usually mean they are juicier—perfect for marmalade!
Tools and Equipment Required
Now that we have the ingredients sorted, let’s talk about the tools. Trust me, having the right equipment on hand makes the process much more enjoyable.
Basic Kitchen Tools
You probably already have most of what you need:
- Sharp knife (for slicing the peel)
- Cutting board
- Large heavy-bottomed pot (prevents burning)
- Wooden spoon (for stirring)
- Measuring cups
A good knife is crucial here because you’ll be slicing thin strips of orange peel. This gives your marmalade that beautiful, textured look.
Optional Tools for Efficiency
- Mandoline slicer (for ultra-thin, even slices)
- Candy thermometer (to monitor the cooking temperature accurately)
- Fine mesh strainer (to catch seeds and pith)
While not strictly necessary, these extras can make your marmalade-making experience even more seamless and professional.
Preparing the Oranges
Properly preparing your oranges is a crucial step in making marmalade that’s as beautiful as it is delicious. Here’s how to get it just right.
Washing and Peeling
Start by giving your oranges a good scrub under warm water. We’re using the peel, so it’s essential to remove any wax or dirt. Use a vegetable brush if you have one.
After washing, slice the oranges in half. Then:
- Thinly slice the halves into strips.
- You can choose the thickness you prefer—thin for a refined marmalade, or thicker if you like a rustic, hearty spread.
Keep the peel on! That’s where a lot of the flavor—and natural pectin—lives.
Removing Seeds and Pith
As you slice, remove and set aside any seeds you find. Don’t throw them away! Orange seeds are packed with pectin, the natural thickener that helps your marmalade set beautifully.
The pith (the white part under the peel) can be bitter. Some bitterness is desired, but too much can be overwhelming. If your oranges have an especially thick pith, you may want to trim it down a little.
Here’s a pro tip: bundle the seeds and some extra pith into a piece of cheesecloth and tie it up. You’ll simmer this little packet with the marmalade to naturally thicken the mixture without manually adding pectin.
Cooking Process Explained
Making orange marmalade is a slow, gentle process that fills your kitchen with the mouthwatering scent of citrus and sugar. Don’t rush it—good marmalade takes a little time and love.
Making the Orange Mixture
After prepping your oranges, place the sliced fruit, the juice, and any collected seeds (in a cheesecloth pouch if using) into a large heavy-bottomed pot. Add 8 cups of water and bring the mixture to a simmer over medium heat.
Here’s what you should do:
- Stir gently and allow the oranges to cook slowly.
- Simmer for about 45 minutes to 1 hour until the peels become tender.
- Keep an eye on the water level; if it reduces too much, you can top it up a little.
During this stage, the water absorbs the oils and flavors from the peel, creating a deeply aromatic base that will give your marmalade its signature punch.
Simmering to Perfection
Once your orange peels are tender, it’s time to introduce the sugar. Remove the cheesecloth pouch containing seeds and pith (squeeze it well to get all the pectin out).
Add the sugar slowly, stirring constantly until it dissolves completely. From here:
- Bring the mixture to a rolling boil.
- Boil steadily but not too furiously—you want it active but not splashing.
- Stir occasionally to prevent sticking or burning.
This boiling stage is when the magic happens. The sugar and pectin will work together to thicken the marmalade and give it that glossy, jewel-like finish we love.
Patience is key! Depending on your stove and batch size, it might take 20–40 minutes.
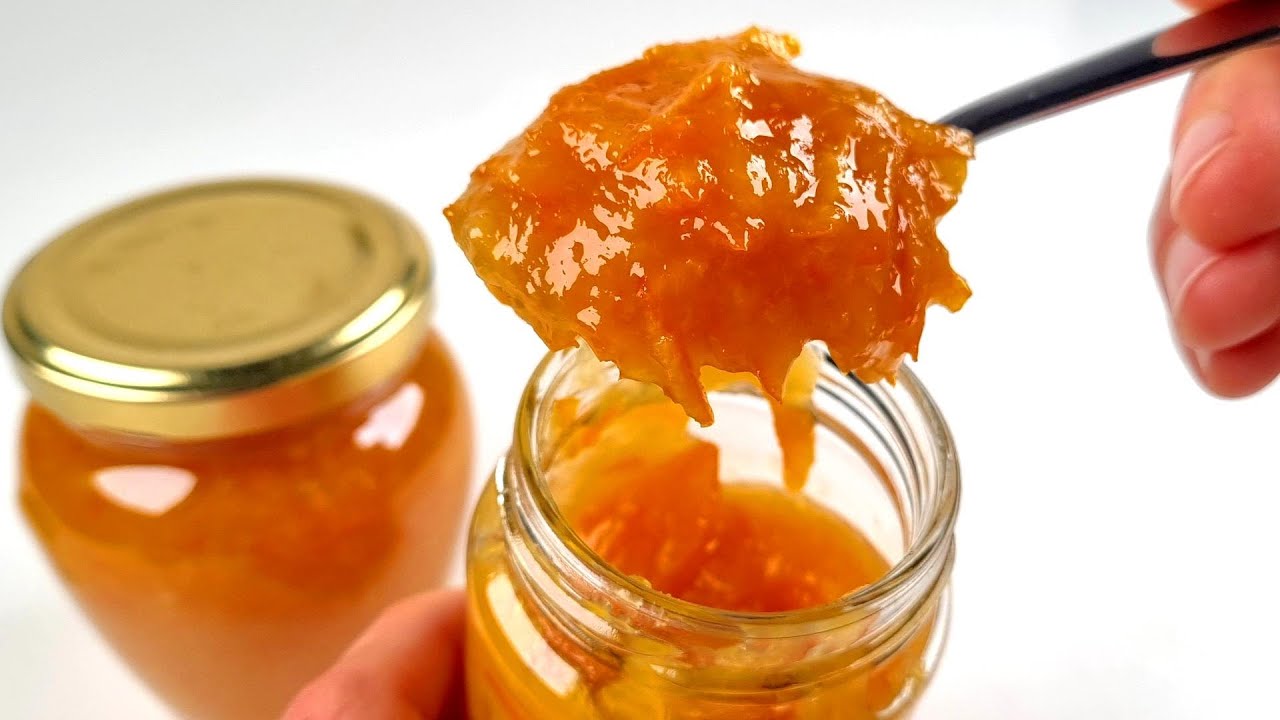
Testing for the Right Consistency
Knowing when your marmalade is ready can feel a bit intimidating, but it’s easier than you think. You don’t want it too runny, nor do you want a stiff, rubbery jam.
The Wrinkle Test
The easiest way to test for readiness is the classic “wrinkle test.”
- Before you start cooking, place a small plate in the freezer.
- Once you think the marmalade might be ready, spoon a little onto the cold plate.
- Let it sit for a minute, then push it gently with your finger.
If the surface wrinkles slightly and doesn’t flood back into place, congratulations—your marmalade is set! If it’s still runny, continue boiling in 5-minute increments, testing after each interval.
Adjustments if Needed
If after a long boil your marmalade is too runny, you can:
- Boil it a little longer.
- Add a bit more lemon juice (for extra pectin) and boil again.
If it’s too thick and stiff, you may have overcooked it. Unfortunately, over-thickened marmalade can be hard to rescue, but you can try stirring in a little boiling water to loosen it slightly before canning.
Don’t stress too much—the more you practice, the better you’ll get at judging when marmalade is just right.
Canning and Storing Your Marmalade
You’ve made your beautiful marmalade—now it’s time to store it properly so you can enjoy it for months to come.
Sterilizing the Jars
Sterilization is crucial for safe, long-lasting preserves. Here’s a quick way to do it:
- Wash your jars and lids with hot, soapy water.
- Rinse well and place them in a preheated oven at 275°F (135°C) for 10 minutes.
- Alternatively, you can boil them for 10 minutes in a large pot.
Always handle sterilized jars with tongs or clean kitchen towels to avoid contamination.
Proper Storage Techniques
Once your marmalade reaches the perfect setting point:
- Pour it immediately into hot, sterilized jars, leaving about ¼ inch headspace at the top.
- Wipe the rims clean.
- Seal tightly with sterilized lids.
- If you want a longer shelf life, process the jars in a boiling water bath for 10 minutes.
Store your jars in a cool, dark place. Properly sealed, your homemade orange marmalade will stay fresh for up to a year. Once opened, keep it refrigerated and use it within a month.
Flavor Variations You Can Try
One of the joys of making your own marmalade is the ability to experiment with flavors. You’re not limited to the traditional orange — you can get creative and customize your marmalade to suit your taste buds!
Adding Lemon or Lime
Adding lemons or limes to your marmalade gives it an extra layer of zingy brightness. Here’s how you can incorporate them:
- Lemon: Add the juice and zest of one or two lemons. This will enhance the natural tartness and give a richer pectin boost, helping your marmalade to set beautifully.
- Lime: Lime can add a refreshing tropical twist. Substitute one of the oranges with a lime for a slightly sharper, tangier marmalade.
The combination of sweet orange with the slight tartness of lemon or lime creates a well-rounded flavor that’s perfect for breakfast spreads, desserts, or even glazing meats like chicken or ham.
Infusing Spices
Why not spice things up a bit? Infusing your marmalade with warm spices can take it from everyday jam to a gourmet experience. Popular spice additions include:
- Cinnamon sticks
- Star anise
- Cloves
- Cardamom pods
- Vanilla beans
Simply add your chosen spices during the simmering stage, and remove them before bottling. The gentle infusion will give your marmalade a subtle, aromatic depth that pairs beautifully with the citrus base.
Imagine the cozy warmth of cinnamon-infused orange marmalade on a cold winter morning—it’s like sunshine in a jar!
Common Mistakes to Avoid
While making marmalade is fairly straightforward, there are a few pitfalls that can trip you up if you’re not careful. Knowing what to watch out for ensures your marmalade comes out perfectly every time.
Overcooking the Marmalade
Overcooking is one of the most common mistakes. If you cook your marmalade too long, it can become:
- Too thick
- Caramelized
- Bitter
The sugars can darken excessively, leading to a burnt or overly bitter taste that’s not pleasant. Always monitor closely once the mixture starts thickening, and use the wrinkle test to check for doneness instead of relying solely on cooking time.
Remember, marmalade thickens further as it cools. If it looks a little runny in the pot but passes the wrinkle test, it’s ready!
Skipping the Consistency Test
Never skip the wrinkle test! Guesswork isn’t enough when it comes to marmalade. Skipping this crucial step can leave you with a soupy mess or a jar of rock-solid jelly.
Take a minute to do a quick plate test. It’s worth the extra effort to ensure you end up with marmalade that’s just right—spreadable, glossy, and packed with fresh citrus flavor.
FAQs about Orange Marmalade Recipe
How long does homemade orange marmalade last?
Homemade orange marmalade can last up to 1 year if properly canned and sealed in sterilized jars. Once opened, refrigerate and use within 3 to 4 weeks for the best flavor and freshness.
Do I need to use pectin in orange marmalade?
Traditional orange marmalade doesn’t usually require added pectin because oranges naturally contain enough pectin, especially in the peel. However, if you want a thicker consistency quickly, a little pectin can help.
Why is my marmalade bitter?
Marmalade can turn bitter if too much of the white pith (the inner part of the peel) is used. To reduce bitterness, carefully peel the zest thinly and remove excess pith before cooking.
Can I use other citrus fruits in this recipe?
Absolutely! You can mix oranges with lemons, limes, or even grapefruits for a unique twist on classic marmalade. Just be sure to balance sweetness and acidity.
How do I know when the marmalade is ready?
Use the “wrinkle test”: place a small spoonful on a cold plate and push it with your finger. If it wrinkles and holds shape, your marmalade is ready. If it’s still runny, cook a little longer.
Can I make sugar-free orange marmalade?
Yes, you can use sugar alternatives like stevia or monk fruit sweetener. However, note that texture and shelf life may differ without traditional sugar.
What is the best type of orange to use?
Seville oranges are the classic choice because of their tart flavor and high pectin content. However, you can also use navel oranges or blood oranges for sweeter or more colorful marmalade.
Final Thoughts
Making your own orange marmalade is an incredibly rewarding process. From choosing the ripest oranges to simmering your kitchen in a sweet, citrusy aroma, every step brings you closer to a homemade treasure that’s miles better than store-bought.
Once you taste your own marmalade—bright, zesty, and full of sunshine—you’ll wonder why you ever settled for anything less. Whether you’re a seasoned jam maker or a first-timer, this simple recipe will guide you to delicious success.
So grab those oranges, roll up your sleeves, and start your marmalade journey today. Your toast (and your tastebuds) will thank you!


