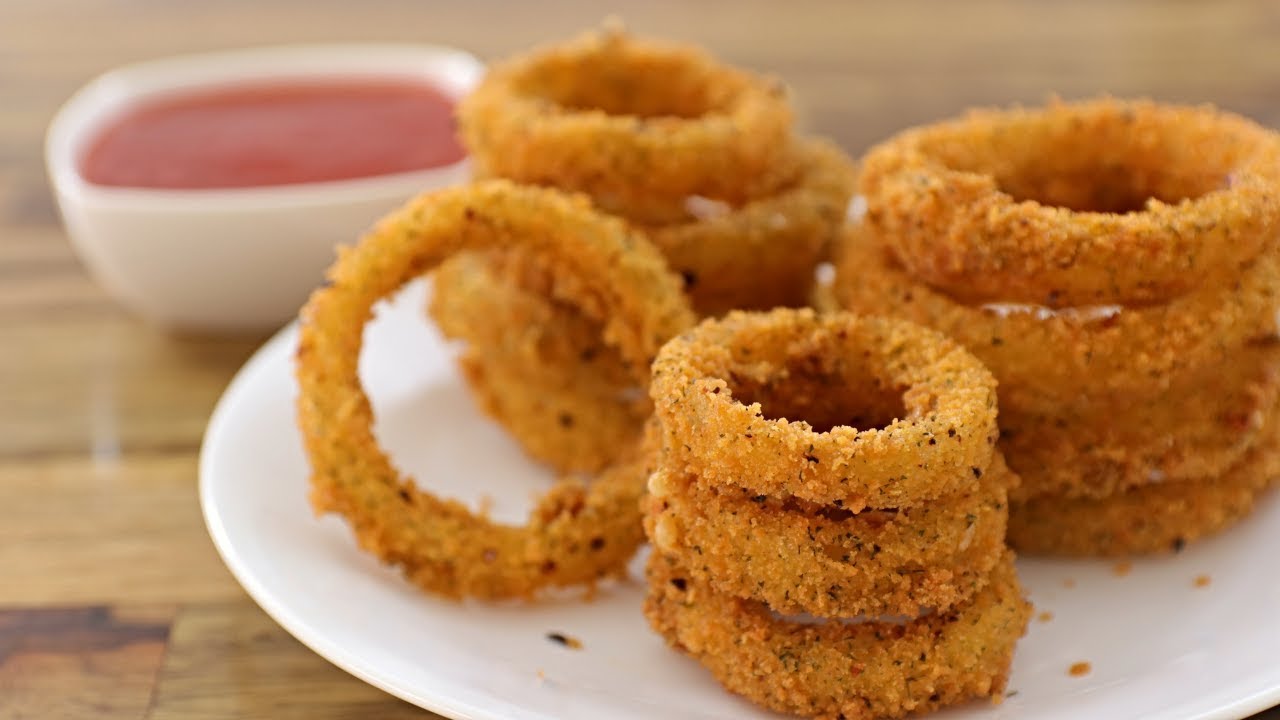
Onion Ring Batter Recipe: Onion rings. Just saying the words is enough to make your mouth water. They’re crispy, golden, crunchy on the outside, and sweetly tender inside—a true snack-time superstar. Whether you’re making them for game day, a weekend party, or just to treat yourself, onion rings are one of those comfort foods that never go out of style. But here’s the catch: the magic of a perfect onion ring lies entirely in the batter.
You can have the freshest onions in the world, but without a killer batter recipe, your rings will fall flat—soggy, greasy, or bland. And let’s be honest, nobody wants that. A properly balanced batter brings the crispiness, holds onto the onion, and packs flavor in every bite. You want it light enough to let the onion shine but strong enough to hold its shape through the deep-frying process.
This guide is here to walk you through the ultimate onion ring batter recipe—step by step. We’ll start with the ingredients you need, show you how to prep your onions just right, and guide you through mixing, dipping, and frying like a pro. By the end of this article, you’ll be whipping up restaurant-worthy onion rings from your own kitchen.
So roll up your sleeves, heat up that oil, and let’s dive into the crispy, crunchy, golden world of onion rings!
Ingredients You’ll Need
Main Ingredients for Batter
Let’s start with the essentials. These core ingredients form the base of your onion ring batter. Each one has a role to play in creating that perfect crunch:
- All-purpose flour (1 cup): The foundation of your batter. It adds structure and helps everything stick to the onions.
- Cornstarch (¼ cup): This is the secret to extra crispiness. It lightens the flour and gives you a crunchier texture.
- Baking powder (1 tsp): It introduces a bit of airiness, helping the batter puff slightly while frying.
- Salt (1 tsp): Essential for bringing out flavor. Don’t skimp on this.
- Black pepper (½ tsp): Adds a mild spice kick and depth.
- Paprika (½ tsp): A subtle smoky flavor and a hint of color.
- Egg (1 large): Helps bind the ingredients together and gives a richer texture.
- Milk (¾ cup): Loosens the batter and makes it easier to coat the onions.
- Cold sparkling water or beer (½ cup): For that ultra-light, airy batter.
These ingredients create a balanced batter that clings beautifully and crisps up like a dream when fried.
Optional Add-ons for Extra Crunch
If you’re looking to elevate your onion rings and make them stand out, consider these additions:
- Panko breadcrumbs: After dipping in batter, roll the rings in panko for a double crunch.
- Garlic powder (¼ tsp): Adds a savory note.
- Cayenne pepper (pinch): Want a spicy kick? This’ll do it.
- Hot sauce (few drops): Mix into the wet ingredients for added zing.
These optional ingredients let you customize the flavor profile based on your preference—spicy, smoky, or extra crispy.
Tools You’ll Need in the Kitchen
Before you dive in, make sure your kitchen is armed with the right tools. Here’s what you’ll need:
- Mixing bowls (2-3 sizes): For dry, wet, and combined ingredients.
- Whisk: To blend your batter until smooth.
- Sharp knife: For clean onion slices.
- Cutting board: A stable surface for slicing.
- Slotted spoon or tongs: For safe frying and easy flipping.
- Deep fryer or heavy pot: Make sure it’s deep enough to submerge the rings.
- Thermometer: Crucial for keeping oil at the right temp.
- Paper towels or wire rack: For draining excess oil after frying.
Having everything prepped in advance makes the whole process smoother, cleaner, and more enjoyable.
Preparing the Onions
Best Onion Types for Rings
Not all onions are created equal, especially when it comes to onion rings. The best choices are:
- Sweet onions (like Vidalia or Walla Walla): These are the top choice. Their mild flavor and natural sweetness make them perfect for frying.
- Yellow onions: Slightly stronger flavor but still a solid option. They hold their shape well.
- White onions: A bit sharper and more pungent. If you like bold flavor, these work too.
Avoid red onions—they tend to be too sharp and don’t fry up as nicely.
How to Slice Perfect Onion Rings
Perfect rings start with perfect slices. Here’s how to do it right:
- Cut off the ends of the onion and peel off the outer skin.
- Use a sharp knife or mandoline to slice the onion into rings about ¼ to ½ inch thick. Thinner rings tend to break or overcook, while thicker rings are juicier.
- Separate the rings carefully, keeping the larger ones for frying. Save the smaller rings for other recipes or frying later.
Consistency is key. Uneven slices will cook at different rates, so take your time and aim for uniform thickness.
Soaking Onions – Secret to Tender Rings
Here’s a pro tip many people overlook: soak your onion rings before dipping them in batter. Why? Because it softens the sharp raw onion flavor and gives you a more tender bite.
There are two great soaking options:
- Cold water soak (for 30 minutes): This helps mellow the taste and firm up the onions.
- Buttermilk soak (for 1–2 hours): Adds richness and makes the batter stick better.
After soaking, pat the rings dry with paper towels. This step is crucial—wet onions will repel the batter and cause splatter in hot oil.
Step-by-Step Guide to Making the Perfect Onion Ring Batter
Step 1 – Mixing the Dry Ingredients
This step sets the foundation for your batter. You’ll want to mix all your dry ingredients thoroughly to make sure the flavor and texture are balanced throughout. Grab a large mixing bowl and add:
- 1 cup all-purpose flour
- ¼ cup cornstarch
- 1 tsp baking powder
- 1 tsp salt
- ½ tsp black pepper
- ½ tsp paprika
If you’re going bold, feel free to toss in garlic powder or cayenne at this point.
Why this matters: Mixing dry ingredients first ensures they’re evenly distributed, preventing clumps of spice or baking powder that can ruin the consistency. Cornstarch, in particular, helps create a barrier between the onion and the oil, reducing sogginess and boosting crispiness.
Pro tip: If you’re using panko breadcrumbs for an extra crunch, don’t mix them into the batter—save them for after dipping.
Use a whisk to combine the dry mix evenly. Don’t skip this; a fork won’t do the job nearly as well. You’re looking for a fine, uniform blend of ingredients.
Step 2 – Blending the Wet Ingredients
In a separate bowl, it’s time to mix the liquids. Start with:
- 1 large egg
- ¾ cup milk
- ½ cup cold sparkling water or cold beer
Whisk them together until smooth and well incorporated. If you want to add a few drops of hot sauce or a splash of buttermilk, this is the moment.
Why sparkling water or beer? The carbonation creates little pockets of air in the batter, making the onion rings puff up slightly and develop that irresistible light crunch when fried. If you’re using beer, go for a lager or ale—not something overly hoppy or dark, unless you’re after a strong flavor twist.
Once combined, let the wet mixture sit for a couple of minutes. This helps reduce foam and allows everything to come to the same cool temperature, which is key for keeping the batter from absorbing too much oil during frying.
Step 3 – Combining for a Smooth Batter
Now that your dry and wet ingredients are prepped, it’s time to bring them together.
Pour the wet mixture slowly into the bowl with your dry ingredients while whisking. This gradual method helps prevent lumps and ensures a smooth, silky batter. You’re aiming for a consistency that’s slightly thicker than pancake batter—thick enough to cling to an onion ring without sliding off, but not so thick that it forms globs.
Tips for perfect batter texture:
- If the batter is too thin, add a little more flour (1 tablespoon at a time).
- If it’s too thick, loosen it with a splash of cold milk or sparkling water.
- Don’t overmix—just stir until combined. Overworking the batter activates the gluten, which can make the coating chewy instead of crispy.
Once mixed, let the batter rest for 10–15 minutes while you heat the oil and prepare the onion rings. This resting time helps reduce bubbles and makes the coating even more consistent.
Step 4 – Optional Beer Batter Twist
For those seeking pub-style onion rings, this step will elevate your game.
Replace the milk and sparkling water in your batter with 1 cup of cold beer. The alcohol evaporates quickly during frying, leaving behind a thin, crackly shell that’s unbelievably light. The type of beer you use will affect the flavor and color of your rings:
- Light beers or lagers: Clean, neutral flavor with a golden finish.
- Wheat beers: Slightly sweeter and fuller-bodied.
- IPAs or dark ales: Richer flavor, but can overpower the onion.
You can even mix and match—try half beer, half milk for a more balanced profile.
Just make sure the beer is ice-cold. Warm beer won’t give you that airy texture and can make the batter separate or feel greasy after frying.
Coating the Onion Rings
Dry-Wet-Dry Dipping Method
Want extra crispy onion rings? Then you need the triple-dip approach:
- First Dip – Dry: Lightly coat the raw onion rings in plain flour. This step helps the batter stick better and avoids bare spots.
- Second Dip – Wet: Dip the floured rings into your prepared batter. Let the excess drip off.
- Third Dip – Optional Panko: For next-level crunch, roll the battered rings in panko breadcrumbs or crushed cornflakes.
This method locks in the onion’s natural juices while creating multiple layers of crispy coating. The outer layer fries up golden brown while the inside stays tender and juicy.
Quick tips:
- Work in small batches to avoid overcrowding.
- Keep one hand for dry ingredients and the other for wet to avoid the dreaded batter fingers.
- Let battered rings rest on a wire rack for 2–3 minutes before frying.
This brief rest helps set the coating, preventing it from sliding off once it hits the hot oil.
How to Prevent Soggy Onion Rings
There’s nothing worse than going through all this effort, only to end up with limp, soggy rings. Here’s how to keep your onion rings crisp and light:
- Dry onions thoroughly before dipping—moisture causes the batter to steam instead of fry.
- Use cold batter—it slows oil absorption and promotes crispness.
- Fry at the right temperature (we’ll cover that in the next section).
- Don’t overcrowd the oil. It drops the temperature and makes everything greasy.
- Drain properly—use a wire rack, not paper towels, to keep them from sitting in oil.
And most importantly, serve immediately after frying. Onion rings lose their crispness fast, so enjoy them fresh and hot for that perfect bite.
Frying the Onion Rings
Best Oil for Deep Frying
The oil you choose plays a big role in how your onion rings turn out. You want something neutral in flavor with a high smoke point so it can handle the heat without breaking down or imparting odd tastes.
Here are the top oils for deep-frying onion rings:
- Canola oil: Affordable, neutral flavor, and high smoke point (~400°F). A solid all-around choice.
- Peanut oil: Excellent for frying due to its high smoke point (~450°F) and subtle flavor. Ideal for ultra-crispy rings.
- Vegetable oil: Also works well and is easy to find. Just make sure it’s fresh to avoid off-flavors.
- Sunflower oil: Clean taste, great for frying, though a bit more expensive.
Avoid olive oil or butter-based oils—they have low smoke points and will burn quickly, leaving a bitter aftertaste.
Also, be sure your oil is fresh. Reusing oil too many times will lead to breakdown and smoke, which not only affects the taste but can also be unhealthy.
Temperature Tips for Frying
Getting the oil to the right temperature is absolutely crucial for achieving crispy, non-greasy onion rings.
- Ideal range: 350°F to 375°F (175°C to 190°C)
- Too hot: Batter burns before the onion cooks
- Too cold: Rings absorb too much oil, making them soggy and heavy
How to monitor it:
- Use a deep-fry or candy thermometer for accurate readings.
- Don’t guess! Visual cues can be misleading.
- If you don’t have a thermometer, drop a tiny bit of batter into the oil. It should sizzle and rise to the top immediately. If it sinks or takes too long, your oil isn’t hot enough.
Maintain a steady temperature by frying in small batches and allowing the oil to reheat between rounds.
Pro tip: Preheat your oil slowly over medium heat rather than cranking it up quickly. This gives you more control and prevents overheating.
How to Fry Without Making a Mess
Frying can be messy, but with a few smart strategies, you can minimize cleanup and maximize success.
- Use a deep, heavy pot like a Dutch oven to prevent splatter.
- Fill oil only halfway up the pot to avoid spills.
- Use long tongs or a spider strainer to lower rings into the oil—never drop them in.
- Don’t overcrowd the pot. It cools the oil and causes uneven cooking.
- Have a draining station ready: A wire rack over a baking sheet is best for keeping the rings crispy.
- Keep paper towels nearby to blot excess oil off your tools.
After each batch, let the oil temperature recover before frying the next. If your rings aren’t coming out crispy, it’s probably because the oil cooled down too much.
When you’re done, let the oil cool completely before disposing or storing. Never pour hot oil down the drain—it will clog your pipes.
Serving Your Onion Rings
Best Dips and Sauces to Pair
What’s an onion ring without a killer dip on the side? These are some of the best pairings to elevate your crispy rings:
- Classic ketchup: You can’t go wrong.
- Garlic aioli: Creamy, garlicky, and rich.
- Spicy ranch: Add hot sauce or chipotle to standard ranch for a zesty twist.
- Honey mustard: Sweet and tangy, great for cutting through the oil.
- BBQ sauce: Smoky and bold, it pairs perfectly with beer-battered rings.
- Cheese sauce: Melted cheddar or nacho cheese = game changer.
Want to get fancy? Try making a Sriracha-lime mayo or curry yogurt dip for a flavor punch.
Presentation tip: Serve sauces in small ramekins alongside your golden rings. It looks clean and keeps things tidy for dipping.
Presentation Tips for Crunch Appeal
Presentation matters more than you think—especially when you’re serving guests. Here’s how to make your onion rings look as good as they taste:
- Serve on a paper-lined tray or basket to absorb any lingering grease.
- Stack the rings by size, with the largest at the bottom.
- Use a small wire stand or skewer to display them upright (restaurant-style!).
- Garnish with chopped parsley or green onions for color contrast.
Add lemon wedges or a dusting of parmesan for bonus flavor and visual appeal.
If you’re prepping for a party, you can keep batches warm in a 200°F (93°C) oven on a wire rack for up to 20 minutes—just don’t cover them, or they’ll steam and lose their crispness.
Common Mistakes to Avoid
What Makes Onion Rings Soggy
Soggy onion rings are a sad sight. Let’s fix that.
Common culprits:
- Wet onions: Always dry your onion slices before battering.
- Low oil temperature: Rings absorb more oil than they should.
- Too much batter: Thick batter takes longer to cook, allowing moisture to seep in.
- Overcrowding the pot: Drops oil temp and causes steaming instead of frying.
- Not draining properly: Letting them sit in oil = greasy mess.
Want crispy rings? Follow the triple-dip method and keep your oil hot. It makes all the difference.
Why Batter Falls Off While Frying
Another common frustration is batter that slips off in the oil. It looks awful and ruins the whole vibe.
Here’s why it happens:
- Onions weren’t dry enough.
- You skipped the dry flour pre-coat.
- The batter was too thin.
- The oil wasn’t hot enough.
- You disturbed the rings too early while frying.
Fix it: Dry onions thoroughly, use the dry-wet-dry method, and let the batter rest on the rings for a minute before frying. Also, be gentle when turning them in the oil—give them time to set and stick.
Storing and Reheating Leftovers
How to Store Without Losing Crunch
Let’s face it—onion rings are best served fresh out of the fryer. But if you’ve made a big batch or want to prep ahead, proper storage can help you keep that crunchy goodness alive for a while longer.
Here’s how to store onion rings the right way:
- Cool completely before storing: Never store hot or warm onion rings. Let them cool to room temperature on a wire rack.
- Use an airtight container lined with paper towels: The paper towels will absorb excess oil and moisture, keeping the rings crisp.
- Refrigeration: Onion rings can be stored in the refrigerator for up to 3 days. But keep in mind—refrigeration softens the crispiness over time.
- Freezing for later: Want to save them longer? Lay cooled onion rings in a single layer on a baking sheet and freeze until solid. Then transfer to a freezer-safe bag or container. They’ll keep for up to 1 month.
Pro tip: If you’re freezing battered onion rings before cooking, make sure the batter is fully set (you can flash freeze them) and then store them uncooked. Fry straight from frozen for best results—no thawing needed!
Best Way to Reheat Onion Rings
Reheating can be tricky. Microwaves? Big no-no—they’ll turn your crispy rings into rubbery sad circles. Here’s how to do it right:
1. Oven method (best for crispiness):
- Preheat oven to 375°F (190°C)
- Place onion rings on a wire rack set over a baking sheet
- Bake for 8–10 minutes until heated through and crispy again
2. Air fryer method (fast & crispy):
- Set air fryer to 350°F (175°C)
- Place rings in a single layer
- Heat for 3–5 minutes
3. Skillet method (quick fix):
- Heat a non-stick skillet over medium-high heat
- Add a small amount of oil
- Reheat onion rings in batches, turning once until both sides are crispy
Avoid reheating in foil or covered containers—they trap steam and kill the crunch. Always reheat uncovered for the best texture.
FAQs about Onion Ring Batter Recipe
1. Can I make the batter ahead of time?
Yes, but with a catch. You can mix the dry ingredients ahead and store them in an airtight container. You can also combine the wet ingredients separately. But don’t combine them until you’re ready to fry. Once mixed, the leavening agents like baking powder start reacting, and the batter loses its puffiness over time.
2. Are air-fried onion rings just as good?
They can be pretty great, especially if you’re watching your oil intake. While traditional deep-frying gives that iconic golden crunch, air fryers can deliver 80–90% of the same crisp with way less mess. Just be sure to pre-coat your rings well and lightly spray them with oil before cooking.
3. How do I make the batter spicy?
You’ve got a few delicious options:
- Add 1 tsp cayenne pepper or smoked paprika to the dry mix.
- Mix hot sauce into the wet ingredients.
- Include a dash of chili powder or chipotle seasoning.
Just be careful not to overdo it—too much spice can overwhelm the sweet onion flavor.
4. Can I freeze battered onion rings before frying?
Absolutely. In fact, freezing them before frying is a great way to prep ahead. Lay the battered rings on a baking sheet lined with parchment paper, freeze them until solid, then transfer to a ziplock bag or airtight container. Fry them straight from frozen—no need to thaw.
5. What can I substitute for beer in beer batter?
If you want to skip the alcohol, you can use sparkling water, club soda, or ginger ale. These carbonated options still give you a light, crispy result. Buttermilk can also work for a thicker, richer batter.
Conclusion
And there you have it—the ultimate, foolproof, step-by-step guide to crafting crispy, golden, irresistible onion rings from scratch.
From choosing the right onions and mixing up a perfectly balanced batter, to frying them just right and serving them with mouthwatering dips, you now know all the secrets. Whether you’re hosting a party, game night, or just craving some deep-fried comfort, these onion rings will deliver every time.
Here’s what to remember:
- Soak the onions to mellow flavor and improve texture.
- Keep the batter cold and the oil hot.
- Use the dry-wet-dry method for the crispiest coating.
- Serve immediately, or store and reheat the smart way.
Homemade onion rings aren’t just better than fast food—they’re a whole experience. Crispy outside, sweet and tender inside, and endlessly customizable to suit your taste.
Now go on—whip up a batch, dip ‘em in your favorite sauce, and bask in the crunchy glory. You deserve it.