Onion Blossom Recipe: Ever sat down at a restaurant, ordered an onion blossom, and thought, “Why don’t I make this at home?” That golden, crispy, blooming onion that’s perfectly fried and served with a zesty dipping sauce is a crowd favorite—and for a good reason! It’s not just food—it’s a showstopper. The way it opens up like a flower and delivers that savory, crunchy bite is just addictive.
But here’s the good news: You don’t need to hit a steakhouse to enjoy one. With just a few pantry staples, a little technique, and some hot oil, you can whip up this iconic appetizer right in your kitchen. And trust me, once you’ve made your first homemade onion blossom, you’ll wonder why you ever paid $10 for one at a restaurant.
Ready to dive in? Let’s start with the basics!
What Is an Onion Blossom?
If you’ve never had the pleasure of meeting an onion blossom before, allow me to introduce you.
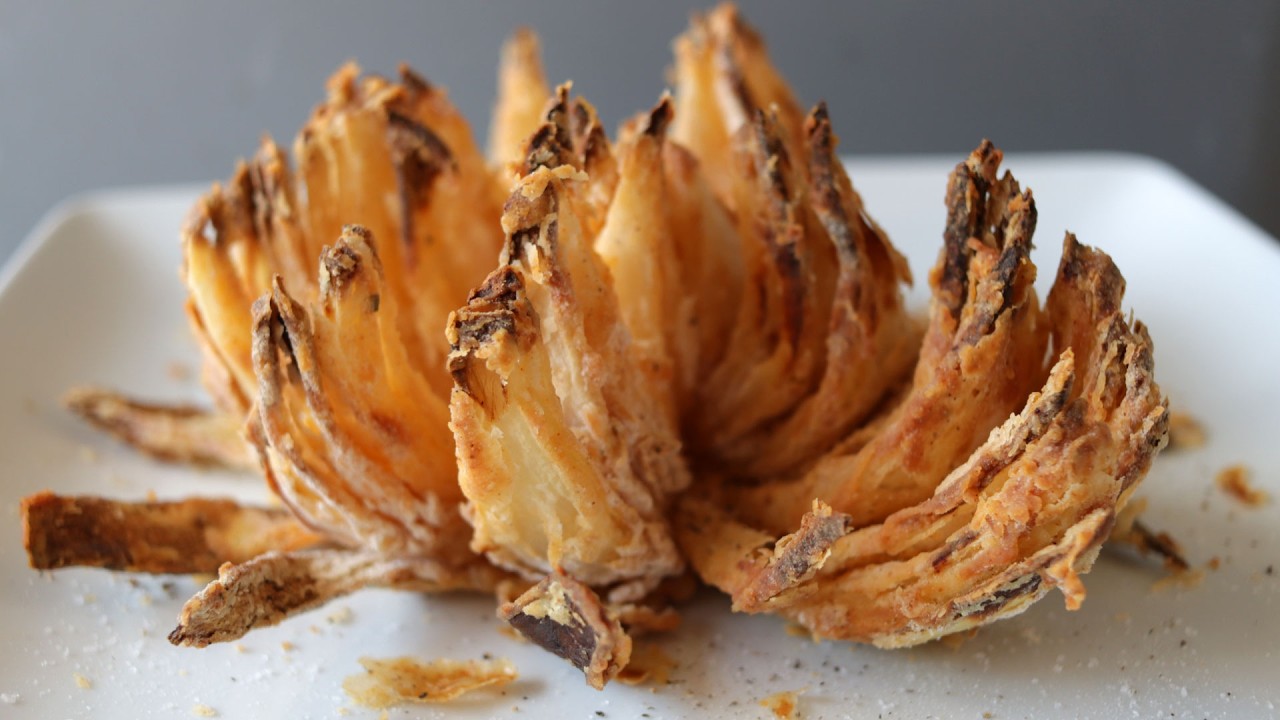
An onion blossom (also called a blooming onion) is a whole onion that’s cut in a way that resembles a flower. The “petals” are battered and deep-fried until golden brown, resulting in a dish that’s crunchy on the outside, tender in the middle, and bursting with flavor.
It originated in the United States and became especially popular thanks to big chain restaurants like Outback Steakhouse, which trademarked their famous “Bloomin’ Onion.” But even though restaurants made it famous, the idea is simple enough for anyone to recreate. It’s a delicious combination of technique and flavor that transforms a humble onion into an indulgent appetizer.
Whether you’re serving guests, making a game-day snack, or just want something a little over the top, the onion blossom never disappoints.
Why Make Onion Blossom at Home?
Sure, you can grab one at a restaurant, but why not make it at home? There are so many reasons to go the homemade route, and here are just a few:
- Healthier Ingredients: When you control the ingredients, you can skip artificial flavors, preservatives, and unnecessary sodium. Want to use organic flour or avocado oil? Go for it.
- Custom Flavors: Add your own spice blends! Cajun, ranch seasoning, chipotle – your kitchen, your rules.
- Cost-Effective: One big onion and a few pantry staples? That’s way cheaper than dining out.
- Fun to Make: It’s like crafting in the kitchen. Once you cut and open that onion, it’s hard not to be impressed.
- Crowd Pleaser: Whether it’s for family night or a party appetizer, this dish always draws attention.
So if you’re someone who loves crispy, golden bites with bold flavor (and honestly, who doesn’t?), you’re going to love making this.
List of Ingredients You’ll Need
Here’s everything you’ll need to make a classic onion blossom:
Main Ingredients:
- 1 large sweet onion (like Vidalia)
- 2 cups all-purpose flour
- 1/2 cup cornstarch (for extra crispiness)
- 2 large eggs
- 1 cup milk or buttermilk
- 1 teaspoon garlic powder
- 1 teaspoon onion powder
- 1 teaspoon paprika
- 1/2 teaspoon cayenne pepper (optional, for spice)
- Salt and pepper to taste
- Vegetable oil (for deep frying)
Optional Add-ins:
- 1/2 teaspoon smoked paprika
- 1 teaspoon dried parsley
- Pinch of chili flakes
For Dipping Sauce (Optional but Recommended!):
- 1/2 cup mayonnaise
- 2 tablespoons ketchup
- 1 tablespoon horseradish sauce
- 1/2 teaspoon paprika
- Salt, pepper, and a squeeze of lemon juice
These are basic pantry staples, which means you’re likely only a trip to the store away from making your own golden onion blossom.
Choosing the Right Onion
This is where it all starts. Picking the right onion can make or break your blooming masterpiece.
Go for Sweet Onions:
Sweet onions like Vidalia, Walla Walla, or Texas Sweet are your best bet. They have a mellow, almost buttery flavor and are large enough to bloom beautifully.
Size Matters:
Choose large, round onions. The bigger the better—ideally around 4 inches in diameter. You want enough space to create lots of petals without tearing them apart.
Avoid These:
- Red onions – too sharp in flavor and color doesn’t suit this dish.
- Small onions – hard to cut into bloom and too tight to fry well.
- Soft or old onions – they’ll fall apart during slicing and frying.
Think of the onion as your canvas. A great blossom starts with a solid foundation.
Essential Tools for the Perfect Bloom
Let’s talk tools. To make a restaurant-style onion blossom at home, you don’t need a commercial kitchen—but having the right gear will make the process smoother (and way less stressful).
Must-Have Kitchen Tools:
- Sharp Knife: A good chef’s knife is key. You’ll need to make clean, precise cuts without tearing the onion. Dull blades = mushy mess.
- Cutting Board: Choose one with a non-slip grip or place a towel underneath to keep it stable.
- Mixing Bowls: You’ll need at least two—one for your seasoned flour and one for your egg wash.
- Deep Fryer or Large Heavy Pot: If you don’t have a deep fryer, no worries! A deep, heavy-bottomed pot like a Dutch oven works great.
- Thermometer: Frying at the right temperature (around 375°F / 190°C) is crucial for that crispy finish.
- Spider Strainer or Slotted Spoon: Makes it easy to lift the blossom out of the hot oil without damaging the delicate petals.
Optional (But Helpful):
- Onion Blossom Cutter Tool: If you’re planning to make this often, these inexpensive tools help cut the onion into a bloom with less effort.
- Cooling Rack: To keep the bloom crispy after frying. Placing it on paper towels alone can make it soggy underneath.
When you’ve got everything set up and ready, cooking becomes so much more enjoyable. Think of this like prepping for a mini kitchen performance—you’re about to make a dish that looks like it took hours but really only takes some smart prep and a little confidence.
Step-by-Step Guide to Making Onion Blossom
Now comes the fun part—making your crispy, golden onion bloom! Follow these detailed steps, and you’ll be frying like a pro.
Step 1: Prepare the Onion
Begin with a large sweet onion, such as Vidalia. Trim about ½ inch off the top, peel the skin, and leave the root end intact to hold the blossom together. Place the onion root-side down and carefully make vertical cuts from top to bottom, slicing into wedges without cutting through the root. Rotate the onion and repeat until you have 12–16 evenly spaced “petals.” Gently spread the layers apart to create the blooming effect.
Step 2: Soak the Onion
Place the cut onion in a bowl of ice-cold water for 30 minutes. This helps the petals open more fully and improves crispiness during frying.
Step 3: Make the Seasoned Flour Mixture
In a large bowl, mix flour, cornstarch, paprika, garlic powder, onion powder, black pepper, and salt. The cornstarch adds lightness, ensuring maximum crunch. Adjust spices to taste.
Step 4: Prepare the Egg Wash
In another bowl, whisk together eggs, milk, and a splash of water. This mixture helps the flour stick to the onion evenly and forms the base of the crispy coating.
Step 5: Bread the Onion
Dip the onion into the seasoned flour, making sure the mixture gets between every petal. Shake off excess, then submerge it fully into the egg wash. Lift it out and return it to the flour mixture for a second coating. This double-dip method creates a thick, crunchy batter.
Step 6: Heat the Oil
Heat oil in a deep pot to 350°F (175°C). Use vegetable or canola oil for a clean, high-heat fry. Always keep a safe distance and avoid overcrowding the pot.
Step 7: Fry the Blossom
Gently lower the coated onion into the hot oil, root-side up. Fry for 7–10 minutes until golden brown. Avoid flipping—this helps maintain the shape. It’s done when crisp and deeply golden.
Step 8: Drain and Rest
Remove the onion blossom and place it on paper towels or a wire rack. Let it cool slightly before serving. Enjoy with your favorite dipping sauce!
How to Make a Dipping Sauce (Bonus Section)
What’s a blooming onion without a killer dipping sauce? Sure, the blossom is the star of the show, but this sidekick brings everything together.
Here’s a simple, zesty sauce you can whip up in under 2 minutes:
Classic Zesty Blossom Sauce:
- 1/2 cup mayonnaise
- 2 tbsp ketchup
- 1 tbsp prepared horseradish
- 1/2 tsp paprika
- Dash of garlic powder
- Squeeze of lemon juice
- Salt and pepper to taste
Mix everything in a bowl until smooth. Chill it while you fry the onion so the flavors have time to develop.
Other Sauce Ideas:
- Spicy Mayo: Mayo + Sriracha + lime juice
- Ranch Remix: Ranch + hot sauce + smoked paprika
- Garlic Aioli: Mayo + fresh minced garlic + lemon + olive oil
Feel free to get creative. The goal is to balance out the crispy, savory onion with something creamy and tangy.
Tips for a Perfect Onion Blossom
Want to make sure your onion blossom is flawless every time? Here are some tried-and-true tips:
- Use cold onions. Cold petals firm up better during frying.
- Dry the onion thoroughly after soaking—any water left on the petals will cause oil splatter and soggy results.
- Double coat. Don’t skip the second dip in flour—it’s what gives the blossom its iconic crunch.
- Keep oil hot. Monitor the oil temperature carefully. Too hot = burnt crust. Too cool = greasy onion.
- Rest before frying. Let the breaded onion sit 10 minutes before it hits the oil—this helps the coating bind better.
Master these, and you’ll be frying onion blossoms like a restaurant chef in no time.
Common Mistakes to Avoid
Let’s face it—making an onion blossom can seem intimidating at first. But most mistakes come from a few common slip-ups that are easy to fix. Here’s what to watch out for so you don’t end up with a soggy, sad onion flower.
1. Using the Wrong Onion
This one’s big. Using a regular white or red onion instead of a large sweet onion can throw off the entire recipe. Sweet onions like Vidalia are bigger, milder, and designed to “bloom” beautifully.
2. Skipping the Soak
It might seem like an unnecessary step, but soaking the cut onion in cold water helps the petals open up and keeps them crisp during frying. Plus, it tones down the bite of the onion and makes it more palatable.
3. Not Drying the Onion Enough
This one is sneaky. If you don’t pat the onion dry thoroughly after soaking, the flour coating won’t stick properly—and even worse, water hitting hot oil causes dangerous splattering. Take your time and use paper towels to dry it completely.
4. Uneven Coating
It’s tempting to rush, but every petal needs attention. Make sure flour and egg wash get into every nook and cranny. Skipping spots can lead to uneven texture and flavor.
5. Oil Temperature Mistakes
Too hot, and the outside will burn while the inside stays raw. Too cold, and your blossom will turn greasy. Use a thermometer and aim for that golden zone: 375°F (190°C).
6. Overcrowding the Pan
Only fry one blossom at a time. If you try to do more, the oil temp will drop, and your crisp crust will turn limp in seconds.
7. Cutting Too Deep
If you slice too far into the root when making your cuts, the whole onion will fall apart. Keep about ½ inch uncut at the root to hold the “petals” together.
Avoiding these common issues can be the difference between a sad, floppy onion and a beautiful, restaurant-worthy bloom.
Serving Suggestions
You’ve made this gorgeous, golden masterpiece—now what? Time to serve it up in style.
Here’s how to make your onion blossom the star of the table:
- Appetizer for Parties: Serve on a platter with a side of dipping sauces. Add some sliced pickles, jalapeños, or even sliders for a full appetizer spread.
- Game Day Snack: This is a total crowd-pleaser during football or sports nights. Pair it with wings, nachos, and cold drinks.
- Side for Grilled Meals: Serve alongside burgers, ribs, or grilled chicken for that BBQ feel.
- Vegetarian Meal: Believe it or not, this can be a filling option with a salad or grain bowl on the side.
Presentation Tips:
- Garnish with fresh parsley, chives, or a sprinkle of smoked paprika for color.
- Place the dipping sauce in a small ramekin in the center of the onion for a picture-perfect bloom.
Food is all about the experience—and when this bloom hits the table, all eyes will be on it.
Storing & Reheating Leftovers
Let’s say you somehow didn’t finish the whole onion (rare, but it happens). Here’s how to keep it crispy and delicious for round two.
Storing:
- Let the blossom cool completely before storing.
- Wrap it loosely in foil or place it in an airtight container.
- Store in the fridge for up to 3 days.
Reheating:
- Best method: Use an oven or air fryer. Preheat to 375°F and heat for 8–10 minutes.
- This brings back that signature crunch while avoiding sogginess.
- Avoid microwaving—it turns the coating rubbery and sad.
Want to revive the flavor? Serve with fresh sauce or even toss a sprinkle of seasoning on before reheating.
FAQs about Onion Blossom Recipe
1. Can I make an onion blossom in an air fryer?
Absolutely! After breading, spray the onion generously with oil and air fry at 375°F for 15–20 minutes. Keep checking for crispiness. It won’t be as crispy as deep-fried, but still delicious.
2. What’s the best dipping sauce for onion blossom?
The classic zesty dip with mayo, ketchup, and horseradish is a fan favorite, but spicy mayo or ranch with hot sauce also work great.
3. How do I cut the onion without breaking it?
Leave the root intact and make your vertical cuts starting ½ inch from the root. Use a sharp knife and make sure the onion is cold—it holds its shape better.
4. Is it gluten-free?
Traditional recipes use flour and cornstarch, which are not gluten-free. But you can easily swap with gluten-free flour and cornstarch alternatives. Just make sure your seasoning blends are also gluten-free.
5. Can I bake the onion blossom instead of frying?
Yes! It won’t be quite as crispy, but you can bake at 400°F for about 25–30 minutes. Spray with oil to help it brown evenly. Great alternative if you want to cut back on oil.
Conclusion
The onion blossom isn’t just an appetizer—it’s a statement piece. Crunchy, flavorful, dramatic, and absolutely mouthwatering. Whether you’re trying to impress guests, add flair to a meal, or just treat yourself to something extra special, this recipe delivers.
And the best part? You don’t need fancy equipment or pro-level skills. With a little patience and a few tips, you’ll turn a humble onion into a golden, blooming tower of deliciousness that could rival any steakhouse.
So go on—get your apron, slice that onion, and make some kitchen magic. Your tastebuds (and your guests) will thank you.


