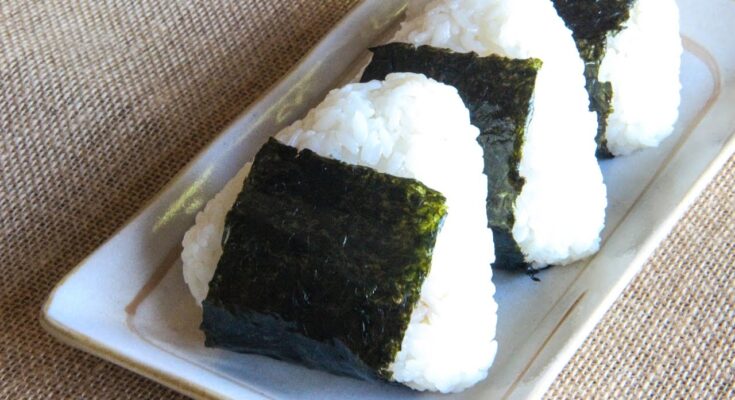
Onigiri Recipe: Onigiri, also known as Japanese rice balls, is a staple of Japanese cuisine. These delightful treats are simple yet versatile, making them perfect for lunchboxes, snacks, and picnics.
Whether you’re a beginner in Japanese cooking or an experienced home chef, making onigiri is an enjoyable process that allows for endless creativity.
In this guide, we’ll take you through a detailed, step-by-step process to create authentic and delicious onigiri at home.
What is Onigiri?
Onigiri is a traditional Japanese dish made by shaping steamed rice into various forms, such as triangles, balls, or cylinders. These rice balls are often filled with flavorful ingredients like salted salmon, pickled plum (umeboshi), or tuna mayo. Wrapped in crispy nori (seaweed), onigiri is both delicious and portable.
History and Cultural Significance
Onigiri has been a part of Japanese culture for centuries. It dates back to the Heian period (794–1185) when rice balls were used as travel food. Samurai carried onigiri as a convenient and nourishing meal during battles. Today, it’s a popular item found in convenience stores across Japan, symbolizing comfort and tradition.
Ingredients Needed for Onigiri
Rice Selection – The Key Ingredient
The most important component of onigiri is the rice. Japanese short-grain rice, often labeled as sushi rice, is ideal due to its sticky texture. This stickiness helps the rice hold its shape without falling apart.
- Recommended Rice Types:
- Japanese short-grain white rice
- Sushi rice
- Brown rice for a healthier alternative
Fillings for Onigiri – Traditional and Modern Options
The fillings can range from traditional flavors to modern twists. Here are some popular choices:
Traditional Fillings:
- Salted Salmon (Shiozake): A savory and salty option.
- Pickled Plum (Umeboshi): Tangy and tart for a unique flavor.
- Tuna Mayo: Creamy and rich, perfect for beginners.
Modern Fillings:
- Teriyaki Chicken: Sweet and savory flavors.
- Spicy Tuna: A spicy twist for adventurous eaters.
- Avocado and Crab: Inspired by sushi rolls.
Vegetarian Options:
- Edamame and Seaweed Salad
- Grilled Tofu with Soy Sauce
Essential Tools for Making Onigiri
To make onigiri successfully, it’s helpful to have the right tools:
- Rice Cooker: Ensures perfectly cooked rice every time.
- Onigiri Mold: Useful for shaping uniform rice balls, especially for beginners.
- Plastic Wrap: Helps in shaping without sticking to your hands.
- Nori Sheets: Adds flavor and holds the rice ball together.
- Small Bowl of Salted Water: Keeps the rice from sticking to your hands.
Preparing the Rice
Washing and Cooking the Rice
- Rinse the Rice: Wash the rice under cold water until the water runs clear. This removes excess starch for a fluffier texture.
- Soak the Rice: Allow the rice to soak in water for 20–30 minutes before cooking to ensure even cooking.
- Cook the Rice: Use a rice cooker or stovetop method. Add 1:1.1 ratio of water to rice for best results.
Seasoning the Rice for Flavor
Once the rice is cooked, let it cool slightly before seasoning. A sprinkle of salt enhances flavor, while adding rice vinegar (optional) provides a subtle tanginess. Avoid over-mixing to maintain the texture.
How to Make Onigiri – Step-by-Step Instructions
Step 1: Cooking and Cooling the Rice
- Cook Japanese short-grain rice and let it cool to room temperature.
- Avoid letting it dry out—keep it covered with a damp cloth.
Step 2: Preparing Fillings
- Chop or flake your chosen fillings into small, bite-sized pieces.
- Mix seasonings, such as soy sauce or sesame oil, for added flavor.
Step 3: Shaping the Onigiri
- Wet Your Hands: Dip your hands in salted water to prevent sticking.
- Shape the Rice: Take a handful of rice and form it into a triangle or ball. Press firmly but gently to ensure it sticks.
Step 4: Adding Fillings
- Make a small indentation in the center of the rice ball.
- Add 1–2 teaspoons of filling, then seal it with additional rice.
Step 5: Wrapping with Nori Seaweed
- Cut nori sheets into strips or squares.
- Wrap them around the rice balls for added flavor and support.
Popular Variations of Onigiri
Onigiri is highly versatile, and its shapes and fillings can be customized to suit any preference. Here are some popular variations:
Classic Triangle Onigiri
- The triangle shape is the most common and traditional form of onigiri.
- It’s easy to hold and perfectly fits into bento boxes.
- Fillings like tuna mayo, salted salmon, and umeboshi are often used in this style.
Cylindrical and Ball-Shaped Onigiri
- Cylindrical onigiri is simpler to shape and works well for modern fillings like teriyaki chicken or avocado.
- Ball-shaped onigiri is great for kids and can be decorated with sesame seeds, furikake (seasoned rice sprinkles), or finely chopped herbs.
Creative Onigiri Designs
Onigiri isn’t just about taste—it can also be a visual delight!
Decorative Onigiri for Kids
- Make mealtime fun by shaping onigiri into stars, hearts, or animal faces.
- Use cookie cutters or rice molds to create different forms.
- Add features with vegetables like carrots, seaweed cutouts, and sesame seeds.
Character Onigiri (Kyaraben)
- Popular in Japan, these themed onigiri designs replicate characters from cartoons or anime.
- They’re perfect for special occasions and lunchboxes, offering both nutrition and creativity.
Serving Suggestions for Onigiri
Onigiri pairs wonderfully with a variety of sides and soups.
Pairing Onigiri with Soups and Side Dishes
- Miso Soup: A warm and comforting combination.
- Japanese Pickles (Tsukemono): Adds a tangy crunch to complement the soft texture of rice.
- Salad Greens or Edamame: Offers a fresh balance to the flavors.
- Tamago (Japanese Omelet): Adds a sweet and savory side dish option.
For drinks, green tea or iced barley tea (mugicha) perfectly complements onigiri’s flavor.
Storage and Packing Tips
Storing for Freshness
- Onigiri tastes best when eaten fresh but can be stored for later use.
- Wrap each rice ball in plastic wrap and store them in an airtight container.
- Refrigerate for up to 24 hours, but avoid freezing as it affects the texture.
Lunchbox Packing Ideas
- Keep the nori separate and wrap it just before eating to maintain crispness.
- Add small packets of soy sauce or sesame seeds for extra flavor when serving later.
- Use insulated containers to keep onigiri warm if desired.
Common Mistakes to Avoid When Making Onigiri
Even though making onigiri is simple, a few common mistakes can affect the results.
- Overcooked or Undercooked Rice: Ensure the rice has the right sticky consistency without being mushy.
- Dry Rice: Keep the rice slightly moist while shaping to prevent cracks.
- Overstuffing Fillings: Too much filling can make the rice ball fall apart.
- Skipping Salted Water: Forgetting to wet your hands with salted water can lead to rice sticking to your fingers.
- Not Wrapping Nori Properly: Add nori at the last minute to avoid it turning soggy.
Health Benefits of Onigiri
Onigiri isn’t just delicious—it’s also nutritious!
- Energy Boosting Carbohydrates: The rice provides long-lasting energy, making it a great snack for busy days.
- Protein-Rich Fillings: Fillings like salmon, tuna, and chicken add protein for muscle repair and growth.
- Low in Fat: Onigiri is naturally low in fat, especially when paired with vegetables or lean proteins.
- Fiber Content: Brown rice onigiri is a good source of fiber, aiding digestion and heart health.
Customizing Onigiri for Dietary Preferences
Onigiri can easily be adapted for different diets and preferences:
- Vegetarian or Vegan Options: Use fillings like grilled vegetables, avocado, or pickled radish.
- Gluten-Free: Onigiri is naturally gluten-free when fillings avoid soy sauce. Opt for tamari as a gluten-free alternative.
- Low-Carb Alternatives: Substitute regular rice with cauliflower rice for a low-carb version.
- Protein-Packed Choices: Add boiled eggs, grilled chicken, or tofu for extra protein.
Fun Facts About Onigiri
- Onigiri is considered a “comfort food” in Japan, much like sandwiches in Western cultures.
- Japanese astronauts have taken onigiri into space as a meal.
- Convenience stores in Japan sell onigiri with automated wrapping to keep the nori crisp until opened.
- Some regions of Japan have unique variations of onigiri with local ingredients.
- Onigiri festivals are held in Japan to celebrate the dish’s cultural significance.
FAQs about Onigiri Recipe
1. What is Onigiri?
Onigiri, also known as rice balls, is a popular Japanese snack made from white rice formed into triangular or cylindrical shapes and often wrapped in nori (seaweed). Traditionally, it includes a filling such as salted salmon, pickled plum, or tuna mayonnaise.
2. What kind of rice is best for making Onigiri?
The best type of rice for making onigiri is short-grain Japanese rice. This rice variety is stickier than other types, which helps the rice balls hold their shape and makes them easier to eat by hand.
3. How do you shape Onigiri?
To shape onigiri, wet your hands with water and sprinkle them with salt to prevent sticking and to add flavor. Place a scoop of rice into your hand, make a dent in the middle for your filling, then mold the rice around it. Finally, shape the rice into a triangle or a ball by pressing lightly with both palms.
4. Can Onigiri be made in advance?
Yes, onigiri can be made a few hours in advance. However, it’s best eaten the same day as it tends to harden when refrigerated. To keep them fresh longer, wrap each onigiri in plastic wrap and store them at room temperature.
5. Are there vegetarian options for Onigiri fillings?
Absolutely! Some popular vegetarian fillings include umeboshi (pickled plum), furikake (a dry Japanese seasoning), and cooked mixed vegetables. Avocado and cucumber also make refreshing fillings for a modern twist.
Conclusion
Onigiri is more than just a rice ball; it’s a versatile and delicious food that connects tradition with creativity. Whether you prefer classic flavors like salted salmon or modern fillings like avocado and spicy tuna, there’s an onigiri style for everyone. With this detailed step-by-step guide, you’re now equipped to make perfect onigiri at home. So grab your ingredients, unleash your creativity, and start shaping these Japanese delights today!


