Old Fashioned Stuffed Bell Peppers Recipe: If you’re craving a hearty, nostalgic dish that takes you back to Grandma’s kitchen, you’re in for a treat. Old-fashioned stuffed bell peppers are one of those beloved recipes that have stood the test of time. They’re comforting, flavorful, and filled with ingredients you probably already have in your pantry. Think of them as edible bowls packed with seasoned meat, rice, herbs, and smothered in tomato sauce. It’s no wonder they’ve been a dinner table favorite for generations.
Stuffed bell peppers are a fantastic way to enjoy a wholesome, well-rounded meal in a single dish. You’ve got your vegetables, your protein, your carbs—all baked together until perfectly tender. What makes this dish even more charming is its versatility. You can customize the filling to your liking, make it ahead, freeze leftovers, and even enjoy it reheated the next day without compromising on flavor.
These peppers aren’t just about taste—they’re about tradition. Passed down through family cookbooks and Sunday dinner memories, this recipe has a soul-warming quality. Let’s dive into making them the old-fashioned way, just like Grandma did—simple, savory, and absolutely satisfying.
Ingredients You’ll Need
Let’s be real—great food starts with great ingredients. To keep this recipe true to its roots, we’re using classic pantry staples and fresh produce that combine beautifully to create a home-cooked masterpiece. Here’s what you’ll need:
Main Ingredients:
- 6 large bell peppers (any color, though green is the classic choice)
- 1 lb ground beef (80/20 blend for flavor)
- 1 cup cooked white rice (leftover rice works great)
- 1 small onion, finely chopped
- 2 cloves garlic, minced
- 1 can (15 oz) tomato sauce
- 1 can (14.5 oz) diced tomatoes (drained)
- 1 tsp salt
- 1/2 tsp black pepper
- 1 tsp Italian seasoning
- 1/2 tsp paprika
- 1 cup shredded cheese (cheddar or mozzarella, optional for topping)
Optional Add-Ins:
- Worcestershire sauce for a tangy kick
- Fresh parsley for garnish
- Red pepper flakes for some heat
When choosing your bell peppers, go for ones that are firm, vibrant, and have flat bottoms so they can stand upright in the baking dish. Red, orange, and yellow peppers are sweeter, while green peppers have a slightly bitter taste that complements the savory filling well.
Pro Tip: Want to go low-carb? Swap out the rice for riced cauliflower. Looking to make it heartier? Add some chopped mushrooms or black beans to the mix.
Tools and Equipment Required
Don’t worry—this recipe doesn’t require any fancy equipment. In fact, you probably have everything you need already:
Essentials:
- Large pot (to parboil the peppers)
- Mixing bowl (for the filling)
- Large skillet (to sauté ingredients)
- 9×13 inch baking dish
- Knife and cutting board
- Spoon or scoop
- Aluminum foil
Nice-to-Haves:
- Meat thermometer (to ensure the stuffing reaches 160°F)
- Garlic press (for quick mincing)
- Cheese grater (if using fresh cheese)
Having the right tools on hand makes this process smoother, especially when you’re juggling multiple steps. A large baking dish is key because you want the peppers to sit upright and snug to prevent tipping during baking.
And let’s not forget about cleanup. A non-stick skillet and parchment paper lining for your dish can save you a lot of scrubbing afterward.
Preparing the Bell Peppers
Prepping the bell peppers is a crucial step that sets the foundation for this dish. If done right, they’ll be tender yet firm enough to hold all that delicious filling without collapsing.
Step-by-Step Prep:
- Wash the peppers thoroughly.
- Cut off the tops (about half an inch) and remove the seeds and membranes inside. A small spoon can help scrape out everything cleanly.
- Optional: Trim the bottom slightly if needed to make them stand upright, but be careful not to make holes.
- Parboil the peppers in boiling water for 5 minutes. This softens them just enough without turning them mushy. If you like a firmer texture, you can skip this step—but parboiling ensures even cooking.
After boiling, place the peppers cut side down on paper towels to drain any excess water. Then flip them upright in your baking dish, ready for stuffing.
Tip: Don’t toss the pepper tops! Dice them and add them into your meat filling for zero waste and extra flavor.
Making the Stuffing
Now comes the heart and soul of this dish—the stuffing. We’re sticking to the old-school combo: seasoned ground beef, rice, tomatoes, and a medley of spices that create that mouthwatering, savory taste everyone loves.
Step-by-Step Filling Prep:
- Brown the meat: In a large skillet, cook the ground beef over medium heat until no longer pink. Drain the excess fat.
- Sauté the aromatics: Add chopped onion, garlic, and the diced tops of your peppers. Cook until softened—about 3-5 minutes.
- Add the rice: Stir in your cooked rice, diced tomatoes, half the tomato sauce, and all your seasonings (salt, pepper, Italian herbs, paprika). Mix thoroughly.
- Simmer: Let it all cook together for another 5-7 minutes, so the flavors meld beautifully. Taste and adjust seasoning if needed.
Once your stuffing is ready, use a spoon to carefully fill each bell pepper to the top, pressing gently to pack in as much filling as possible. Don’t worry about being too neat—it’s all about flavor.
Want to switch it up? Try using ground turkey or chicken for a leaner option. Vegetarian? Replace the meat with lentils or beans and add extra veggies. The key is to keep the base seasoned and moist.
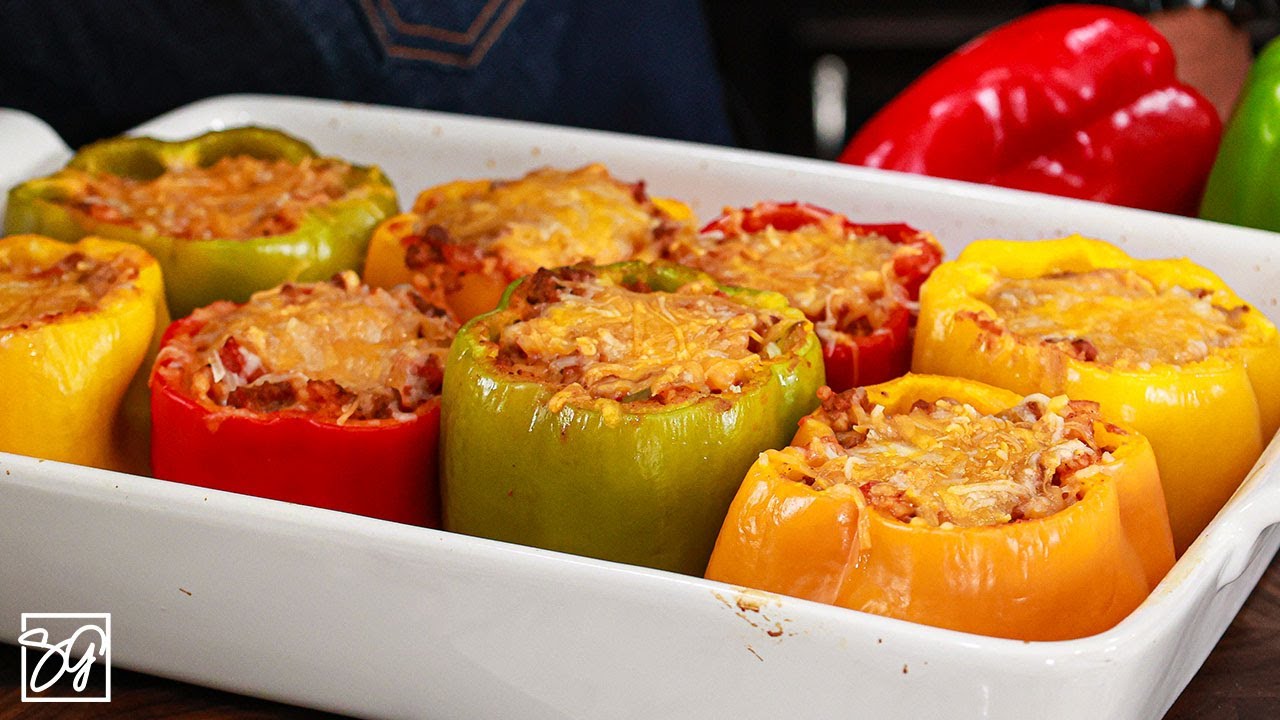
Baking the Stuffed Bell Peppers
Once your bell peppers are filled to the brim with that rich, savory stuffing, it’s time to bring them to life in the oven. Baking is where all those flavors come together and the magic really happens. The tomato sauce seeps into the peppers, the filling becomes juicy and tender, and if you’ve added cheese—well, get ready for a golden, bubbly crown on top.
Step-by-Step Baking Instructions:
- Preheat your oven to 375°F (190°C).
- Pour the remaining tomato sauce over the tops of the stuffed peppers and into the bottom of the baking dish. This keeps the peppers moist and adds another layer of flavor.
- Cover the dish with aluminum foil. This traps steam and helps cook the peppers evenly.
- Bake for 35–40 minutes. If you skipped parboiling, extend the bake time to 45–50 minutes to ensure the peppers are soft.
- Optional Cheese Topping: Remove the foil for the last 10 minutes of baking. Sprinkle shredded cheese over each pepper and bake uncovered until melted and slightly browned.
Once done, let them rest for 5–10 minutes before serving. This allows the juices to redistribute, and trust me, it’s worth the wait.
Serving Suggestions and Side Dishes
Old-fashioned stuffed bell peppers are satisfying on their own, but if you want to round out the meal, there are plenty of tasty options. Whether you’re going for a traditional comfort food vibe or something light and fresh, here are a few ideas:
Classic Pairings:
- Mashed potatoes – Creamy and buttery, the perfect partner to soak up extra sauce.
- Buttered corn or peas – A simple vegetable side that’s sweet and satisfying.
- Crusty bread – Ideal for mopping up any tomato goodness left in the dish.
Lighter Sides:
- Garden salad – Crisp greens with a tangy vinaigrette balance the rich peppers.
- Steamed broccoli or green beans – Add a splash of color and crunch to your plate.
- Quinoa or couscous – A nutritious base that complements the stuffed peppers well.
And don’t forget a glass of red wine or a cold iced tea—it completes the whole comfort food experience.
Make-Ahead Tips and Storage
Life gets busy, and this dish is a meal-prepper’s dream. Not only can you assemble the peppers ahead of time, but they also store and reheat beautifully.
Make-Ahead Tips:
- Prepare the stuffed peppers fully, but don’t bake them. Cover tightly with foil or plastic wrap and store in the fridge for up to 24 hours.
- When ready to bake, just pour on the sauce and pop them in the oven. You may need to add 5–10 minutes to the bake time if starting cold.
Storage:
- Fridge: Leftover stuffed peppers can be stored in an airtight container in the fridge for up to 4 days.
- Freezer: Wrap each cooled pepper individually in foil, then place in a freezer bag. They’ll last up to 3 months.
- Reheating: Microwave individual peppers on medium power or reheat a whole batch in the oven at 350°F until warmed through.
Variations to Try
While the classic recipe is always a winner, sometimes it’s fun to shake things up. Here are a few twists that keep things exciting without straying too far from the old-fashioned roots.
Global Flavors:
- Mexican Style: Add black beans, corn, cumin, and use salsa instead of tomato sauce.
- Italian-Inspired: Mix in fresh basil, chopped olives, and mozzarella.
- Asian Twist: Use ground pork, ginger, soy sauce, and finish with a drizzle of sesame oil.
Dietary Adjustments:
- Low-Carb: Swap rice for cauliflower rice.
- Vegetarian: Replace meat with lentils, quinoa, mushrooms, or tofu.
- Dairy-Free: Skip the cheese or use a dairy-free alternative.
These variations are perfect for customizing to dietary needs or just spicing things up midweek. Either way, you’re still enjoying a delicious, homey meal.
FAQs About Old Fashioned Stuffed Bell Peppers Recipe
1. Can I use a different type of meat for stuffed bell peppers?
Absolutely! While ground beef is the traditional choice, you can also use ground turkey, chicken, or even sausage. For a vegetarian option, try lentils, quinoa, or black beans.
2. How do I prevent the peppers from becoming too soggy?
To keep peppers from becoming soggy, don’t overcook them. Parboil or pre-bake them for just 5–10 minutes before stuffing to maintain a slight crunch.
3. Can I make stuffed bell peppers ahead of time?
Yes, stuffed peppers can be made a day in advance. Assemble them, cover, and refrigerate. When ready to cook, simply bake them as directed, adding 5–10 extra minutes.
4. What’s the best type of rice to use in the filling?
Long-grain white rice is commonly used, but brown rice or even wild rice works well. Just make sure it’s fully cooked before mixing it into the filling.
5. How do I store leftovers?
Store leftover stuffed peppers in an airtight container in the fridge for up to 3–4 days. Reheat in the oven or microwave until hot.
6. Can I freeze stuffed bell peppers?
Yes! After baking, let them cool completely. Wrap each pepper individually in plastic wrap and store in a freezer-safe container for up to 3 months.
7. What sauces go well with stuffed bell peppers?
Classic tomato sauce is the most common, but you can also try marinara, spicy arrabbiata, or a cheese sauce for variation.
8. How do I make this recipe spicier?
Add diced jalapeños, crushed red pepper flakes, or hot sauce to the meat mixture to give your stuffed peppers a kick.
9. Can I cook stuffed bell peppers in a slow cooker?
Yes, layer the stuffed peppers in your slow cooker with some sauce, and cook on low for 4–6 hours or until tender.
10. Do I need to cover the peppers while baking?
Cover the dish with foil for the first half of baking to keep them moist, then uncover for the last 10–15 minutes to brown the tops.
Conclusion
There’s something undeniably heartwarming about a tray of old-fashioned stuffed bell peppers fresh out of the oven. This classic recipe is more than just a meal—it’s a slice of home, a taste of tradition, and a reminder of how simple ingredients can create unforgettable flavors. With a bit of prep and a lot of love, you can bring this comforting dish to your own table, just like Grandma used to make.
So whether you’re cooking for family, meal-prepping for the week, or simply craving some old-school comfort food, this recipe has you covered. Enjoy every savory, saucy, and satisfying bite!


