Old Fashioned Pancake Recipe: There’s something truly special about old-fashioned pancakes. They bring a sense of nostalgia, warmth, and comfort that no fancy brunch dish can match. Picture this: a cozy morning, the scent of butter sizzling on a skillet, and a tall stack of golden-brown pancakes drizzled with maple syrup — it’s pure happiness on a plate.
Old-fashioned pancakes are loved not only for their taste but also for their simplicity. They require no exotic ingredients or complicated techniques. All you need are a few pantry staples and a bit of patience. The result? Fluffy, soft, melt-in-your-mouth pancakes that taste just like grandma used to make.
These pancakes have stood the test of time because they strike the perfect balance between hearty and light. Whether served with butter and syrup or fresh berries and cream, they are endlessly adaptable. This recipe will walk you through every step — from measuring the ingredients to flipping the perfect pancake — so you can enjoy this classic breakfast favorite in your own kitchen.
Why Old-Fashioned Pancakes Never Go Out of Style
In a world full of trendy breakfast recipes and instant mixes, old-fashioned pancakes hold their ground. Why? Because they deliver on taste, texture, and nostalgia. Unlike boxed pancake mixes, homemade ones have a depth of flavor that comes from fresh ingredients — the creamy richness of real milk, the subtle sweetness of sugar, and the warmth of a hint of vanilla.
Another reason they never fade away is versatility. You can serve them with just about anything — honey, fruits, whipped cream, or even savory toppings like bacon. They are a blank canvas for creativity, yet deliciously satisfying in their simplest form.
Most importantly, making them from scratch brings people together. Whether it’s a lazy Sunday breakfast with family or a cozy breakfast-for-dinner treat, pancakes create moments that last. Once you make your first batch of truly old-fashioned pancakes, you’ll see why they remain a breakfast staple across generations.
Ingredients You’ll Need
Before you begin, it’s important to gather everything you need. Here’s a list of ingredients that will give you those perfectly soft and golden pancakes — the way they were meant to be.
Essential Ingredients for Classic Pancakes
| Ingredient | Quantity | Purpose |
|---|---|---|
| All-purpose flour | 1 ½ cups | Base for structure |
| Granulated sugar | 2 tablespoons | Adds sweetness |
| Baking powder | 2 ½ teaspoons | Leavening for fluffiness |
| Salt | ½ teaspoon | Balances flavor |
| Whole milk | 1 ¼ cups | Adds moisture and richness |
| Large egg | 1 | Binds ingredients together |
| Unsalted butter (melted) | 3 tablespoons | Adds flavor and softness |
| Vanilla extract | 1 teaspoon | Enhances aroma |
Each ingredient plays a crucial role in the pancake’s texture and flavor. The baking powder creates air bubbles that make the pancakes light, while the melted butter adds that irresistible buttery taste.
Optional Add-ins for Extra Flavor
If you want to take your pancakes up a notch, try adding a few of these extras:
- Cinnamon – Adds warmth and spice.
- Blueberries or chocolate chips – Perfect for a burst of flavor in every bite.
- Banana slices – Give natural sweetness and a soft texture.
- Chopped nuts – Add crunch and a nutty flavor.
These ingredients make your pancakes unique and can turn a simple breakfast into something special.
Ingredient Substitutions for Dietary Preferences
Don’t worry if you’re missing an ingredient or following a specific diet — pancakes are incredibly flexible:
- Dairy-Free Option: Use almond milk or oat milk instead of regular milk.
- Gluten-Free Version: Substitute all-purpose flour with a gluten-free blend.
- Vegan Pancakes: Replace the egg with a flaxseed egg (1 tbsp flaxseed + 3 tbsp water).
- Low-Sugar Option: Swap sugar for honey, stevia, or coconut sugar.
With these simple swaps, you can enjoy delicious pancakes that fit your lifestyle without sacrificing flavor.
Tools and Equipment Required
To make restaurant-quality pancakes at home, you don’t need fancy gadgets — just a few reliable kitchen tools that make the process smoother.
Kitchen Essentials for Pancake Perfection
Here’s what you’ll need:
- Mixing bowls (one large and one medium)
- Whisk or electric mixer
- Measuring cups and spoons
- Spatula (for flipping)
- Non-stick skillet or griddle
- Ladle or measuring cup (to pour batter evenly)
Having the right tools ensures even cooking and consistent results. For example, a whisk helps you avoid lumps in your batter, while a non-stick skillet prevents your pancakes from sticking and burning.
The Importance of Using the Right Pan
Believe it or not, the type of pan you use can make or break your pancakes. A heavy-bottomed non-stick pan or cast-iron griddle distributes heat evenly, giving your pancakes that golden-brown crust without burning. Avoid thin aluminum pans — they tend to heat unevenly, resulting in overcooked spots.
Also, make sure your pan is preheated just right. A medium temperature works best — too hot, and your pancakes will burn on the outside before cooking through; too cool, and they’ll turn pale and flat.
A quick tip: sprinkle a few drops of water on the skillet. If they sizzle and evaporate quickly, it’s ready!
Step-by-Step Guide to Making Old-Fashioned Pancakes
Now that you’ve gathered everything, it’s time to get cooking! Follow these simple steps to make the fluffiest, most delicious old-fashioned pancakes right in your own kitchen.
Step 1 – Gather and Measure Ingredients
Cooking is much smoother when you prep first. Measure out all your ingredients accurately before you start mixing. Even small changes in ingredient ratios can affect the texture — for example, too much flour can make pancakes dense, while too much milk can make them runny.
Set everything on your counter in the order you’ll use them. This step not only saves time but also helps prevent mistakes — because nothing ruins a morning faster than realizing you forgot to add baking powder halfway through cooking!
Step 2 – Mix Dry Ingredients
In a large mixing bowl, combine your flour, sugar, baking powder, and salt. Use a whisk to blend them together evenly. This step might seem simple, but it’s crucial — evenly mixing the dry ingredients ensures your pancakes rise properly and have a consistent texture.
Think of this step as setting the foundation for your pancakes. The baking powder is your secret weapon for fluffiness, while the sugar and salt balance out the flavors. If you want to add a hint of spice, this is also the perfect time to sprinkle in a pinch of cinnamon or nutmeg.
Take your time with this step; whisking introduces air into the mixture, which contributes to that light and airy texture everyone loves in old-fashioned pancakes. Once everything looks well-blended, set the bowl aside and move on to the wet ingredients.
Step 3 – Combine Wet Ingredients
In another bowl, crack one large egg and whisk it lightly. Add in the milk, melted butter, and vanilla extract, then whisk again until everything is smooth and well-combined. The melted butter gives richness to the batter, while the vanilla adds a warm aroma that fills your kitchen as the pancakes cook.
Make sure your butter isn’t too hot when you mix it in — you don’t want to accidentally scramble the egg! Lukewarm butter blends better and keeps your batter smooth.
You might notice the mixture looking slightly frothy — that’s good! It means air is incorporated, which will make your pancakes fluffier. Once your wet mixture is ready, it’s time to bring everything together.
Step 4 – Blend Wet and Dry Mixtures
Now for the magic moment — combining the wet and dry ingredients. Slowly pour the wet mixture into the bowl of dry ingredients. Using a whisk or a spatula, gently fold everything together.
Here’s the golden rule: do not overmix. Mix just until you no longer see streaks of dry flour. The batter should be slightly lumpy, not perfectly smooth. Overmixing activates the gluten in the flour, making your pancakes tough and chewy instead of soft and fluffy.
If the batter looks too thick, add a tablespoon or two of milk to loosen it up. On the other hand, if it’s too thin, sprinkle a bit more flour and stir lightly. The ideal batter should be thick but pourable — like heavy cream.
Once your batter is ready, let it rest for about 5–10 minutes. This resting time allows the flour to absorb the liquid and the baking powder to start doing its job, resulting in fluffier pancakes.
Step 5 – Heat the Pan and Test the Temperature
While your batter rests, it’s time to heat your skillet or griddle. Place it over medium heat and let it warm up for a few minutes. To test if it’s ready, sprinkle a few drops of water onto the surface. If they dance and evaporate quickly, your pan is at the perfect temperature.
Lightly grease the pan with butter or oil. A paper towel can help spread it evenly and remove any excess — you want a thin, even coating, not puddles of grease. The butter gives your pancakes a beautiful golden edge and that irresistible buttery flavor.
If the pan is too hot, your pancakes will brown too quickly on the outside and stay raw in the middle. If it’s too cool, they’ll spread too much and turn pale. The right temperature is key to achieving those evenly golden, fluffy pancakes every time.
Once your pan is ready, you’re set to pour the batter and start cooking!
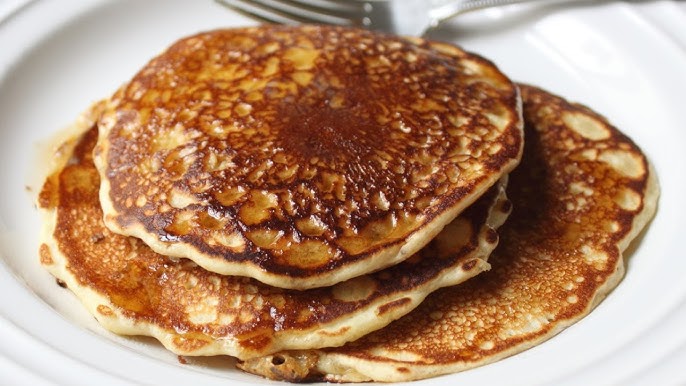
Step 6 – Cook the Pancakes to Golden Perfection
Now comes the most satisfying part — watching your pancakes puff up and turn beautifully golden. Using a ¼ cup measuring cup or ladle, pour the batter gently onto the skillet. Don’t overcrowd the pan; leave space between each pancake so they have room to spread.
Let them cook undisturbed for 2–3 minutes on the first side. You’ll notice small bubbles forming on the surface — that’s your cue to check underneath. When the edges look set and the underside is a rich golden brown, it’s time for the big moment — the flip!
Use a flat spatula and flip with confidence in one smooth motion. Cook the other side for another 1–2 minutes until golden brown and cooked through.
Keep a plate warm in the oven (set at a low temperature) and transfer your cooked pancakes there while you finish the rest. This keeps them warm and soft without drying out.
Repeat the process until all your batter is gone, greasing the pan lightly between batches if needed. By now, your kitchen will be filled with that delicious buttery aroma that makes everyone eager for breakfast!
Step 7 – Serve and Enjoy
Congratulations — you’ve just made the perfect old-fashioned pancakes! Now it’s time to serve them up and enjoy your creation. Stack the pancakes high on a plate, drizzle them with warm maple syrup, and top with a pat of butter that slowly melts down the sides.
If you’re feeling fancy, add some fresh fruits like strawberries, bananas, or blueberries. A dusting of powdered sugar gives a pretty finish, and a dollop of whipped cream makes them feel extra indulgent.
For a heartier meal, serve with crispy bacon or scrambled eggs on the side. The combination of sweet and savory flavors is unbeatable.
The best part about homemade pancakes is that they taste even better shared. Gather your family around the table, pour yourself a cup of coffee, and enjoy every bite of these fluffy, buttery, old-fashioned pancakes — just like breakfast used to be.
Pro Tips for Perfect Pancakes Every Time
Even if you’re new to cooking, these expert tips will help you master the art of pancake-making every single time.
How to Keep Pancakes Fluffy
The key to light and airy pancakes lies in how you handle the batter. Overmixing is the biggest culprit behind flat pancakes. Stir just enough to combine — a few lumps are perfectly fine!
Also, make sure your baking powder is fresh. Old leavening agents lose their potency and won’t give you that desired lift. Letting your batter rest for 5–10 minutes before cooking also makes a huge difference, allowing the gluten to relax and the air bubbles to form properly.
Lastly, don’t press your pancakes down while cooking — it squeezes out the air and makes them dense. Let them rise naturally, and you’ll be rewarded with perfect fluffiness every time.
The Ideal Pancake Flip Timing
Timing the flip can be tricky, but once you get it right, it becomes second nature. Look for these signs before flipping:
- Bubbles form and pop on the surface.
- The edges appear set and slightly dry.
- The bottom side is golden brown.
Flip only once. Multiple flips can deflate the pancakes and make them tough. After flipping, cook for another minute or two just until golden and cooked through. You’ll know they’re ready when they bounce back slightly when pressed in the center.
Common Mistakes to Avoid
Even seasoned cooks can make a few pancake blunders. Here are some to watch out for:
- Using a pan that’s too hot – leads to burnt outsides and raw insides.
- Overmixing the batter – creates dense pancakes.
- Skipping the rest period – results in less fluffy texture.
- Pressing with a spatula – flattens your pancakes.
- Not measuring ingredients accurately – affects the consistency.
Keep these in mind, and your pancakes will turn out perfect every single time — soft on the inside, golden on the outside, and full of that classic homemade flavor.
Delicious Toppings and Variations
One of the best things about old-fashioned pancakes is how versatile they are. Whether you prefer the traditional butter-and-syrup combo or want to experiment with fun flavors, there are endless ways to dress them up. Here’s how you can elevate your pancakes and make them suit every mood or occasion.
Classic Toppings to Try
When it comes to pancakes, sometimes the simplest toppings are the most satisfying. Here are some timeless favorites that never disappoint:
- Maple Syrup – A drizzle of warm, pure maple syrup is the classic way to enjoy pancakes. It soaks into the fluffy layers, creating that perfect bite of sweetness and comfort.
- Butter – Add a small pat of butter on top of your stack and watch it melt down the sides — pure perfection.
- Fresh Fruits – Strawberries, bananas, and blueberries are great choices for adding freshness and a pop of color.
- Powdered Sugar – A light dusting gives your pancakes a pretty, café-style finish.
- Whipped Cream – For a decadent touch, top your pancakes with a swirl of whipped cream.
These simple toppings let the rich, buttery flavor of the pancakes shine through while adding subtle sweetness and texture.
Creative Pancake Variations
Feeling adventurous? Try giving your pancakes a creative twist with these variations:
- Blueberry Pancakes – Gently fold a handful of fresh or frozen blueberries into the batter for bursts of fruity flavor.
- Chocolate Chip Pancakes – Perfect for kids (and adults with a sweet tooth), sprinkle mini chocolate chips into the batter before cooking.
- Banana Walnut Pancakes – Add mashed bananas and chopped walnuts for a rich, nutty taste.
- Cinnamon Roll Pancakes – Swirl cinnamon sugar into the batter and top with cream cheese glaze for a bakery-style treat.
- Lemon Poppy Seed Pancakes – Add lemon zest and poppy seeds for a refreshing twist that’s light and zesty.
These variations keep breakfast exciting and allow you to customize your pancakes for different occasions or cravings.
Healthy Topping Ideas
For those looking to enjoy pancakes without guilt, you can keep things nutritious while still delicious. Try these healthy options:
- Greek Yogurt and Honey – Replace syrup with protein-packed Greek yogurt and a drizzle of honey.
- Nut Butter – Spread peanut butter, almond butter, or cashew butter on top for healthy fats and extra flavor.
- Fresh Berries and Nuts – A mix of raspberries, blueberries, and crushed almonds adds antioxidants and crunch.
- Chia Seed Jam – A homemade jam made from chia seeds and fresh fruit is a great low-sugar option.
- Coconut Cream and Toasted Coconut – A dairy-free alternative that adds a tropical flair.
Healthy doesn’t have to mean boring — these options give your pancakes a nutritious makeover while keeping every bite satisfying.
Storage and Reheating Tips
Sometimes, you make a batch of pancakes and have leftovers — lucky you! The good news is, old-fashioned pancakes store beautifully and reheat without losing their texture or flavor. Here’s how to keep them fresh and ready for another round.
How to Store Pancakes Properly
Let your pancakes cool completely before storing them. If you stack them while warm, condensation forms and makes them soggy. Once cool, you can store them in one of the following ways:
- Refrigerator – Place pancakes in an airtight container or resealable bag. They’ll stay fresh for up to 3 days.
- Freezer – For longer storage, place a piece of parchment paper between each pancake, stack them, and freeze in a freezer-safe bag. They’ll last for up to 2 months.
When freezing, squeeze out as much air as possible to prevent freezer burn. Label the bag with the date so you’ll know how long they’ve been stored.
The Best Ways to Reheat Pancakes
Reheating pancakes correctly ensures they taste just as good as when freshly made. Avoid the microwave when possible, as it can make them rubbery. Here are the best methods:
- Oven Method – Preheat your oven to 350°F (175°C). Place pancakes on a baking sheet in a single layer, cover with foil, and heat for about 10 minutes.
- Toaster Method – For a quick option, pop individual pancakes into the toaster for 1–2 minutes until warm and slightly crisp.
- Skillet Method – Heat a non-stick pan over medium-low heat and warm pancakes for about 1 minute per side.
If you’re reheating from frozen, add an extra minute or two to the time. Avoid reheating too long — overdoing it can dry them out.
For extra flavor, brush a tiny bit of butter on the pancakes before reheating. It refreshes the texture and gives them that just-cooked taste again.
Nutritional Information (Per Serving)
It’s always good to know what’s on your plate! Old-fashioned pancakes can be part of a balanced breakfast, especially when enjoyed in moderation. Here’s a general nutritional breakdown for two medium pancakes made with the classic recipe.
| Nutrient | Amount |
|---|---|
| Calories | ~200–250 kcal |
| Carbohydrates | 35g |
| Protein | 5g |
| Fat | 6g |
| Fiber | 1g |
| Sugar | 5g |
| Sodium | 250mg |
Keep in mind that these values can vary based on your ingredients. If you use whole wheat flour or reduce sugar, you can make your pancakes a bit healthier. For added protein, consider adding a scoop of protein powder or pairing them with Greek yogurt instead of syrup.
Remember — breakfast is about balance. Pair your pancakes with some fruit, eggs, or a smoothie for a complete, energizing meal.
Making Healthier Pancake Versions
If you want to indulge without guilt, there are simple tweaks you can make:
- Use Whole Wheat Flour – Adds fiber and nutrients.
- Replace Sugar with Honey or Maple Syrup – Natural sweeteners with more flavor.
- Substitute Butter with Coconut Oil – A lighter, dairy-free option.
- Add Oats – Gives texture and boosts fiber content.
- Use Egg Whites Instead of Whole Eggs – Reduces fat and cholesterol.
With these adjustments, you can enjoy pancakes that are both satisfying and nourishing — perfect for any day of the week.
FAQs about Old Fashioned Pancake Recipe
1. Can I make old-fashioned pancakes without eggs?
Yes! You can replace one egg with a flaxseed egg (1 tbsp flaxseed meal + 3 tbsp water). It gives similar binding power without changing the flavor.
2. What’s the best way to keep pancakes warm before serving?
Place cooked pancakes on a baking sheet in an oven set to 200°F (93°C). Keep them covered with foil to retain moisture.
3. Can I freeze old-fashioned pancakes?
Absolutely. Layer them with parchment paper, store in a freezer-safe bag, and freeze for up to 2 months. Reheat in the toaster or oven for a quick breakfast.
4. Why are my pancakes flat instead of fluffy?
Flat pancakes usually mean overmixed batter or old baking powder. Mix gently and always check that your leavening agent is fresh.
5. What’s the difference between old-fashioned and buttermilk pancakes?
Old-fashioned pancakes use regular milk and are lighter in flavor, while buttermilk pancakes have a tangy taste and slightly denser texture due to the acidity of the buttermilk.
Conclusion
There’s something magical about making old-fashioned pancakes from scratch. It’s not just about the taste — it’s about slowing down, creating memories, and enjoying the simple pleasures of life. These pancakes remind us of cozy mornings, laughter at the table, and the warmth of homemade comfort food.
Whether you serve them with classic maple syrup, fresh fruit, or a creative twist, these pancakes will never disappoint. The beauty of this recipe lies in its simplicity — easy ingredients, minimal prep time, and maximum satisfaction.
So next Sunday, grab your whisk, heat up that skillet, and make a batch of these golden, fluffy pancakes. They’ll fill your home with an aroma that feels like a hug and give you the perfect start to your day — just like Grandma used to make.