Oatmeal Muffin Recipe: Oatmeal muffins are one of those classic breakfast staples that combine comfort, convenience, and nutrition in every bite. Unlike store-bought muffins that are often loaded with refined sugar and artificial ingredients, homemade oatmeal muffins allow you to control what goes in—making them a smarter, healthier option. Oats are packed with fiber, particularly beta-glucan, which helps lower cholesterol and improve heart health. Plus, oats keep you full longer, making them a fantastic breakfast or snack choice if you’re looking to curb cravings throughout the day.
Another reason oatmeal muffins are considered a healthier treat is the opportunity to incorporate other nutrient-dense ingredients like fresh fruits, nuts, seeds, and even vegetables. Think of them as a blank canvas for creativity in the kitchen, with health benefits baked right in.
Whether you’re someone who loves meal prepping for the week or just want a quick grab-and-go breakfast for busy mornings, these muffins are a versatile option that checks all the right boxes.
Benefits of Baking Muffins at Home
Baking at home isn’t just therapeutic—it gives you total control over your ingredients and serving sizes. You can choose organic oats, reduce the sugar, or use natural sweeteners like honey or maple syrup. You can also avoid preservatives, which are common in commercial baked goods.
Not to mention, the smell of muffins baking in the oven? It’s the kind of warm, cozy aroma that turns any house into a home. And when they’re fresh out of the oven, fluffy and golden? That’s pure happiness in muffin form.
Plus, homemade muffins are budget-friendly. With pantry staples and a little time, you can whip up a batch that serves the whole family, costs less than a few bucks, and probably tastes ten times better than anything you’d grab on the go.
Ingredients You’ll Need
Basic Ingredients for Classic Oatmeal Muffins
Here’s what you’ll need to make a basic batch of oatmeal muffins. These ingredients are easy to find and might already be sitting in your pantry:
- Rolled oats – 1 cup (Old-fashioned oats work best for texture)
- Milk – 1 cup (any kind: dairy, almond, soy, oat, etc.)
- All-purpose flour – 1 cup (you can also use half whole wheat)
- Brown sugar – ½ cup (light or dark)
- Baking powder – 2 teaspoons
- Baking soda – ½ teaspoon
- Salt – ¼ teaspoon
- Egg – 1 large
- Vegetable oil or melted butter – ⅓ cup
- Vanilla extract – 1 teaspoon
This combo creates a moist, fluffy muffin with just the right touch of sweetness and a hearty oat base that gives each bite some chew.
Optional Add-ins to Customize Your Muffins
Want to jazz things up? These mix-ins and toppings take your oatmeal muffins from basic to bakery-worthy:
- Chopped nuts – walnuts, pecans, or almonds (¼ cup)
- Fresh or dried fruit – blueberries, raisins, chopped apples, or cranberries (½ cup)
- Chocolate chips – dark, milk, or white chocolate (¼ to ½ cup)
- Spices – cinnamon, nutmeg, or pumpkin spice (½ to 1 teaspoon)
- Seeds – flax, chia, or sunflower seeds (2 tablespoons)
- Shredded coconut or carrots – for added texture and nutrition
Mix and match your favorites, but don’t overload the batter—stick to about ¾ cup of total mix-ins for best results.
Substitutions for Dietary Needs
No eggs? Dairy-free? Gluten-sensitive? No problem—oatmeal muffins are super adaptable. Try these substitutions:
- Egg replacement – Use 1 flax egg (1 tablespoon ground flaxseed + 3 tablespoons water) for a vegan version.
- Dairy-free milk – Almond, soy, oat, or coconut milk works well in place of regular milk.
- Gluten-free – Use a certified gluten-free oat and substitute all-purpose flour with a gluten-free blend (like Bob’s Red Mill 1:1 Baking Flour).
- Sugar alternatives – Swap brown sugar with coconut sugar, honey, maple syrup, or a sugar-free sweetener like erythritol.
Equipment and Tools You’ll Need
Must-Have Baking Tools
Before you get started, make sure you’ve got the following essentials:
- Mixing bowls – One for wet ingredients and one for dry
- Measuring cups and spoons – Accuracy is key to perfect muffins
- Muffin tin – Standard 12-cup muffin pan
- Paper liners or non-stick spray – To prevent sticking
- Whisk and spatula – For combining ingredients smoothly
- Scoop or spoon – To evenly fill each muffin cup
- Oven – Preheated to the right temperature (usually 375°F or 190°C)
Having the right tools can make the baking process smoother, cleaner, and a whole lot more enjoyable.
Nice-to-Have Tools for Easier Prep
While not necessary, these extras can make the process even better:
- Cooling rack – Helps muffins cool evenly
- Stand mixer or hand mixer – Speeds up mixing (especially useful for large batches)
- Food scale – For those who want precise measurements
- Toothpick – To test muffin doneness
A well-equipped kitchen makes baking less of a chore and more of a fun, creative session.
Preparation Tips Before You Start
How to Properly Measure Ingredients
Baking is a science. If you eyeball your flour or guess your sugar, you could end up with dry, dense muffins. Here’s how to measure like a pro:
- Flour – Spoon it into your measuring cup and level it with a knife (don’t scoop directly from the bag—it packs too tightly).
- Brown sugar – Pack it down firmly into the cup.
- Liquid ingredients – Use a clear liquid measuring cup and check at eye level.
- Baking powder/soda and salt – Level with a knife, don’t heap.
Proper measurement ensures consistent texture, rise, and flavor every time you bake.
Prepping Your Oven and Muffin Tin
Before mixing your ingredients, take these important steps:
- Preheat your oven – This ensures your muffins start baking immediately and rise properly.
- Grease or line your muffin tin – Use paper liners or lightly oil the cups. Even non-stick pans benefit from this step.
- Soak your oats – If the recipe calls for it, soak oats in milk for about 10-15 minutes. This helps soften them and creates a moist muffin.
Taking time to prep saves you from scrambling mid-recipe—and can prevent baking disasters like stuck muffins or uneven bakes.
Step-by-Step Guide to Making Oatmeal Muffins
Step 1 – Gather and Prep Ingredients
Organization is the secret to stress-free baking. Measure out everything before you start. Lay it all out on your counter and double-check your list. Missing one key ingredient mid-recipe can throw off your whole batch.
Step 2 – Soak the Oats
This step might seem simple, but it makes a huge difference in texture and flavor. Oats can be chewy and dry if not properly softened before baking. That’s why soaking them in milk (or your milk alternative) is a game changer. This not only softens the oats but also enhances their natural nutty flavor and ensures they distribute evenly in the batter without clumping.
To do this, combine the oats and milk in a bowl and let them sit for at least 10–15 minutes. If you have extra time, even better—soaking for up to 30 minutes can make the muffins even more moist. Use this time to preheat your oven to 375°F (190°C), line or grease your muffin tin, and get your mixing bowls ready.
Some recipes skip this step, but trust us—once you taste the difference, you’ll always take a few extra minutes to soak those oats.
Step 3 – Mix Wet and Dry Ingredients Separately
The golden rule of muffin baking? Don’t dump everything in at once. Mixing dry and wet ingredients separately ensures even distribution and avoids overmixing—a surefire way to tough muffins.
In one bowl, whisk together the flour, baking powder, baking soda, salt, and any spices you’re using like cinnamon or nutmeg. Stir in any dry mix-ins (nuts, seeds, or dried fruit) at this stage too. Coating them in flour helps prevent them from sinking to the bottom during baking.
In a second bowl, beat the egg, then add the soaked oats and milk, sugar, oil or melted butter, and vanilla extract. Stir gently until well combined.
Separating the ingredients this way also prevents lumps and gives you better control over the final batter texture.
Step 4 – Combine Everything Gently
Now comes the magic—bringing it all together. Slowly pour the wet mixture into the dry ingredients. Use a spatula or wooden spoon to gently fold everything together. This isn’t a time for vigorous stirring. Overmixing activates the gluten in the flour, leading to tough, dense muffins.
Here’s what you’re looking for: a slightly lumpy batter with no streaks of flour. A few small lumps are okay! The batter should be thick but scoopable, not runny.
At this stage, you can fold in any delicate ingredients like fresh berries or chocolate chips. Just a few gentle turns will do. Overworking the batter can break the fruit or make the muffins gummy.
Take your time. Gentle folding and patience result in light, fluffy muffins with just the right crumb.
Step 5 – Fill the Muffin Tin and Bake
This is the home stretch—and it’s where you set yourself up for bakery-style perfection. Use an ice cream scoop or spoon to evenly divide the batter among the muffin cups, filling each about ¾ full. If you overfill, the muffins may overflow or bake unevenly.
Want that beautiful muffin top? Try this little trick: fill every other cup in the muffin tin (leave the rest empty). This allows better air circulation and helps the muffins rise higher.
You can also sprinkle a bit of raw sugar, oats, or crushed nuts on top for extra texture and visual appeal.
Place the muffin tin in your preheated oven and bake for 18–22 minutes. Oven times vary, so keep an eye on them. A toothpick inserted in the center should come out clean or with a few moist crumbs when they’re done.
Once baked, let them cool in the pan for about 5 minutes before transferring to a wire rack. Cooling prevents soggy bottoms and helps set the structure of the muffins.
Common Mistakes to Avoid
Overmixing the Batter
The number one muffin killer? Overmixing. It’s easy to do, especially when you’re eager to get a smooth, uniform batter. But here’s the truth: muffins are supposed to have a bit of lumpiness. Mixing too much causes the flour’s gluten to develop, leading to dense, chewy muffins instead of light, tender ones.
When combining your wet and dry ingredients, aim for about 12–15 gentle folds. Stop mixing as soon as you no longer see dry flour. It’s okay if it looks a little rustic—your muffins will thank you.
Incorrect Oven Temperature
Too hot, and your muffins rise too fast and then collapse. Too low, and they dry out before they’re fully cooked. A consistent 375°F (190°C) is the sweet spot for oatmeal muffins. It allows a nice dome to form while cooking the interior to moist perfection.
Avoid opening the oven door repeatedly—this drops the temperature and can ruin the rise. If your muffins are browning too quickly, tent them with foil for the last few minutes.
For even better results, invest in an oven thermometer. Many home ovens run hotter or cooler than the dial suggests. Accuracy is key in baking.
Storing and Reheating Muffins
Best Ways to Store Muffins
Freshly baked muffins can last up to 3 days at room temperature—but only if stored correctly. Keep them in an airtight container with a paper towel beneath and on top to absorb moisture. This helps prevent sogginess and maintains a soft texture.
For longer storage:
- Refrigerate: Keeps muffins fresh for up to 5 days. Just know that refrigeration can slightly dry them out.
- Freeze: The best long-term option. Wrap each muffin individually in plastic wrap or foil, then store in a zip-top bag or airtight container. They’ll last up to 3 months in the freezer.
Label the bag with the date to keep track of freshness. Frozen muffins make excellent last-minute breakfasts—just pop one in the microwave or toaster oven.
Reheating Tips for Fresh Taste
No one likes a cold muffin (unless it’s summer and you’re dunking it in iced coffee). To revive that just-baked magic:
- Microwave: Wrap in a damp paper towel and heat for 20–30 seconds.
- Oven: Reheat at 300°F (150°C) for about 10 minutes.
- Toaster oven: Great for getting the edges a little crisp.
Avoid overheating—too much heat will dry them out. A gentle warm-up brings back the soft center and makes your kitchen smell amazing all over again.
Variations and Flavor Twists
Banana Oatmeal Muffins
Got overripe bananas lying around? Don’t toss them—turn them into banana oatmeal muffins. Bananas not only add natural sweetness but also create an ultra-moist texture that’s hard to beat. For this variation, swap out half of the sugar for mashed bananas (about 1 cup mashed, or 2–3 medium bananas). You can even reduce the oil a bit since bananas add richness.
To enhance the flavor, add:
- ½ tsp cinnamon
- ¼ tsp nutmeg
- A handful of chopped walnuts or pecans
These muffins are perfect for breakfast and make great lunchbox treats. The banana flavor intensifies the next day, so they’re also a great make-ahead option.
Apple Cinnamon Oatmeal Muffins
When fall rolls around, nothing beats the combo of apples and cinnamon. These muffins taste like apple pie in handheld form. Use about 1 cup of finely chopped fresh apple (peeled or unpeeled), and fold it in just before baking.
For spice, use:
- 1 tsp ground cinnamon
- ¼ tsp ground ginger or allspice (optional)
You can also top each muffin with a cinnamon-oat streusel or a sprinkle of brown sugar for extra crunch and sweetness. They’re fantastic warm with a pat of butter and a mug of hot tea.
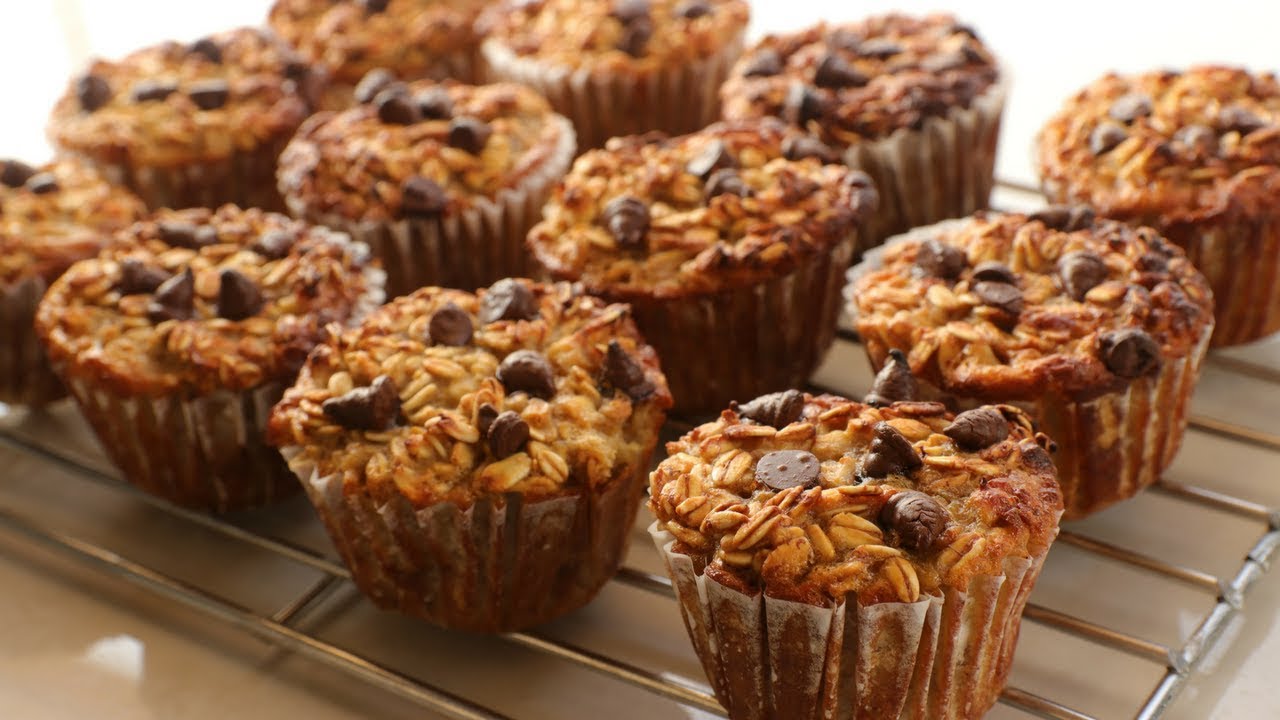
Chocolate Chip Oatmeal Muffins
Want to win over kids (and adults)? Add chocolate chips. Semi-sweet, milk, dark, or even white chocolate chips all work well here. Use about ½ cup to ¾ cup depending on how chocolaty you want it. To prevent chips from sinking, toss them in a little flour before adding to the batter.
Amp it up with a pinch of cinnamon or espresso powder to bring out the chocolate flavor. You can also mix chocolate chips with banana or peanut butter for an indulgent twist.
These are dessert-level delicious while still offering the wholesome base of oats—so don’t feel too guilty.
Making Oatmeal Muffins for Special Diets
Gluten-Free Option
For gluten-free eaters, oatmeal muffins are an easy treat to make safe. Just follow these tips:
- Use certified gluten-free oats. Regular oats are often processed in facilities that handle wheat.
- Swap flour with a gluten-free 1:1 baking blend. Choose one with xanthan gum for structure.
- Avoid wheat-based mix-ins. Skip granola or cookie crumbles unless they’re gluten-free.
The texture will be slightly different—maybe a bit more tender—but still delicious. A touch of apple cider vinegar or lemon juice helps mimic the fluffiness of traditional muffins when baking without gluten.
Vegan Adaptations
Want to make your muffins entirely plant-based? Easy peasy. Here’s how:
- Replace the egg with a flax egg: 1 tbsp ground flaxseed + 3 tbsp water (let sit 5 minutes).
- Use plant-based milk: Almond, soy, or oat milk are all great options.
- Substitute butter with oil or vegan butter: Coconut oil also works, but will add a subtle flavor.
- Sweeten naturally: Maple syrup or agave are vegan-friendly options that also add moisture.
These vegan oatmeal muffins turn out just as moist and flavorful as the classic ones—perfect for sharing with everyone, regardless of dietary preferences.
Nutritional Breakdown of Oatmeal Muffins
Estimated Calories and Macros
Curious about what’s in one of these delicious muffins? Here’s a rough estimate for a basic oatmeal muffin (without mix-ins), based on standard ingredients:
- Calories: 180–220 kcal
- Protein: 4–6 grams
- Fat: 7–10 grams
- Carbohydrates: 28–32 grams
- Fiber: 2–3 grams
- Sugar: 10–14 grams
Adding fruit, nuts, or chocolate will increase the calories, fats, and sugars slightly. If you’re looking to reduce sugar or carbs, use a sugar substitute and add extra fiber via flaxseed or chia.
How They Fit Into a Balanced Diet
Oatmeal muffins can easily be part of a healthy diet, especially when you control the ingredients. They’re rich in complex carbs for sustained energy, and oats offer heart-healthy fiber. Add-ins like fruit and nuts boost vitamins, antioxidants, and healthy fats.
Here’s how to make them work for your lifestyle:
- Pair with Greek yogurt for extra protein at breakfast.
- Grab one as a pre-workout snack for energy without a sugar crash.
- Enjoy with a smoothie for a complete, on-the-go meal.
Compared to store-bought options, homemade oatmeal muffins are cleaner, fresher, and way better for your long-term health goals.
Pairing Ideas: What Goes Well With Oatmeal Muffins
Breakfast Combos
If muffins alone don’t keep you full, pair them with one of these breakfast ideas:
- Scrambled eggs and avocado toast – Adds protein and healthy fats
- Yogurt parfait – Layer with fruit and granola for extra crunch
- Smoothie bowl – A cool, creamy side that balances the muffin’s warmth
- Fruit salad – Light, refreshing, and full of fiber
These combos turn your muffin into a balanced breakfast that covers all the food groups. They’re great for meal prep too—just make a batch of muffins and rotate the sides throughout the week.
Beverages That Complement the Flavor
Let’s be honest—nothing beats a warm muffin and a hot drink. Here are some beverage pairings that take the experience to the next level:
- Coffee – Go bold with dark roast for banana or chocolate muffins
- Tea – Chai and cinnamon muffins are a match made in heaven
- Milk or plant-based milk – Always a classic combo
- Fresh juice – Orange or apple juice works great with fruity muffins
If you’re making muffins for brunch, serve with a latte, mimosa, or even a spiced cider in colder months for a cozy seasonal vibe.
Baking Tips from the Pros
How to Get a Perfect Muffin Top
Want that iconic dome-shaped muffin top? Here’s the trick:
- Fill the muffin cups ¾ full. Too little batter means flat muffins.
- Start hot, then reduce. Begin baking at 425°F (218°C) for 5 minutes, then reduce to 375°F (190°C) for the remainder. The initial heat gives a strong rise.
- Don’t overmix. It can stop your muffins from rising properly.
- Let the batter rest. If you have time, let your mixed batter rest for 10–15 minutes before baking to improve rise.
These techniques give you tall, bakery-style muffins every time. No more flat tops!
Keeping Muffins Moist and Fluffy
Dry muffins? No thanks. To ensure moist, fluffy muffins every time:
- Use oil instead of butter. It retains moisture better.
- Add a bit of yogurt or sour cream. Even ¼ cup can make a difference.
- Don’t overbake. Start checking for doneness at the minimum bake time.
- Store properly. Airtight containers and a paper towel layer help preserve freshness.
Moisture is everything in muffins, and these tips will keep yours soft for days.
FAQs about Oatmeal Muffin Recipe
1. Can I use quick oats instead of rolled oats?
Yes, you can use quick oats in a pinch, but rolled oats are recommended for the best texture. Quick oats absorb liquid faster and may make the muffins softer and less chewy. If you do use quick oats, reduce the soaking time to 5–10 minutes and adjust the liquid slightly if the batter seems too thick.
2. How do I prevent my muffins from sticking to the liners?
To keep muffins from sticking, use high-quality parchment paper liners or lightly spray the liners with non-stick cooking spray. Let the muffins cool completely before trying to remove the paper—steam causes sticking when muffins are too warm. You can also skip the liners altogether and grease the pan well.
3. Why did my muffins come out dry or dense?
Dry or dense muffins usually happen because of overmixing, overbaking, or too much flour. Make sure to spoon and level your flour when measuring, mix just until combined, and check for doneness a couple of minutes before the timer goes off. Using oil or a mix of yogurt and milk also helps keep muffins moist.
4. Can I make the batter ahead of time and bake later?
Yes, but with caution. You can mix the wet and dry ingredients separately and store them in the fridge overnight. Combine and bake the next morning. Fully mixed batter can be stored for a few hours, but leavening agents may lose strength over time, leading to less rise. For best results, bake right after mixing.
5. How can I make mini oatmeal muffins instead of regular-sized ones?
Just use a mini muffin tin! Fill each cup about ¾ full and reduce the baking time to 10–14 minutes. Keep an eye on them, as mini muffins bake quickly. They’re perfect for kids, portion control, or party snacks.
Conclusion
Oatmeal muffins are the ultimate comfort food that blends healthy ingredients with satisfying flavor and texture. Whether you’re craving a hearty breakfast, a wholesome snack, or a tasty treat with a cup of tea, these muffins deliver on all fronts. The beauty of this recipe lies in its simplicity and flexibility—you can tailor it to your taste, diet, or pantry ingredients without compromising on deliciousness.
From the moment you soak your oats to the aroma that fills your kitchen as they bake, these muffins promise more than just nourishment—they bring joy. And with endless variations like banana, chocolate chip, or apple cinnamon, there’s always a new version to try.
So grab your mixing bowls, preheat that oven, and enjoy the process. Whether you’re baking for yourself, your family, or a weekend brunch, this step-by-step oatmeal muffin recipe is all you need to bake like a pro and feel like a rockstar in the kitchen.