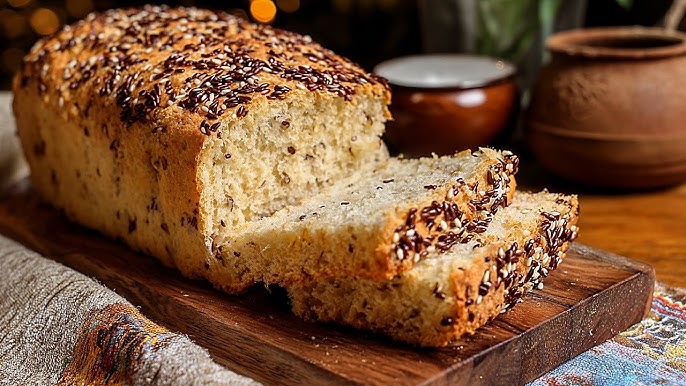
Oatmeal Bread Recipe: Oatmeal bread is not just your average homemade loaf—it’s the warm, cozy hug of the baking world. It has a beautiful balance of softness and heartiness, making it ideal for everything from morning toast to sandwich perfection. What sets oatmeal bread apart from plain white or whole wheat varieties is its distinct texture and slightly nutty flavor, thanks to the oats. The oats give the loaf a rich chewiness and a wholesome character that makes you feel like you’re doing something good for your body with every bite.
Plus, oatmeal bread is super versatile. Want it savory? Add herbs or a sprinkle of sea salt. Craving something sweet? Stir in honey or molasses. Whether you’re a seasoned baker or a complete beginner, this bread welcomes you with open arms. And the best part? Your kitchen will smell like a rustic bakery.
Homemade oatmeal bread has that farmhouse charm, with each slice offering a tender crumb and a slightly crisp crust. It’s a feel-good, bake-it-on-a-Sunday kind of recipe that fits perfectly into any lifestyle.
Benefits of Making Homemade Bread
Why go through the trouble of baking your own oatmeal bread when store shelves are loaded with ready-made options? Simple. Homemade is always better. When you bake at home, you control every ingredient that goes into your loaf. No preservatives. No weird additives. Just wholesome, real food.
Another major bonus? Cost savings. A few cups of flour, some oats, yeast, and water—those basic ingredients can make an entire loaf that rivals any artisan bakery product. And let’s not forget the satisfaction. There’s nothing quite like slicing into a fresh, warm loaf that you made from scratch. It’s the kind of little win we all need more of.
From a health standpoint, homemade oatmeal bread is also a great source of dietary fiber, thanks to the oats. This can help keep your digestion in check and your energy levels steady. So whether you’re baking for your family, your friends, or just yourself, oatmeal bread is a soul-warming staple worth mastering.
List of Ingredients You’ll Need
Core Ingredients for Oatmeal Bread
Let’s get down to business. Here’s what you’ll need to make a classic, hearty oatmeal bread:
- Rolled oats (1 cup): These are the star of the show. Rolled oats offer the best texture for bread. Avoid quick oats or steel-cut for this recipe.
- Boiling water (1 1/4 cups): Used to soften the oats before mixing.
- Warm water (1/2 cup): Helps activate the yeast.
- Active dry yeast (2 1/4 teaspoons or 1 packet): The powerhouse behind that beautiful rise.
- Honey or molasses (1/4 cup): Adds a touch of sweetness and depth. Molasses gives a darker, richer flavor.
- Butter (2 tablespoons, softened): Enhances the bread’s richness and gives it a tender crumb.
- Salt (1 1/2 teaspoons): Balances the flavors and strengthens the dough.
- All-purpose flour (2 1/2 to 3 cups): Provides the structure. You can also use a mix of whole wheat and white flour for a more rustic feel.
These ingredients come together in perfect harmony to create a loaf that’s both flavorful and functional—perfect for sandwiches, toast, or just tearing apart with your hands and enjoying warm.
Optional Add-ins for Extra Flavor
If you’re feeling adventurous or want to customize your bread, here are a few optional mix-ins that work beautifully with the oatmeal base:
- Chopped nuts (walnuts or pecans): For added crunch.
- Dried fruits (raisins, cranberries, or chopped dates): For a slightly sweet twist.
- Seeds (sunflower, flax, or chia): For extra fiber and nutrients.
- Spices (cinnamon, nutmeg): Add warmth and complexity to the flavor.
- Cheese (sharp cheddar or feta): If you want a savory spin.
You don’t need to go overboard—just one or two of these can transform your bread into something completely unique. The key is to mix them in evenly so the flavors are well-distributed throughout the loaf.
Kitchen Tools You’ll Need
Essential Tools for Bread-Making
Baking bread doesn’t require a kitchen full of gadgets, but there are a few must-haves to make the process smoother:
- Large mixing bowl: For combining your dough ingredients.
- Measuring cups and spoons: Precision matters in baking.
- Wooden spoon or dough whisk: Ideal for mixing the dough initially.
- Stand mixer with dough hook (optional): Makes kneading effortless, but you can do it by hand just as well.
- Loaf pan (9×5 inches): Shapes the bread and ensures even baking.
- Clean kitchen towel or plastic wrap: Covers the dough while it rises.
- Cooling rack: Allows air to circulate around the bread once it’s baked, preventing soggy bottoms.
Substitutes for Common Kitchen Tools
Missing a tool? Don’t worry. Bread-making is flexible:
- No stand mixer? Use your hands. It’s more work but oddly satisfying.
- No loaf pan? Shape the dough into a rustic round loaf and bake it on a parchment-lined baking sheet.
- No cooling rack? Just tilt the bread slightly on its side on a cutting board to let the steam escape.
The point is—you don’t need a fancy kitchen to make great bread. Just some basic tools and a bit of patience.
Preparing Your Ingredients
Measuring Techniques for Accuracy
Baking is more science than art—especially when it comes to bread. Accurate measurements can mean the difference between a beautifully risen loaf and a dense brick. Here’s how to measure like a pro:
- Flour: Spoon the flour into the measuring cup and level it off with a knife. Don’t scoop directly from the bag—it compacts the flour and gives you too much.
- Oats: Measure as you would flour. Lightly fill the cup and level it.
- Liquids: Use a liquid measuring cup. Set it on a flat surface and get eye-level to check accuracy.
- Yeast: If you’re not using pre-packaged yeast, use a digital scale for precision. 1 packet equals about 2 1/4 teaspoons.
Using these techniques helps maintain consistency every time you bake. You’ll get to know your ingredients better, and soon enough, you’ll be able to eyeball it like a seasoned baker.
Why Ingredient Temperature Matters
Temperature can make or break your bread dough. If your liquid is too hot, it can kill the yeast. Too cold, and the yeast won’t activate. The ideal temperature for warm water is between 100°F and 110°F (37°C to 43°C)—just warm to the touch.
Let your ingredients sit at room temperature for at least 30 minutes before you begin. Cold butter or eggs (if you use them) can slow down the fermentation process.
It might sound nitpicky, but getting this part right is one of the secrets to baking like a pro.
Step-by-Step Guide to Making Oatmeal Bread
Step 1: Preparing the Oat Mixture
Start by combining rolled oats, boiling water, butter (or oil), and a bit of honey or brown sugar in a large mixing bowl. Stir until the butter melts completely, and the mixture looks creamy and slightly thick. Let it sit for about 10–15 minutes to cool down to a warm (not hot) temperature — you don’t want to kill your yeast later.
This step softens the oats, giving the bread its signature tenderness and subtle nutty flavor.
Step 2: Mixing the Dough
Once the oat mixture is warm (not hot to touch), add your active dry yeast and let it sit for about 5 minutes until foamy — that’s how you know your yeast is alive and ready to rise.
Next, stir in whole wheat flour, all-purpose flour, and salt. Mix until a soft dough forms. You can knead by hand for 8–10 minutes or with a stand mixer fitted with a dough hook for about 6 minutes. The dough should feel soft, elastic, and slightly tacky (not sticky).
Step 3: First Rise – Letting the Dough Double
Place the dough in a lightly greased bowl, turning it once to coat all sides with oil. Cover the bowl with a clean kitchen towel or plastic wrap and let it rise in a warm, draft-free spot for about 1 to 1½ hours, or until it doubles in size.
This first rise develops flavor and gives your oatmeal bread that beautiful, airy texture. You’ll know it’s ready when a gentle poke in the dough leaves a slight dent that doesn’t spring back immediately.
Step 4: Shaping the Dough and Second Rise
Once the dough has doubled, punch it down gently to release excess air. Turn it out onto a floured surface and shape it into a loaf — roll it up tightly like a jelly roll and pinch the seams closed.
Place the shaped loaf into a greased 9×5-inch loaf pan. Cover it again and let it rise for another 30–45 minutes, or until the dough crowns about an inch above the pan rim. This second rise helps build structure and volume.
Step 5: Baking the Bread to Perfection
Preheat your oven to 350°F (175°C). Bake the loaf for 35–40 minutes, or until the top is golden brown and the bread sounds hollow when tapped on the bottom. If it’s browning too quickly, tent it loosely with foil halfway through baking.
Remove from the oven and brush the warm top with a little melted butter — this adds shine and keeps the crust soft. Let the bread cool in the pan for 10 minutes, then transfer to a wire rack to cool completely before slicing.
Enjoy your freshly baked oatmeal bread with a smear of butter, jam, or even a drizzle of honey — soft, wholesome, and perfect for breakfast or sandwiches!
Pro Tips for Perfect Oatmeal Bread Every Time
Avoiding Dense or Dry Bread
One of the most common issues in homemade bread is density. If your oatmeal bread turns out heavy or dry, don’t panic—it’s fixable next time around. Here’s what might have gone wrong and how to fix it:
- Too much flour: It’s tempting to add extra flour when the dough is sticky, but too much can create a dry, heavy loaf. Stick with minimal additions and try kneading longer before adding more.
- Under-kneading: Insufficient kneading doesn’t develop the gluten properly. This leads to a crumbly or flat texture. Aim for at least 8–10 minutes of kneading.
- Yeast problems: Old or dead yeast won’t rise well. Always check the expiration date and ensure it’s stored in a cool, dry place.
- Over-proofing: Letting the dough rise too long can cause it to collapse. Watch the rise closely—when it’s doubled and springs back slowly when pressed, it’s ready.
- Not enough hydration: If the dough is too dry, the crumb will be tight and stiff. The oats absorb a lot of moisture, so follow the liquid measurements closely.
Perfecting oatmeal bread is about learning how your dough behaves—every kitchen is a bit different due to temperature and humidity. Keep a baking journal, adjust as you go, and soon you’ll have a foolproof formula that works like magic every time.
Storing and Freezing Oatmeal Bread
Keeping Bread Fresh on the Counter
So, you’ve baked the perfect loaf of oatmeal bread. Now the big question—how do you keep it fresh? Homemade bread doesn’t contain preservatives like store-bought versions, so it requires proper storage to stay soft and tasty.
First off, let the bread cool completely before wrapping it up. Wrapping it while warm traps steam and makes the crust soggy. Once cool, store your loaf in one of the following ways:
- Wrap it in plastic wrap or aluminum foil to seal in moisture.
- Place it in a bread box to maintain airflow while preventing it from drying out.
- Avoid storing it in the fridge, which can actually make bread go stale faster due to moisture loss.
If stored properly on the counter, oatmeal bread will stay fresh for about 3 to 4 days. You can always toast a slice if it starts to dry out!
Freezing for Long-Term Storage
Want to keep your bread longer? Freezing is your best bet. Oatmeal bread freezes wonderfully if done right:
- Once the loaf is completely cool, slice it if you plan to use it gradually. This way, you can grab one or two slices at a time.
- Wrap the whole loaf or individual slices tightly in plastic wrap, then place them in a zip-top freezer bag.
- Label it with the date—it will stay good for up to 3 months in the freezer.
To thaw, let slices sit at room temperature for 15–30 minutes or pop them straight into the toaster. For a full loaf, let it defrost in the fridge overnight, then bring to room temperature on the counter. You can also warm it in a 300°F oven for 10 minutes to revive that just-baked magic.
Creative Ways to Enjoy Oatmeal Bread
Breakfast Ideas
Oatmeal bread is a breakfast all-star. It’s slightly sweet, incredibly soft, and toasts beautifully. Here are a few tasty ideas to kickstart your day:
- Toasted with butter and honey – Classic, simple, and soul-satisfying.
- French toast – Use thick slices dipped in egg mixture for a hearty breakfast.
- Avocado toast – The chewiness of oatmeal bread is the perfect base for creamy avocados.
- Nut butter and banana – Slather on some almond or peanut butter, top with banana slices and a sprinkle of cinnamon.
Because of the bread’s slight nutty undertone, it pairs exceptionally well with both sweet and savory toppings. Bonus: oats are slow-digesting carbs, meaning oatmeal bread will keep you full longer than regular white bread.
Savory Sandwich Suggestions
Oatmeal bread’s sturdy texture and subtle flavor make it a dream for sandwiches. Here are some lunch or dinner ideas to try:
- Grilled cheese and tomato soup – Crispy on the outside, gooey on the inside. A comfort food classic.
- Turkey and cranberry – Perfect for fall, with creamy mayo and crisp lettuce.
- Egg salad or tuna salad – Oatmeal bread holds up beautifully under moist, rich fillings.
- BLT – Bacon, lettuce, and tomato on toasted oatmeal bread is next-level good.
Whether you’re building a gourmet sandwich or just slapping on some leftovers, this bread elevates anything you put between two slices.
Common Mistakes and How to Avoid Them
Over-Kneading or Under-Kneading
Kneading is key. It’s what develops the gluten network that gives bread its structure. But too much or too little kneading can spell disaster:
- Under-kneading results in dough that tears easily and doesn’t rise well. It creates dense, flat bread with poor texture.
- Over-kneading (usually in stand mixers) can make dough stiff and difficult to shape, resulting in a tough loaf.
How do you know it’s just right? Use the “windowpane test”: Stretch a small piece of dough—if it forms a thin, translucent sheet without tearing, it’s kneaded enough.
Misjudging Proofing Time
Proofing isn’t about exact timing—it’s about watching the dough. That’s where many bakers trip up. If you let it rise too long (over-proofing), the gluten weakens, and the dough collapses. Under-proofing means the bread hasn’t developed enough air pockets to rise properly in the oven.
Use the poke test to judge readiness: Gently press the dough with your finger.
- If the dent springs back quickly: Not ready.
- If it doesn’t spring back at all: Over-proofed.
- If it springs back slowly and leaves a slight dent: Perfect.
Trust your dough more than your clock.
Nutritional Information
Calories and Macros per Slice
Here’s a general estimate for a standard slice of homemade oatmeal bread (based on a loaf cut into 12 slices):
| Nutrient | Amount (Per Slice) |
|---|---|
| Calories | ~150–180 kcal |
| Carbohydrates | ~28–30g |
| Protein | ~4–6g |
| Fat | ~3–4g |
| Fiber | ~2–3g |
| Sugar | ~4–6g (if using honey) |
The actual values may vary based on the ingredients you use (e.g., type of flour, honey vs. molasses, butter amount).
Health Benefits of Oats in Bread
Oats aren’t just a filler—they’re a nutritional powerhouse. Here’s what they bring to your bread:
- Fiber-rich: Helps with digestion, keeps you full longer.
- Heart-friendly: Oats contain beta-glucan, a soluble fiber known to lower cholesterol.
- Blood sugar control: Slows down digestion, preventing spikes in blood sugar.
- Nutrient-dense: Rich in manganese, phosphorus, magnesium, and antioxidants.
Adding oats to bread enhances not just the texture but also the nutritional profile. So yes, your morning toast can actually be good for you!
Variations of Oatmeal Bread
Gluten-Free Oatmeal Bread
Living gluten-free doesn’t mean you have to give up hearty, homemade bread. You can still enjoy oatmeal bread with a few smart swaps.
- Use certified gluten-free oats – Regular oats may be cross-contaminated with wheat.
- Swap the all-purpose flour for a gluten-free flour blend that contains xanthan gum or guar gum for structure.
- Consider adding extra moisture (like an extra tablespoon of oil or milk) to avoid dryness.
Because gluten-free doughs don’t behave the same as traditional ones, the texture will be different—softer and denser—but still delicious. Also, you may not need to knead it much, as there’s no gluten to develop.
Bake in a pan for support, and you’ll be rewarded with a lovely loaf that’s perfect for toast or sandwiches.
Sweet Honey Oat Bread
Want something a little more dessert-like? Sweet honey oat bread is the cozy cousin of classic oatmeal bread. Here’s how to tweak your recipe:
- Increase the honey to 1/3 or even 1/2 cup.
- Add a dash of cinnamon and a splash of vanilla extract to the dough.
- Stir in raisins, chopped dates, or even a handful of chocolate chips for extra indulgence.
Top with a drizzle of honey or a light glaze after baking for that bakery finish. Serve this version warm with butter or cream cheese—perfect for breakfast or afternoon tea.
Serving Suggestions and Pairings
What to Serve with Oatmeal Bread
Oatmeal bread is endlessly versatile. Here are some delicious pairings to take it to the next level:
- Soups: Tomato basil, lentil, or creamy chicken soup. Oatmeal bread is perfect for dipping.
- Salads: Serve thick toasted slices alongside Caesar, Greek, or garden salads for a satisfying crunch.
- Charcuterie boards: Add sliced oatmeal bread as part of your cheese and meat platter.
- Egg dishes: Scrambled eggs, omelets, or poached eggs sit beautifully atop toasted oatmeal bread.
The bread’s mild flavor makes it a chameleon—it complements bold, spicy, savory, or sweet dishes alike.
Perfect Drinks to Pair With
Here are a few beverage ideas to complete your oatmeal bread experience:
- Coffee: Especially with sweet or cinnamon-spiced variations.
- Herbal teas: Chamomile, peppermint, or rooibos pair well with a warm slice and honey.
- Milk or oat milk: A kid-friendly and cozy pairing for any time of day.
- Red wine: If you’re enjoying it with a savory spread or cheese.
These drink options elevate your meal and turn a simple slice into something memorable.
Why Homemade is Better than Store-Bought
Control Over Ingredients
When you bake your own oatmeal bread, you’re in the driver’s seat. You decide:
- How much sugar goes in.
- Whether to use organic or locally sourced ingredients.
- Whether to add nuts, seeds, or keep it simple.
You skip preservatives, artificial flavors, and other hard-to-pronounce ingredients that often come with store-bought loaves. This makes homemade bread not only tastier but also healthier and cleaner.
Flavor and Texture Differences
Let’s be real: store-bought bread often tastes bland and feels spongy. Homemade oatmeal bread, on the other hand, has:
- A tender yet hearty texture.
- A rich, nutty aroma from the oats.
- Crusty edges with a soft, flavorful interior.
It’s the kind of bread that makes you go back for seconds. Once you’ve had fresh homemade oatmeal bread, there’s no turning back.
Troubleshooting Bread Baking Issues
Dough Not Rising?
Here are the most common culprits:
- Dead yeast: Always proof your yeast if you’re unsure of its freshness.
- Water too hot: Kills the yeast. Keep it under 110°F.
- Too cold: Slows the yeast activity. Find a warm spot for rising.
- Not enough time: Be patient. Give it time to work its magic.
Fix it by restarting the yeast step if needed or letting the dough rise a bit longer.
Crust Too Hard or Too Soft?
Want the perfect crust? Here’s what could be going wrong:
- Hard crust: Overbaking or oven too hot. Cover with foil toward the end of baking.
- Soft crust: Steam or moisture trapped while cooling. Let it cool on a wire rack, uncovered.
- Rubbery crust: Wrapped while still warm. Always let it cool fully before storing.
Pro tip: For a crispier crust, place a pan of hot water in the oven while baking to create steam.
FAQs about Oatmeal Bread Recipe
Can I use quick oats instead of rolled oats?
Quick oats can be used in a pinch, but rolled oats are preferred for better texture and structure in the bread. Quick oats break down more and may result in a softer, mushier crumb.
How long does oatmeal bread last?
Stored properly at room temperature, oatmeal bread lasts about 3–4 days. It can be frozen for up to 3 months without losing quality.
Can I make this bread without yeast?
You can use baking powder or baking soda as leaveners, but it will turn into more of a quick bread than traditional oatmeal yeast bread. The flavor and texture will differ significantly.
What’s the best flour substitute for all-purpose?
You can use bread flour for a chewier loaf or a blend of whole wheat and all-purpose flour for added nutrition. Avoid using only whole wheat unless you increase hydration.
Is oatmeal bread good for weight loss?
Oatmeal bread can be a healthy choice for weight management if eaten in moderation. The oats provide fiber and slow-digesting carbs that keep you full longer.
Conclusion
Oatmeal bread is more than just a loaf—it’s an experience. It brings warmth, comfort, and nourishment to your table. Whether you’re enjoying it for breakfast with butter and jam, turning it into gourmet sandwiches, or baking it as a gift for a friend, this humble loaf has a way of becoming a household favorite.
By following the step-by-step guide and tips above, you’ll be well on your way to baking bread that’s not only delicious but also uniquely yours. It’s simple, rewarding, and once you start, you may never want to go back to store-bought again.
So roll up those sleeves, get the oven preheated, and let the smell of homemade oatmeal bread fill your home.


