Nut Roll Recipe: There’s something undeniably nostalgic and heartwarming about a freshly baked nut roll. The tender dough wrapped around a rich, sweet nut filling reminds many of cozy kitchens, family gatherings, and holiday traditions. Whether you’re recreating a cherished family recipe or trying it for the first time, making a nut roll from scratch is more than just baking—it’s preserving a slice of heritage.
This delightful dessert, often found at Eastern European holiday tables, combines the perfect balance of buttery pastry and aromatic, sweetened nuts. But here’s the deal—nut rolls can be a bit intimidating if you’re not used to working with yeast or rolling dough. That’s where this detailed, step-by-step guide comes in. I’ll walk you through every part of the process, from prepping your ingredients to slicing that perfect spiral of sweet nutty goodness.
Ready to roll? Let’s dive into the ingredients you’ll need first.
List of Ingredients You’ll Need
Before we jump into mixing and rolling, let’s break down the ingredients. Each one plays a key role in creating that soft, fluffy dough and flavorful filling. Here’s what you’ll need:
Dough Ingredients
- 4 cups all-purpose flour
- 1/2 cup granulated sugar
- 1/2 cup unsalted butter (softened)
- 2 large eggs
- 1 cup warm milk (around 110°F)
- 1 packet (2 1/4 tsp) active dry yeast
- 1/2 tsp salt
- 1 tsp vanilla extract
Nut Filling Ingredients
- 2 cups finely ground walnuts (or pecans)
- 3/4 cup brown sugar
- 1/4 cup milk
- 2 tbsp unsalted butter
- 1 tsp cinnamon
- 1 tsp vanilla extract
Optional Add-ins
- 1/2 cup raisins (soaked in warm water or rum)
- 1 tbsp honey (for extra sweetness)
- 1 tsp lemon zest (for brightness)
For Brushing
- 1 egg yolk mixed with 1 tbsp water (for egg wash)
Tip: Use the freshest ingredients possible. Fresh yeast and high-quality nuts make all the difference in flavor and texture.
Essential Kitchen Tools
While you can technically make a nut roll with just your hands and a bowl, having the right tools will save time and deliver better results. Here’s what I recommend:
- Large mixing bowls (for dough and filling)
- Stand mixer or hand mixer (makes kneading easier)
- Wooden spoon or silicone spatula
- Measuring cups and spoons
- Rolling pin
- Clean kitchen towel or plastic wrap (for rising dough)
- Pastry brush (for egg wash)
- Sharp knife or dough cutter
- Baking sheet lined with parchment paper
These tools ensure smooth handling, clean rolling, and even baking. Let’s now move on to the most important part: the dough.
Preparing the Dough
Making the dough is the foundation of a perfect nut roll. This isn’t your regular bread dough—it’s enriched, meaning it includes butter, eggs, and sugar for a tender, rich texture.
Step 1: Activate the Yeast
Start by warming your milk (not hot, just warm to the touch). Stir in 1 tbsp of sugar and sprinkle the yeast over the top. Let it sit for 5–10 minutes until frothy. If it doesn’t bubble, your yeast might be expired.
Step 2: Mix Wet and Dry Ingredients
In a large bowl, combine the flour, remaining sugar, and salt. In a separate bowl, beat the eggs, then mix them with the softened butter and vanilla. Once the yeast mixture is ready, pour everything into the dry ingredients.
Step 3: Knead the Dough
Mix until a sticky dough forms. If using a stand mixer, knead with a dough hook for 6–8 minutes. If kneading by hand, turn the dough out onto a floured surface and knead for 10 minutes. The dough should be soft, slightly tacky, but not sticky.
Step 4: Let it Rise
Place the dough in a greased bowl, cover with a damp towel or plastic wrap, and let it rise in a warm area for about 1 to 1.5 hours, or until doubled in size. Don’t rush this step—good things come to those who wait!
Making the Nut Filling
While your dough is rising, let’s get that sweet, nutty filling ready. This is where the magic happens.
Step 1: Grind the Nuts
Use a food processor to finely grind your walnuts or pecans. Don’t turn them into paste—aim for a coarse, even grind.
Step 2: Mix the Sweet Base
In a saucepan, heat the milk and butter until the butter is melted. Stir in brown sugar, cinnamon, and vanilla. Let it simmer gently for a minute.
Step 3: Combine with Nuts
Add the ground nuts to the warm mixture and stir until fully combined. The filling should be spreadable but not runny. Let it cool to room temperature before spreading it on the dough.
Optional Twist
Add raisins or honey for extra depth. A bit of lemon zest also brightens the flavor beautifully.
Assembling the Nut Roll
Now comes the fun part—rolling and filling! This step is where you see everything come together, and the key here is to work gently and patiently. The dough is soft and delicate, and you don’t want to tear it.
Step 1: Roll Out the Dough
Once your dough has doubled in size, punch it down gently to release air. Turn it out onto a lightly floured surface and roll it into a large rectangle—about 1/4 inch thick. Try to keep the edges as even as possible for a clean final roll.
A good target size is 14×18 inches, but this can vary depending on how thick or thin you want your roll. If your dough resists stretching, let it rest for a few minutes and then try again.
Step 2: Spread the Filling
Spoon the cooled nut filling evenly across the dough, leaving about a half-inch border around all sides. Use a spatula or the back of a spoon to gently spread it in a thin, uniform layer. Avoid overloading with filling—it can cause the roll to split while baking.
Step 3: Time to Roll
Starting from the long side, carefully roll the dough into a tight cylinder. Roll slowly, tucking gently as you go to prevent air pockets. Don’t press too hard, or the filling will squeeze out.
Step 4: Seal the Deal
Pinch the seam shut and tuck the ends under to seal. Place the roll seam-side down on a parchment-lined baking sheet. If you’re making multiple rolls, leave enough space between them for expansion.
Letting the Roll Rise Again
This second rise, also called “proofing,” is crucial for a fluffy, light texture. It gives the dough one more chance to expand and fill with those beautiful air pockets before baking.
Where to Proof
Place the roll in a warm, draft-free spot. Cover it loosely with a towel or lightly oiled plastic wrap and let it rise for 45 minutes to 1 hour. You’ll know it’s ready when it looks puffier and springs back slowly when gently pressed with a finger.
Don’t skip this step! Baking without a proper second rise can make your nut roll dense and heavy.
Preheating and Baking the Nut Roll
Now that your dough is full of air and ready for the oven, it’s time to bake!
Set the Oven Right
Preheat your oven to 350°F (175°C) while the roll is proofing. This ensures that your oven is fully heated when the roll goes in, which is essential for even baking.
Bake with Care
Bake the nut roll in the center rack for 35 to 40 minutes, or until it’s golden brown on top and firm to the touch. If the top is browning too quickly, loosely tent it with foil halfway through baking.
A finished roll should sound slightly hollow when tapped and have an internal temperature of around 190°F (use a food thermometer if you have one).
Brushing with Egg Wash
Want that shiny, golden finish you see in bakeries? That’s where egg wash comes in.
How to Apply
Whisk one egg yolk with a tablespoon of water. Gently brush it over the roll right before baking. This adds a beautiful color and shine, making your nut roll look as good as it tastes.
Avoid brushing too heavily, or the wash can pool and cause uneven coloring. A light touch is all you need.
Cooling and Slicing the Nut Roll
It’s tempting to slice into that warm, fragrant roll right away—but patience pays off.
Let It Cool
Transfer your roll to a wire rack and let it cool completely. Cutting it too early will smear the filling and flatten the roll. Cooling allows the filling to set and the dough to firm up just enough for clean slices.
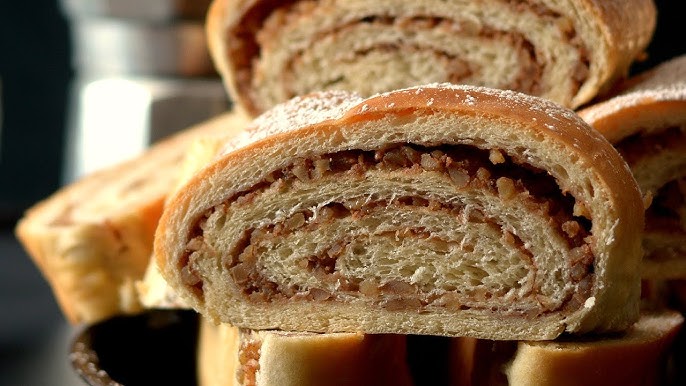
How to Slice
Use a serrated knife to gently saw through the roll. Cut into 1-inch thick slices. If you’re serving for a party, you can also cut them smaller for bite-sized portions.
Storage Tips
Nut rolls store incredibly well, making them perfect for holidays or gifting.
Short-Term Storage
- Wrap tightly in plastic wrap or foil and store at room temperature for up to 5 days.
- Avoid refrigeration—it can dry out the roll.
Freezing for Later
- Wrap the whole roll or slices in plastic wrap, then foil.
- Store in the freezer for up to 3 months.
- Thaw overnight in the fridge and bring to room temperature before serving.
If you want that “just-baked” warmth, reheat slices in the oven at 300°F for about 5 minutes.
Serving Suggestions
Nut rolls are a showstopper on any table, especially during holidays, but they’re just as good with your morning coffee.
Perfect Pairings
- Serve with coffee, hot chocolate, or a cup of strong black tea.
- Add a dollop of whipped cream or a drizzle of honey for extra indulgence.
Holiday Vibes
Sprinkle the top with powdered sugar just before serving for a festive look. You can also serve them with a scoop of vanilla ice cream for dessert.
Hosting a party? Slice into smaller rounds, arrange on a platter, and watch them disappear in minutes.
Common Mistakes to Avoid
Even seasoned bakers run into trouble with nut rolls. Here are some pitfalls to dodge:
Dough Issues
- Too dry or stiff? You may have added too much flour. Always add a little at a time.
- Sticky mess? Chill the dough for 10–15 minutes before rolling.
Filling Fails
- Don’t overload! Too much filling causes breakage and can make the dough soggy.
- Always let the filling cool before spreading.
Rolling Woes
- If the roll cracks, it might be too dry or rolled too tight.
- Pinch seams tightly and tuck ends to prevent leaking during baking.
Gluten-Free or Vegan Alternatives
Want to make it allergy-friendly or plant-based? Totally doable.
Gluten-Free Version
- Use a gluten-free all-purpose flour with xanthan gum.
- Expect a more delicate dough, so roll gently and use parchment to help shape.
Vegan Substitutes
- Swap eggs with flax eggs (1 tbsp flax + 2.5 tbsp water = 1 egg)
- Use plant-based butter and oat or almond milk
- Replace honey with maple syrup or agave
Even with changes, the nutty sweetness and comforting texture will shine through.
Why This Nut Roll Recipe Works
This nut roll is a mix of old-world charm and modern baking science. You get:
- A dough that’s rich and pillowy without being heavy
- A filling that’s sweet, nutty, and spiced just right
- A method that balances tradition with practical steps
Whether you’re sharing it during holidays or baking it just because, this recipe is reliable, rewarding, and incredibly delicious.
FAQs about Nut Roll Recipe
1. Can I use different nuts in the filling?
Yes! Walnuts are traditional, but pecans, almonds, or even hazelnuts work beautifully. Just make sure they’re finely ground for a smooth texture.
2. How do I prevent the roll from cracking?
Keep the dough moist but not wet. Don’t roll too tightly, and make sure the dough rises enough before baking.
3. Can I make the dough ahead of time?
Absolutely. You can refrigerate the dough after the first rise for up to 24 hours. Let it come to room temp before rolling.
4. Why did my nut roll turn out dry?
Overbaking or too much flour in the dough is usually the culprit. Use an oven thermometer and measure ingredients accurately.
5. What’s the difference between nut rolls and strudels?
Nut rolls use a soft yeast dough, while strudels are usually made with a flaky, layered pastry. Both are delicious, just different textures.
Conclusion
There’s something magical about slicing into a nut roll and seeing that beautiful spiral of nuts and dough. It’s not just a treat—it’s a tradition, a memory, and a connection to generations past. With this detailed guide, you now have everything you need to make the perfect nut roll right in your kitchen. Follow each step carefully, don’t rush the process, and most importantly—enjoy the experience.
Baking is love made edible. So roll up those sleeves, fire up the oven, and bake something unforgettable.


