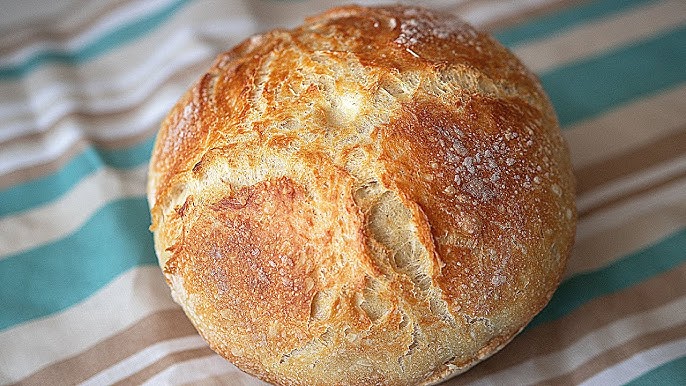
No Knead Bread Recipe: Homemade bread doesn’t have to be complicated! With this No Knead Bread Recipe, you can create bakery-quality bread at home with minimal effort. Whether you’re a beginner or an experienced baker, this method will transform your baking game.
Let’s dive into this foolproof step-by-step guide for making no knead bread.
What is No Knead Bread?
No knead bread is exactly what it sounds like—a simple bread-making method that eliminates the need for kneading the dough. This technique was popularized by Jim Lahey and has since become a favorite for home bakers worldwide.
Instead of kneading, time does the work for you. The dough rises slowly, allowing gluten to develop naturally, resulting in a soft, airy interior and a crispy crust.
Why Choose No Knead Bread?
So, why is no knead bread such a hit?
- Minimal Effort: No mixers or complicated techniques—just mix, rise, and bake!
- Few Ingredients: Requires only four basic pantry staples.
- Versatile and Foolproof: Perfect for beginners but impressive enough for seasoned bakers.
- Delicious Results: Creates a rustic, artisan-style loaf that’s crunchy on the outside and soft on the inside.
Essential Ingredients for No Knead Bread
Here’s what you’ll need to get started:
- 3 cups (360g) all-purpose flour – The foundation for your bread.
- 1 1/4 teaspoons salt – Adds flavor and strengthens gluten.
- 1/2 teaspoon instant yeast – Helps the dough rise slowly over time.
- 1 1/2 cups (360ml) warm water – Activates the yeast and hydrates the dough.
Optional add-ins: Seeds, nuts, dried herbs, or cheese for flavor variations.
Tools You Need to Get Started
- Mixing Bowl – Large enough to accommodate rising dough.
- Wooden Spoon or Spatula – For easy mixing.
- Plastic Wrap or Kitchen Towel – To cover the dough while it rises.
- Dutch Oven with Lid – Ensures even baking and creates steam for a crusty exterior.
- Parchment Paper – Prevents sticking and makes transferring dough easier.
Step-by-Step Instructions
Step 1: Mixing the Dough
- In a large mixing bowl, combine the flour, salt, and yeast. Stir to evenly distribute the ingredients.
- Add the warm water and mix until a shaggy, sticky dough forms. You don’t need to knead—just make sure all the flour is hydrated.
- Cover the bowl with plastic wrap or a kitchen towel and let it sit at room temperature for 12-18 hours.
Pro Tip: Don’t rush this step! The long rise time allows the gluten to develop naturally, giving your bread its signature texture.
Step 2: Letting the Dough Rise
- Leave the dough undisturbed in a warm place. It should double in size and have a bubbly, airy texture.
- After 12-18 hours, lightly flour your hands and gently fold the dough over itself a few times to shape it.
If your kitchen is cold, you can place the bowl inside an oven with the light turned on for added warmth.
Step 3: Shaping the Dough
- Turn the dough onto a floured surface.
- Gently shape it into a round ball without overworking it.
- Place the dough on a piece of parchment paper and let it rest for 30 minutes while you preheat the oven.
Step 4: Baking the Bread
- Preheat your oven to 450°F (230°C). Place the Dutch oven inside to heat up for 30 minutes.
- Carefully transfer the dough (with the parchment paper) into the hot Dutch oven.
- Cover with the lid and bake for 30 minutes.
- Remove the lid and bake for another 10-15 minutes to develop a golden, crispy crust.
Pro Tip: The Dutch oven traps steam, which helps create the crunchy crust. If you don’t have one, use a heavy pot with a lid as an alternative.
Step 5: Cooling and Storing the Bread
- Once baked, remove the bread from the oven and place it on a wire rack to cool for at least 1 hour. This allows the interior to set properly.
- Store leftover bread in a paper bag or wrap it in a kitchen towel to maintain its texture. Avoid plastic bags, as they can make the crust soggy.
Pro Tips for Perfect No Knead Bread
Secrets for Getting a Crispy Crust
A crispy crust is one of the highlights of no knead bread. Here are some tips to achieve that golden perfection:
- Use a Dutch Oven – The enclosed space traps steam, which helps create that crackly crust.
- Preheat the Oven and Dutch Oven – Make sure your oven and Dutch oven are fully preheated to 450°F (230°C) before baking.
- Avoid Excess Flour – Too much flour on the surface can prevent proper browning. Use just enough to handle the dough without sticking.
- Remove the Lid Midway – Baking with the lid on traps moisture, but removing it for the last 10-15 minutes allows the crust to brown.
- Let the Bread Cool Completely – Resist the temptation to cut into the bread immediately. Cooling allows moisture to escape, preventing sogginess.
Common Mistakes to Avoid
- Skipping the Resting Time – The dough needs time to rise and develop gluten naturally. Rushing this process will result in dense bread.
- Using Too Much Flour – Sticky dough is normal. Adding too much flour during shaping can make the bread tough.
- Not Heating the Dutch Oven Properly – A hot Dutch oven ensures the bread starts cooking immediately, locking in steam for a soft interior.
- Cutting While Hot – Slicing too soon can make the crumb gummy. Always wait until it’s fully cooled.
- Inaccurate Measurements – Baking is a science. Use a kitchen scale for precise measurements, especially with flour.
Flavor Variations and Add-Ins
Adding Herbs and Cheese
Enhance your bread with flavorful add-ins.
- Herb Variations: Add 1-2 tablespoons of dried herbs like rosemary, thyme, or oregano for an aromatic touch.
- Cheese Options: Mix in 1/2 cup of shredded cheddar, Parmesan, or Gruyère for a rich, savory flavor.
- Garlic and Onion: Roast garlic or caramelize onions and fold them into the dough for an added punch.
Sweet Variations
For a sweeter version of no knead bread, try these ideas:
- Cinnamon Raisin Bread: Add 1 teaspoon of cinnamon and 1/2 cup of raisins to the dough.
- Honey Wheat Bread: Replace 1/2 cup of all-purpose flour with whole wheat flour and add 2 tablespoons of honey.
- Chocolate Chip Bread: Fold in 1/2 cup of chocolate chips for a dessert-like treat.
Pro Tip: Always add mix-ins during the initial dough mixing stage to ensure even distribution.
Serving Suggestions
Wondering how to serve your fresh no knead bread? Here are some ideas:
- Breakfast Toast: Slice and toast it with butter and jam for a quick morning treat.
- Sandwich Base: Its sturdy texture makes it ideal for sandwiches, from classic ham and cheese to gourmet paninis.
- Soup Companion: Serve slices with soups or stews for dipping.
- Charcuterie Board Addition: Pair it with cheeses, meats, and spreads for an elegant appetizer.
- Garlic Bread Transformation: Slice, brush with garlic butter, and toast for a delicious side dish.
Tip: Reheat slices in the oven or toaster for that fresh-baked flavor!
FAQs about No Knead Bread Recipe
1. What ingredients do I need for a no knead bread recipe?
To make no knead bread, you typically need just four basic ingredients: flour, water, salt, and yeast. Some recipes might include sugar or oil for flavor and texture, but these are optional.
2. How long does it take to make no knead bread?
The total time for making no knead bread can vary but generally includes at least 12-18 hours of rising time, with minimal hands-on effort. This long fermentation period helps develop the flavor and texture of the bread without kneading.
3. Do I need special equipment to bake no knead bread?
No special equipment is necessary for baking no knead bread. However, many bakers prefer to use a Dutch oven to achieve a crusty exterior, as it mimics a professional bread oven’s steamy environment.
4. Can I make no knead bread without yeast?
Traditional no knead bread recipes require yeast to rise. If you’re avoiding yeast, you might consider using alternatives like sourdough starter, but this will significantly change the process and flavor of the bread.
5. How can I ensure my no knead bread has a crispy crust?
To ensure a crispy crust, bake the bread in a preheated Dutch oven and make sure to heat your oven to the right temperature before baking. Removing the lid during the last few minutes of baking can also help achieve a crisper crust.
6. What should I do if my dough is too wet or dry?
If your dough is too wet, add a little more flour, just enough to handle it. If it’s too dry and crumbly, add a few teaspoons of water until you reach a shaggy, sticky consistency.
7. Can I add other ingredients to my no knead bread dough?
Absolutely! You can customize your bread by adding ingredients such as nuts, seeds, herbs, dried fruits, or cheeses. Mix these into the dough during the initial mixing stage for even distribution.
Conclusion
No knead bread is the perfect recipe for anyone looking to bake delicious, homemade bread without the hassle of kneading. With just a few ingredients and simple steps, you can create an artisan-style loaf that’s sure to impress. Whether you stick with the classic recipe or experiment with flavors, this bread is a versatile staple for any occasion.
Why not give it a try today? You’ll never go back to store-bought bread once you taste this easy, homemade delight!


