New York Pizza Dough Recipe: There’s something magical about biting into a fresh slice of New York pizza. The thin, chewy crust, crisp edges, and that perfect balance of sauce and cheese make it unlike any other style of pizza in the world. But here’s the secret—what truly sets New York pizza apart isn’t just the toppings or even the baking method, it’s the dough. The foundation of every great slice starts with a perfectly made dough that’s been fermented just right to give it flavor, structure, and that signature chew.
When people talk about New York pizza, they often describe it as foldable. That’s because the dough has just the right texture: thin enough to bend without breaking, but strong enough to hold all your toppings. Unlike deep-dish or Neapolitan pizza, this style strikes a beautiful balance between crispness and chewiness, which is why it has become a global favorite. If you’ve ever wondered why you can eat two or three slices without feeling stuffed, it’s thanks to the light and airy dough.
In this guide, you’ll learn step by step how to make authentic New York pizza dough at home. We’ll cover everything: from selecting ingredients, mixing, kneading, fermenting, to baking. By the end, you’ll be able to recreate that iconic New York slice right in your own kitchen.
Essential Ingredients for Authentic New York Pizza Dough
The beauty of New York pizza dough lies in its simplicity. Unlike complex recipes with dozens of spices or add-ins, a true New York dough relies on just a handful of high-quality ingredients. Here’s what you’ll need:
Flour – Choosing the Right Type
The most important ingredient in your pizza dough is flour. For authentic New York pizza, high-protein bread flour works best. Bread flour has more gluten than all-purpose flour, which gives your dough that chewy texture and strong structure. Gluten is the protein that forms when flour and water mix, and it’s what allows your dough to stretch without tearing.
- Bread Flour Protein Content: ~12–14%
- All-Purpose Flour Protein Content: ~10–11%
If you only have all-purpose flour, you can still make a decent dough, but it won’t have the same chew. Some pizzerias in New York even blend bread flour with high-gluten flour for extra strength.
Yeast – Fresh vs. Instant
Yeast is the powerhouse that makes your dough rise. Without it, your dough would be flat and dense. You can use active dry yeast or instant yeast. Both work, but instant yeast tends to activate faster and doesn’t require proofing in water beforehand. Fresh yeast is another option, but it’s less common for home bakers.
For best results, use just a small amount of yeast and rely on cold fermentation (resting the dough in the fridge for 24–72 hours). This slow rise develops complex flavors that make New York pizza so irresistible.
Water – The Role of Hydration
Water might seem simple, but it plays a big role in pizza dough. Hydration levels affect the dough’s texture and elasticity. For New York pizza, aim for 60–65% hydration (water compared to flour weight). This level creates a dough that’s soft enough to stretch, but not too sticky.
And yes—New Yorkers swear by their tap water, claiming it’s the secret to their world-famous pizza. While you don’t need NYC water to succeed, using filtered water at room temperature is best.
Salt – Flavor Enhancer
Salt doesn’t just add flavor; it also strengthens the gluten network and controls yeast activity. Without enough salt, your dough would rise too quickly and taste flat. For pizza dough, about 2% salt compared to the flour weight works perfectly. Use fine sea salt or kosher salt for even distribution.
Olive Oil – For Texture and Elasticity
Olive oil isn’t always used in Neapolitan pizza, but in New York style, it’s essential. A small amount of oil adds flavor, helps with browning, and makes the dough easier to stretch. Don’t go overboard though—too much oil can make the crust heavy. A tablespoon or two per batch is just right.
Summary of Ingredients You’ll Need:
- 4 cups (500g) bread flour
- 1 ½ cups (360ml) water
- 1 tsp (5g) yeast
- 2 tsp (10g) salt
- 2 tbsp (30ml) olive oil
These basic ingredients, when treated with care, will give you that perfect New York dough.
Tools and Equipment You’ll Need
Making great pizza dough isn’t just about the ingredients—it’s also about the tools you use. While you don’t need a professional pizzeria setup, having the right equipment will make the process smoother and your results more authentic.
Stand Mixer vs. Hand Kneading
Kneading develops gluten, which gives your dough elasticity and structure. If you have a stand mixer with a dough hook, it will save you time and effort. Just mix on low speed for 8–10 minutes until smooth and stretchy.
But don’t worry if you don’t own one—hand kneading works just as well. It just takes more patience and arm strength. A good kneading session should last 10–12 minutes. The key is consistency, not speed.
Pizza Stone or Steel – Which is Better?
To get that crispy crust, you’ll need a very hot surface to bake your pizza on. A pizza stone absorbs heat and mimics the floor of a brick oven. A pizza steel is even better because it conducts heat more efficiently, resulting in faster cooking and crispier bottoms.
If you don’t have either, you can still bake on an inverted baking sheet, but the results won’t be quite as authentic.
Proofing Containers and Kitchen Scale
For fermentation, it’s best to store your dough in airtight containers or covered bowls. This prevents it from drying out and developing a skin. A kitchen scale is another essential tool—it ensures you measure ingredients accurately. Pizza dough is all about precision, and even small changes can affect the final result.
Other Useful Tools
- Dough scraper (for shaping and handling dough)
- Measuring spoons and cups (if not using a scale)
- Pizza peel (for sliding pizza into the oven)
- Sharp knife or pizza cutter
With these tools, you’ll be fully equipped to handle the dough like a true New York pizzaiolo.
Step-by-Step Guide to Making New York Pizza Dough
Now comes the fun part—putting everything together. Making New York pizza dough is not complicated, but each step plays a crucial role in developing that authentic flavor and texture.
Step 1 – Measuring Ingredients Accurately
The first rule of great baking: measure by weight, not volume. Cups can be inconsistent because flour compacts differently depending on how it’s scooped. A kitchen scale ensures you get the right ratios every time.
- Flour: 500g
- Water: 325g (about 65% hydration)
- Salt: 10g
- Yeast: 5g
- Olive Oil: 30g
By measuring accurately, you eliminate guesswork and guarantee consistent results.
Step 2 – Mixing and Hydration
Mixing is where the transformation begins—your flour, water, yeast, and salt go from separate ingredients to a cohesive dough. The process may seem simple, but how you mix directly affects gluten development, hydration, and overall texture.
Start by combining the flour, yeast, and salt in a large mixing bowl. Stir these dry ingredients briefly to distribute them evenly. Next, add water slowly while stirring with either a spoon, spatula, or the dough hook on a stand mixer. Finally, drizzle in olive oil and continue mixing until everything comes together.
At first, the dough may look rough, shaggy, and uneven. Don’t worry—that’s completely normal. The goal at this stage isn’t to make it perfectly smooth, but to hydrate the flour thoroughly. Once all the flour is absorbed, you’ll have a sticky mass. Resist the temptation to add more flour right away; stickiness is expected, especially at 65% hydration.
This stage is also where autolyse can come into play. Autolyse is a rest period before kneading—simply cover the dough and let it sit for 20–30 minutes after the initial mixing. During this time, the flour naturally absorbs water, and gluten begins developing without effort. Once you return to knead the dough, it will already be smoother and easier to handle.
Remember: hydration is key. Too little water and your dough will be tough and hard to stretch. Too much water and it’ll be sticky and difficult to shape. The sweet spot for New York pizza lies between 60–65%. With proper hydration, you’ll get a crust that’s crisp on the outside yet chewy inside.
Step 3 – Kneading the Dough Properly
Kneading is where the magic of gluten really comes alive. Gluten strands form when flour and water interact, but kneading organizes them into a strong network. Without proper kneading, your dough won’t stretch well, and it may tear when you try to shape it into a pizza.
If you’re using a stand mixer, knead on low speed for about 8–10 minutes. The dough should become elastic, smooth, and slightly tacky but not sticky. If you’re kneading by hand, expect to spend about 10–12 minutes. Push the dough forward with the heel of your hand, fold it over, rotate, and repeat. It’s a rhythmic process that takes some patience.
A great test to see if you’re done kneading is the windowpane test. Take a small piece of dough and gently stretch it between your fingers. If it forms a thin, almost transparent membrane without tearing, the gluten is well-developed. If it tears easily, knead for a few more minutes.
One mistake many beginners make is adding too much flour while kneading. Yes, the dough may feel sticky at first, but adding excess flour creates a dry crust. Instead, use a dough scraper to handle sticky dough or lightly flour your work surface. The dough should be soft, supple, and slightly tacky at the end of kneading—not stiff.
Once kneaded properly, shape the dough into a ball and place it into a lightly oiled bowl. Cover it with plastic wrap or a damp kitchen towel to prevent drying. This sets the stage for fermentation, where the real flavor develops.
Step 4 – First Rise (Bulk Fermentation)
Now that your dough is kneaded, it’s time for fermentation. This is when yeast feeds on sugars in the flour and produces carbon dioxide, which makes the dough rise. Bulk fermentation refers to the dough’s initial resting period before dividing it into smaller portions.
At room temperature, let the dough rise for 1–2 hours. During this time, it should roughly double in size. This stage is crucial because it builds the foundation of structure and flavor. Keep in mind that fermentation is influenced by temperature:
- Warmer rooms = faster fermentation
- Cooler rooms = slower fermentation
Don’t rush this process—flavor takes time to develop. Some bakers even extend bulk fermentation slightly by leaving the dough at room temperature for 3–4 hours before refrigeration. This extra step can give the dough deeper flavor complexity.
How do you know when bulk fermentation is complete? Gently press a finger into the dough. If the indentation springs back slowly but doesn’t fully disappear, it’s ready. If it bounces back too quickly, it needs more time.
After this first rise, it’s time to portion the dough. Use a scale for accuracy, dividing it into individual balls—usually around 250–300g each for a standard 12-inch pizza. Place each ball into a lightly oiled container or tray, cover, and prepare for cold fermentation.
Step 5 – Shaping Dough Balls
Shaping dough balls properly is more important than most people realize. A well-shaped ball ensures even fermentation, easier stretching later, and a rounder pizza base. If the dough ball isn’t tight enough, it may spread unevenly.
To shape, take a divided portion and gently fold the edges into the center, creating surface tension. Flip it seam-side down and roll it lightly against the counter using your hands in a cupped motion. The goal is to create a smooth, taut ball without tearing the dough.
Place each ball into an individual airtight container or a covered tray. If you don’t have containers, lightly oil a baking sheet and cover it tightly with plastic wrap. Make sure the dough has space to expand—remember, it will continue rising during fermentation.
Pro tip: avoid over-handling the dough. Rough shaping can degas it too much, resulting in a flat crust. Gentle movements are key to keeping air bubbles intact. Those bubbles are what create that airy, slightly blistered New York crust when baked.
At this stage, your dough is technically usable after another short proof at room temperature, but for authentic New York flavor, cold fermentation is the gold standard.
Step 6 – Cold Fermentation (24–72 Hours)
Cold fermentation is the secret weapon of New York pizza dough. While quick-rise doughs can be made in a few hours, they lack the depth of flavor that comes from a long, slow fermentation. Placing your dough balls in the fridge for 24–72 hours allows the yeast to work gradually, producing complex flavors and aromas.
During this time, enzymes break down starches into sugars, giving your crust a subtle sweetness. It also improves texture, making the dough more extensible (easy to stretch without tearing). That’s why pizzerias in New York rely on this method—it creates the iconic balance of chewiness and crispness.
Here’s a timeline for guidance:
- 24 hours: Good flavor, easy to stretch, perfect for beginners.
- 48 hours: Ideal balance of flavor and texture, recommended for most home bakers.
- 72 hours: Deepest flavor, stronger chew, great for pizza purists.
To ferment, simply place the covered dough in the refrigerator. When you’re ready to bake, take it out and let it rest at room temperature for 1–2 hours before stretching. This rest period allows the gluten to relax, making the dough easier to handle.
Patience pays off here. The longer the fermentation, the more authentic your New York pizza will taste. If you’ve ever had a slice from a famous New York pizzeria, chances are the dough was cold-fermented for at least two days.
Step 7 – Preparing the Dough for Baking
After cold fermentation, your dough is alive with flavor, but it needs some final preparation before going into the oven. First, remove the dough balls from the refrigerator and let them rest at room temperature for about 1–2 hours. This crucial step relaxes the gluten and warms the dough, making it far easier to stretch without tearing.
Lightly flour your work surface and gently remove a dough ball from its container. Avoid pressing too hard—your goal is to preserve the tiny air bubbles formed during fermentation. These bubbles give your crust that airy texture and slight charring when baked.
Next, shape the dough into a round disk, pressing gently from the center outward with your fingertips. This pushes air toward the edges, forming a natural crust border. Resist the temptation to roll the dough with a pin—rolling flattens the dough and eliminates the airy texture we want. Instead, stretch the dough by lifting it onto your knuckles and rotating it gently until it reaches your desired size, usually around 12 inches for New York style.
At this point, you can transfer the dough onto a floured pizza peel or parchment paper. It’s now ready for sauce, cheese, and toppings. But remember: the dough is delicate—handle it with care, and don’t overload it with toppings, or it will be harder to bake evenly.
Baking the Perfect New York Pizza
Baking is where all your hard work comes together, and the method you choose can make or break your pizza. Unlike Neapolitan pizzas, which bake in ultra-hot wood-fired ovens, New York pizzas are typically baked at a slightly lower temperature for a longer time.
Preheating Your Oven the Right Way
Home ovens don’t reach the blazing temperatures of professional pizza ovens, but you can still achieve great results. Preheat your oven to its maximum setting, usually between 500–550°F (260–290°C). Place a pizza stone or steel inside while preheating to absorb heat and mimic a pizzeria-style oven floor. Ideally, let it preheat for at least 45 minutes before baking.
Stretching vs. Rolling the Dough
As mentioned earlier, stretching by hand is key. Rolling compresses air bubbles, but stretching preserves them. This difference results in a crust that is airy, chewy, and flavorful. Aim for a thin center with a slightly thicker outer rim.
Adding Sauce, Cheese, and Toppings
New York pizza typically uses a simple tomato sauce made from canned tomatoes, olive oil, salt, and a hint of oregano or garlic. Less is more—too much sauce makes the crust soggy.
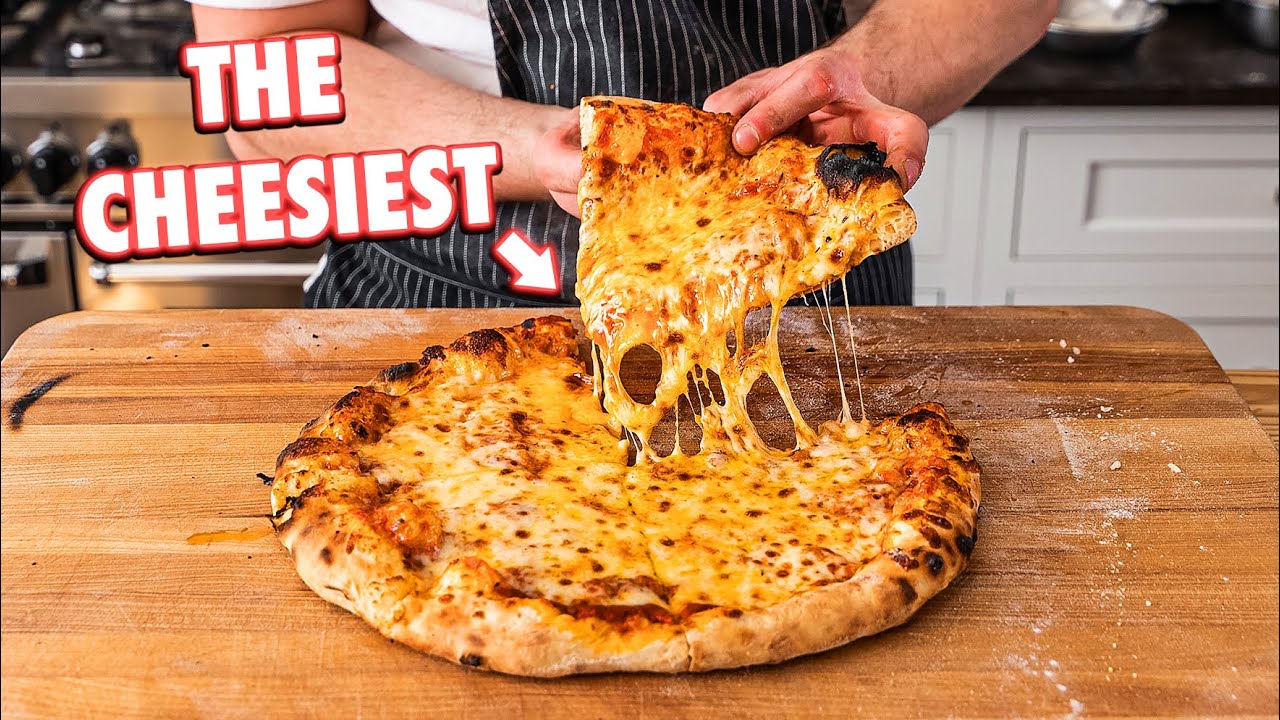
For cheese, low-moisture mozzarella is the gold standard. It melts evenly, doesn’t release excess water, and gives that signature stretch. You can add other cheeses like provolone or parmesan for extra flavor.
Toppings should be kept minimal. Classic options include pepperoni, mushrooms, onions, sausage, and peppers. Overloading the pizza makes it heavy and prevents even cooking.
Baking Time and Temperature
Once topped, slide the pizza onto the preheated stone or steel. Bake for 7–10 minutes, depending on your oven, until the crust is golden brown and slightly charred on the bottom. The cheese should be bubbling and lightly browned.
For extra crispness, you can finish the pizza under the broiler for 1–2 minutes. Just keep a close eye on it to avoid burning.
Tips for Achieving the Best Results
Even with a perfect recipe, little details can make a huge difference in your final pizza. Here are some expert tips:
Common Mistakes to Avoid
- Using too much flour: Adding flour during kneading or stretching can dry out the dough. Use just enough to prevent sticking.
- Skipping cold fermentation: Quick-rise dough lacks depth of flavor. Be patient for best results.
- Overloading with toppings: Keep it simple—less is more for New York style.
- Not preheating the oven long enough: A hot baking surface is crucial for crisp crust.
How to Store Dough Properly
If you don’t plan to bake right away, store dough balls in airtight containers in the fridge for up to 3 days. For longer storage, freeze them. Simply thaw in the refrigerator overnight, then bring to room temperature before baking.
Reheating Leftover Pizza
The microwave makes pizza soggy, so skip it. Instead, reheat slices in a skillet on medium heat until the crust is crispy again. For extra melty cheese, cover the skillet briefly with a lid. Alternatively, reheat in the oven at 375°F (190°C) for 8–10 minutes.
These little tricks ensure your homemade pizza rivals what you’d get at a pizzeria.
Variations of New York Pizza Dough
While the classic recipe is unbeatable, you might want to explore variations to suit dietary needs or preferences.
Whole Wheat New York Pizza Dough
Substitute up to 50% of the bread flour with whole wheat flour. This adds a nutty flavor and more fiber, though the dough will be denser and less airy. To balance, increase hydration slightly, as whole wheat absorbs more water.
Gluten-Free New York Pizza Dough
For gluten-free options, use a specialized pizza flour blend with xanthan gum or psyllium husk for structure. While it won’t have the same chew as traditional dough, it can still deliver a crispy, tasty crust.
Thin-Crust vs. Traditional Thickness
Classic New York pizza isn’t paper-thin, but it’s not thick either—it’s somewhere in between. If you prefer a thinner crust, stretch the dough wider (14–16 inches) while keeping the same weight. For a thicker, chewier slice, use slightly more dough per pizza and keep the diameter smaller.
Experimenting with variations allows you to tailor the recipe to your own taste while keeping the spirit of New York style alive.
Nutrition Information
Pizza dough is simple, but understanding its nutritional profile helps you balance your diet while enjoying your favorite slice.
Calories in New York Pizza Dough
One 12-inch New York style pizza crust (without toppings) contains roughly:
- Flour (500g total / per slice ~60g): 220 calories
- Olive Oil (30g): 270 calories
- Yeast, salt, water: negligible calories
Per slice (1/8th of a 12-inch pizza), the dough alone is around 120–150 calories. Add cheese, sauce, and toppings, and a slice averages 250–350 calories.
Healthier Ingredient Alternatives
- Use half whole wheat flour for added fiber.
- Replace some olive oil with yogurt for lower fat content.
- Try low-fat mozzarella to reduce calories.
- Add vegetables like peppers, mushrooms, and spinach to balance richness.
This way, you can enjoy pizza guilt-free while keeping it healthier.
FAQs about New York Pizza Dough Recipe
1. Can I freeze New York pizza dough?
Yes! Pizza dough freezes beautifully. After the cold fermentation stage, wrap each dough ball tightly in plastic wrap and store it in a freezer bag for up to 3 months. When ready to use, thaw overnight in the fridge, then let it sit at room temperature for 1–2 hours before stretching.
2. How long should I ferment the dough?
For authentic flavor, aim for 48 hours of cold fermentation. That’s the sweet spot for most bakers—long enough for complex flavor, but not so long that the dough becomes overly sour. However, anywhere from 24–72 hours works well depending on your schedule and taste preference.
3. What’s the best flour for New York pizza?
High-protein bread flour (12–14% protein) is the top choice because it creates a chewy, foldable crust. All-purpose flour works in a pinch, but the texture won’t be as authentic. For the closest match to pizzeria results, some bakers use high-gluten flour blends.
4. Do I need a pizza stone for authentic results?
A pizza stone or steel is highly recommended. They hold heat and mimic the hot floor of a pizza oven, giving you that crispy crust. If you don’t have one, you can use an inverted baking sheet, but the results won’t be quite as crisp.
5. How do I prevent soggy crust?
A soggy crust is usually caused by too much sauce, watery cheese, or underbaking. To prevent this:
- Use low-moisture mozzarella instead of fresh mozzarella.
- Keep sauce light—just enough to coat the dough.
- Preheat your oven thoroughly and bake on a hot stone or steel.
Following these steps ensures your crust stays crisp and foldable, just like a real New York slice.
Conclusion
Patience is the key. Cold fermentation transforms a simple mix of flour, water, salt, yeast, and olive oil into something extraordinary. It gives the crust its depth of flavor, its chewy-yet-crisp texture, and its unmistakable aroma. Pair that with the right baking method, a hot oven, and a little practice, and you’ll have pizza that rivals even the best New York shops.
The beauty of this recipe is its versatility. Whether you stick to the traditional version, experiment with whole wheat, or try gluten-free, the foundation remains the same: respect the dough, don’t rush the process, and keep your toppings balanced. With this guide, you now have everything you need to make authentic New York pizza right in your own kitchen.
So the next time you’re craving a slice of New York, skip delivery. Roll up your sleeves, fire up your oven, and bake your own masterpiece. Trust me—you’ll taste the difference in every bite.