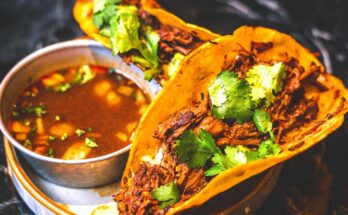
Molcajete Recipe: If you’ve ever been to a traditional Mexican kitchen or a truly authentic Mexican restaurant, chances are you’ve seen a molcajete. It looks like a hefty stone bowl with three stubby legs and is made from volcanic rock. It’s not just a decorative relic—it’s a functional cooking tool that’s been used for centuries.
A molcajete is essentially the Mexican version of a mortar and pestle, known as the “tejolote.” Together, they’re used for grinding spices, making salsas, and even preparing guacamole. Unlike the small ceramic mortar and pestles you might find elsewhere, the molcajete is robust. Its rough surface helps break down ingredients with ease, unlocking flavors that you simply can’t get with a blender.
But the real beauty of the molcajete isn’t just its grinding power—it’s the flavor. Over time, it absorbs the oils and flavors of the spices and ingredients used in it. This creates depth and complexity in your food that’s nearly impossible to replicate with modern kitchen tools. And when you make a full molcajete dish—meat, cheese, sauce, veggies—served sizzling in the same bowl it was prepared in? That’s culinary gold.
History and Cultural Significance
The molcajete dates back thousands of years, originating with the Aztecs and other indigenous civilizations of Mesoamerica. These stone tools were essential for preparing daily meals—grinding corn for tortillas, crushing herbs for medicinal use, and creating rich, spicy moles and salsas that still define Mexican cuisine today.
What makes the molcajete more than just a tool is its connection to tradition. Families pass them down through generations, each carrying the legacy of meals shared and recipes refined. Cooking with a molcajete isn’t just about food; it’s about heritage. The act of grinding by hand connects you to the ingredients, to the dish, and to centuries of culinary history.
So when you make a molcajete dish, you’re not just cooking—you’re carrying on a story. A tradition. A piece of history that’s still alive and sizzling.
Tools and Ingredients Needed
Traditional Tools: The Molcajete and Tejolote
Before diving into your recipe, let’s talk gear. At the heart of this dish is the molcajete itself. It’s traditionally made from basalt, a type of volcanic rock that’s both porous and strong. This texture isn’t just for show—it creates friction that helps crush and blend ingredients effectively.
The molcajete comes with a matching pestle, called a tejolote. It’s shaped to fit comfortably in your hand and gives you the leverage you need to press, grind, and mix with ease. Unlike electric blenders that cut through ingredients with blades, the molcajete crushes and fuses them, which enhances flavor release.
If you’re buying a new molcajete, make sure it’s made from real volcanic rock. Some cheaper versions are made with cement or other artificial materials that won’t work well—and could even be unsafe for food use. A real molcajete is heavy, gritty, and just a little rustic. That’s how you know you’ve got the real deal.
Besides the molcajete and tejolote, you’ll need a comal or skillet for roasting your ingredients, and maybe some tongs or a spatula. But the magic? That all happens in the stone bowl.
Key Ingredients for Molcajete Recipes
Now let’s get to the good stuff—what you’ll actually need for the molcajete recipe. Keep in mind, there are many regional variations, but we’re going to focus on a bold, traditional version featuring meat, veggies, and a fire-roasted salsa.
Here’s a typical ingredient list:
For the Sauce:
- 3-4 Roma tomatoes
- 2 garlic cloves (unpeeled)
- 2-3 dried chiles (guajillo, pasilla, or arbol)
- 1-2 fresh jalapeños or serrano peppers
- 1 small onion
- Salt to taste
- A few sprigs of cilantro
- Fresh lime juice
For the Protein:
- 1/2 lb carne asada (grilled steak)
- 1/2 lb chorizo (or spicy sausage)
- 1/2 lb grilled chicken breast
Extras for the Dish:
- Grilled nopales (cactus paddles)
- Panela or queso fresco cheese
- Avocado slices
- Radishes
- Warm corn tortillas
Every one of these ingredients plays a role—bringing heat, creaminess, tang, or texture to the dish. When everything comes together in a steaming hot molcajete bowl, it’s like a fiesta for your taste buds.
Preparing the Molcajete for Cooking
Seasoning Your Molcajete (Curing)
If you’re using a new molcajete, this step is crucial. Raw volcanic stone is super porous and may still contain tiny bits of rock or grit from the carving process. You definitely don’t want that ending up in your food.
Here’s how to cure it:
- Wash it thoroughly – Use a stiff brush and rinse with hot water. Don’t use soap.
- Grind rice – Pour in a handful of uncooked rice and grind it with the tejolote. The rice will turn gray from loose rock dust. Discard and repeat until the rice remains white.
- Add garlic and salt – Grind a few cloves of garlic with some coarse salt to fill in the pores with flavor.
- Rinse and dry – Give it a final rinse, dry it completely, and let it sit in a dry place for a day or two.
Once cured, your molcajete is ready to start building flavors and become your new favorite kitchen tool.
Cleaning and Maintaining Your Molcajete
Here’s the deal: molcajetes are tough, but they do need a little TLC. Never wash it with soap, as the porous rock will absorb it. Stick to hot water and a brush. If food sticks, let it soak in warm water for a few minutes before scrubbing.
After each use:
- Rinse immediately
- Use a natural bristle brush to scrub off residue
- Let it air dry completely before storing
With time, your molcajete will become seasoned—absorbing all the bold, smoky, spicy flavors of the salsas and dishes you make in it. Like cast iron, it only gets better with use.
Making the Molcajete Sauce
Roasting Vegetables for Flavor
If you want to unlock next-level flavor, roasting is where the magic happens. The smoky char that comes from roasting vegetables like tomatoes, chiles, garlic, and onions gives the sauce a depth that’s unmistakably delicious. And when all that roasted goodness is ground in a molcajete? Chef’s kiss.
Start by heating a comal (flat griddle) or skillet over medium-high heat. No oil is needed here—we’re dry-roasting. Place the tomatoes, onion, garlic (leave the skins on), and chiles directly on the surface.
Here’s a step-by-step roasting timeline:
- Garlic: Roast for about 5–7 minutes, turning occasionally, until the skin is charred and the garlic feels soft. Peel it once it cools.
- Chiles: Roast the dried chiles until they puff slightly and darken—this takes only 10–15 seconds per side. Be careful not to burn them, or they’ll turn bitter.
- Onion: Let it get nicely blackened on the outside while softening inside. That caramelization adds natural sweetness.
- Tomatoes: Roast until the skins are blistered and slightly blackened, about 10–15 minutes total.
Once everything is roasted, let it cool slightly. Then you’re ready to turn that pile of charred perfection into a rustic, bold, fire-kissed salsa. The roasted flavors will make your molcajete dish taste like it’s been simmering all day—even if you just whipped it up in under an hour.
Roasting also brings out the natural sugars in the veggies and mellows the heat of the chiles. This adds balance, turning up the flavor without overwhelming your palate. It’s an old-school trick, and once you try it, you’ll never go back.
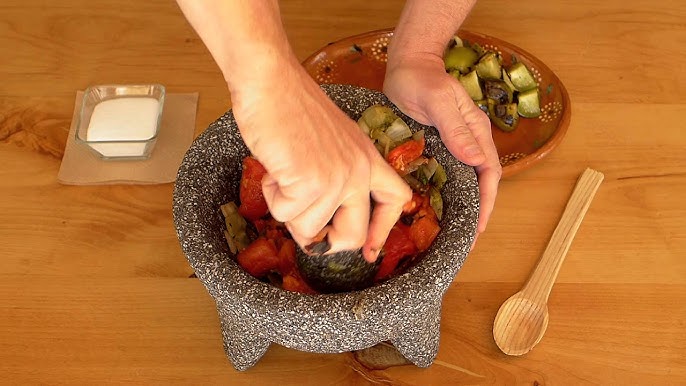
Grinding Ingredients the Traditional Way
This is where the molcajete earns its keep. After you’ve roasted and prepped your ingredients, it’s time to grind them into that rich, rustic sauce. It’s not hard—but it does take a little elbow grease and a lot of love.
Start with the toughest ingredients first:
- Grind the dried chiles and salt – Add a pinch of coarse salt (to help with abrasion) and begin grinding the roasted dried chiles. Use a circular motion and press down firmly with the tejolote.
- Add garlic and onion – Smash and grind them into the chile paste. Take your time. The molcajete isn’t about speed—it’s about flavor.
- Tomatoes go last – Toss in the roasted tomatoes one at a time, grinding them into the base until the sauce becomes thick, chunky, and aromatic.
Once you’ve reached your desired consistency (chunky, smooth—your call), taste it. Add lime juice, cilantro, or more salt as needed.
The texture you get with a molcajete is unbeatable. It’s rustic, with bits of char and pepper that make each bite exciting. Unlike a blender that whips everything into a smooth purée, this sauce has soul. It’s alive with flavor, and the molcajete is the secret weapon behind it.
Crafting the Ultimate Molcajete Dish
Building Layers of Flavor
Now that your sauce is ready, it’s time to put everything together in one epic, sizzling molcajete dish. Think of it like a Mexican hot pot—layers of protein, cheese, grilled veggies, and salsa bubbling together in one volcanic bowl.
First, preheat your oven to about 400°F (200°C). If your molcajete is oven-safe—and most real stone ones are—you’ll want to heat it for about 15–20 minutes. A hot molcajete keeps the food sizzling at the table, just like a cast iron skillet.
While that’s heating, cook your proteins:
- Carne Asada (Steak): Marinate it with lime juice, garlic, and spices, then grill or pan-sear until juicy.
- Chorizo: Remove from casing, then fry until crispy and caramelized.
- Chicken Breast: Season and grill until charred on the outside, tender on the inside.
Then, grill your nopales (cactus paddles) and panela cheese until both have grill marks and a slightly smoky flavor.
To assemble:
- Start with a generous layer of your molcajete sauce at the bottom of the hot bowl.
- Arrange your grilled meats, cheese, and vegetables on top, artfully stacked.
- Spoon more sauce over the top—don’t be shy.
- Garnish with avocado slices, lime wedges, and a handful of fresh cilantro.
- Serve with a stack of warm corn tortillas on the side.
As the hot molcajete sizzles, it continues to cook and meld the ingredients. Every bite is packed with flavor—spicy, smoky, creamy, and bold. It’s not just a meal—it’s an experience.
Combining Meat, Cheese, and Vegetables
What makes a molcajete dish unique is the balance. You’re not just throwing ingredients together—you’re creating a harmony of textures and flavors. The tender steak, the crumbly cheese, the roasted chiles, and the creamy avocado all play off one another. It’s rustic Mexican cuisine at its finest.
Let’s break down how each component contributes:
- Steak brings richness and protein, with a savory, meaty chew.
- Chorizo adds spice and fat, boosting the flavor of the whole dish.
- Chicken offers a milder contrast and juicy tenderness.
- Panela cheese or queso fresco melts slightly, absorbing the salsa while holding its shape.
- Nopales give a tart, almost citrusy bite that cuts through the heaviness.
- Avocado adds creaminess and balances the heat.
Don’t skip the corn tortillas—they’re the perfect vehicle for scooping up the saucy, sizzling mixture. A little bite of everything on a warm tortilla? Pure heaven.
And that’s the essence of a molcajete meal—it’s bold, interactive, and packed with tradition. It’s the kind of dish that turns dinner into a celebration.
Serving and Presentation Tips
How to Serve a Molcajete Dish
Once your molcajete dish is hot and ready, presentation becomes part of the flavor experience. This isn’t your average plate of food—it’s a full-on show. The sizzling sound, the aroma wafting from the volcanic rock, the layers of color and texture—it’s all part of the appeal.
Start by placing your hot molcajete carefully on a thick wooden trivet or heat-resistant mat. This thing stays hot for a long time, so protect your surfaces and warn your guests. The goal is to serve it bubbling and steaming so it stays warm throughout the meal.
Make sure everyone has:
- A plate for assembling their own bites
- A spoon or tongs for serving from the molcajete
- A stack of warm tortillas
- Optional sides like lime wedges, radishes, chopped onions, cilantro, or extra salsa
People can grab a tortilla, fill it with a bit of steak, cheese, sauce, and avocado, and build their perfect bite. It’s casual, social, and delicious—kind of like a taco night, but way more intense.
This dish is great for sharing. Whether it’s a family meal or a dinner party, the molcajete becomes the center of the table and the center of attention. And when it’s time for seconds (and there will be seconds), it’ll still be hot and ready.
Garnishing for Maximum Flavor and Visual Appeal
Let’s not forget the final touches. A few well-chosen garnishes can take your molcajete from “great” to “gourmet.” And honestly, when you’ve put this much love into your dish, it deserves a little glam.
Here are some go-to garnishes:
- Avocado slices: Fan them out on top for creaminess and color contrast
- Fresh cilantro: Adds brightness and a fresh herbal punch
- Crumbled queso fresco: Gives a salty pop and a snowy white finish
- Chopped white onions: A little crunch and heat
- Sliced radishes: Adds peppery snap and color
- Toasted sesame seeds or pepitas: For crunch and a nutty kick
- Lime wedges: The acidity balances everything beautifully
When you garnish, think balance—both flavor and color. The deep reds and browns of the meat and salsa benefit from greens, whites, and fresh pops of brightness. And don’t just toss them on—arrange with intention. Remember, we eat with our eyes first.
Variations of the Molcajete Recipe
Vegetarian and Vegan Alternatives
Don’t eat meat? No problem. The beauty of the molcajete is its versatility. You can make a completely satisfying vegetarian—or even vegan—version without sacrificing any of the bold flavors.
Here’s how:
For Protein Substitutes:
- Grilled Portobello Mushrooms – Meaty, juicy, and packed with umami.
- Tofu or Tempeh – Marinate and grill or fry for texture and protein.
- Seitan Strips – Perfect for mimicking carne asada.
- Jackfruit – Shredded and sautéed, it mimics pulled meat with ease.
Load up on Veggies:
- Zucchini or squash (grilled or pan-seared)
- Bell peppers
- Roasted corn
- Nopales (still a must!)
- Onions and tomatoes
Vegan Cheese:
- Use store-bought vegan queso or make a quick cashew cream with garlic, lime, and nutritional yeast for a cheesy drizzle.
You’ll prepare your salsa the same traditional way, and build your molcajete just like before. Even without animal products, this dish is bursting with smoky, spicy, and savory flavors. Honestly? Most meat-eaters won’t even miss the meat.
Regional Twists Across Mexico
Travel across Mexico, and you’ll find that molcajete dishes vary by region. Some areas use different proteins, others highlight local veggies or salsas unique to their culinary traditions.
Here are a few variations:
Jalisco-Style Molcajete:
- Uses arrachera (skirt steak), chorizo, and grilled shrimp
- Topped with a spicy red salsa and grilled panela cheese
Michoacán-Inspired:
- Includes carnitas or slow-cooked pork
- Salsa verde is common, made with tomatillos and serrano peppers
Veracruz Variation:
- Combines seafood like shrimp and octopus
- Uses garlic-heavy sauces and plenty of lime
Yucatán Style:
- Might feature cochinita pibil (achiote-marinated pork)
- Accompanied by pickled red onions and habanero salsa
If you’ve got roots in any of these regions or just want to explore, trying a local twist is a fantastic way to keep your molcajete game fresh.
Storage and Reheating Tips
How to Store Leftovers
Molcajete dishes are usually devoured in one sitting—but if you’ve got leftovers, they keep surprisingly well. First, let everything cool to room temperature. Then, scoop the contents out of the molcajete and into an airtight container. Don’t store food in the molcajete itself—it’s porous and can absorb moisture and odors.
Keep your leftover meat, veggies, and sauce together if possible to preserve the blend of flavors. You can also store tortillas and garnishes separately.
Leftovers will keep in the refrigerator for up to 3–4 days. If you used seafood, try to eat it within 1–2 days for best quality.
Best Reheating Methods
To reheat, avoid the microwave—it tends to dry out meats and ruin textures.
Instead:
- Stovetop: Add a splash of water or broth to a skillet. Warm everything over medium heat, stirring occasionally.
- Oven: Place the contents in a baking dish, cover with foil, and heat at 350°F for about 15–20 minutes.
- Molcajete (if oven-safe): For the ultimate throwback experience, reheat your food directly in your molcajete. Place it in a 400°F oven for about 20 minutes. It’ll come out sizzling like the first time!
Refresh with fresh garnishes—like cilantro, lime, and avocado—and you’re back in business.
Health Benefits and Nutritional Value
Nutritional Overview of Ingredients
Believe it or not, molcajete dishes can be surprisingly balanced and nutritious. Yes, there’s grilled meat and cheese, but there are also fresh veggies, healthy fats, and whole ingredients.
Here’s a general breakdown of a well-rounded molcajete meal:
- Protein: Lean cuts of steak, chicken, or seafood pack in the protein
- Vegetables: Roasted tomatoes, onions, and nopales are loaded with fiber, vitamins A and C, and antioxidants
- Healthy Fats: Avocados provide monounsaturated fats and potassium
- Herbs and Spices: Garlic, chiles, and cilantro bring anti-inflammatory and immune-boosting benefits
- Tortillas: Whole corn tortillas are gluten-free and full of complex carbs
If you’re watching calories, you can skip the cheese or use leaner proteins. You can also control the heat, salt, and oil levels depending on your dietary needs.
Why Homemade Beats Restaurant Versions
Here’s the truth: when you make molcajete at home, you’re in control. Restaurant versions often go heavy on oil, cheese, and sodium. At home, you can make swaps, portion your proteins, and load up on veggies.
You also get to pick the quality of ingredients. Fresh tomatoes, organic meats, seasonal vegetables—you get to go as wholesome or indulgent as you like.
And let’s not forget the biggest benefit: pride. There’s nothing like watching your friends and family devour a dish that you crafted from scratch—with a stone tool, no less.
FAQs about Mincemeat Pie Recipe
What ingredients do I need for a traditional mincemeat pie?
Traditional mincemeat pie requires a mixture of minced meat (typically beef or lamb), suet, fruits like apples and raisins, spices such as cinnamon, nutmeg, and cloves, and often a dash of brandy or rum for flavor. Over time, many variations have become popular, focusing more on sweet elements and less on meat.
Is it possible to make a vegetarian mincemeat pie?
Absolutely! Vegetarian mincemeat pies use vegetable suet or butter instead of traditional suet, and they exclude meat. The rich, spiced flavor comes from a blend of fruits, nuts, and spices, making it a delightful alternative for those avoiding meat.
How long does it take to make mincemeat pie?
Preparing mincemeat pie can vary in time. If you’re making the mincemeat from scratch, it might require about 2 hours, including preparation and cooking. The pie itself takes additional baking time, usually around 40-45 minutes in the oven.
Can I store mincemeat pie? How?
Mincemeat pie stores wonderfully. You can keep it refrigerated for up to five days. For longer storage, mincemeat pie can be frozen. Wrap it tightly in plastic wrap or aluminum foil and freeze for up to three months. Thaw in the refrigerator before reheating gently to serve.
What’s the best way to serve mincemeat pie?
Mincemeat pie tastes best when served warm. You can top it with ice cream, whipped cream, or a dollop of brandy butter for extra richness. It’s perfect as a holiday dessert or a special treat during the cold months.
Conclusion
Whether you go with the classic carne asada version or a veggie-packed alternative, the heart of this recipe lies in the process. Grinding your own salsa, layering ingredients by hand, and serving it all bubbling hot in the same stone vessel it was prepared in—it’s rustic, it’s real, and it’s ridiculously satisfying.
Plus, once you master this dish, you’ll want to keep your molcajete on the counter for everything from guacamole to moles to fire-roasted salsa. It’s not just a tool—it’s a tradition in your hands.
So what are you waiting for? Light the fire, prep your ingredients, and bring the molcajete magic into your kitchen. Your taste buds—and your guests—will thank you.