Mochi Ice Cream Recipe: Ever crave a chewy, cold, creamy bite of heaven? That’s mochi ice cream. This delightful dessert, with its soft, pillowy rice dough wrapped around rich, flavorful ice cream, has taken the world by storm. The best part? You can make it right at home—and it’s surprisingly easy (and super fun). Whether you’re new to mochi or looking to upgrade your dessert game, this step-by-step guide will show you how to master the art of homemade mochi ice cream.
What is Mochi Ice Cream?
Mochi ice cream is a fusion dessert that combines two beloved treats: traditional Japanese mochi and creamy ice cream. Mochi is a sticky, chewy rice dough made from glutinous rice flour (called mochiko). When wrapped around a small ball of ice cream, it transforms into a unique dessert that’s sweet, soft, and bursting with texture.
Each bite is a blend of smooth and stretchy, cold and warm (once it hits your mouth), creating a contrast that keeps you coming back for more. Mochi ice cream is available in a variety of flavors—matcha, mango, vanilla, chocolate, strawberry—but making your own lets you get as creative as you want.
Why You’ll Love Making Mochi Ice Cream at Home
Here’s the thing: store-bought mochi ice cream is good, but homemade? Game-changer. First off, you control everything—the sweetness, flavors, portion size, and ingredients. Want dairy-free or vegan ice cream? No problem. Need to keep it gluten-free? Mochi is naturally gluten-free!
Homemade mochi ice cream is also a fun activity for families, foodies, and dessert lovers. It takes a little time, sure, but the process is satisfying and almost meditative. Plus, there’s nothing like pulling a tray of mochi ice cream from your freezer and seeing the joy on someone’s face after their first bite.
Tools and Equipment You’ll Need
Before diving in, gather your tools. Mochi ice cream doesn’t require fancy equipment, but a few basic items make the process smoother:
- Ice cream scoop or small cookie scoop
- Microwave-safe bowl
- Whisk
- Rolling pin (or bottle!)
- Cornstarch for dusting
- Plastic wrap
- Cupcake liners or parchment paper
- Baking tray
- Freezer-safe container
- Kitchen scissors or pizza cutter
A clean workspace is essential because mochi can get sticky. Trust us—cornstarch will be your new best friend.
Ingredients You’ll Need
You only need a few ingredients to make this magic happen. Keep in mind: quality matters, especially when it comes to ice cream.
For the Mochi Dough:
- 1 cup mochiko (sweet rice flour/glutinous rice flour)
- 3/4 cup water
- 1/4 cup granulated sugar
- Cornstarch (for dusting and rolling)
For the Ice Cream Filling:
- Your favorite ice cream (1 pint or more depending on how many servings you want)
Choose high-quality ice cream with bold flavors and minimal air (low overrun). That way, it holds its shape and flavor better when frozen inside the mochi.
Choosing the Right Ice Cream Flavors
The sky’s the limit with ice cream choices! Here are a few popular options to get you started:
- Matcha Green Tea – Earthy, slightly bitter, and perfect for balancing the sweet mochi
- Strawberry – Classic and refreshing
- Vanilla Bean – A blank canvas that pairs with any fruit or topping
- Chocolate – Rich and decadent
- Mango or Passionfruit – Tropical and tangy
Experiment with gelato, frozen yogurt, or dairy-free ice creams made with almond, oat, or coconut milk. Just make sure it’s firm before you start wrapping it with mochi.
Step-by-Step Guide to Making Mochi Ice Cream
Let’s break it down, step by step. This process takes patience, but it’s totally doable. Give yourself a couple of hours (most of it is just freezing time).
Step 1: Prepare the Ice Cream Balls
Begin by scooping your favorite ice cream into small, round balls using an ice cream scoop. Place each ball on a parchment-lined tray and freeze for at least 1 hour. The firmer the ice cream, the easier it will be to wrap later.
Step 2: Make the Mochi Dough
In a microwave-safe bowl, whisk together 1 cup glutinous rice flour, ¼ cup sugar, and 1 cup water until smooth. This mixture forms the base of your stretchy mochi dough.
Step 3: Cook the Mochi Dough
Cover the bowl loosely with plastic wrap and microwave for 1 minute. Stir, then microwave for another minute. Stir again and microwave for a final 30–60 seconds until the dough becomes thick, sticky, and slightly translucent.
Step 4: Let the Dough Cool
Dust a clean surface generously with cornstarch. Transfer the hot mochi dough onto the surface and allow it to cool for 10–15 minutes. Cornstarch prevents sticking, so be generous.
Step 5: Roll and Cut the Dough
Once cool enough to handle, flatten the dough using a rolling pin dusted with cornstarch. Roll it to about ¼-inch thickness. Use a round cutter or cup to cut circles large enough to wrap around the ice cream balls.
Step 6: Wrap Ice Cream in Mochi
Place a frozen ice cream ball in the center of each mochi circle. Quickly wrap the dough around it, pinching to seal the bottom. Freeze for 30 minutes before serving. Enjoy!
Tips for Perfect Mochi Ice Cream
Getting mochi ice cream just right takes a bit of practice, but a few expert tips can help you nail it every time.
- Keep the ice cream super cold – This can’t be overstated. The colder and firmer your ice cream balls, the easier they’ll be to wrap. Soft ice cream will melt too quickly and ruin the dough.
- Use plenty of cornstarch – Mochi dough is incredibly sticky. Don’t be shy with the cornstarch on your hands, tools, and surface. You can always dust off the excess later.
- Work fast – Once you start wrapping, speed is key. Take out only a few ice cream balls at a time from the freezer so they don’t melt while you’re wrapping.
- Freeze wrapped mochi quickly – As soon as you finish wrapping each mochi ball, get it back in the freezer. This helps maintain its shape and keeps everything fresh.
- Use plastic wrap to help shape the mochi – Wrapping the mochi ball tightly in plastic wrap helps create a smooth, round shape and prevents air pockets or cracks.
With a little patience and practice, you’ll get that perfect bite—soft, stretchy mochi with a creamy frozen center that doesn’t ooze or crack.
Common Mistakes to Avoid
Even though the recipe sounds simple, there are a few pitfalls that can lead to disappointing results. Here’s what to watch out for:
- Using the wrong flour – You must use glutinous rice flour (mochiko or shiratamako), not regular rice flour. The wrong flour will result in a dough that doesn’t stretch or become sticky.
- Undercooking the mochi – If you don’t fully cook the mochi dough, it’ll stay gooey and raw-tasting. Make sure it turns translucent and pulls away from the bowl.
- Overheating the dough – On the flip side, overheating can make the mochi dry and rubbery. Stick to the cooking times and stir between intervals.
- Letting dough dry out – Once mochi is rolled out, it dries quickly. Always cover unused dough with plastic wrap or a towel.
- Freezing too slowly – Slow freezing can result in icy texture or freezer burn. Use a quick-freeze setting if available on your freezer.
Avoid these mistakes, and you’re already ahead of the curve.
Storage Tips: How to Keep Mochi Ice Cream Fresh
Homemade mochi ice cream doesn’t last forever, but with proper storage, you can enjoy them for up to a month. Here’s how to store them the right way:
- Wrap individually – Keep each mochi ice cream wrapped in plastic wrap to prevent freezer burn and sticking.
- Use airtight containers – After wrapping, place them in an airtight, freezer-safe container to protect against moisture and freezer odors.
- Label and date – If you’re making different flavors, label each mochi ball and write the date. You’ll thank yourself later!
- Avoid thawing and refreezing – Once thawed, the texture of the mochi and ice cream can suffer. Always take out only what you plan to eat.
When you’re ready to serve, let your mochi ice cream sit at room temperature for 2–3 minutes. It softens just enough to become chewy and delicious.
Flavor Variations You Should Try
Why stick to just one flavor when the possibilities are endless? Once you master the basic technique, the door is wide open to explore unique and delicious variations.
Strawberry Mochi Ice Cream
Fresh, fruity, and kid-approved! Use real strawberry ice cream or blend fresh berries into vanilla ice cream before freezing. You can even add a tiny piece of real strawberry in the center for a surprise.
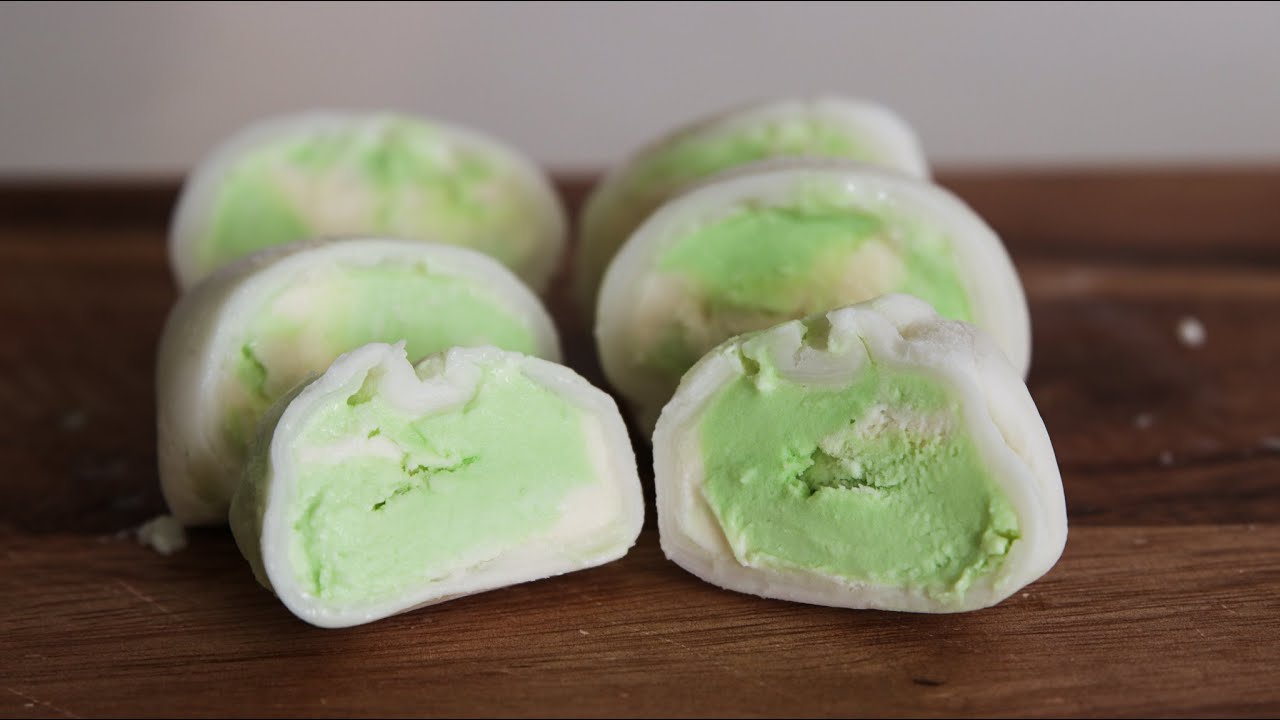
Matcha Green Tea Mochi Ice Cream
A fan favorite! The earthy bitterness of matcha perfectly balances the sweet mochi dough. You can even add a little matcha powder to the mochi dough itself for extra flavor and color.
Chocolate Mochi Ice Cream
Rich and indulgent, chocolate mochi is perfect for dessert lovers. Use chocolate ice cream or create a fudge core. Sprinkle cocoa powder with the cornstarch for a chocolatey twist on the outer layer.
Bonus Ideas
- Mango Coconut Mochi – Mango ice cream with shredded coconut in the dough
- Cookies & Cream Mochi – Crushed Oreos mixed into vanilla ice cream
- Coffee Mochi – Espresso-infused ice cream with cocoa-dusted mochi dough
Get creative! Mochi is a blank canvas for your imagination.
Is Mochi Ice Cream Healthy?
Let’s be honest—mochi ice cream isn’t exactly a salad. But it can still be part of a balanced lifestyle if enjoyed in moderation. Here’s a quick breakdown:
| Nutrient | Per Piece (approx.) |
|---|---|
| Calories | 100–130 kcal |
| Sugar | 12–15g |
| Fat | 2–4g |
| Gluten-Free | Yes (if made with mochiko) |
| Dairy-Free | Optional (use dairy-free ice cream) |
To make it healthier, you can:
- Use low-sugar or light ice cream
- Make your own ice cream with fruits or yogurt
- Limit portion size (cut in half for a quick bite)
- Skip artificial colors and use natural fruit-based flavors
At the end of the day, it’s dessert—so savor every bite without guilt!
Where Did Mochi Ice Cream Come From?
Mochi itself dates back thousands of years in Japan and is traditionally eaten during New Year’s celebrations. But mochi ice cream? That’s a modern twist.
It was popularized in the U.S. in the 1990s, credited to a Japanese-American entrepreneur who had the brilliant idea of wrapping traditional mochi around Western-style ice cream. Since then, it’s gone global.
Today, you can find mochi ice cream everywhere—from grocery stores to trendy dessert shops. But nothing beats the homemade version with your favorite flavors.
Serving Suggestions
Serving mochi ice cream is simple, but adding a few thoughtful touches can elevate it from snack to showstopper.
- Dust with matcha or cocoa powder for visual appeal.
- Slice in half to show off the ice cream center—perfect for social media shots.
- Serve on chilled plates to prevent early melting.
- Add fresh fruit like strawberries, mango, or kiwi on the side.
- Drizzle chocolate or caramel sauce for an indulgent twist.
Want to get fancy? Stack multiple mochi balls in a dessert tower or serve them with a scoop of sorbet for a frozen fusion plate.
FAQs about Mochi Ice Cream Recipe
1. Can I make mochi ice cream without a microwave?
Yes! You can steam the mochi dough in a steamer for about 15 minutes instead of microwaving it. Stir halfway through to ensure even cooking.
2. How long does homemade mochi ice cream last in the freezer?
Properly stored, it can last up to 1 month. Wrap each piece tightly and keep them in an airtight container to prevent freezer burn.
3. Can I make vegan mochi ice cream?
Absolutely! Just use a dairy-free ice cream made with coconut, almond, or oat milk. The mochi dough itself is naturally vegan.
4. Why is my mochi dough too sticky or hard to work with?
This is usually due to undercooking or not using enough cornstarch. Always dust your surface and tools generously.
5. What’s the best way to eat mochi ice cream?
Let it sit at room temperature for 2–3 minutes before eating so the mochi softens and the ice cream becomes just the right texture—chewy, creamy perfection!
Final Thoughts
Mochi ice cream is more than just a trendy treat—it’s a fun, customizable, and downright delicious dessert that anyone can make at home. With just a few ingredients and some practice, you’ll be creating soft, chewy, creamy bites of joy that rival anything you’d find in a store.
From choosing your favorite ice cream flavor to wrapping it in homemade mochi dough, every step is a chance to make something special—and uniquely yours. So why not roll up your sleeves, dust off that mochiko flour, and create your own mochi masterpiece today?