Mini Apple Pie Recipe: Mini apple pies are the ultimate bite-sized dessert that combines the warm, cozy flavors of traditional apple pie with the convenience of single servings. Imagine all the sweetness of spiced apples, the buttery crispness of a golden crust, and the aroma of cinnamon filling your kitchen—only in a perfectly portioned size. Unlike a large pie that requires slicing and serving, mini apple pies are grab-and-go delights that look just as good as they taste.
Another reason people adore mini pies is portion control. Instead of feeling guilty about eating a large slice of pie, you can enjoy just one mini pie without overindulging. Plus, they bake faster than a traditional apple pie, which means you get to enjoy them sooner.
In this guide, we’ll walk you through everything step by step—from gathering ingredients to baking and serving—so you can create bakery-style mini apple pies right at home.
Ingredients You’ll Need
The beauty of mini apple pies lies in their simplicity. With just a handful of pantry staples and fresh apples, you can whip up this dessert anytime. Below is a breakdown of what you’ll need.
For the Pie Crust
- 2 ½ cups all-purpose flour
- 1 cup (2 sticks) cold unsalted butter, cubed
- 1 teaspoon salt
- 1 tablespoon granulated sugar
- 6–8 tablespoons ice water
(Tip: You can also use store-bought pie crust if you’re short on time, but homemade always gives a flakier, richer result.)
For the Apple Filling
- 4 medium apples (Granny Smith, Honeycrisp, or a mix)
- ½ cup granulated sugar
- ¼ cup brown sugar
- 1 teaspoon ground cinnamon
- ¼ teaspoon ground nutmeg
- 2 tablespoons all-purpose flour (to thicken)
- 1 tablespoon lemon juice (to prevent browning)
Optional Toppings and Garnishes
- Egg wash (1 egg + 1 tablespoon water, for brushing)
- Coarse sugar (for sprinkling)
- Caramel sauce or whipped cream for serving
Essential Tools and Equipment
To make your baking process smooth and stress-free, it’s helpful to have the right tools ready before you start.
- Rolling pin – for flattening the dough evenly
- Round cookie cutter or glass – to cut out circles for mini pie crusts
- Muffin tin or mini pie pans – the perfect mold for shaping pies
- Mixing bowls – for preparing dough and apple filling
- Pastry brush – for applying egg wash
- Sharp knife or peeler – for slicing apples thinly
- Measuring cups and spoons – to keep the recipe precise
Don’t worry if you don’t own a muffin tin; you can get creative by using ramekins, tart pans, or even shaping the pies by hand. The key is ensuring the crust holds the filling securely while baking.
Having these tools ready makes the process seamless, ensuring you focus on the fun part—assembling and baking your pies!
Step-by-Step Guide to Making Mini Apple Pies
Step 1 – Preparing the Pie Dough
Start by making the crust. In a large mixing bowl, combine flour, sugar, and salt. Add in the cold, cubed butter and use a pastry cutter or your fingers to work it into the flour until the mixture resembles coarse crumbs. Slowly drizzle in ice water, one tablespoon at a time, and mix until the dough comes together. Divide it into two discs, wrap in plastic, and refrigerate for at least 30 minutes before rolling.
This chilling step is crucial—it prevents the butter from melting too quickly in the oven and ensures a flaky crust.
Step 2 – Making the Apple Filling
While the dough chills, peel, core, and thinly slice the apples. Place them in a large bowl and toss with lemon juice, sugars, flour, cinnamon, and nutmeg. This not only flavors the filling but also helps absorb excess juice so your pies don’t turn soggy. Let the mixture rest for 10 minutes to draw out the natural apple juices.
The result? A perfectly spiced, slightly caramelized filling that will bubble beautifully inside your pies.
Step 3 – Rolling Out and Cutting the Dough
Once your dough has chilled, lightly flour your work surface and rolling pin. Roll out one disc of dough into a thin, even sheet, about ⅛ inch thick. Use a round cookie cutter (or the rim of a drinking glass) to cut circles large enough to fit into your muffin tin wells or mini pie pans, with a little extra dough hanging over the edges.
Gently press each dough circle into the greased muffin tin. Be careful not to stretch the dough too much—this could cause shrinking while baking. If the dough cracks, simply patch it with a small piece of leftover dough. After lining the tin, place it back in the fridge for a few minutes to firm up again.
Keeping the dough cold at every stage is key to achieving that golden, flaky crust. It’s like layering butter and flour into hundreds of tiny sheets—when the butter melts in the oven, it releases steam, creating those airy, tender layers we all love in a good pie crust.
Step 4 – Assembling the Mini Pies
Now comes the fun part: filling your pies! Spoon the prepared apple mixture into each crust-lined cup, making sure not to overfill. The apples will soften and shrink slightly while baking, so a gentle mound is perfect.
For the top crust, you have several creative options:
- Classic Round Lid: Cut smaller circles of dough and place them over the filling. Seal by pinching the edges with a fork.
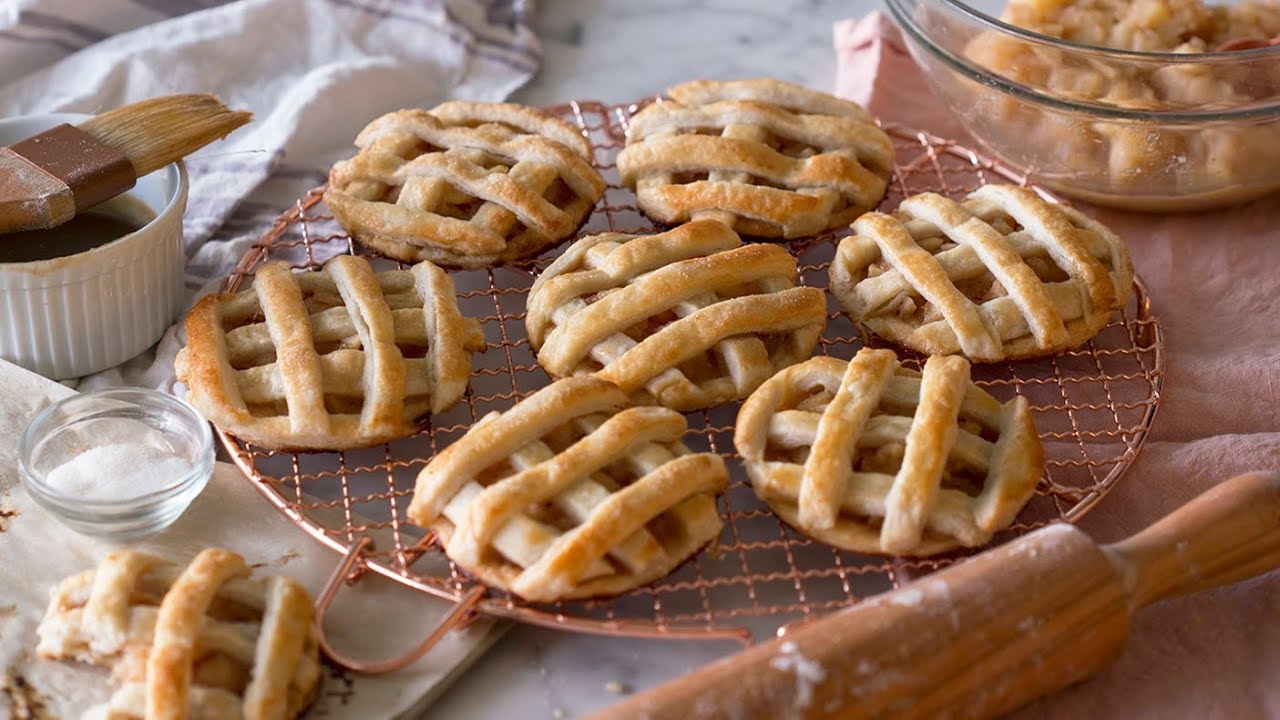
- Lattice Design: Cut thin strips of dough and weave them across the filling for that iconic pie look.
- Cut-Out Shapes: Use small cookie cutters (hearts, stars, or leaves) to create decorative tops that also let steam escape.
Brush the tops with egg wash and sprinkle with coarse sugar for a golden, sparkling finish. This not only makes the pies look bakery-worthy but also adds a slight crunch to each bite.
Step 5 – Baking the Mini Apple Pies
Preheat your oven to 375°F (190°C). Place the muffin tin on the middle rack and bake for about 20–25 minutes, or until the crusts are golden brown and the filling is bubbling. Keep an eye on them during the last few minutes; small pies can go from golden to overbaked quickly.
Once baked, let the pies cool in the tin for about 10 minutes before carefully removing them. This cooling period helps the filling set and prevents the pies from falling apart. If you used a muffin tin, run a small knife around the edges to loosen them.
The aroma that fills your kitchen during this step is pure magic—warm cinnamon, buttery crust, and sweet apples blending together. At this point, resisting the urge to dive right in is the hardest part!
Tips for the Perfect Mini Apple Pies
Even though mini apple pies are fairly simple, a few pro tips can take them from good to exceptional.
- Choose the right apples: A mix of tart Granny Smith and sweet Honeycrisp or Fuji apples gives the best balance of flavors.
- Prevent soggy bottoms: Sprinkle a little flour or breadcrumbs at the base of the crust before adding filling. This soaks up excess juice.
- Keep everything cold: From butter to water to dough, the colder the ingredients, the flakier the crust.
- Vent the pies: Always create small slits or cutouts in the top crust so steam can escape. This keeps the filling from bubbling over.
- Rotate the pan halfway through baking: Ensures even browning and prevents hot spots.
By keeping these tricks in mind, your mini pies will come out bakery-level every time—crispy on the outside, tender on the inside, and filled with perfectly spiced apples.
Variations of Mini Apple Pies
Mini apple pies are endlessly versatile. Here are a few fun twists you can try:
- Crumble Topping – Instead of a top crust, sprinkle a mixture of butter, brown sugar, flour, and oats over the filling for a crunchy, streusel-like finish.
- Caramel Drizzle – After baking, drizzle warm caramel sauce over the pies for extra indulgence.
- Cheddar Cheese Crust – Add finely shredded cheddar to the dough for a savory-sweet combo that’s surprisingly delicious.
- Gluten-Free Option – Substitute with a gluten-free flour blend for the crust.
- Vegan Mini Apple Pies – Use coconut oil or vegan butter for the crust, and replace egg wash with plant-based milk.
These variations allow you to tailor the pies to different tastes, dietary needs, or occasions. Imagine a dessert table filled with an assortment of mini pies—each one unique, yet equally irresistible.
Serving Suggestions
Mini apple pies are delightful on their own, but the right accompaniments can turn them into a show-stopping dessert. Imagine pulling a tray of warm pies from the oven, their golden crusts glistening with sugar. What could possibly make them better? The answer lies in how you serve them.
- Classic Style: Serve warm with a scoop of vanilla ice cream. The contrast of hot pie and cold ice cream creates that irresistible melt-in-your-mouth experience.
- With Whipped Cream: A dollop of freshly whipped cream adds lightness and creaminess, balancing the spiced apple filling.
- Caramel or Chocolate Drizzle: Drizzle warm caramel sauce for a rich, decadent finish. For a twist, try melted chocolate.
- Paired with Drinks: Coffee, chai latte, or spiced apple cider make perfect companions for these pies. For adults, pair them with a glass of sweet dessert wine.
- Holiday Presentation: Sprinkle a little powdered sugar over the top for a festive snow-dusted effect.
Serving is all about creating an experience. Whether you’re plating them for a dinner party or packing them into treat boxes as gifts, mini apple pies are guaranteed to impress.
Storage and Make-Ahead Tips
One of the best things about mini apple pies is that they can be made ahead of time and stored without losing their flavor.
- Room Temperature: Store leftover pies in an airtight container for up to 2 days. They’ll stay crisp and fresh.
- Refrigerator: Extend their shelf life by keeping them in the fridge for 4–5 days. Just warm them in the oven before serving.
- Freezing: Mini apple pies freeze beautifully. Once baked and cooled, wrap each pie tightly in plastic wrap, then place in a freezer bag. They can last up to 3 months. To serve, reheat in a 350°F (175°C) oven for 10–15 minutes.
- Make-Ahead Option: Prepare the dough and filling separately, store them in the fridge, and assemble the pies just before baking. This method saves time on busy days while still giving you fresh-baked pies.
Having these pies ready to go means you’re always prepared for surprise guests, potlucks, or late-night cravings.
Common Mistakes to Avoid
Even simple recipes come with a few pitfalls. Here are the most common mistakes people make with mini apple pies—and how to avoid them.
- Overfilling the Pies – Too much filling can cause juices to overflow, making the crust soggy or burning in the pan. Always leave a little space at the top.
- Using the Wrong Apples – Soft apples like Red Delicious break down too much, leaving you with mush instead of tender slices. Stick to firm varieties like Granny Smith or Honeycrisp.
- Skipping Vent Holes – If you don’t cut slits or create lattice designs, steam can’t escape, leading to soggy pies.
- Underbaking – A pale crust means undercooked dough. Wait until the tops are golden brown and the filling bubbles.
- Not Letting Them Cool – Cutting or serving too soon can make the filling spill out. Give the pies at least 10 minutes to set before removing from the pan.
Avoid these mistakes, and your pies will turn out perfect every time—crispy, golden, and deliciously filled.
Nutritional Information
While mini apple pies are an indulgence, it’s helpful to know what’s inside each serving. Keep in mind these values can vary depending on your ingredients and toppings.
Approximate Nutrition (per mini pie):
- Calories: 220–260
- Carbohydrates: 35g
- Sugars: 18g
- Protein: 3g
- Fat: 9g
- Fiber: 2g
Compared to a large slice of traditional apple pie (which can run 400+ calories), mini pies give you all the flavor in a lighter portion. Plus, making them at home allows you to control the sugar and fat content, swap in whole wheat flour, or even reduce sugar without sacrificing taste.
Why Homemade Mini Apple Pies are Better than Store-Bought
You’ve probably seen mini apple pies sold in bakeries or grocery stores, but nothing beats the homemade version.
- Freshness: Store-bought pies often sit on shelves for days. Homemade pies are baked fresh, giving you the best texture and flavor.
- Customization: You can adjust the sweetness, spice levels, and crust style to suit your preferences. Add a crumble topping, drizzle with caramel, or keep it simple—it’s all up to you.
- Healthier Ingredients: When you bake at home, you know exactly what’s going in. No preservatives, artificial flavors, or unnecessary additives.
- Cost Savings: A batch of homemade pies costs far less than buying them individually from a bakery.
- Love and Effort: Food always tastes better when made with care. Sharing homemade mini pies adds a personal touch that no store-bought dessert can match.
When you bite into a warm, flaky, freshly baked mini apple pie, you’ll instantly know why homemade is always worth the effort.
FAQs about Mini Apple Pie Recipe
1. Can I use store-bought pie crust for mini apple pies?
Yes! While homemade crust gives the flakiest texture, store-bought crust is a great shortcut when you’re short on time.
2. What are the best apples for mini apple pies?
Granny Smith, Honeycrisp, or Fuji apples are best because they hold their shape and provide a sweet-tart balance.
3. Can I make mini apple pies ahead of time?
Absolutely. You can bake them in advance and reheat, or prepare the dough and filling separately to assemble later.
4. How do I prevent the crust from getting soggy?
Sprinkle a little flour or breadcrumbs on the bottom crust before adding filling. Baking until golden brown also helps.
5. Can I make these pies without a muffin tin?
Yes. You can use ramekins, tart pans, or even shape hand pies for a rustic version.
Conclusion
Mini apple pies are more than just a dessert—they’re little bundles of comfort, joy, and tradition wrapped in a flaky crust. From their irresistible aroma to the sweet-tart apple filling, every bite feels like a hug from the inside out. With just a handful of ingredients and simple steps, you can create pies that look impressive, taste incredible, and bring smiles to everyone at the table.
Whether you serve them at holiday feasts, casual gatherings, or as an afternoon pick-me-up, mini apple pies are sure to become a favorite in your kitchen. With the tips, variations, and step-by-step guide shared here, you’re now equipped to bake mini apple pies that rival any bakery’s version. So roll up your sleeves, preheat your oven, and get ready to enjoy one of the most comforting treats you’ll ever bake!