Milk Bar Pumpkin Pie Recipe: Pumpkin pie is one of those timeless desserts that never fails to bring comfort and joy, especially around the holidays. But when Milk Bar, the world-famous bakery founded by Christina Tosi, puts its own twist on this classic, the result is something truly extraordinary. The Milk Bar Pumpkin Pie isn’t just your average holiday pie—it’s rich, creamy, perfectly spiced, and baked in a unique crust that adds texture and flavor you won’t find in traditional recipes.
In this guide, we’re going to dive deep into how you can recreate the Milk Bar Pumpkin Pie in your own kitchen. From the list of ingredients you’ll need to the step-by-step instructions that guarantee success, this article will walk you through every detail so you can wow your friends and family with a bakery-level dessert.
Why Milk Bar Pumpkin Pie is Unique
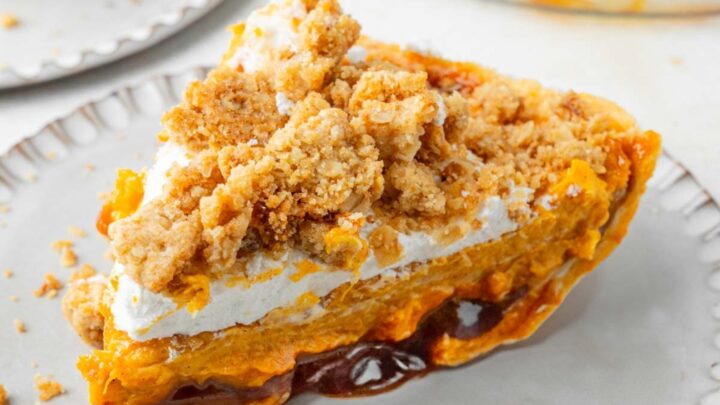
What makes Milk Bar’s pumpkin pie stand out isn’t just the filling—it’s the entire experience. While a traditional pumpkin pie uses a simple buttery crust, the Milk Bar version typically incorporates a more playful, textural crust made with cookie crumbs or cereal, giving it that signature Christina Tosi flair. The filling itself is rich, custardy, and spiced to perfection, striking the perfect balance between sweet and savory notes.
Unlike the traditional versions, Milk Bar’s pumpkin pie often leans on unexpected ingredients that amplify flavor and texture. For example, using condensed milk instead of heavy cream creates a creamier consistency, while their famous cereal milk-style add-ins give subtle hints of nostalgia in every bite. This isn’t just a dessert—it’s an experience.
A Modern Twist on a Classic Dessert
Pumpkin pie has been around for centuries, often gracing holiday tables as a symbol of warmth and family tradition. Milk Bar takes that tradition and turns it into something modern without losing its essence. The pie becomes more playful, more indulgent, and undeniably Instagram-worthy. Think of it as pumpkin pie dressed up for a party—it has all the comforting flavors you love but with a creative edge that makes it unforgettable.
Perfect Occasions to Serve This Pie
While Thanksgiving is the obvious time to bring out a pumpkin pie, Milk Bar’s version is versatile enough for a variety of occasions. Imagine serving it at a fall dinner party, a Friendsgiving, or even as a weekend baking project to share with loved ones. Its unique flavor and presentation also make it a great option for potlucks or festive gatherings where you want to stand out. Trust me, when you show up with a Milk Bar-inspired pumpkin pie, everyone will be asking for the recipe.
Ingredients You’ll Need
Essential Ingredients for the Pie Crust
The crust is where Milk Bar takes a creative turn. Instead of just flour, butter, and water, this recipe often uses cookie crumbs or graham crackers for extra flavor and crunch. Here’s what you’ll need:
- 2 cups graham cracker crumbs (or gingersnap cookies for more spice)
- ½ cup granulated sugar
- 1 teaspoon cinnamon
- ½ teaspoon nutmeg
- ½ cup unsalted butter, melted
This crust holds up beautifully against the creamy filling and adds a slightly caramelized, toasty flavor that complements pumpkin perfectly.
Core Ingredients for the Pumpkin Filling
The filling is where the magic happens. You’ll need:
- 1 can (15 oz) pumpkin puree (not pumpkin pie filling)
- 1 can (14 oz) sweetened condensed milk
- 2 large eggs
- 1 teaspoon vanilla extract
- 1 teaspoon ground cinnamon
- ½ teaspoon ground ginger
- ½ teaspoon ground nutmeg
- ¼ teaspoon ground cloves
- ½ teaspoon salt
These ingredients work together to create that silky, custard-like texture while layering in the warmth of fall spices.
Optional Toppings and Variations
Here’s where you can get creative:
- Whipped cream or whipped topping
- A sprinkle of crushed gingersnaps or graham crackers
- A drizzle of caramel sauce
- A dusting of powdered sugar
- Candied pecans for crunch
Milk Bar is all about fun and unexpected twists, so feel free to add your own flair.
Step-by-Step Guide to Making Milk Bar Pumpkin Pie
Step 1 – Preparing the Pie Crust
Start by making a sturdy and flavorful crust. You can use graham crackers, crushed cookies, or a classic pastry crust depending on your preference. Crush the base ingredient into fine crumbs, mix with melted butter and a little sugar, then press it firmly into a pie dish. Make sure it’s even on the bottom and up the sides. Chill the crust in the fridge for at least 15 minutes to help it set before baking. For extra flavor, you can lightly pre-bake the crust for about 10 minutes.
Step 2 – Mixing the Pumpkin Filling
In a large bowl, whisk together canned pumpkin puree, sugar, eggs, heavy cream, and warm spices like cinnamon, nutmeg, ginger, and cloves. To mimic Milk Bar’s signature richness, you can add a splash of sweetened condensed milk or a bit of brown butter for depth. The filling should be smooth, velvety, and slightly thick but pourable.
Step 3 – Assembling the Pie
Pour the pumpkin filling into the prepared crust, smoothing it out with a spatula. Tap the pie dish gently on the counter to release any air bubbles. This helps ensure the filling bakes evenly without cracks.
Step 4 – Baking to Perfection
Preheat your oven to 350°F (175°C). Place the pie on the middle rack and bake for 45–55 minutes, or until the edges are set but the center still has a slight jiggle. Be careful not to overbake—it will continue setting as it cools. For the authentic Milk Bar-style touch, you can sprinkle a bit of crumb topping (like cookie crumbs or streusel) around the edges before the pie finishes baking.
Step 5 – Cooling and Serving
Once baked, remove the pie from the oven and let it cool completely at room temperature. This allows the filling to firm up. For best results, refrigerate it for at least 2 hours before serving. When ready, slice and top with whipped cream, caramel drizzle, or a sprinkle of cinnamon. Each bite should be creamy, spiced, and indulgent—just like the Milk Bar classic.
Tips and Tricks for the Perfect Milk Bar Pumpkin Pie
How to Avoid a Soggy Crust
Nobody likes a soggy crust, especially when you’ve worked hard to get that crunchy, flavorful base. To avoid this:
- Pre-bake the crust before adding the filling (blind baking).
- Brush the crust with a thin layer of beaten egg white before pouring in the filling—this creates a moisture barrier.
- Make sure the crust cools completely before adding the filling.
Best Pumpkin Puree for Creamy Texture
Canned pumpkin puree works best here, as it has the perfect balance of moisture and flavor. If you want to use fresh pumpkin, roast it first, then blend into a smooth puree. Just be sure to strain out excess liquid, or your filling could turn runny.
Flavor Boosting Additions
Want to level up your pie? Here are a few fun ways:
- Add a tablespoon of bourbon or dark rum for depth of flavor.
- Mix in a bit of brown sugar for caramel-like richness.
- Swap out traditional whipped cream for a maple or cinnamon-flavored version.
These little tweaks can transform your pumpkin pie into something that feels straight out of the Milk Bar playbook.
Storing and Reheating Pumpkin Pie
Refrigerating Your Pie
Pumpkin pie is best stored in the fridge due to its custard filling. Cover it loosely with plastic wrap or foil, and it will stay fresh for up to 4 days.
Freezing for Longer Storage
If you want to make your pie ahead of time, freezing is a great option:
- Wrap the cooled pie tightly in plastic wrap and then in aluminum foil.
- Freeze for up to 2 months.
- Thaw in the fridge overnight before serving.
Reheating Without Losing Texture
To enjoy warm pumpkin pie without ruining its creamy texture:
- Preheat your oven to 300°F (150°C).
- Warm the pie (or individual slices) for about 10–15 minutes.
- Avoid the microwave—it can make the crust soggy.
Serving Ideas and Pairings
Pumpkin pie is delicious on its own, but when you’re serving a Milk Bar-inspired version, it deserves a little extra flair. Here are some creative serving ideas:
Whipped Cream and Ice Cream Options
- Classic Whipped Cream: A dollop of freshly whipped cream balances the spices with lightness.
- Maple Whipped Cream: Add a teaspoon of maple syrup to your whipped cream for a warm, fall-inspired twist.
- Vanilla Ice Cream: A scoop of ice cream on the side provides contrast between hot and cold.
- Pumpkin Spice Ice Cream: For pumpkin lovers, double up with pumpkin ice cream for maximum flavor.
Coffee, Tea, and Wine Pairings
Pairing drinks with pumpkin pie enhances the whole experience:
- Coffee: A dark roast coffee with nutty undertones pairs beautifully with pumpkin pie.
- Chai Tea: The spices in chai echo the pumpkin filling for a cozy, harmonious match.
- Dessert Wines: Sweet wines like Moscato or Riesling balance the spice while adding elegance.
- Hot Chocolate: For kids (and adults with a sweet tooth), a creamy hot chocolate is the perfect sidekick.
Holiday Presentation Tips
Want your pumpkin pie to steal the show at the holiday table? Try these ideas:
- Garnish with candied pecans for crunch and elegance.
- Dust with powdered sugar for a snowy holiday look.
- Serve slices with caramel drizzle for extra indulgence.
- Place the pie on a rustic wooden board with seasonal decorations like cinnamon sticks and cranberries.
Presentation makes the pie feel festive and adds that extra “wow” factor when guests first see it.
Common Mistakes to Avoid
Even experienced bakers can run into trouble with pumpkin pie. Here’s how to sidestep the most common issues:
Overbaking or Undercooking the Pie
Pumpkin pie should have a creamy custard-like center. If you bake it too long, it can crack and turn dry. If underbaked, it can stay runny. Always check for doneness around the edges and slight jiggle in the center.
Using the Wrong Type of Pumpkin
Canned pumpkin puree is your best friend here. Pumpkin pie filling (sold in cans) already has spices and sugar added, which can throw off the recipe. Stick to pure pumpkin puree for consistent results.
Not Allowing Proper Cooling
It’s tempting to slice into a warm pie fresh from the oven, but resist the urge. Pumpkin pie needs time to cool and set. Cutting too soon results in a runny mess. Cooling for several hours is essential for clean slices.
Nutritional Information
Pumpkin pie may be indulgent, but it also offers nutritional benefits thanks to pumpkin’s vitamins and fiber. Here’s a rough breakdown per slice (based on 8 servings):
Calories per Slice
- Approx. 310–350 calories, depending on toppings and crust variation.
Carbs, Protein, and Fat Breakdown
- Carbohydrates: 42g
- Protein: 6g
- Fat: 14g (with about 7g saturated fat)
Healthier Ingredient Substitutions
If you want a lighter version of this dessert, consider:
- Using low-fat condensed milk instead of full-fat.
- Swapping butter in the crust with coconut oil.
- Replacing sugar with maple syrup or honey for natural sweetness.
- Choosing a whole wheat or oat-based crust for more fiber.
These tweaks make the pie a little healthier without compromising flavor.
FAQs about Milk Bar Pumpkin Pie Recipe
Can I Make This Pie Ahead of Time?
Yes! Pumpkin pie actually tastes better the next day as the flavors have more time to blend. Bake it a day ahead, refrigerate overnight, and serve chilled.
Can I Use Fresh Pumpkin Instead of Canned?
Definitely. Roast fresh pumpkin until soft, scoop out the flesh, and puree it. Just make sure to drain any excess liquid before adding it to the filling to avoid a watery pie.
How Long Will the Pie Stay Fresh?
Stored in the refrigerator, pumpkin pie will last up to 4 days. For longer storage, freeze it for up to 2 months.
Can I Make It Gluten-Free?
Yes! Substitute the graham crackers with gluten-free cookies or gluten-free graham cracker crumbs. The filling is naturally gluten-free.
What Makes Milk Bar’s Recipe Different?
Milk Bar pumpkin pie stands out because of its creative crust and rich, custardy filling. It takes a classic dessert and gives it a playful, modern twist with unexpected textures and flavors.
Conclusion
The Milk Bar Pumpkin Pie is more than just dessert—it’s a conversation starter, a holiday table centerpiece, and a bite of nostalgia reimagined in a fun, modern way. From its crunchy, flavorful crust to its silky pumpkin filling, this pie checks all the boxes for flavor, texture, and presentation. Whether you’re making it for Thanksgiving, Friendsgiving, or just a cozy weekend treat, this recipe is sure to impress.
By following this step-by-step guide, you’ll not only create a bakery-worthy pie but also enjoy the process of baking something that’s both creative and comforting. So grab your pumpkin puree, roll up your sleeves, and get ready to bake a pie that might just become your new holiday tradition.