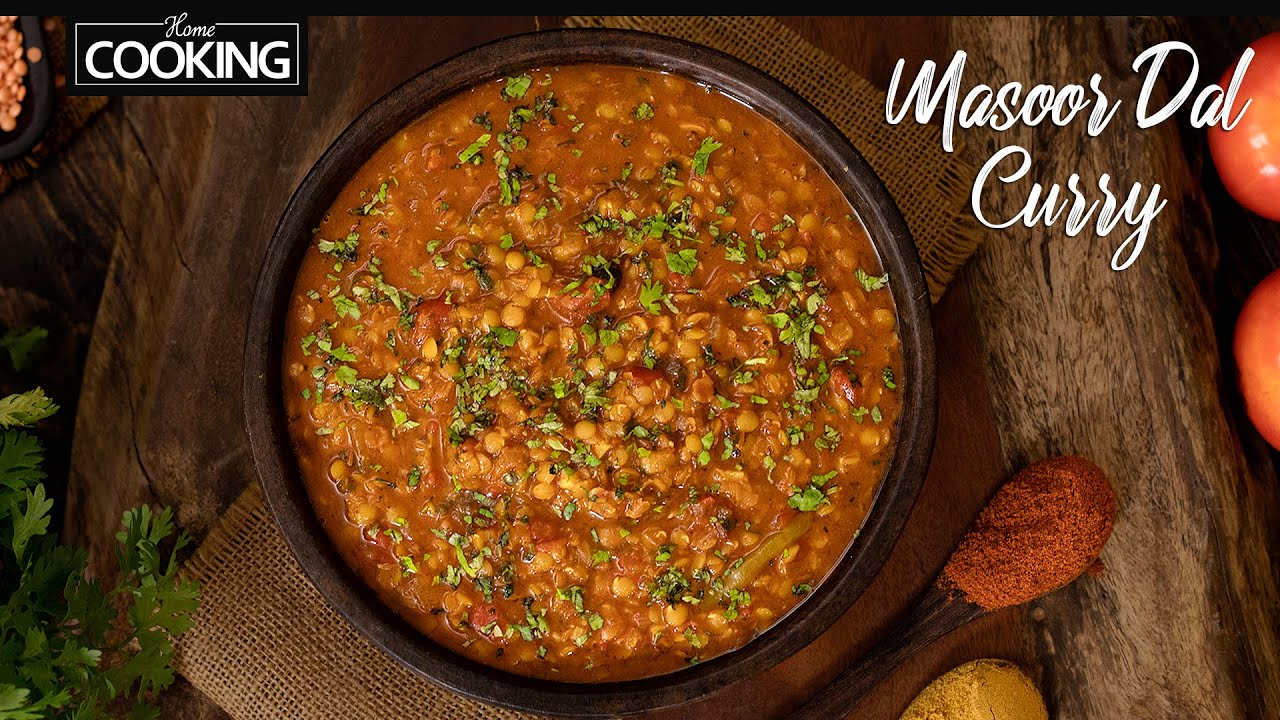
Masoor Dal Recipe: Masoor Dal, also known as red lentils, is one of the most popular and widely consumed lentils in Indian households. It’s known for its quick cooking time, rich taste, and creamy texture once cooked. Masoor Dal comes in two main varieties: whole (brown on the outside, orange inside) and split (orange and skinless). It’s often used in curries, soups, and stews due to its versatility and nutritional benefits.
What makes Masoor Dal a favorite across many kitchens is its simplicity and the ease with which it can be adapted to suit different palates. It’s a staple for both beginners and seasoned cooks. When cooked, Masoor Dal breaks down into a smooth, hearty consistency, making it perfect for comforting dal recipes that go well with rice, roti, or even bread.
Masoor Dal isn’t just about taste—it’s also packed with nutrients. From iron to protein, it brings a ton of health benefits to your plate without being too heavy on your pocket. Whether you’re cooking for a weeknight dinner or planning a wholesome meal for guests, Masoor Dal has you covered.
Why You’ll Love This Recipe
If you’re someone who enjoys comfort food that’s both healthy and tasty, this Masoor Dal recipe is for you. Here’s why you’ll love it:
- Quick Cooking: Unlike many other lentils, Masoor Dal cooks fast, making it ideal for busy schedules.
- Minimal Ingredients: You don’t need a fancy pantry to make it—just some basic Indian spices and aromatics.
- Highly Customizable: Want it spicy? Add more chili. Prefer creamy? Add coconut milk. The recipe is flexible.
- Budget-Friendly: Lentils are affordable, filling, and make large batches without breaking the bank.
- Nutrient-Dense: Packed with fiber, protein, and iron, this dish supports a balanced diet.
This recipe is designed for all levels—whether you’re cooking your first Indian dish or perfecting your dal game. Get ready for a comforting bowl of warmth that’s satisfying and nourishing.
Health Benefits of Masoor Dal
Nutritional Value
Masoor Dal isn’t just a comfort food—it’s a nutritional powerhouse. Just one cup of cooked Masoor Dal offers a wide array of essential nutrients that support overall health. Here’s what makes it stand out:
- High in Protein: Masoor Dal is a fantastic plant-based protein source. One cup provides around 18 grams of protein, perfect for vegetarians and vegans.
- Rich in Fiber: It’s loaded with dietary fiber which aids digestion, supports heart health, and helps regulate blood sugar levels.
- Low in Fat: This dal contains very little fat, which makes it a heart-friendly option.
- Packed with Iron: Iron is crucial for red blood cell production and energy levels. Masoor Dal helps combat anemia and fatigue.
- B Vitamins: It’s a great source of B-complex vitamins like folate and B6, essential for energy metabolism and brain health.
- Potassium and Magnesium: These minerals help regulate blood pressure and muscle function.
If you’re trying to eat healthier or lose weight, incorporating Masoor Dal into your diet is a no-brainer. It keeps you full for longer, prevents overeating, and boosts your energy naturally.
Why Masoor Dal is a Superfood
The term “superfood” often gets thrown around, but Masoor Dal truly deserves the title. Here’s why:
- Supports Heart Health: The fiber and antioxidants in Masoor Dal help lower cholesterol and protect your heart.
- Helps in Weight Management: Its high fiber and protein content promote satiety, reducing unnecessary snacking.
- Balances Blood Sugar: Lentils have a low glycemic index, making them suitable for diabetics.
- Boosts Immunity: With essential minerals and antioxidants, Masoor Dal supports a strong immune system.
- Improves Skin and Hair Health: Thanks to its iron, protein, and vitamin content, it contributes to glowing skin and strong hair.
It’s not just about physical health either—eating nourishing food like Masoor Dal also supports mental well-being. When your body feels good, your mind does too.
Types of Masoor Dal
Whole Masoor vs. Split Masoor
When you head to an Indian grocery store or even the lentils section in your local supermarket, you’ll often find two types of Masoor Dal:
- Whole Masoor Dal: This is unpolished and includes the brownish skin. It takes a bit longer to cook and has a nuttier flavor. The texture is slightly more firm.
- Split Masoor Dal: This is de-skinned and split into halves, appearing orange-red. It cooks faster and has a smoother, more creamy finish.
Both types have their merits. Whole Masoor is slightly more nutritious due to the presence of the skin, but split Masoor is preferred for quick weekday meals. Depending on your preference for texture and time, you can choose accordingly.
Choosing the Right Dal for Cooking
Here’s a simple guide to help you decide which one to use:
| Preference | Best Choice |
|---|---|
| Quick cooking | Split Masoor Dal |
| Hearty, rustic dishes | Whole Masoor Dal |
| Smooth texture | Split Masoor Dal |
| Slightly chewy texture | Whole Masoor Dal |
Ultimately, both are excellent, and your choice can also depend on the dish you’re preparing. Some recipes even combine both for a unique taste and texture.
Ingredients You’ll Need
Main Ingredients
Here’s a list of essential ingredients required for making a flavorful bowl of Masoor Dal:
- Masoor Dal (Red Lentils) – 1 cup, rinsed and soaked
- Onion – 1 medium, finely chopped
- Tomato – 1 large, chopped
- Garlic – 3-4 cloves, minced
- Ginger – 1-inch piece, grated
- Green Chilies – 1-2 (adjust to taste)
- Turmeric Powder – ½ tsp
- Red Chili Powder – ½ tsp (optional for heat)
- Cumin Seeds – 1 tsp
- Mustard Seeds – ½ tsp
- Salt – to taste
- Water – 2 to 3 cups (for cooking)
- Oil or Ghee – 2 tbsp
- Fresh Coriander – chopped, for garnish
These ingredients form the base of any good dal recipe. You can always tweak it based on what’s available or your taste preference.
Optional Ingredients for Extra Flavor
Want to level up your dal? Try adding these:
- Asafoetida (Hing) – Just a pinch for a distinct aroma
- Garam Masala – ½ tsp for warmth
- Lemon Juice – A splash for a tangy finish
- Kasuri Methi (Dried Fenugreek) – Crushed for extra aroma
- Curry Leaves – For a South Indian twist
These additions aren’t necessary but can make your Masoor Dal even more delightful.
Equipment Needed for Cooking
Basic Kitchen Tools
You don’t need any fancy gadgets to cook Masoor Dal. Here’s a simple list of what you’ll need:
- Large Pot or Saucepan – For boiling and simmering the dal
- Tempering Pan or Small Frying Pan – For the spice tempering
- Knife and Chopping Board – To prep your veggies
- Spatula or Wooden Spoon – For stirring
- Measuring Cups and Spoons – For accurate measurements
These are items you’ll find in most kitchens, making this dish extremely beginner-friendly.
Time-Saving Appliances
If you’re short on time, consider using:
- Pressure Cooker – Cuts down cooking time significantly
- Instant Pot – Great for hands-off cooking with a set-and-forget approach
- Blender – Optional, if you prefer a smoother dal
Pressure cookers and Instant Pots can reduce the cooking time of dal from 30 minutes to just about 8–10 minutes!
Preparation Before Cooking
Soaking the Dal
Soaking Masoor Dal is an important step that often gets overlooked, especially when you’re in a hurry. But taking 15–30 minutes to soak the lentils before cooking can make a big difference in texture, cook time, and even digestion.
Why soak Masoor Dal?
- Faster Cooking Time: Soaked lentils cook more quickly and evenly.
- Better Digestion: Soaking reduces phytic acid and other antinutrients, making it easier on your stomach.
- Improved Texture: Pre-soaked dal becomes softer and creamier, which is perfect for dal recipes.
How to soak:
- Rinse 1 cup of Masoor Dal thoroughly under running water until the water runs clear.
- Place the dal in a bowl and cover it with 2–3 cups of water.
- Let it soak for 30 minutes to 1 hour. If you’re short on time, even 15 minutes will help.
After soaking, drain the water and rinse once more before cooking. This prep step ensures your dal is soft, flavorful, and cooks in less time.
Chopping and Prepping Ingredients
While the dal is soaking, take this time to prep the other ingredients. Freshness matters when it comes to spices and aromatics, so make sure everything is ready before the cooking process starts.
Here’s your prep checklist:
- Chop 1 onion finely: This helps it cook faster and blend well with the dal.
- Dice 1 tomato: A fresh tomato adds acidity and balance.
- Mince 3–4 garlic cloves and grate 1 inch of ginger: You can also use ginger-garlic paste if you’re in a rush.
- Slice 1–2 green chilies: Optional, depending on your heat preference.
- Measure all spices: Turmeric, cumin seeds, red chili powder, and salt.
- Wash and chop coriander leaves: For garnishing later.
With everything prepped in advance, the cooking process becomes smooth and stress-free.
Step-by-Step Cooking Instructions
Step 1: Heating Oil and Tempering Spices
This is where the magic begins. Indian cooking often starts with what’s called a “tadka” or tempering of spices in hot oil or ghee. This technique unlocks the flavor and aroma of spices, making your dal irresistibly tasty.
- Heat 2 tablespoons of oil or ghee in a large pan on medium heat.
- Add 1 teaspoon cumin seeds and ½ teaspoon mustard seeds.
- Let them sizzle and pop for 30 seconds.
- Optional: Add a pinch of asafoetida (hing) for an earthy aroma.
- You can also toss in a few curry leaves for a South Indian twist.
Tempering the spices in hot oil releases their essential oils and enhances the depth of flavor in your dal. Don’t rush this step—it’s what takes your dal from average to amazing.
Step 2: Sautéing Aromatics
Now it’s time to build your flavor base. This step is crucial because it creates the foundation of taste for your dal.
- Add the chopped onions to the pan and sauté until golden brown (about 5–7 minutes).
- Stir occasionally to prevent burning.
- Once onions are soft and lightly caramelized, add the minced garlic, grated ginger, and green chilies.
- Cook for another 1–2 minutes until the raw smell disappears.
- Now add the chopped tomato and cook until soft and mushy (5 minutes).
- Sprinkle in ½ teaspoon turmeric powder, ½ teaspoon red chili powder, and salt to taste.
This combination of spices, onions, and tomatoes will form a rich masala base for your dal. Take your time here—the more you sauté, the deeper the flavors become.
Step 3: Cooking the Dal
With your masala base ready and dal soaked, it’s time to bring them together.
- Add the soaked and drained Masoor Dal to the pan.
- Stir everything well to coat the dal with the masala.
- Pour in 2½ to 3 cups of water, depending on how thick or soupy you want your dal.
- Stir, bring to a boil, then reduce the heat and cover with a lid.
- Let it simmer for 20–25 minutes or until the dal is soft and cooked through.
If you’re using a pressure cooker:
- Close the lid and cook on medium heat for 2–3 whistles.
- Let the pressure release naturally before opening.
If using an Instant Pot:
- Cook on high pressure for 6–8 minutes, then allow a natural release.
The dal should be soft but not mushy, with a creamy texture that still holds some body.
Step 4: Simmering and Seasoning
Once your dal is cooked, taste it—it should already be flavorful. But this is where you refine the flavor.
- Adjust salt and spice to your liking.
- If it feels too thick, add a bit more water. If too thin, simmer uncovered until it thickens.
- You can add a pinch of garam masala or a squeeze of lemon juice at this point for brightness.
Let it simmer on low heat for another 5–10 minutes to allow the flavors to meld together beautifully.
Step 5: Final Touches and Garnishing
Before serving, garnish your dal to elevate both its look and taste.
- Add chopped fresh coriander (cilantro) for a burst of freshness.
- Drizzle a teaspoon of ghee on top for extra richness (optional but recommended).
- You can also add a final tempering (tadka) of cumin seeds, red chili, and garlic in ghee for a dramatic finish.
This final touch adds aroma, texture, and a wow factor that brings the whole dish together.
Serving Suggestions
What to Serve with Masoor Dal
Masoor Dal is incredibly versatile and can be enjoyed in many different ways depending on your preference, mood, or the occasion. Whether you want something light and simple or hearty and indulgent, Masoor Dal fits the bill.
Here are some of the best ways to serve Masoor Dal:
- Steamed Basmati Rice: The most classic combo. Dal Chawal is a staple in Indian homes and nothing beats its comfort. Add a spoon of ghee on top for that restaurant-style touch.
- Jeera Rice (Cumin Rice): Slightly more flavorful than plain rice, jeera rice pairs beautifully with the creamy, mildly spiced dal.
- Chapati or Roti: If you prefer bread over rice, pair your dal with soft Indian flatbreads. It’s perfect for scooping up the dal.
- Naan or Paratha: Want to make it indulgent? Serve it with butter naan or stuffed parathas for a rich, satisfying meal.
- Quinoa or Brown Rice: For a healthy twist, substitute basmati with quinoa or brown rice. It’s equally delicious and adds more fiber.
- Pickles and Papad: A spoon of mango pickle or a crisp papadum on the side adds crunch and zing to your meal.
Add a simple side salad of onions, cucumbers, and lemon wedges for freshness. A bowl of Masoor Dal with rice, pickle, and salad isn’t just a meal—it’s an experience of comfort and satisfaction.
Pairing with Rice, Roti, and More
Depending on your daily routine and dietary goals, here’s how to mix and match:
| Meal Type | Best Pairing |
|---|---|
| Light Lunch | Dal + Plain Rice + Salad |
| High-Protein Dinner | Dal + Quinoa + Roti |
| Comfort Food | Dal + Ghee Rice + Papad |
| Weekend Treat | Dal + Butter Naan + Pickle |
Get creative! Masoor Dal doesn’t limit you—it gives you endless options.
Storage and Leftover Tips
Refrigeration and Freezing
Masoor Dal stores really well, making it an ideal dish for batch cooking and meal prep. You can easily refrigerate or freeze leftovers for later without losing flavor or texture.
Refrigeration:
- Let the dal cool to room temperature before storing.
- Transfer it to an airtight container.
- Store in the refrigerator for up to 4 days.
- Reheat gently on the stovetop or microwave, adding a splash of water to adjust consistency.
Freezing:
- Freeze in portioned containers to make reheating easier.
- Label with the date so you know how long it’s been stored.
- Masoor Dal freezes well for up to 2 months.
- To reheat, let it thaw overnight in the fridge and warm it slowly on low heat.
Proper storage keeps your dal fresh and tasty. Just make sure not to reheat it more than once to maintain its flavor and safety.
Reheating Without Losing Flavor
Here are a few tricks to retain that fresh-cooked taste:
- Add water: Dal thickens when stored. Add a bit of water while reheating to bring back its original texture.
- Reheat with a tadka: For an extra punch, reheat the dal and add a fresh tempering of ghee, garlic, and cumin. It’ll taste as good as day one.
- Stir well: Lentils tend to settle at the bottom. Stir thoroughly to avoid burning and to maintain consistency.
Leftover dal also makes a great base for lentil soups, dals with added veggies, or even a protein-rich filling for wraps and quesadillas!
Tips and Tricks for Perfect Masoor Dal
Avoiding Common Mistakes
Even though Masoor Dal is beginner-friendly, a few common mistakes can ruin its texture or taste. Let’s avoid them:
- Skipping the rinse: Always rinse the dal well to remove dust, debris, and excess starch.
- Not soaking: Even 15–30 minutes of soaking can make a big difference in cooking time and digestion.
- Overcooking: While Masoor Dal is soft, you don’t want it to become mushy. Watch the cooking time, especially in a pressure cooker.
- Burning the tadka: Spices can go from fragrant to burnt in seconds. Always keep the heat on medium and stir constantly.
- Under-seasoning: Don’t be shy with salt or spices. Lentils absorb flavor, so make sure your seasoning is balanced.
Flavor Enhancements
Want to give your Masoor Dal a chef-level twist? Try these upgrades:
- Add a smoked flavor: Light a piece of coal, place it in a small bowl inside the dal pot, drizzle with ghee, and cover. The smoky aroma infuses beautifully.
- Stir in coconut milk: For a creamy, tropical flavor.
- Add a dash of kasuri methi: Crushed dried fenugreek leaves give an earthy fragrance.
- Use homemade ghee: It elevates the entire flavor profile.
Even small tweaks like these can turn your humble dal into a gourmet dish.
Variations of Masoor Dal
Spicy Masoor Dal
Love heat? Make a spicier version with just a few changes:
- Add more green chilies or red chili powder.
- Include a pinch of black pepper.
- Finish with a tempering of dried red chilies and garlic.
This version is perfect for those who love bold, intense flavors. Serve with cool raita or yogurt to balance the heat.
Creamy Coconut Masoor Dal
This is a South Indian-inspired twist that adds creaminess and a subtle sweetness:
- After cooking the dal, add ½ cup of coconut milk.
- Let it simmer for 5 more minutes.
- Finish with curry leaves and mustard seed tempering.
The result? A rich, creamy dal that pairs well with plain rice or even appam and dosa.
Vegan and Gluten-Free Notes
How to Make It Vegan
Masoor Dal is naturally vegan if you use oil instead of ghee. Just avoid:
- Ghee: Replace with any plant-based oil (coconut oil, olive oil, or avocado oil).
- Cream Additions: Skip dairy cream; use coconut cream or cashew paste instead.
Ensuring It’s Gluten-Free
Masoor Dal is naturally gluten-free, but you need to watch out for:
- Asafoetida (Hing): Many store-bought versions contain wheat flour. Choose a gluten-free brand or skip it.
- Cross-contamination: Make sure your spices, cooking equipment, and storage containers haven’t been exposed to gluten-containing foods.
With these tweaks, Masoor Dal can be safely enjoyed by anyone with dietary restrictions.
FAQs about Masoor Dal Recipe
1. Is Masoor Dal good for weight loss?
Yes! Masoor Dal is high in protein and fiber, which keeps you full longer and helps manage hunger. It’s low in fat and calories, making it ideal for a weight-loss-friendly diet.
2. Can I use a slow cooker to make Masoor Dal?
Definitely. Masoor Dal works beautifully in slow cookers. Just add all ingredients and cook on low for 6–7 hours or high for 3–4 hours.
3. What’s the difference between Masoor Dal and Moong Dal?
Masoor Dal is red and slightly nutty in flavor, while Moong Dal is yellow and more delicate. Both are nutritious but differ in texture and cooking time.
4. How can I thicken dal if it’s too watery?
Let it simmer uncovered on low heat. You can also mash some of the lentils with the back of a spoon or add a tablespoon of cooked rice to thicken it naturally.
5. Can I prepare this dal in advance for guests?
Absolutely! Masoor Dal actually tastes better the next day as the flavors deepen. Just reheat with a splash of water and fresh tadka before serving.
Conclusion
Masoor Dal isn’t just a dish—it’s a warm hug in a bowl. It’s nourishing, budget-friendly, and endlessly customizable to suit your flavor cravings or dietary needs. Whether you’re new to cooking or a seasoned home chef, this step-by-step guide should empower you to make a delicious, comforting bowl of dal that you’ll come back to again and again.
From the tempering of spices to the final spoonful, making Masoor Dal is a meditative, flavorful process. It connects you with centuries of culinary tradition while giving you the freedom to make it your own.
So, grab those red lentils, fire up the stove, and let your kitchen fill with the aroma of home-cooked comfort. Your perfect bowl of Masoor Dal is just a few simple steps away.