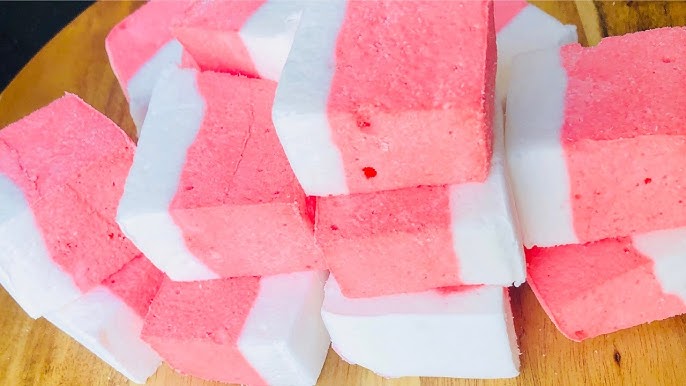
Marshmallow Recipe: Have you ever wondered what makes marshmallows so light, fluffy, and irresistible? While store-bought marshmallows are convenient, homemade ones are on another level entirely. They’re softer, more flavorful, and can be customized with your favorite flavors and colors. Plus, making them at home is surprisingly simple and an enjoyable activity for kids and adults alike.
Homemade marshmallows are perfect for special occasions, gifts, or just to treat yourself. Ready to learn how to create marshmallow magic at home? Let’s dive in.
Ingredients Needed for Marshmallows
Before you start, gather all your ingredients. Here’s what you’ll need:
- Granulated Sugar (2 cups): The base for sweetness.
- Corn Syrup (1 cup): Helps prevent the sugar from crystallizing.
- Gelatin (3 packs or about 7 teaspoons): This creates the structure.
- Water (1 cup, divided): Used for the gelatin and sugar syrup.
- Salt (½ teaspoon): Balances the sweetness.
- Vanilla Extract (1 tablespoon): Adds flavor (you can swap for other extracts).
- Powdered Sugar & Cornstarch Mix (½ cup each): Prevents sticking.
Optional Add-ons:
- Food coloring.
- Flavor extracts like peppermint, lemon, or almond.
- Chocolate chips or sprinkles for decoration.
Essential Equipment for Making Marshmallows
You don’t need fancy tools to make marshmallows, but having the right equipment makes the process easier:
- Medium Saucepan: For boiling the sugar syrup.
- Candy Thermometer: Ensures the syrup reaches the perfect temperature.
- Stand Mixer or Hand Mixer: Whips the marshmallow mixture to the right consistency.
- 9×13-inch Baking Pan: To set the marshmallows.
- Parchment Paper or Non-stick Spray: Keeps the mixture from sticking.
- Spatula: For spreading the marshmallow mixture evenly.
- Mesh Sifter: For dusting with powdered sugar and cornstarch.
If you don’t have a candy thermometer, no worries! I’ll guide you on how to judge the syrup’s readiness.
Step-by-Step Marshmallow Recipe
Making marshmallows involves a few steps, but each one is straightforward if you follow closely.
1. Preparing the Pan
- Line a 9×13-inch pan with parchment paper or spray it generously with non-stick spray.
- Sift the powdered sugar and cornstarch mixture over the pan to coat it lightly. This prevents sticking.
2. Blooming the Gelatin
- In the bowl of your stand mixer, sprinkle the gelatin over ½ cup of cold water. Let it sit for about 10 minutes to bloom. It will turn into a jelly-like consistency.
3. Making the Sugar Syrup
- In a medium saucepan, combine granulated sugar, corn syrup, ½ cup water, and salt.
- Heat over medium heat, stirring until the sugar dissolves. Once dissolved, stop stirring and attach your candy thermometer.
- Allow the syrup to boil until it reaches 240°F (soft-ball stage). If you don’t have a thermometer, test by dropping a small amount into cold water—it should form a soft ball that flattens when removed.
4. Combining the Syrup and Gelatin
- Once the syrup reaches 240°F, remove it from the heat immediately.
- With the mixer on low speed, slowly pour the hot syrup into the bloomed gelatin. Be careful—it’s very hot!
5. Whipping the Mixture
- Gradually increase the mixer speed to high and whip for about 10–15 minutes.
- The mixture will turn white, fluffy, and triple in volume. Add vanilla extract (or your chosen flavor) in the last minute.
6. Pouring and Setting
- Pour the marshmallow mixture into your prepared pan. Use a spatula to spread it evenly.
- Dust the top with more powdered sugar and cornstarch mixture.
- Let the marshmallows set at room temperature for 6–8 hours or overnight.
Flavor Variations for Marshmallows
Marshmallows are endlessly versatile. Here are a few flavor ideas to try:
- Classic Vanilla: Stick to the traditional vanilla extract for a crowd-pleaser.
- Chocolate Marshmallows: Add 2 tablespoons of cocoa powder while whipping the mixture.
- Fruity Marshmallows: Use fruit purees like strawberry or raspberry instead of some water in the gelatin step.
You can also swirl food coloring into the mixture before it sets for a fun, colorful effect.
Tips for Perfect Marshmallows
- Don’t Overheat the Syrup: Keep it at 240°F; higher temperatures will make the marshmallows too firm.
- Dust Generously: Use plenty of powdered sugar and cornstarch to prevent sticking.
- Work Quickly: Once whipped, marshmallow mixture sets fast, so pour it into the pan immediately.
Storage Instructions for Homemade Marshmallows
To keep your marshmallows fresh and fluffy:
- Store them in an airtight container at room temperature.
- Separate layers with parchment paper to avoid sticking.
- They last up to 2 weeks when stored properly.
Avoid refrigerating—they may absorb moisture and turn sticky.
Using Marshmallows in Desserts
Wondering what to do with your homemade marshmallows? Here are some ideas:
- S’mores: A classic campfire treat.
- Hot Chocolate Topping: Melt them for a creamy, sweet addition.
- Cereal Treats: Use them in place of store-bought marshmallows for homemade crispy rice treats.
Marshmallow Troubleshooting Guide
- Too Sticky: Dust with extra powdered sugar and cornstarch.
- Didn’t Set Properly: Ensure you used the right amount of gelatin and cooked the syrup to 240°F.
- Too Hard: The syrup was likely overheated.
FAQs about Marshmallow Recipe
1. What ingredients are needed to make homemade marshmallows?
To make homemade marshmallows, you’ll need granulated sugar, light corn syrup, cold water, unflavored gelatin, and vanilla extract. Some recipes might also include salt or powdered sugar for dusting.
2. How long does it take to make marshmallows?
The preparation time for marshmallows is relatively short, typically around 20 minutes. However, they need to set for at least 4 hours or overnight, which is crucial for achieving the right texture.
3. Do I need any special equipment to make marshmallows at home?
Yes, a candy thermometer and a stand mixer with a whisk attachment are essential tools for making marshmallows. The thermometer ensures the sugar syrup reaches the correct temperature, and the mixer is needed to whip the mixture properly.
4. Can I make marshmallows without corn syrup?
Yes, you can substitute corn syrup with other ingredients like honey, maple syrup, or a simple sugar syrup, though the texture and sweetness may vary.
5. Are there any flavor variations I can try?
Absolutely! While vanilla is the classic flavor, you can experiment with others like peppermint, almond, or even fruit purees. Adding cocoa powder or dipping the finished marshmallows in melted chocolate are other delicious variations.
6. How should I store homemade marshmallows?
Store them in an airtight container at room temperature. They can last up to three weeks if kept away from moisture and heat. Avoid refrigerating as it can cause them to become sticky.
7. Are homemade marshmallows gluten-free?
Yes, marshmallows made from the basic ingredients listed are gluten-free. However, always check labels on individual ingredients like powdered sugar to ensure they haven’t been processed with products that contain gluten.
Conclusion
Making marshmallows at home is easier than you might think! With the right tools and a little patience, you’ll create fluffy, melt-in-your-mouth marshmallows that will outshine anything store-bought. Whether you enjoy them plain, dipped in chocolate, or in a cozy cup of hot cocoa, homemade marshmallows are a treat worth the effort.


