Manicotti Filling Recipe: When you think of comfort food that warms both the heart and the soul, pasta dishes immediately come to mind. One dish that stands out for its creamy richness and satisfying bite is manicotti. This Italian-American classic isn’t just about pasta and sauce—it’s about the delicious filling that turns a simple pasta shell into a gourmet meal.
What is Manicotti?
The word manicotti translates to “little sleeves” in Italian, which perfectly describes its shape. These large pasta tubes are designed to be stuffed with cheese, meat, or vegetables before being baked with sauce and melted cheese. Manicotti is often compared to cannelloni, another Italian stuffed pasta, but there’s a subtle difference: manicotti is typically ridged and slightly larger, while cannelloni is smooth. Both are delicious, but manicotti offers more room for that mouthwatering filling.
Manicotti is a dish often prepared for family gatherings, holidays, or Sunday dinners. The beauty of it lies in its versatility—you can make it simple with just cheese or elevate it with herbs, spinach, or even ground meat. The filling is the heart of this dish, and that’s exactly what we’ll be focusing on in this guide.
Why Homemade Manicotti is Better than Store-Bought
Sure, you can buy frozen manicotti at the store, but homemade manicotti is on a completely different level. Store-bought versions often use overly processed cheese fillings, lack seasoning, and don’t have the freshness that comes from mixing your own ingredients. When you make manicotti filling at home, you have control—control over the creaminess, the flavor, and the texture.
Want a richer filling? Add extra ricotta. Prefer more depth of flavor? Toss in fresh basil and garlic. Craving more creaminess? Mix in mascarpone cheese. Homemade manicotti is customizable, fresher, and far more satisfying than anything pre-packaged.
Ingredients You’ll Need
When it comes to making a perfect manicotti filling, quality ingredients are non-negotiable. The filling should be creamy, cheesy, and full of flavor without being overly heavy. Below, I’ll list the essential ingredients along with optional ones for extra flavor.
Core Ingredients for Manicotti Filling
These are the foundation of a classic Italian-style manicotti filling:
- Ricotta cheese (2 cups) – The star of the filling, providing a creamy, slightly tangy base.
- Mozzarella cheese (2 cups, shredded) – For melty goodness that holds everything together.
- Parmesan cheese (½ cup, grated) – Adds sharpness and depth of flavor.
- Eggs (2 large) – Helps bind the cheese mixture so it doesn’t ooze out.
- Salt (1 teaspoon) – Enhances the overall flavor.
- Black pepper (½ teaspoon) – Adds a subtle kick.
Optional Ingredients for Extra Flavor
Want to take your filling to the next level? Consider adding these:
- Fresh spinach (1 cup, cooked and chopped) – For a vegetarian boost.
- Fresh basil or parsley (2 tablespoons, chopped) – Brings a burst of freshness.
- Garlic (1 clove, minced) – Adds depth and aroma.
- Nutmeg (a pinch) – Enhances the cheese flavor subtly.
- Mascarpone or cream cheese (½ cup) – Makes the filling creamier.
Ingredient Substitutions for Dietary Preferences
Manicotti is flexible enough to fit different diets. Here’s how:
- Gluten-free: Use gluten-free manicotti shells or substitute with crepes.
- Vegan: Replace ricotta with tofu ricotta, mozzarella with vegan cheese shreds, and skip the eggs or use a flax egg.
- Low-fat: Use part-skim ricotta and mozzarella to cut down on calories.
- Meat lovers: Mix in ground beef, sausage, or even shredded chicken for a heartier filling.
When selecting your ingredients, always go for fresh, high-quality products. Freshly grated Parmesan tastes much better than the pre-packaged kind, and whole-milk ricotta provides the creamiest results.
Preparing the Manicotti Pasta Shells
The pasta shells are just as important as the filling—they need to be cooked perfectly so they can hold all that cheesy goodness without falling apart.
Boiling vs. No-Boil Pasta Shells
Traditional manicotti uses boiled pasta shells. You cook them until just al dente, which means slightly firm to the bite. Overcooked shells will fall apart during stuffing, while undercooked ones will be too chewy after baking.
On the other hand, many brands now offer no-boil manicotti shells. These are designed to soften while baking in the sauce, making the process quicker and easier. However, some home cooks argue that no-boil pasta doesn’t absorb flavor as well as pre-cooked shells. If you’re short on time, no-boil is fine, but if you want authenticity and better texture, boiling is the way to go.
Tips to Prevent Pasta from Tearing
One of the most frustrating parts of making manicotti is dealing with torn shells. To prevent this:
- Cook carefully: Don’t overcook the pasta. Stick to the package instructions.
- Use plenty of water: This prevents shells from sticking together.
- Drain gently: After cooking, place them on a flat baking sheet lined with parchment paper instead of stacking them.
- Rinse lightly: A quick rinse in cool water stops the cooking process and makes them easier to handle.
Taking care of your pasta shells ensures that filling and baking become much smoother and less stressful.
Step-by-Step Guide to Making Manicotti Filling
Now, let’s get into the heart of this recipe—the filling itself.
Preparing the Cheese Mixture
In a large mixing bowl, combine:
- Ricotta cheese
- Shredded mozzarella
- Grated Parmesan
- Eggs
Mix these together until smooth. The ricotta should be creamy, the mozzarella slightly stringy, and the eggs should bring everything together into a unified mixture.
Adding Herbs and Seasonings
Next, fold in your seasonings and fresh herbs:
- Chopped parsley or basil
- Garlic
- Salt and black pepper
- A pinch of nutmeg
This is where your filling develops character. Fresh herbs bring a brightness that balances the richness of the cheese, while garlic adds a savory undertone.
Mixing to the Right Consistency
The filling should be thick enough to hold its shape when spooned into a shell but soft enough to spread easily. If it feels too dry, add a spoonful of mascarpone or a splash of cream. If it’s too wet, stir in extra mozzarella or Parmesan.
At this point, your filling should taste irresistible—don’t be afraid to take a little taste test!
How to Stuff Manicotti Shells Properly
Filling manicotti is the part that can intimidate beginners, but with the right technique, it’s actually pretty simple.
Using a Spoon vs. Piping Bag
You have two main options for stuffing manicotti shells:
- Spoon method: Carefully spoon filling into each shell, pushing it in gently with the back of the spoon. This works but can get messy.
- Piping bag method: Fill a piping bag (or a resealable plastic bag with the corner cut off) with the cheese mixture. Pipe the filling directly into each shell. This method is faster and cleaner, especially if you’re making a large batch.
Common Mistakes to Avoid
- Overfilling: Too much filling can cause shells to split open while baking.
- Underfilling: Don’t leave big gaps inside the shell—it’ll taste bland.
- Breaking shells: Handle gently and don’t force the filling in too quickly.
Best Way to Keep Filling Intact While Baking
Once stuffed, place the manicotti shells seam-side down in your baking dish. Cover them with sauce generously—this not only keeps them moist but also prevents the filling from spilling out during baking.
Baking Your Manicotti
Now that your manicotti shells are filled with delicious, creamy goodness, it’s time to bake them to perfection. This is the step that transforms your dish from raw ingredients into a bubbling, golden-brown masterpiece that makes your kitchen smell like an Italian trattoria.
Preparing the Baking Dish
Before adding your manicotti, prepare your baking dish. Choose a dish that’s deep enough to hold the pasta and sauce without overflowing. Lightly grease the bottom with olive oil or non-stick spray—this prevents sticking and makes cleanup easier.
Next, spread a thin layer of marinara sauce over the bottom. This step is crucial because it acts as a cushion for the pasta, preventing the shells from burning or drying out.
Layering Sauce and Cheese
Once your base is ready, lay the stuffed manicotti shells in a single layer, seam-side down. Cover them generously with more marinara sauce, making sure every piece is coated. This helps the pasta finish cooking and keeps it tender.
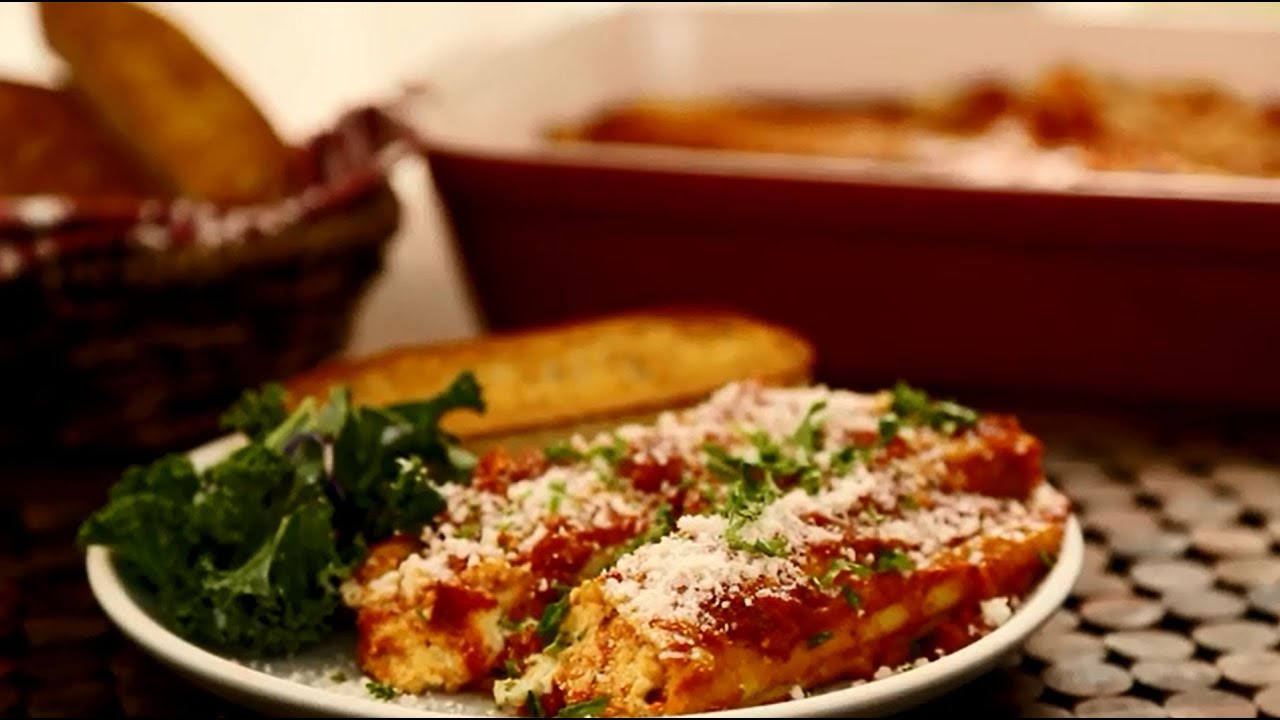
For extra indulgence, sprinkle shredded mozzarella and a little grated Parmesan over the top. This cheese layer creates that irresistible golden crust we all love. If you want your dish to stand out even more, add dollops of ricotta or mascarpone on top before baking—it’ll give the final dish a creamy finish.
Baking Time and Temperature
Preheat your oven to 375°F (190°C). Cover the baking dish with aluminum foil for the first half of baking—this traps moisture and prevents the pasta from drying out. Bake for about 25 minutes covered, then remove the foil and bake for an additional 15–20 minutes until the cheese is bubbly and lightly browned.
Once done, let the manicotti rest for 5–10 minutes before serving. This cooling time helps the filling firm up and makes serving much easier.
Serving Suggestions
The beauty of manicotti is that it pairs beautifully with a variety of side dishes and drinks. If you want to turn it into a complete Italian-inspired dinner, consider the following pairings.
Side Dishes That Pair Well with Manicotti
- Garlic Bread or Focaccia – Perfect for soaking up extra sauce.
- Caprese Salad – Fresh tomatoes, mozzarella, and basil add a refreshing balance.
- Caesar Salad – Crisp romaine with a creamy dressing complements the richness of the pasta.
- Roasted Vegetables – Zucchini, bell peppers, or asparagus add a healthy, colorful side.
Wine Pairings for an Italian Touch
Pairing wine with manicotti elevates the dining experience:
- Red wines: A medium-bodied red like Chianti or Merlot works beautifully with cheese-based manicotti.
- White wines: If your manicotti is on the lighter side with spinach or vegetables, a crisp Pinot Grigio or Sauvignon Blanc is an excellent match.
- Non-alcoholic options: Sparkling water with lemon or a refreshing Italian soda adds a fun, fizzy touch.
With the right sides and drinks, your manicotti dinner becomes more than just a meal—it turns into an experience.
Variations of Manicotti Filling
The best part about manicotti is that it’s endlessly customizable. While the traditional version uses cheese, there are countless variations to try depending on your taste and dietary preferences.
Meat Lovers’ Manicotti
If you want something heartier, add meat to your filling. Ground beef, Italian sausage, or even shredded chicken can be mixed into the cheese filling. Cook the meat first, drain any excess fat, and fold it into the ricotta mixture. The result is a richer, more satisfying dish that’s perfect for those who want protein-packed comfort food.
Vegetarian Manicotti
Spinach and ricotta are a classic pairing, but you can take it further by adding mushrooms, zucchini, or roasted red peppers. The vegetables not only add nutrition but also bring texture and earthy flavors that balance the richness of the cheese. For extra flair, drizzle a bit of pesto over the top before serving.
Vegan-Friendly Options
For those avoiding dairy or animal products, manicotti can still be indulgent. Use tofu ricotta (tofu blended with nutritional yeast, lemon juice, and garlic) as the base. Swap out mozzarella and Parmesan with vegan cheese alternatives. You can even make a dairy-free béchamel or cashew cream sauce to pour over the top instead of traditional marinara.
Whether you’re a meat eater, vegetarian, or vegan, there’s a version of manicotti that will leave you satisfied.
Storage and Reheating Tips
One of the best things about manicotti is that it stores well, making it perfect for meal prep, leftovers, or even freezing for later.
Refrigeration Guidelines
If you have leftovers, store them in an airtight container in the refrigerator. They’ll stay fresh for up to 3–4 days. Make sure the pasta is cooled completely before storing to avoid excess moisture buildup.
Freezing for Later Use
Manicotti is freezer-friendly. You can freeze it either before or after baking:
- Before baking: Assemble the dish but don’t bake. Wrap tightly in foil and plastic wrap, then freeze for up to 3 months. When ready to eat, bake directly from frozen at 375°F, adding about 20–30 extra minutes to the cook time.
- After baking: Let the manicotti cool, then portion into freezer-safe containers. Reheat as needed.
Best Way to Reheat Without Drying Out
When reheating refrigerated or frozen manicotti, cover it with foil and bake at 350°F until warmed through. Adding a splash of marinara or a sprinkle of cheese before reheating keeps it moist and flavorful.
FAQs about Manicotti Filling Recipe
1. What’s the difference between manicotti and cannelloni?
Manicotti is typically ridged and slightly larger, while cannelloni is smooth and smaller. Both are stuffed pasta tubes, but manicotti is more common in Italian-American cooking.
2. Can I make manicotti filling ahead of time?
Yes! You can prepare the filling up to 2 days in advance and store it in the refrigerator. Just give it a quick stir before stuffing the shells.
3. How do I keep manicotti shells from breaking while filling?
Cook them just until al dente and handle gently. Using a piping bag instead of a spoon also reduces the risk of breaking.
4. What cheeses can I substitute in the filling?
You can replace ricotta with cottage cheese or mascarpone. For a stronger flavor, add provolone or pecorino romano.
5. Can manicotti be made gluten-free?
Absolutely! Use gluten-free pasta shells or even thin crepes as an alternative to traditional wheat pasta.
Conclusion
Manicotti may look like a fancy restaurant dish, but with the right ingredients and a little patience, you can easily make it at home. From the creamy ricotta filling to the bubbling cheese topping, every bite feels like a warm hug straight from the heart of Italy.
What makes this dish even better is its versatility—you can keep it simple with a three-cheese filling, add spinach for freshness, load it with meat for extra richness, or make it vegan without sacrificing flavor. Once you’ve mastered the technique of filling and baking, you’ll find yourself making manicotti for family dinners, holidays, or anytime you’re craving something truly comforting.
Homemade manicotti is more than just pasta—it’s a celebration of flavors, textures, and the joy of sharing food with the people you love.

