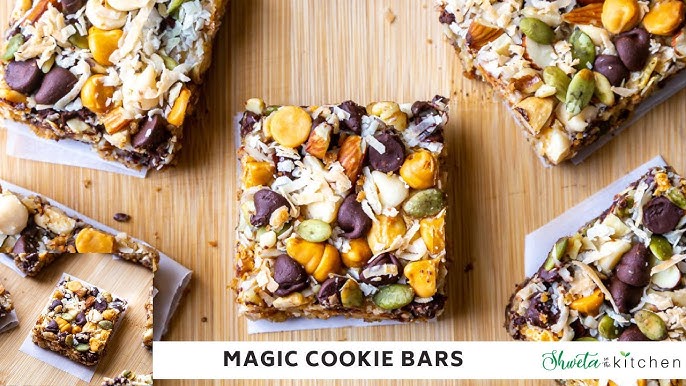
Magic Cookie Bar Recipe: Magic cookie bars are the ultimate no-fuss dessert that taste like you’ve spent hours baking. These layered bars are chewy, gooey, crispy, and chocolaty all at once—a real treat for anyone who loves a sweet bite. Typically made with a graham cracker crust, sweetened condensed milk, chocolate chips, coconut, and nuts, these bars are a party favorite, bake sale best-seller, and an effortless snack for the family.
Why They’re Called “Magic”
The “magic” behind these bars lies in how simple ingredients transform into something truly special without even needing a mixing bowl. That’s right—no mixing, just layering. Once you pop them into the oven, the sweetened condensed milk binds everything together into a bar that’s chewy on the inside, with golden toasted edges and a deliciously crunchy base. It’s kitchen wizardry at its finest!
Ingredients You’ll Need
The Basic Ingredients List
Let’s take a look at the classic line-up of ingredients:
- 1 ½ cups graham cracker crumbs
- ½ cup unsalted butter (melted)
- 1 can (14 oz) sweetened condensed milk
- 1 cup semi-sweet chocolate chips
- 1 cup butterscotch chips (optional)
- 1 cup shredded sweetened coconut
- 1 cup chopped walnuts or pecans
These are the staples of a traditional magic cookie bar, and each one plays a key role in creating the layers of flavor and texture.
Substitutions and Variations
One of the best things about magic cookie bars is how adaptable they are. Here are some swaps and additions to fit your taste or dietary needs:
- Graham cracker crumbs: Try crushed digestive biscuits or gluten-free graham crackers.
- Butter: Substitute with coconut oil for a dairy-free version.
- Chocolate chips: Mix in dark chocolate, white chocolate, or peanut butter chips.
- Nuts: Use almonds, macadamias, or skip the nuts entirely for a nut-free option.
- Coconut: Use unsweetened coconut flakes for a less sweet version or omit entirely.
Get creative—it’s hard to go wrong here!
Step-by-Step Instructions
Step 1 – Prepping Your Pan
Start by preheating your oven to 350°F (175°C). Line a 9×13-inch baking dish with parchment paper or aluminum foil. Lightly grease the lining with non-stick spray or a bit of butter. This ensures your bars won’t stick and are easy to lift out later. Trust me, taking this step saves you a lot of cleanup and frustration!
Step 2 – Creating the Crust
In a medium bowl, mix the graham cracker crumbs with melted butter until the texture resembles wet sand. Press this mixture evenly into the bottom of your prepared pan. Use the back of a spoon or the bottom of a glass to compact it firmly—this is your base, so it needs to hold together well.
This crust adds a slightly crunchy contrast to the gooey layers on top and brings that classic cookie bar flavor. If you’re short on time, some stores sell ready-made graham crust mix—another shortcut in this magic recipe.
Step 3 – Layering the Goodies
Now comes the fun part: layering the toppings! Begin with the chocolate chips, followed by butterscotch chips if you’re using them. Next, sprinkle the shredded coconut over the top, then add a generous layer of chopped nuts.
Don’t worry about pressing these layers down just yet—the condensed milk will take care of that when we pour it in the next step. Think of it like stacking your dessert sandwich!
Step 4 – Pouring the Sweetened Condensed Milk
Drizzle the can of sweetened condensed milk evenly over the entire surface. Make sure every corner and edge is covered—this acts like the glue that binds all your delicious layers together.
As the bars bake, the milk seeps through the layers, making everything stick together and caramelize beautifully. It’s this step that gives the bars their signature chewy, golden texture.
Step 5 – Baking to Perfection
Slide your pan into the preheated oven and bake for 25 to 30 minutes, or until the top is golden brown and the edges are bubbly. You’ll know they’re done when your kitchen smells like toasted coconut and melted chocolate heaven.
Don’t rush to cut them right out of the oven. Let them cool completely on a wire rack for at least 2 hours. This cooling time allows them to firm up, making slicing much easier.
Cooling and Cutting Tips
Why Cooling Time Matters
You’ve just pulled your golden, bubbling tray of magic cookie bars from the oven. The aroma is irresistible, and you might be tempted to dive in immediately. But hold on! Allowing your bars to cool completely is absolutely essential. Why? Because cooling gives the sweetened condensed milk time to set and solidify, binding all the ingredients together in firm, sliceable layers.
Cutting the bars while they’re still warm can result in a gooey mess. They’ll fall apart, stick to your knife, and just won’t have that clean, picture-perfect square you’re going for. Ideally, let the bars cool at room temperature for 1-2 hours. If you’re in a rush, pop the whole pan into the fridge for about 30 minutes to speed things up.
How to Get Clean Slices
Now, let’s talk about how to slice those bars like a pro. First, lift the bars out of the pan using the parchment paper or foil overhang. Place them on a cutting board. Use a long, sharp knife—preferably not serrated—and run it under hot water for a few seconds, then dry it off. This warm blade will slice through the gooey layers like butter.
Wipe the knife clean after every few cuts to keep things neat. If you want exact uniform bars, measure the pan with a ruler and lightly score the top before cutting. Pro tip: for bite-sized treats, cut them into 1.5-inch squares and serve on a platter!
Storage and Serving Suggestions
How to Store Magic Cookie Bars
Magic cookie bars are the gift that keeps on giving—even days after baking! They store beautifully and can be made ahead for parties or holiday gatherings.
Here’s how to store them:
- Room Temperature: Store in an airtight container for up to 4 days. Layer them with parchment paper to prevent sticking.
- Refrigerator: Keeps them fresh for up to 10 days. The bars get firmer when chilled and the flavors meld even better.
- Freezer: Wrap individual bars in plastic wrap and store in a zip-top freezer bag. They can last up to 3 months. Thaw at room temperature or enjoy cold for a chewier texture.
Fun Serving Ideas
Magic cookie bars are so versatile that they fit into any setting—be it a casual family snack or a fancy dessert spread. Here are a few creative ways to serve them:
- Dessert Platter: Arrange them with brownies, lemon bars, and cookies for a colorful display.
- Topped with Ice Cream: Warm a bar slightly and serve with a scoop of vanilla or coconut ice cream.
- Holiday Treat Bags: Cut into small squares, wrap in wax paper, and tie with a ribbon for festive gift giving.
- Party Trays: Use cookie cutters to cut out fun shapes for themed events or kids’ parties.
Tips and Tricks for Perfect Magic Cookie Bars
Avoiding Common Mistakes
Even though magic cookie bars are nearly foolproof, a few common pitfalls can ruin the magic. The first mistake many make is not pressing the crust firmly enough. If your graham cracker base is loose or crumbly, your bars might fall apart when you lift them. Use a glass or measuring cup to press it down tightly.
Another frequent issue is overbaking. While a golden brown top is your signal that they’re ready, overdoing it can dry out the bars and make the crust too hard. Keep a close eye during the last 5 minutes of baking to ensure perfect results.
Lastly, don’t skip the parchment paper! It makes cleanup a breeze and guarantees you can lift the bars out cleanly for slicing. If you forget this step, you’ll be stuck scraping sticky, gooey bits out of the pan.
Layering Order Matters
The order in which you layer the ingredients affects how the bars hold together. Always place your solid mix-ins (chocolate chips, coconut, nuts) before pouring the sweetened condensed milk. This allows the milk to flow through the layers, binding everything together as it bakes. If you pour the milk too early or put it on the bottom, the bars may turn out too wet or unevenly cooked.
Also, try to spread the toppings evenly. It ensures each bite has that perfect combination of textures and flavors. No one wants a corner square with just coconut or all nuts and no chocolate!
Kid-Friendly Version of Magic Cookie Bars
Making It Fun for the Little Bakers
Magic cookie bars are a wonderful recipe to make with kids. They’re simple, colorful, and don’t require any complex cooking skills. Let your little ones get involved by helping with the layering process—they’ll love sprinkling chocolate chips or patting down the crust.
You can even turn this into a mini DIY bar activity. Set up bowls with various toppings (mini M&Ms, crushed Oreos, rainbow sprinkles, marshmallows), and let kids create their own custom cookie bar creations.
Just supervise closely when it comes to handling the oven and hot pans. Otherwise, this is a perfect rainy-day kitchen adventure or birthday party activity.
Healthier Swaps for Kids
Want to make them a tad healthier for kids? Try these swaps:
- Use whole wheat or gluten-free graham crackers.
- Choose dark chocolate or cacao nibs instead of milk chocolate.
- Swap sweetened coconut with unsweetened flakes.
- Use almond butter or sunflower seed butter for a nut-free alternative.
- Reduce the amount of sweetened condensed milk slightly to lower sugar content.
These changes don’t compromise flavor and can ease the guilt of indulging a little!
Magic Cookie Bars for Special Diets
Gluten-Free Version
To make gluten-free magic cookie bars, the main thing you need to switch is the crust. Use gluten-free graham crackers or even gluten-free oats ground into crumbs. Double-check all other ingredients, especially chocolate chips and condensed milk, to make sure they’re certified gluten-free.
The rest of the steps remain the same—no need to overthink it. These bars are so adaptable that one little swap still gives you a delicious result that everyone can enjoy.
Vegan and Dairy-Free Alternatives
Yes, magic cookie bars can be made completely vegan! Here’s how:
- Use plant-based butter (like Earth Balance).
- Choose dairy-free sweetened condensed milk (many brands now offer coconut or oat versions).
- Pick dairy-free chocolate chips and butterscotch chips.
- Omit or replace the nuts if needed with seeds or crunchy granola.
The end result? Still chewy, gooey, rich, and sweet—just without the animal products. Whether you’re baking for a crowd or just treating yourself, no one will miss the dairy.
FAQs about Magic Cookie Bar Recipe
Q1: Can I use different types of chocolate chips in Magic Cookie Bars?
Absolutely! You can substitute or mix semi-sweet, dark, milk, or even white chocolate chips depending on your taste. Peanut butter or butterscotch chips also work great for a twist.
Q2: What is the best way to store Magic Cookie Bars?
Store them in an airtight container at room temperature for up to 5 days. For longer storage, refrigerate them for up to 10 days or freeze for up to 3 months.
Q3: Can I make Magic Cookie Bars without coconut?
Yes, you can leave out the shredded coconut or replace it with chopped nuts, oats, or dried fruit for a similar texture.
Q4: Why are my bars too crumbly?
If your bars are crumbly, it might be due to not pressing the crust firmly enough or not allowing them to cool completely before slicing. Chill them before cutting for cleaner edges.
Q5: Can I make these bars gluten-free?
Yes! Just use gluten-free graham cracker crumbs or crushed gluten-free cookies for the base. The rest of the ingredients are typically gluten-free, but always double-check labels.
Q6: Do I need to pre-bake the crust?
No pre-baking is needed. Once you press the graham cracker crust into the pan, you can immediately start layering the other ingredients and bake everything together.
Q7: Can I double the recipe for a crowd?
Absolutely. You can double the ingredients and use a larger baking pan (like 9×13 inch) to make more servings. Just adjust the baking time slightly, adding a few extra minutes.
Q8: Are Magic Cookie Bars freezer-friendly?
Yes, they freeze beautifully. Wrap individual bars in plastic wrap and store in a freezer-safe bag or container. Thaw at room temperature before enjoying.
Conclusion
Magic cookie bars are more than just a dessert—they’re a nostalgic, customizable, and incredibly easy treat that brings smiles to faces of all ages. Whether you’re sticking to the classic recipe or getting creative with layers and flavors, the possibilities are endless. With a few simple ingredients and a bit of layering magic, you’ve got a crowd-pleasing sweet that never fails.
These bars fit every occasion, from after-school snacks to holiday gatherings, and they store like a dream. So the next time you need something sweet, simple, and spectacular, you know what to make—magic cookie bars!

