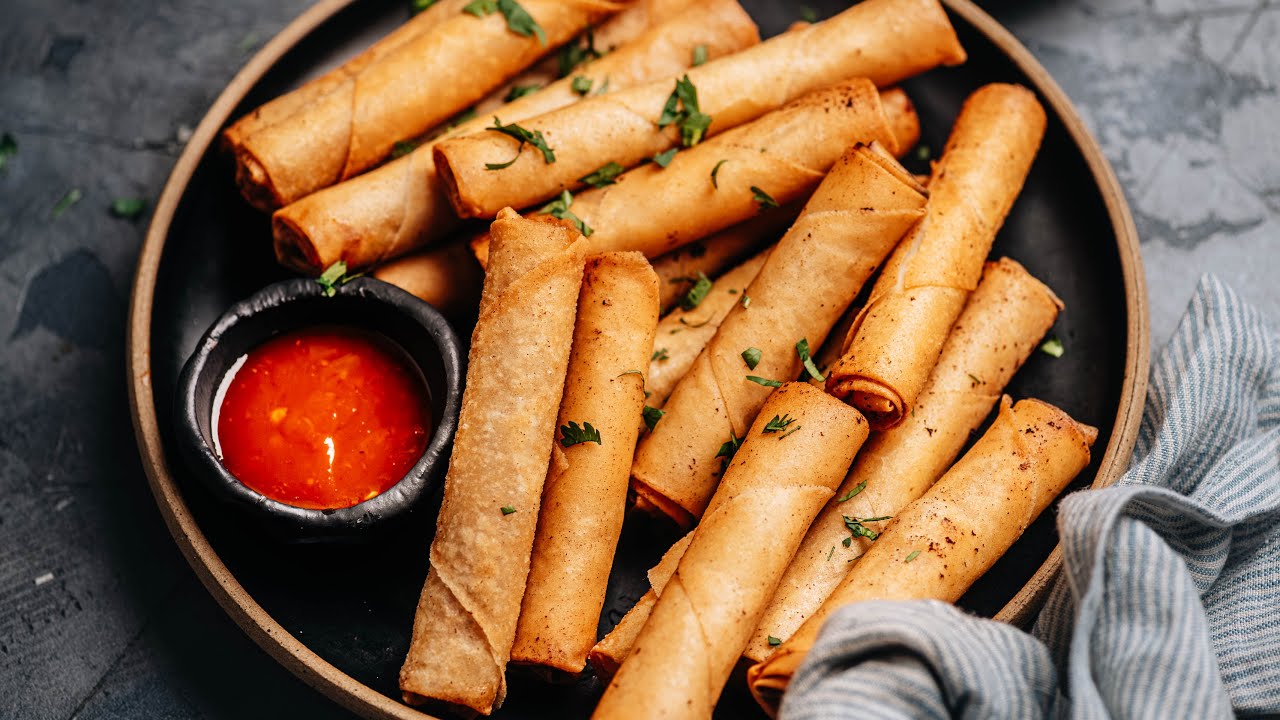
Lumpiang Shanghai Filipino Recipe: Lumpiang Shanghai isn’t just food—it’s part of every Filipino celebration. From birthdays to weddings, and even Sunday family lunches, this golden-fried roll holds a place in every Pinoy heart. It’s crunchy on the outside, juicy on the inside, and goes perfectly with banana ketchup or a tangy vinegar dip.
But what makes it so special? Maybe it’s the simplicity of its ingredients or the joy of biting into something you know was made with love.
Whether you’re a beginner or a kitchen pro, this guide will walk you through the entire process of making authentic Filipino Lumpiang Shanghai from scratch.
What is Lumpiang Shanghai?
Lumpiang Shanghai is the Filipino version of spring rolls—crispy, golden brown on the outside and packed with seasoned meat on the inside. Although the name might suggest Chinese origins (thanks to “Shanghai”), this dish has been completely Filipinized over generations. It’s smaller and thinner than Chinese spring rolls, which makes it ideal for party finger food.
Unlike other lumpia varieties (like fresh lumpia or vegetable lumpia), Lumpiang Shanghai focuses primarily on meat—usually ground pork. It’s tightly rolled in a thin wrapper, deep-fried to perfection, and best served with a sweet and sour sauce or banana ketchup. It’s a crowd-pleaser, a comfort food, and a crunchy delight all rolled into one.
List of Ingredients You’ll Need
Here’s your complete ingredient list for making authentic Lumpiang Shanghai. You can always customize, but this list will give you the most traditional and flavorful result.
Proteins:
- 1 lb ground pork (can substitute with chicken or beef)
- 1 egg (acts as a binder)
Vegetables:
- 1 small carrot, finely minced or grated
- 1 small onion, finely chopped
- 2-3 cloves garlic, minced
- 2 stalks green onion, chopped
Seasonings & Fillers:
- 2 tablespoons soy sauce
- 1 tablespoon oyster sauce (optional but adds umami)
- ½ teaspoon ground black pepper
- ½ teaspoon salt
- ½ teaspoon sugar
- 1 tablespoon cornstarch or flour (helps bind)
Wrappers & Oil:
- Lumpia wrappers (spring roll wrappers, 25-30 pieces)
- Cooking oil (vegetable or canola for deep frying)
Tip: Always taste-test your filling by cooking a small portion before wrapping everything. This way, you can adjust seasoning before it’s too late.
Kitchen Tools You’ll Need
Before you roll up your sleeves, make sure your kitchen is prepped. The right tools will save time and keep your lumpia-making session mess-free.
Must-Have Tools:
- Mixing bowl (for the filling)
- Chopping board and sharp knife
- Frying pan or deep fryer
- Slotted spoon or tongs
- Paper towels (for draining excess oil)
Nice-to-Haves:
- Silicone brush (for sealing wrappers with water)
- Food processor (if you want finely chopped veggies fast)
- Cooling rack (to keep lumpia crispy after frying)
Having the right gear ensures smooth prep, cooking, and cleanup.
Choosing the Best Wrapper
Not all wrappers are created equal. For Lumpiang Shanghai, go for ultra-thin, square lumpia wrappers, which are sold in most Asian or Filipino grocery stores. These wrappers are delicate but fry up super crisp and light.
Lumpia Wrapper vs. Spring Roll Wrapper:
- Lumpia wrappers: Thinner, more delicate, and crispier when fried.
- Spring roll wrappers: Thicker and chewier, not ideal for authentic Lumpiang Shanghai.
Storage Tip: Keep them covered with a damp towel while wrapping to prevent drying out. If frozen, thaw them in the fridge overnight—not on the counter—to avoid moisture build-up.
Best Meat for Lumpiang Shanghai
The go-to meat for this dish is ground pork, known for its juicy flavor and ideal fat content. However, here are a few alternatives:
- Ground chicken: Leaner and healthier, but may need added fat (like a spoon of oil or egg yolk).
- Ground beef: Adds a beefier flavor, but make sure it’s not too fatty.
- Tofu or mushrooms: Perfect for vegetarians, but season them well to avoid blandness.
If using lean meat, be generous with seasonings and add moisture using eggs or grated vegetables.
Step-by-Step Guide to Making Lumpiang Shanghai
This is where the magic happens. Follow these steps closely for the tastiest and crunchiest lumpia you’ll ever make.
Step 1: Prep the Ingredients
Finely chop garlic, onions, carrots, and green onions. Prepare ground pork (or a mix of pork and chicken), egg, soy sauce, salt, and pepper. Separate lumpia wrappers and keep them covered with a damp cloth to prevent drying.
Step 2: Mix the Filling
In a large bowl, combine ground meat, chopped vegetables, egg, soy sauce, salt, and pepper. Mix gently with your hands until just combined. Avoid overmixing to keep the filling tender and juicy.
Step 3: Wrap the Lumpia
Lay a lumpia wrapper flat with one corner facing you. Place about 1 tablespoon of filling near the edge, shaping it into a thin line. Fold the bottom corner over the filling, then fold in the sides and roll tightly. Seal the edge with a dab of water.
Step 4: Store for Later (Freezing Tips)
Arrange uncooked lumpia in a single layer on a tray and freeze until firm. Once frozen, transfer them to freezer bags or airtight containers. They can be stored for up to 2 months and fried straight from frozen when ready to serve.
How to Wrap Lumpia Properly
Wrapping lumpia might seem tricky at first, but once you get into a rhythm, it becomes second nature. A tightly wrapped roll ensures that no filling escapes and that it cooks evenly.
Here’s how to do it right:
- Place your wrapper like a diamond on a clean, dry surface.
- Scoop about 1 tablespoon of filling and shape it into a thin log near the bottom third of the wrapper.
- Fold the bottom point of the wrapper over the filling, making it snug.
- Fold in the left and right sides toward the center, just like you’re wrapping a burrito.
- Roll it tightly toward the top point of the wrapper.
- Seal the edge using a dab of water or a beaten egg.
Pro Tips:
- Don’t overfill—this causes bursting when frying.
- Keep your wrappers covered with a damp cloth to prevent them from drying and cracking.
- Roll as tightly as you can without tearing the wrapper.
Once you’ve done a few, you’ll get faster and more consistent. Make it a fun family activity—kids and adults love helping roll!
How to Fry Lumpiang Shanghai Perfectly
Now that your lumpia are wrapped and ready, it’s time for the final (and most satisfying) step—frying! The goal is golden brown, crisp perfection on the outside with fully cooked filling inside.
Deep Frying Instructions:
- Heat your oil in a deep pan over medium-high heat. The ideal temperature is around 350°F (175°C).
- Add lumpia in batches, being careful not to overcrowd the pan. Overcrowding drops the oil temperature, resulting in soggy rolls.
- Fry each batch for 5–7 minutes, turning occasionally, until golden brown.
- Remove and drain on a paper towel-lined plate or a wire rack.
Pan Frying Alternative:
- You can also pan-fry lumpia if you prefer using less oil.
- Fry on medium heat, rotating until all sides are crispy and browned.
- It may take a bit longer, but it’s just as tasty.
Avoid These Common Frying Mistakes:
- Don’t fry on high heat—your wrapper will burn before the filling cooks.
- Avoid flipping too early; let one side crisp before turning.
- Don’t fry straight from frozen unless you adjust the cooking time.
Lumpiang Shanghai Dipping Sauces
While Lumpiang Shanghai is already flavorful, the right dipping sauce takes it to a whole new level. Here are a few delicious options:
1. Sweet and Sour Sauce:
- ½ cup vinegar
- ¼ cup sugar
- 1 tbsp ketchup
- 1 tsp soy sauce
- 1 tsp cornstarch (diluted in water)
- Simmer everything until slightly thickened.
2. Spicy Garlic Vinegar Dip:
- ½ cup white vinegar
- 2 cloves garlic, minced
- 1 chili (optional)
- Salt and pepper to taste
3. Banana Ketchup (Filipino Favorite):
- Straight from the bottle or mixed with hot sauce for a spicy twist.
Feel free to experiment with sauces until you find your personal favorite!
Serving Suggestions
Lumpiang Shanghai is incredibly versatile. Whether it’s a snack, a side dish, or the main attraction, here’s how to serve it right:
- As a Main Dish: Serve with garlic rice and a fresh salad.
- As a Party Appetizer: Slice them in half for bite-sized pieces and place them on a platter with toothpicks.
- Lunchbox Favorite: Pack with rice and ketchup for school or work meals.
Pair With:
- Pancit Canton or Bihon (Filipino noodles)
- Fried rice or plain steamed rice
- Atchara (pickled papaya)
Making Lumpiang Shanghai Healthier
Want to enjoy Lumpia without the guilt? Here are two healthier cooking options:
1. Baked Lumpiang Shanghai:
- Preheat oven to 400°F (200°C).
- Lightly brush lumpia with oil.
- Bake for 25–30 minutes, flipping halfway through, until golden brown.
2. Air Fryer Method:
- Set air fryer to 375°F (190°C).
- Spray lumpia with oil.
- Cook for 15–18 minutes, shaking the basket halfway.
Note: These methods won’t be as crispy as deep frying, but they still deliver amazing flavor with much less oil.
Common Mistakes to Avoid
Even pros can mess up lumpia if they’re not careful. Here’s what to watch out for:
- Overfilling the wrapper: Makes it hard to roll and can cause bursting.
- Using cold or thick wrappers: They crack easily and don’t fry well.
- Not draining oil properly: Leads to greasy, soggy lumpia.
- Wrong oil temperature: Too hot = burnt outside, raw inside. Too cold = oily lumpia.
- Skipping the taste test: Always fry a small portion of filling before rolling the rest.
Avoid these issues and you’ll have perfect lumpia every time!
Storage and Reheating Tips
Freezing Raw Lumpia:
- Arrange in a single layer on a tray.
- Freeze until firm, then transfer to a zip-lock bag.
- Lasts up to 2 months.
Cooking from Frozen:
- Do NOT thaw.
- Fry straight from the freezer—just add a couple of minutes to cooking time.
Storing Cooked Lumpia:
- Refrigerate leftovers in an airtight container for up to 3 days.
- Reheat in the oven or air fryer to restore crispiness. Avoid the microwave—it makes them soggy!
FAQs about Lumpiang Shanghai Filipino Recipe
1. Can I make lumpia ahead of time?
Yes! You can roll the lumpia ahead of time and freeze them raw. Fry them straight from frozen when you’re ready to eat.
2. What’s the best meat substitute for pork?
Ground chicken or ground beef work well. For vegetarian options, try tofu, mushrooms, or a mix of both.
3. Can I freeze lumpia after frying?
It’s best to freeze lumpia before frying. However, if already fried, reheat in the oven or air fryer to restore crispiness.
4. What oil should I use for frying?
Use a neutral oil with a high smoke point, like vegetable, canola, or sunflower oil.
5. Can I use store-bought sauce?
Absolutely. Banana ketchup, sweet chili sauce, or bottled sweet and sour sauce work great!
Conclusion
Lumpiang Shanghai is more than just a dish—it’s a taste of Filipino culture, love, and tradition. Whether you’re making it for a party or prepping a freezer stash for busy nights, it’s always a crowd-pleaser. With the step-by-step guide above, you’re more than ready to roll up your sleeves (and your lumpia). So grab those wrappers, fire up that oil, and start frying your way to crispy, golden perfection.

