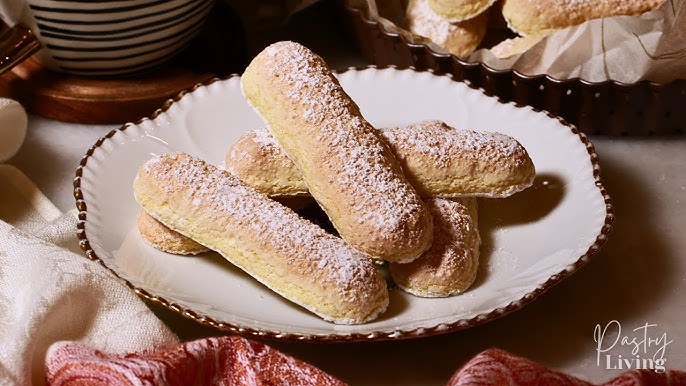
Lady Fingers Recipe: Lady fingers, also known as “savoiardi,” are delicate, airy sponge biscuits that are shaped like long fingers. These light treats are a staple in classic European desserts, especially the world-famous Italian tiramisu. The unique texture of lady fingers—crispy on the outside yet soft and slightly spongy on the inside—makes them ideal for soaking up flavors in layered desserts.
Their appeal lies not only in their texture but also in their simplicity. Made with just a few pantry ingredients like eggs, sugar, and flour, lady fingers can be whipped up with ease, even by beginner bakers. The magic happens when egg whites are whipped into a fluffy meringue, which gives the biscuits their characteristic airiness. Once baked, they become golden and firm, ready to be used as-is or incorporated into various dessert recipes.
What makes lady fingers especially versatile is their ability to act as a dessert building block. Whether you’re constructing an elegant tiramisu, a berry trifle, or a layered mousse cake, these biscuits add both structure and texture. They’re a baker’s secret weapon—simple, elegant, and infinitely customizable.
A Brief History of Lady Fingers
The history of lady fingers can be traced back to the late 15th century in the region of Savoy, located in present-day France and Italy. Created to honor a royal visit from the King of France, these finger-shaped sponge biscuits quickly became a culinary staple among the European elite. Over the centuries, they found their way into the royal courts of Europe, becoming a classic accompaniment to tea and coffee.
As travel and trade expanded, so did the popularity of lady fingers. French patissiers elevated them by incorporating them into elaborate desserts, while Italians embraced them as the foundation for their beloved tiramisu. The biscuit’s name varies by region—savoiardi in Italy, boudoirs in France—but the recipe has remained largely the same for centuries.
These timeless cookies have earned their place in culinary tradition due to their adaptability, elegance, and delightful texture. From aristocratic banquets to cozy kitchens, lady fingers have remained a beloved dessert component for generations.
Popular Uses of Lady Fingers in Desserts
Lady fingers are the unsung heroes in many iconic desserts. Their sponge-like texture makes them ideal for absorbing rich flavors like coffee, liquor, or fruit juices without falling apart. Here are a few classic and creative ways they are used:
- Tiramisu: Possibly the most famous use, where lady fingers are soaked in espresso and layered with mascarpone cream and cocoa powder.
- Charlotte Cake: Lined around a mousse or fruit filling, lady fingers form a decorative and delicious outer layer.
- Trifles: Layered with whipped cream, fruit, and pudding, they offer both structure and flavor to this English dessert.
- Icebox Cakes: When layered with cream and chilled, they soften perfectly, creating a creamy, cake-like consistency.
- Snack or Coffee Companion: Sometimes dusted with powdered sugar and served plain, they’re perfect for dipping into coffee or tea.
In short, lady fingers are incredibly versatile—whether as the foundation of a layered dessert or a sweet treat on their own.
Ingredients You’ll Need
Basic Ingredients List
To make traditional lady fingers, you’ll only need a handful of basic pantry staples. Here’s a classic list:
- Eggs (4 large): Separated into yolks and whites.
- Granulated Sugar (½ cup): Adds sweetness and stability to the batter.
- All-Purpose Flour (¾ cup): Forms the structural base.
- Cornstarch (2 tbsp): Lightens the flour for a more delicate texture.
- Vanilla Extract (1 tsp): For flavor.
- Powdered Sugar (for dusting): Optional, but gives that professional touch.
Each ingredient plays a specific role. The eggs create the light and airy texture, sugar sweetens and stabilizes the mixture, while flour and cornstarch provide the gentle structure needed for the cookies to hold their shape after baking.
When using simple ingredients, quality matters. Choose fresh eggs and pure vanilla extract to get the best flavor and texture. This is especially important if you plan to serve the lady fingers on their own or with just a dusting of sugar.
Optional Ingredients for Variation
Want to get creative? Here are a few optional add-ins to personalize your lady fingers:
- Lemon Zest: Adds a refreshing citrus twist.
- Almond Extract: A nutty, aromatic alternative to vanilla.
- Cocoa Powder (1-2 tbsp): Mix with the flour to make chocolate lady fingers.
- Espresso Powder: Adds a rich, bold flavor—perfect for coffee lovers.
You can play with these variations depending on what dessert you’re planning to make. Just be sure not to overload the batter, as the light texture is key to perfect lady fingers.
Ingredient Substitutes for Special Diets
Dietary restrictions? No problem. Here are a few swaps you can try:
- Gluten-Free Flour Blend: Use a 1:1 gluten-free baking mix instead of regular flour.
- Egg Replacer: Some brands offer meringue powder or aquafaba (chickpea water) to replicate whipped egg whites.
- Sugar Substitutes: Monk fruit or stevia blends can work for low-carb/keto diets, but test for sweetness adjustments.
Keep in mind that altering ingredients may affect the texture slightly. Always test a small batch before committing to a large recipe when experimenting with substitutes.
Tools and Equipment Required
Essential Baking Tools
To make lady fingers successfully, you’ll need the right tools. Don’t worry—it’s mostly basic kitchen gear:
- Mixing Bowls: One large for the egg whites, one medium for the yolks.
- Electric Mixer (Hand or Stand): Essential for whipping egg whites to stiff peaks.
- Fine Mesh Sifter: For flour and powdered sugar.
- Spatula: To gently fold mixtures without deflating the batter.
- Piping Bag with Round Tip: For piping even, finger-shaped cookies.
While you can technically spoon the batter onto the sheet, piping ensures consistency in size and shape—important for even baking and presentation.
Helpful Extras for Better Results
If you want to level up your baking game, these tools make a difference:
- Kitchen Scale: For accurate ingredient measurement.
- Oven Thermometer: To ensure your oven is at the correct baking temperature.
- Silicone Baking Mat or Parchment Paper: Prevents sticking and makes cleanup easier.
- Cooling Rack: Helps the cookies cool evenly without becoming soggy underneath.
Investing in the right tools pays off in results. Precision and technique matter most when making delicate baked goods like lady fingers.
Preparing Your Kitchen
Preheating and Setting Up
First things first—get your oven hot and ready. Preheat to 350°F (175°C) and make sure the rack is positioned in the center of the oven for even baking. A properly heated oven ensures that your lady fingers bake quickly and evenly, forming that golden crust without becoming dry.
While the oven is preheating, separate your eggs carefully—no yolk should mix with the whites. Have all your ingredients measured and ready to go. Timing is crucial in this recipe, especially when working with whipped egg whites, so mise en place (everything in its place) is your best friend here.
Set up your mixing station with all the tools nearby. Make sure your mixer bowls are clean and dry—especially for the egg whites, as any grease can prevent them from whipping properly.
Lining and Prepping Baking Sheets
Next, prepare your baking sheets. Line them with parchment paper or a silicone baking mat. If you’re piping the batter, it helps to draw finger-shaped outlines (about 3 to 4 inches long) on the underside of the parchment paper to ensure uniformity. Flip the paper over so the ink or pencil doesn’t touch the batter.
Also, fill your piping bag with the batter once it’s ready and twist the top closed to avoid spillage. If you’re using a zip-top bag, snip off one corner after filling.
Preparation may seem like a lot upfront, but it’ll make the baking process smoother, faster, and a lot more enjoyable.
Step-by-Step Lady Fingers Recipe
Step 1: Separating Eggs Properly
Egg separation might seem simple, but it’s one of the most critical steps when making lady fingers. You’ll need to separate the yolks from the whites without getting even a trace of yolk into the whites, or they won’t whip properly. The best way to do this is to crack the egg and pass the yolk back and forth between the shell halves, letting the whites drip into a bowl beneath.
Here are a few pro tips to make it easier:
- Use cold eggs: They’re firmer and easier to separate.
- Separate one egg at a time: In case one yolk breaks, it won’t ruin the rest of your batch.
- Use two bowls: One for whites, one for yolks, and a third as a “middle bowl” to catch each white before transferring to the main bowl.
Once the eggs are separated, let them come to room temperature before whipping. This helps them reach maximum volume. Room-temperature egg whites trap more air, which results in fluffier, lighter lady fingers. Time to move on to the fun part—whipping!
Step 2: Beating Egg Yolks and Sugar
In a medium bowl, whisk together the egg yolks and half of the granulated sugar (about ¼ cup) until the mixture becomes thick, pale, and creamy. This can take about 3–5 minutes using an electric mixer. You’re looking for a ribbon stage—when the mixture falls from the whisk in a thick, slow ribbon that briefly sits on top of the rest before sinking in.
This stage is important because it ensures your lady fingers have the right structure and don’t collapse during baking. Once the mixture is thick and ribbony, add in your vanilla extract (or any flavoring like lemon zest or almond extract) and give it one final mix.
Set this bowl aside—it’s now ready to be gently folded into the egg whites later on. The key here is patience; you want volume and air in every step of this recipe.
Step 3: Whipping Egg Whites to Stiff Peaks
Here comes the heart of the recipe—whipping those egg whites! In a clean, dry bowl (preferably metal or glass), begin beating the whites on medium speed. When they start to get foamy, gradually add the remaining ¼ cup of sugar.
Increase the speed to high and beat until stiff peaks form. This means that when you lift the beaters, the peaks should stand straight up without drooping. But be careful not to overbeat, or the mixture can become grainy and dry, making it hard to fold later.
Why all the fuss over peaks? Because the volume from the egg whites is what gives lady fingers their light, airy texture. They don’t have baking powder or soda for lift—so all that puffiness? That’s all thanks to air.
When you’re confident your whites have stiff peaks, it’s time to marry the mixtures!
Step 4: Folding and Combining Mixtures
Now, take the egg yolk mixture and gently fold it into the egg whites. Use a rubber spatula and make long, deliberate strokes, rotating the bowl as you go. The key is to retain as much air as possible while mixing the two together.
Once combined, sift the flour and cornstarch over the mixture in batches, folding it in just until no streaks remain. Don’t stir—fold. Folding maintains the air bubbles that give your lady fingers their rise and soft texture.
Avoid overmixing, which can deflate the batter. You want it to be light, fluffy, and slightly thick—easy to pipe but not runny. If it holds its shape when piped, you’re in the sweet spot!
Step 5: Piping the Batter
Fit a piping bag with a ½-inch round tip and fill it with the batter. Holding the bag at a 45° angle, pipe lines about 3 to 4 inches long and spaced at least an inch apart. Use those penciled-in guidelines under your parchment paper if needed.
Once piped, dust the tops with powdered sugar using a fine sieve. Let them sit for 2–3 minutes, then dust again. This double-dusting gives lady fingers their classic crackly top.
Make sure you work quickly at this stage—the batter can start deflating if it sits too long. If you need to, bake in batches rather than trying to pipe too many at once.
And now, let’s bake!
Step 6: Baking to Perfection
Place your baking tray in the preheated oven and bake at 350°F (175°C) for 10 to 12 minutes, or until the lady fingers are lightly golden and just firm to the touch. They should not brown too much; a pale golden hue is what you’re aiming for.
Keep an eye on them—baking time may vary slightly based on your oven or the size of the fingers. Avoid opening the oven door in the first 8 minutes to prevent collapse.
Once baked, remove them immediately and let them cool on the baking sheet for 2–3 minutes before transferring to a wire rack to cool completely. Be gentle—they’re delicate!
They should be slightly crisp on the outside but still soft in the center. Once cooled, you’ll notice the texture firms up more, making them perfect for soaking up liquids in desserts like tiramisu.
Step 7: Cooling and Storing
After cooling on a wire rack, your lady fingers are ready to use! If you’re planning to eat them plain, enjoy them within 1–2 days for the best texture. You can store them in an airtight container at room temperature for up to a week, though they may lose a bit of crispness over time.
For longer storage, you can freeze them in a zip-top bag with parchment paper between layers. They’ll keep well for up to 2 months. To thaw, just leave them at room temperature for about 20 minutes—no need to re-bake.
If you’re using them in tiramisu or trifle, it’s actually better to use day-old lady fingers. They soak up liquid without turning mushy, holding their structure in layered desserts.
Tips and Tricks for Perfect Lady Fingers
Common Mistakes to Avoid
Even though lady fingers are simple in ingredients, they can be tricky if you’re not careful. Here are some common pitfalls to steer clear of:
- Overbeating or underbeating egg whites: You want stiff, glossy peaks—anything less won’t hold up. But overbeating can make them grainy and dry.
- Mixing too aggressively: Folding is key. If you stir instead of fold, you’ll deflate all that beautiful air you just whipped into the batter.
- Skipping the powdered sugar topping: That sugary dusting helps give lady fingers their iconic finish. It’s not just for looks!
- Incorrect oven temperature: Too hot, and they’ll brown too quickly; too cool, and they’ll be pale and soft.
- Inconsistent piping: Uneven shapes lead to uneven baking. Try to keep the size and spacing uniform.
Mastering lady fingers is all about respecting the process. Once you’ve got the hang of it, they’ll become your go-to for show-stopping desserts.
How to Get the Perfect Texture
You’re aiming for a balance: a crispy, golden outside with a soft, slightly chewy interior. Here’s how to achieve it:
- Use room temperature eggs: Cold eggs won’t whip properly.
- Sift your flour and cornstarch: This prevents lumps and helps maintain lightness.
- Pipe immediately: Don’t let your batter sit too long. It’ll deflate.
- Double-dust with powdered sugar: That sweet crackly crust? It’s all thanks to the sugar.
With the right technique and a little patience, your lady fingers will come out bakery-quality every single time.
Flavor Variations and Creative Twists
Chocolate Lady Fingers
Who doesn’t love a chocolate twist on a classic? Chocolate lady fingers offer a rich and indulgent version of the traditional cookie. To make them, simply replace 2 tablespoons of the flour with unsweetened cocoa powder. This minor tweak delivers a deep cocoa flavor while maintaining the same light texture.
For a more intense chocolate punch, consider adding a handful of mini chocolate chips into the batter, or melt a bit of chocolate to drizzle over the finished cookies. Some bakers even dip one end of each lady finger in melted dark or white chocolate after baking and cooling—great for presentation and extra flavor.
These are perfect for chocolate tiramisu, mocha trifles, or as standalone treats with a glass of milk. Kids especially love these, and they make a fabulous addition to lunchboxes or party dessert tables.
Coffee-Infused Lady Fingers
Calling all coffee lovers—this one’s for you! To infuse a gentle coffee flavor into your lady fingers, dissolve 1 teaspoon of instant espresso powder in the egg yolk mixture before whipping. You can also brush baked lady fingers lightly with brewed espresso before layering them in desserts.
The result? A subtly caffeinated twist that pairs exceptionally well with desserts like tiramisu or coffee mousse. It enhances the depth of flavor without overpowering the sweetness. Think of it as a latte in cookie form—comforting, rich, and deeply satisfying.
For an adult version, add a splash of coffee liqueur to the espresso brushing liquid. It adds complexity and gives your desserts a grown-up vibe.
Gluten-Free and Vegan Alternatives
Lady fingers for everyone! If you have dietary restrictions, there are several ways to tweak the recipe:
For gluten-free lady fingers:
- Use a 1:1 gluten-free flour blend that includes xanthan gum for structure.
- Substitute cornstarch with tapioca flour or potato starch if needed.
For vegan lady fingers:
- Replace eggs with aquafaba (the liquid from a can of chickpeas). Use 3 tablespoons of aquafaba per egg white.
- Use a plant-based yolk replacer or create a mixture of soy flour and water.
- Be sure to use vegan sugar, as some varieties are processed with bone char.
The texture might differ slightly, but with the right balance, you’ll still get a delicious, soft-centered cookie that holds up in desserts. Bonus points if you make a vegan tiramisu from scratch—impressive and inclusive!
How to Use Lady Fingers in Desserts
Classic Tiramisu
The queen of lady finger desserts! Tiramisu is a creamy, dreamy Italian dessert that layers espresso-soaked lady fingers with a rich mascarpone filling, topped with a dusting of cocoa powder. It’s no-bake, elegant, and totally irresistible.
Here’s how you use lady fingers in tiramisu:
- Dip each cookie briefly in strong brewed espresso or coffee.
- Layer them in a dish with whipped mascarpone cream.
- Repeat until the dish is full, then refrigerate for at least 6 hours.
Lady fingers absorb the coffee without turning mushy, providing the ideal base for the creamy layers. Want to go extra fancy? Add a splash of coffee liqueur or dark rum to the espresso for depth.
Tiramisu is a showstopper at parties and gatherings—and once you’ve made your own lady fingers, it hits a whole new level of amazing.
Charlotte Cake
If tiramisu is a classic, the Charlotte cake is a showpiece. It’s an elegant dessert where lady fingers form a wall around a luscious mousse or fruit-filled center. Picture a vertical dessert that looks like it came straight from a French patisserie.
To assemble a Charlotte cake:
- Line the sides of a springform pan with lady fingers.
- Fill the center with layers of mousse, whipped cream, or fruit puree.
- Chill for a few hours until set, then decorate with fresh berries and mint.
Charlotte cakes are incredibly versatile. You can make them chocolate, vanilla, raspberry, or even tropical-flavored. They’re perfect for birthdays, anniversaries, or when you want to wow your guests.
Trifles and Mini Layered Desserts
Lady fingers shine in trifles—layered desserts made in clear bowls to show off the beauty of the layers. They’re typically made with:
- Fruit or fruit compote
- Whipped cream or custard
- Lady fingers (soaked or dry)
Because of their absorbent texture, lady fingers make the perfect base or middle layer. You can cut them to size, stack them neatly, or break them up for a rustic look.
Want to keep it cute and personal? Make mini trifles in mason jars or glasses. These are ideal for picnics, potlucks, and individual dessert servings. Add a spoon and a ribbon, and you’ve got yourself a Pinterest-worthy treat.
Storing and Freezing Lady Fingers
Shelf Life and Storage Tips
Once baked and cooled, homemade lady fingers should be stored properly to maintain their texture and flavor. Here’s how:
- Room Temperature: Store in an airtight container in a cool, dry place for up to 1 week.
- Refrigerator: Not recommended unless used in a dessert; moisture can make them soggy.
- Humidity Warning: If your home is humid, consider using a container with a silica packet or placing a paper towel inside to absorb moisture.
If your lady fingers start losing their crispiness, you can re-crisp them in a 250°F oven for 5 minutes. Let them cool before using again.
Freezing and Thawing Instructions
Need to make them ahead of time? Freezing is a great option:
- How to Freeze: Place cooled lady fingers in a single layer on a baking sheet. Once frozen, transfer them to a zip-top bag with parchment paper between layers.
- Freezer Life: Up to 2 months.
- How to Thaw: Leave at room temperature for 15–20 minutes. Don’t microwave or bake—let them thaw naturally to retain their texture.
If you’re prepping for a party or making desserts in bulk, this trick saves you time and ensures freshness when you need it most.
Nutritional Information
Calorie Count and Macronutrients
Lady fingers are considered a light dessert option, especially when eaten plain. Here’s an approximate nutritional breakdown for 2 pieces (about 30g total):
| Nutrient | Amount |
|---|---|
| Calories | 110–120 kcal |
| Carbohydrates | 20g |
| Sugars | 10g |
| Protein | 3g |
| Fat | 2g |
| Fiber | 0.5g |
These numbers can vary based on the ingredients used and portion size. If you’re using them in tiramisu or other desserts, expect the calorie count to rise due to cream, cheese, and added sugars.
Diet-Friendliness and Allergen Info
Lady fingers are naturally nut-free, but not gluten-free or vegan unless modified. Here’s a quick dietary snapshot:
- Vegetarian-friendly: Yes
- Gluten-free: Only with GF flour blend
- Vegan: Requires egg substitutes
- Low-carb/keto: Not suitable in traditional form
Always read labels or ask about ingredients if you’re buying them pre-made, especially for allergies. Homemade is often the safest route if you need to control what goes in.
FAQs about Lady Fingers Recipe
What are lady fingers?
Lady fingers, or savoiardi, are light and sweet sponge biscuits roughly shaped like a large finger. They are commonly used in recipes like tiramisu and trifle due to their excellent ability to absorb flavors while maintaining their structure.
How do I make lady fingers at home?
Making lady fingers at home is straightforward. You’ll need eggs, sugar, flour, and a pinch of baking powder. The process involves whipping eggs with sugar until fluffy, then gently folding in the flour and baking powder. Pipe the batter onto a baking sheet in finger shapes and bake until lightly golden.
Can I make lady fingers without a piping bag?
Yes, you can use a plastic bag with a corner cut off as a DIY piping bag. Alternatively, you can simply drop spoonfuls of batter onto the baking sheet, though the traditional finger shape may be lost.
What are the key tips for perfect lady fingers?
- Ensure your eggs are at room temperature to achieve maximum volume when whipped.
- Fold the flour gently to keep the air in the batter.
- Do not overbake, as lady fingers should be light and soft, not brown and crispy.
Are lady fingers gluten-free?
Traditional lady fingers are not gluten-free as they contain wheat flour. However, you can substitute gluten-free flour to accommodate dietary needs without significantly affecting the texture or taste.
How long do homemade lady fingers last?
Stored in an airtight container, homemade lady fingers can last up to a week at room temperature. They can also be frozen for up to three months, making them a convenient make-ahead option for desserts.
Conclusion
Making lady fingers from scratch might sound intimidating, but once you try it, you’ll see it’s a rewarding and surprisingly simple baking project. With just a few ingredients and the right technique, you can create bakery-quality cookies that are light, airy, and absolutely delicious.
Whether you’re building a masterpiece like tiramisu, layering a fancy trifle, or just enjoying them with a cup of tea, homemade lady fingers add a touch of elegance and authenticity to any dessert. The best part? You can tweak the recipe to fit your taste or dietary needs—making them perfect for everyone.
So next time you’re craving something sweet or planning to impress guests, whip up a batch of these delightful sponge cookies. Once you taste the homemade version, there’s no going back to store-bought.
Happy baking!