Kombucha Tea Recipe: Kombucha tea has exploded in popularity—and for good reason. This fizzy, slightly tangy drink isn’t just trendy; it’s packed with probiotics and potential health benefits that keep people coming back for more. What’s even more exciting? You can make kombucha at home with just a few simple ingredients and a little bit of patience.
So why do people prefer homemade kombucha over store-bought versions? First, it’s way more affordable. A single bottle from the store can cost as much as a whole batch you make at home. Second, you get to control everything—from the strength of the brew to the flavors you infuse during the second fermentation. It’s a delicious little science experiment that rewards your effort with something tasty and good for your gut.
In this guide, I’ll walk you through every single step of making your own kombucha, from gathering ingredients to fermenting, flavoring, and bottling your final product. If you’ve never brewed anything before, don’t worry. We’re breaking it all down in plain English so you can become a kombucha master in no time.
Health Benefits of Kombucha
Kombucha isn’t just tasty—it’s also known for its potential to support your health in several different ways.
Probiotic Power: The real magic of kombucha lies in its probiotic content. These friendly bacteria can help balance your gut microbiome, improving digestion and possibly even boosting mood and brain health.
Boosts Immunity: Kombucha is rich in antioxidants, especially when made with green tea. These compounds help neutralize harmful free radicals in the body and may strengthen your immune response.
Aids Digestion: Thanks to the enzymes and acids produced during fermentation, kombucha can promote better digestion. If you struggle with bloating or irregularity, a small daily dose of kombucha might help things move more smoothly.
And that’s just scratching the surface. While more scientific research is still being done, millions of kombucha drinkers swear by the positive effects it has on their health and energy levels.
List of Ingredients You’ll Need
Let’s get down to the nitty-gritty. Here’s everything you’ll need to make a one-gallon batch of kombucha:
- 8 cups of water (filtered or distilled preferred)
- 1 cup of white cane sugar (don’t substitute here—your SCOBY needs the real stuff)
- 8 bags of black tea or green tea (avoid flavored or oily teas like Earl Grey)
- 2 cups of starter tea (from a previous batch or a store-bought bottle of raw, unflavored kombucha)
- 1 SCOBY (Symbiotic Culture of Bacteria and Yeast)
The ingredients are simple and affordable. Once you get your hands on a SCOBY, you’re ready to roll. If you’re starting from scratch and don’t have a SCOBY or starter tea yet, don’t worry—we’ll talk about how to get those too.
Equipment You’ll Need
Making kombucha doesn’t require a fancy brewing setup. Here’s the basic gear you’ll need:
- A large glass jar (1-gallon mason jars work great)
- A breathable cloth or coffee filter (to cover the jar)
- Rubber band (to secure the cloth)
- Measuring cups and spoons
- A wooden or plastic stirring spoon (avoid metal, which can harm your SCOBY)
- Funnel (optional but helpful for bottling)
- Glass bottles with tight lids (for storing your final brew, especially if you want carbonation)
Make sure everything is clean and free of soap residue. Sanitization is key when it comes to home fermentation.
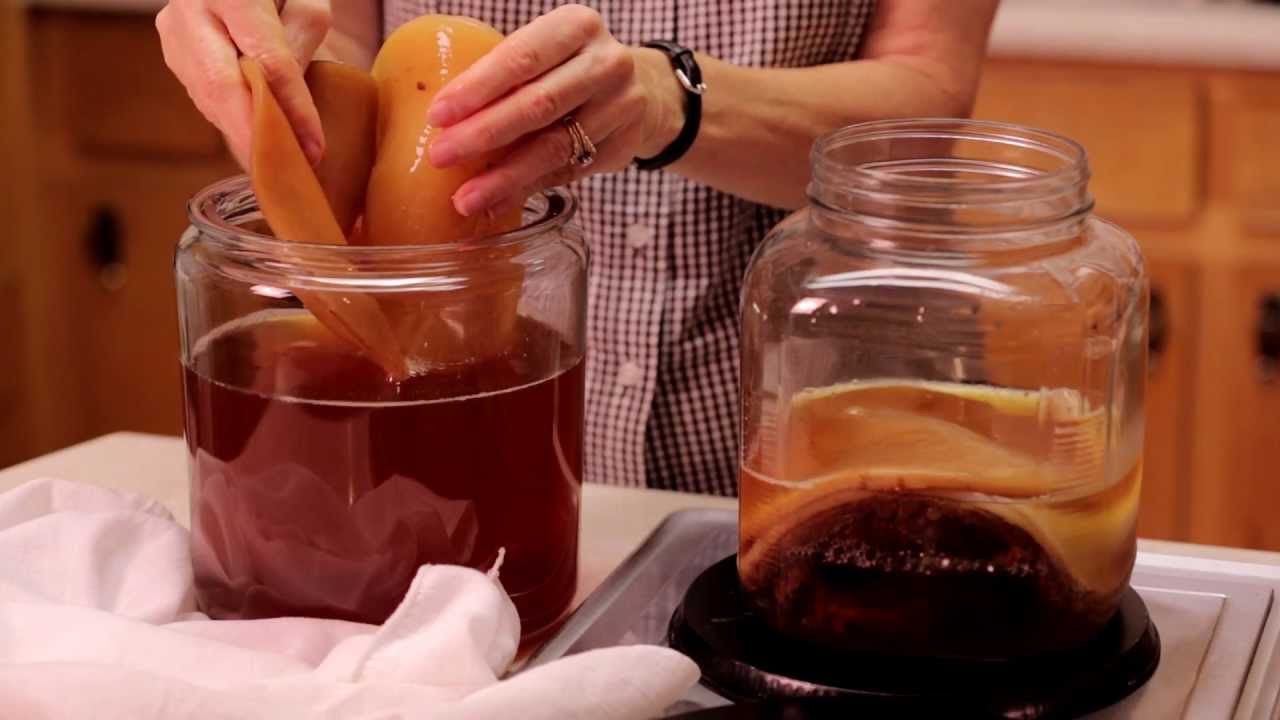
Understanding the SCOBY
If kombucha is the result, then SCOBY is the secret sauce. It looks weird—kind of like a rubbery pancake—but it’s essential for turning your sweet tea into kombucha.
What is a SCOBY?
SCOBY stands for Symbiotic Culture of Bacteria and Yeast. It’s a living biofilm that ferments your tea, eating the sugar and producing those signature acids and bubbles.
Where to Get One?
- Ask a kombucha-brewing friend for a spare SCOBY.
- Buy one online from a reputable source.
- Grow your own from a bottle of raw, unflavored kombucha (takes 2–3 weeks).
How to Store a SCOBY
Keep your SCOBY in a jar with some starter tea in the fridge or at room temperature (in a “SCOBY hotel”) between brews. Just make sure it’s submerged to stay alive.
Step-by-Step Kombucha Brewing Process
This is where the magic happens. Let’s walk through each step of making your own kombucha from scratch.
Step 1: Boil the Water
Bring 8 cups of water to a boil in a large pot. You’ll need hot water to brew your tea and dissolve the sugar.
Step 2: Brew the Tea
Remove the boiling water from heat and add your 8 tea bags. Let them steep for about 10–15 minutes. Stronger tea = better flavor.
Step 3: Add the Sugar
Stir in 1 cup of white sugar while the tea is still hot. Make sure it dissolves completely—this is the food source for your SCOBY.
Step 4: Cool the Mixture
Let the sweet tea cool to room temperature. This step is crucial. If you add your SCOBY to hot tea, it can die. Not cool.
Step 5: Add SCOBY and Starter Tea
Pour the cooled tea into your glass jar, then add 2 cups of starter tea and gently place the SCOBY on top. It might float, sink, or hang out sideways—it’s all normal.
Step 6: Ferment the Tea
Cover the jar with a breathable cloth and secure it with a rubber band. Place it somewhere warm (70–80°F), dark, and undisturbed. Let it sit for 7 to 14 days.
Step 7: Taste Test for Readiness
After about a week, start tasting your brew with a clean spoon. The longer it ferments, the more acidic and less sweet it becomes. When you like the balance, it’s time to bottle!
Second Fermentation (Optional)
Want bubbles and flavor in your kombucha? This is where the second fermentation comes in—a fun, creative step that turns your tangy tea into a fizzy, fruity treat.
Why Do a Second Fermentation?
The first fermentation gives you plain kombucha. The second is where you:
- Add fruit, herbs, or spices for flavor.
- Trap the natural carbonation in sealed bottles to create fizz.
How to Do It:
- Remove the SCOBY and about a cup or two of kombucha for your next batch.
- Pour the remaining kombucha into bottles, leaving about 1 inch of space at the top.
- Add your flavoring ingredients to each bottle. A few ideas:
- 1/4 cup of fruit juice
- A handful of berries
- A slice of ginger
- A few mint leaves
- Seal the bottles tightly and let them sit at room temperature for 2 to 4 days.
- “Burp” the bottles daily to release pressure and avoid explosions.
- Once fizzy, move them to the fridge to slow fermentation.
Just like that, you’ve turned basic kombucha into a fizzy drink that rivals any soda or store-bought version.
Flavoring Your Kombucha
Now comes the fun part—playing with flavors. You can go wild or keep it simple. Either way, there’s no limit to the combinations you can try.
Popular Fruit Flavors:
- Mango
- Strawberry
- Blueberry
- Pineapple
- Apple + cinnamon
Herbs and Spices:
- Ginger
- Mint
- Basil
- Lavender
- Turmeric
Creative Combos to Try:
- Raspberry + lime
- Peach + ginger
- Blueberry + basil
- Pineapple + jalapeño (if you’re feeling adventurous)
You can use fresh, frozen, or dried ingredients. Just make sure they’re clean, and avoid anything oily (like citrus peels or Earl Grey tea).
Pro tip: Label your bottles with dates and flavor combos so you can remember your favorites.
How Long Does it Take to Ferment Kombucha?
Timing can be everything with kombucha. The general rule is:
- First Fermentation: 7 to 14 days
- Second Fermentation: 2 to 5 days
But the actual time depends on several factors:
- Temperature: Warmer temps speed up fermentation. If it’s cooler, your kombucha may need more time.
- Taste Preference: Want it sweeter? Ferment for fewer days. Like it tart? Let it sit longer.
- Strength of Starter Tea & SCOBY: A stronger starter tea or more active SCOBY may ferment faster.
Always rely on taste, not just the calendar. Start sampling after day 7 to find your sweet spot.
Storing Your Finished Kombucha
Once your kombucha is fizzy and flavorful, it’s time to store it properly so it stays fresh and tasty.
Here’s how to store it:
- Refrigerate: Once your second fermentation is complete, move the bottles to the fridge. Cold temps slow down the fermentation process.
- Shelf Life: Homemade kombucha can last 2 to 3 months in the fridge, but it’s best enjoyed within the first few weeks for peak flavor and fizz.
- Avoid shaking before opening—it’s naturally carbonated, and the pressure can build up!
If you’re storing large quantities, consider keeping a backup SCOBY in a separate container (“SCOBY hotel”) in case you take a break from brewing.
Troubleshooting Common Problems
Brewing kombucha is mostly smooth sailing, but a few issues can pop up now and then. Here’s how to troubleshoot them:
Mold on the SCOBY:
- Looks fuzzy, blue, green, or black? That’s mold. Toss the batch and SCOBY.
- Prevention: Keep your equipment clean and don’t disturb the brew while it ferments.
Off Smells or Flavors:
- Smells like vinegar? Totally normal.
- Smells rotten or like cheese? Probably contaminated. Start fresh.
SCOBY is sinking, floating, or sideways:
- Don’t worry. It can do all of these and still be totally healthy.
- A new baby SCOBY usually forms at the surface.
No Fizz in Bottles:
- Try adding a bit more sugar or fruit during second fermentation.
- Make sure your bottles are sealed tightly and left at room temperature.
Patience, cleanliness, and experimentation are your best tools for overcoming brewing issues.
Cleaning and Sanitizing Equipment
Clean tools = healthy kombucha. It’s that simple.
Why It Matters: Fermentation is a delicate process. Bad bacteria can ruin your batch, and worse—make you sick. That’s why cleaning is not optional.
How to Clean:
- Wash jars, bottles, and utensils with hot water and mild, unscented soap.
- Rinse thoroughly—soap residue can harm the SCOBY.
- Use white vinegar to sanitize surfaces and hands before handling your SCOBY.
Avoid using bleach or harsh chemical cleaners, especially if they leave residues.
Tips for Brewing Better Kombucha
Want to take your kombucha game to the next level? Follow these expert tips:
- Temperature matters – Keep your brew between 70–80°F. Use a seedling mat or brew in summer if your home runs cold.
- Don’t refrigerate your SCOBY – It goes dormant in cold temps and takes longer to bounce back.
- Use the right sugar and tea – White cane sugar and plain black or green tea work best. Avoid sweeteners like honey or artificial sugar.
- Be patient – Great kombucha takes time. Rushing it = weak flavor or unhappy SCOBY.
- Keep notes – Record how long each batch took, how it tasted, and what flavors worked. This will help you perfect your process.
Is Kombucha Safe for Everyone?
Kombucha is generally safe for most people, but there are a few exceptions.
Who should avoid kombucha?
- Pregnant or breastfeeding women (due to trace alcohol and unpasteurized nature)
- People with compromised immune systems
- Those sensitive to caffeine or alcohol
Does kombucha contain alcohol?
Yes, but it’s usually less than 0.5% if brewed properly. If you let it ferment too long or bottle it too warm, that number can rise slightly.
As always, if you have health concerns, check with a healthcare provider before making kombucha a regular part of your diet.
FAQs about Kombucha Tea Recipe
1. Can I use flavored tea to make kombucha?
It’s best to stick with plain black or green tea. Flavored or herbal teas can contain oils or additives that harm the SCOBY.
2. How do I know if my SCOBY is healthy?
A healthy SCOBY is thick, rubbery, and off-white. Brown stringy bits are normal. Mold, fuzz, or weird colors mean it’s gone bad.
3. What happens if I forget to burp the bottles?
Pressure can build up and cause bottles to explode. Always burp glass bottles daily during the second fermentation.
4. Can I reuse the SCOBY?
Yes! SCOBYs can be reused multiple times. In fact, you’ll often grow a new one with each batch.
5. Is store-bought kombucha the same as homemade?
Not quite. Store-bought versions are often pasteurized (killing some probiotics), and they may contain extra sugar. Homemade kombucha is fresher, stronger, and customizable.
Conclusion
Brewing kombucha at home is part art, part science, and a whole lot of fun. You don’t need fancy tools or a culinary degree—just a little patience, a healthy SCOBY, and the willingness to experiment. Once you get the hang of it, you’ll not only save money but also enjoy a custom, flavorful, gut-friendly drink made exactly how you like it.
The best part? Every batch is a fresh adventure. So roll up your sleeves, steep that tea, and start brewing your way to better health—one fizzy bottle at a time.