Kitchenaid Pasta Recipe: Let’s face it—nothing compares to the taste of fresh, homemade pasta. It’s rich, tender, and has a bite that store-bought pasta simply can’t match. Now, if you’ve got a KitchenAid stand mixer collecting dust in your kitchen, it’s time to give it a new mission—pasta making! This guide is your ultimate go-to walkthrough for using the KitchenAid pasta attachments to create delicious pasta from scratch. We’re not just throwing ingredients into a bowl and calling it a day—we’re diving deep, step-by-step, so even a beginner can roll out restaurant-quality pasta in no time.
You’ll learn everything—from the ingredients you need, to mastering that silky-smooth dough, to cutting and drying your pasta like a pro. Plus, we’ll tackle those annoying problems that can mess up your pasta game. Ready to impress yourself (and your dinner guests)? Let’s roll!
Benefits of Making Homemade Pasta
Making pasta from scratch might sound intimidating, but the benefits far outweigh the effort. First off, the flavor is leagues better than anything you’ll get in a plastic package. Fresh pasta has a delicate texture and rich flavor that clings beautifully to sauces. It doesn’t turn to mush like some store-bought kinds, and the bite you get—especially with egg-based dough—is incredibly satisfying.
Another huge plus? Control. You know exactly what’s going into your dough—no weird preservatives or artificial stuff. Want to go gluten-free, low-carb, or add herbs and veggies? You’re the boss of that bowl. Homemade pasta is also surprisingly economical. You’re basically turning flour and eggs into gourmet fare. Not to mention, making pasta from scratch can be downright therapeutic. Once you get into the rhythm of kneading and rolling, it’s like edible meditation.
And let’s not ignore the bragging rights. Serving homemade pasta to friends or family is an instant “wow” moment. You’ll get compliments, maybe a few marriage proposals, and definitely requests for seconds.
Why Use a KitchenAid Mixer for Pasta Making?
If you’ve ever tried kneading pasta dough by hand, you know it’s a workout. Sure, it builds forearm strength—but if you’re after consistency and efficiency, KitchenAid is your new best friend. The stand mixer with the dough hook attachment takes the muscle out of mixing and kneading, giving you a perfectly smooth and elastic dough every time.
But here’s where it gets exciting: the pasta roller and cutter attachments. These genius tools transform your dough into paper-thin sheets and perfect pasta strands with almost no effort. Forget wrestling with manual crank machines or uneven rolling pins. With KitchenAid, you set the roller thickness, feed the dough, and watch it roll out flawlessly every time.
You also get better results. Because the machine handles the pressure evenly, the texture and thickness of your pasta stay consistent, which means even cooking. No more doughy bites or overcooked edges. The attachments are also built tough—they’ll last years and make you feel like a legit Italian nonna, minus the grey hair.
Understanding the KitchenAid Pasta Attachments
To unlock the magic of fresh pasta, you’ll need the right gear. KitchenAid’s pasta attachments usually come in a 3-piece set:
- Pasta Roller: This is your sheet maker. It flattens your dough into thin sheets, which you’ll later cut into different shapes.
- Spaghetti Cutter: This attachment slices those sheets into thin, round spaghetti strands.
- Fettuccine Cutter: This one cuts wider, flatter noodles, perfect for Alfredo or Bolognese.
There are also optional attachments if you want to level up your pasta game—like the ravioli maker, lasagnette cutter, or capellini cutter. But to start, the 3-piece set has everything you need. Each piece clicks into the front of your mixer easily, and cleanup is surprisingly simple (a dry brush does wonders).
The key is using each attachment at the right stage. You can’t cut spaghetti from a thick lump—you have to flatten it first. Think of it like a team: roller preps, cutter finishes. Simple and effective.
List of Ingredients You’ll Need
The beautiful part of making pasta is how few ingredients you actually need. For basic egg pasta, here’s what you’ll want on hand:
Basic Pasta Dough Ingredients:
- 2 cups all-purpose flour (or 1 cup AP + 1 cup semolina for more bite)
- 3 large eggs
- 1/2 teaspoon salt
- 1 tablespoon olive oil (optional, for elasticity)
Optional Add-ins:
- 1/2 cup pureed spinach (for green pasta)
- 1 tablespoon beetroot powder (for red pasta)
- Fresh chopped herbs like basil, thyme, or rosemary
- A touch of turmeric or squid ink for color and flavor
Flour Types Explained:
- All-Purpose Flour: Easy to find and great for soft, tender pasta.
- Semolina Flour: Adds firmness and a slightly rough texture—ideal for sauce clinging.
- 00 Flour: Super fine Italian flour. The gold standard for silky, delicate pasta.
Pro tip: Make sure your eggs are at room temperature before mixing. Cold eggs can throw off your dough’s moisture balance.
Kitchen Tools You’ll Need
Before you dive in, let’s get your workspace ready. Here’s a checklist of the gear you’ll want:
- KitchenAid Stand Mixer (any model with the front hub works)
- Dough Hook Attachment (comes with the mixer)
- KitchenAid Pasta Roller & Cutter Set
- Bench Scraper (for lifting and shaping dough)
- Pasta Drying Rack or Clean Hanger
- Rolling Pin (just in case)
- Mixing Bowl
- Measuring Cups & Spoons
- Plastic Wrap or Clean Towel (for resting dough)
- Flour for dusting
A clean countertop is also essential. You’ll need space to roll and shape the pasta sheets. And trust me, dusting everything with flour (lightly!) helps more than you think—no one wants sticky dough clogging the roller.
Step-by-Step Guide to Making Pasta Dough
Here comes the heart of the recipe—making that golden, silky-smooth dough. Don’t worry, the KitchenAid stand mixer does most of the heavy lifting.
Step 1: Measuring Ingredients
Begin by measuring your ingredients accurately. Use 2 cups of all-purpose or “00” flour and place it in a bowl. Create a small well in the center and crack in 3 large eggs. Proper measurements ensure your dough develops the right texture—neither too dry nor too sticky.
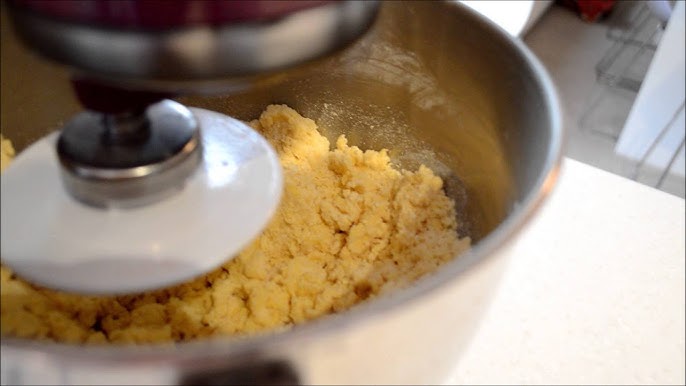
Step 2: Mixing with the Dough Hook
Transfer the mixture to a stand mixer fitted with a dough hook. Start on low speed and allow the flour and eggs to slowly combine. Scrape the sides if needed. Mix until the dough begins to form a rough, slightly sticky ball. Let the mixer do the initial heavy work for you.
Step 3: Kneading Times and Tips
Once the dough comes together, knead on medium speed for 6–8 minutes. The dough should become smooth, elastic, and slightly tacky. If it’s too sticky, add a little flour; if too dry, sprinkle in a few drops of water.
Step 4: Resting the Dough
Shape the dough into a ball, cover it tightly, and let it rest for 30 minutes. This relaxes the gluten for easier rolling and silky, tender pasta.
How to Use the KitchenAid Pasta Roller
Now that your dough is rested and ready, it’s time to shape it into silky, smooth pasta sheets using the KitchenAid Pasta Roller. This step is pure magic—you’ll watch rough dough transform into thin ribbons that practically melt in your mouth once cooked.
Let’s Roll: Step-by-Step Instructions
- Attach the Roller: Turn off your KitchenAid, then insert the pasta roller into the front attachment hub. Secure it with the side knob.
- Set the Thickness Dial: Start on setting #1—this is the widest. You’ll work your way up to thinner settings gradually.
- Flatten the Dough: Take one of the dough pieces you cut earlier. Flatten it into a small oval (about ½ inch thick) with your hands or rolling pin.
- Dust With Flour: Lightly flour both sides of the dough. This prevents sticking in the roller.
- Feed the Dough Through: Turn your mixer to Speed 2, then feed the flattened dough through the roller. Let it fall out naturally.
- Fold and Repeat: Fold the dough in half and feed it through again 2–3 times on setting #1. This helps smooth and strengthen the sheet.
- Adjust Thickness: Move the dial to #2, then run the dough through once. Continue increasing settings (up to #5 or #6) depending on how thin you want it. For fettuccine and spaghetti, #5 is usually ideal.
- Trim if Needed: If your sheet gets too long to handle, slice it in half.
Pro Tips for Perfect Sheets:
- Keep dusting with flour as you go—sticky sheets = torn pasta.
- Always start from the widest setting and work thinner gradually. Never skip levels.
- Let the dough rest again for 5 minutes after rolling if it’s springing back.
At this point, you should have long, smooth, thin sheets of pasta that feel slightly tacky but don’t stick. You’re now ready for the fun part—cutting it into your favorite shapes!
Cutting Pasta with KitchenAid Attachments
Time to bring those pasta sheets to life! Whether you love twirlable spaghetti or sauce-loving fettuccine, the KitchenAid cutters make it a breeze. Just clip in the attachment and feed your sheet—no guesswork needed.
How to Cut Spaghetti:
- Attach Spaghetti Cutter to the front hub.
- Lightly Flour Your Pasta Sheet to prevent sticking in the blades.
- Feed Through the Cutter on Speed 2. Support the pasta as it comes out.
- Catch and Drape the strands onto a drying rack or coat hanger.
How to Cut Fettuccine:
- Switch to the Fettuccine Cutter.
- Use the Same Process: Light flour, feed, catch.
- Toss With Semolina Flour to prevent sticking if storing right away.
Best Practices:
- Don’t rush. Feed one sheet at a time and give yourself space to handle the noodles.
- If the pasta strands stick together, sprinkle with more flour and gently shake them apart.
- Lay strands flat or hang to dry for about 10–15 minutes before boiling or storing.
There’s something deeply satisfying about seeing fresh strands of pasta appear right in front of you. It’s the kind of kitchen magic that makes the effort worth every second.
Drying and Storing Fresh Pasta
Once your noodles are cut, you have two choices: cook immediately, or store for later. Either way, a bit of drying goes a long way in preserving texture and preventing clumps.
Drying Fresh Pasta:
- Air Dry: Drape strands over a pasta drying rack, coat hanger, or floured baking sheet.
- Time: Let them dry for 15–30 minutes if cooking same day, or 12–24 hours for long-term storage.
- Environment: Dry in a cool, non-humid place. Avoid direct sunlight.
Storing Options:
- Refrigerator: Store semi-dried pasta in an airtight container for up to 2 days.
- Freezer: Freeze nests of fresh pasta in ziplock bags for up to 2 months.
- Dried Pasta: Once fully dried (snaps when bent), store in airtight jars or bags for up to 3 months.
Just remember—if you skip drying and throw fresh pasta into boiling water straight from the cutter, it might stick and clump. A little patience goes a long way here.
Cooking Fresh Pasta
Cooking fresh pasta is lightning-fast—no more waiting 10+ minutes like with dried store-bought noodles.
Boiling Instructions:
- Bring a Large Pot of Water to a Rolling Boil.
- Salt Generously: Like the ocean. This seasons the pasta from the inside out.
- Add the Pasta Gently: Don’t overcrowd the pot.
- Cook Time: Usually 2–3 minutes max! Taste after 2 minutes to check for doneness.
- Drain and Serve Immediately.
Sauce Pairing Tips:
- Fettuccine: Rich sauces like Alfredo, creamy mushroom, or Bolognese.
- Spaghetti: Classic marinara, garlic & oil, or pesto.
- Herb Pasta: Light butter or olive oil sauces to let flavors shine.
No oil in the water, please! That old myth just makes your sauce slide off the pasta. Fresh pasta absorbs flavor better than dried, so use a sauce that complements it, not overpowers it.
Flavor Variations You Can Try
One of the best parts about homemade pasta is how endlessly customizable it is. You can tweak the color, flavor, and texture by mixing in a few simple ingredients.
Popular Variations:
- Spinach Pasta: Add ½ cup of pureed, squeezed-dry spinach to the dough.
- Beetroot Pasta: Mix in 1 tablespoon of beetroot powder or ¼ cup beet puree.
- Herbed Pasta: Fold in fresh chopped herbs like basil, rosemary, or parsley.
- Lemon Zest or Black Pepper: Adds a zing and spice that elevates your pasta.
Adjust your flour slightly if you add wet ingredients like purees. You want the dough to stay pliable, not sticky. Experiment freely—your KitchenAid can handle the creativity.
Troubleshooting Common Pasta Issues
Making pasta isn’t always picture-perfect, especially in the beginning. Let’s fix some of the most common issues.
Dough Too Dry?
- Crumbles instead of forming? Add a teaspoon of water at a time and knead again.
Dough Too Sticky?
- Sticks to your hands or roller? Dust with more flour and rest longer.
Tearing in the Roller?
- Your dough might be too thick or not rested enough. Fold and re-roll on setting #1.
Uneven Pasta Thickness?
- Always roll gradually through settings. Jumping from #1 to #6 causes trouble.
Sticky Pasta Strands?
- Not enough flour while cutting. Toss gently with semolina after cutting.
Don’t be discouraged by mishaps. Every batch is a learning experience—and you’ll get better with each try.
Tips for Perfect Pasta Every Time
By now, you’ve got the technique down—but let’s make sure every batch you make is next-level. These pro tips will take your homemade pasta from good to “where have you been all my life?” good.
Use the Right Flour Blend
A 50/50 blend of all-purpose and semolina flour gives your pasta just the right texture—tender, but not mushy. If you want silky pasta, go for 00 flour. If you want more bite, use more semolina.
Temperature Matters
Room temperature ingredients make a big difference. Cold eggs can mess with dough consistency. Even your kitchen’s temperature affects how the dough behaves—on humid days, you may need extra flour; in drier climates, a splash more water.
Rest, Always Rest
That 30-minute dough rest isn’t optional. It lets the gluten relax, making the dough much easier to roll and shape. If you skip this, your dough will fight back and shrink during rolling.
Flour is Your Friend (But Don’t Overdo It)
Use just enough flour to keep the dough from sticking to the roller and cutters—but don’t overload, or the dough gets too dry. A light dusting goes a long way.
Work in Batches
Cutting the dough into quarters before rolling helps manage the size and prevents it from drying out. Keep unused portions wrapped in plastic while you work with one piece at a time.
Dry Before Cooking or Storing
Always let your pasta dry for 15–30 minutes before boiling or freezing. It firms up the strands, preventing them from clumping or sticking.
Clean Your Attachments the Right Way
Never wash the pasta attachments with water. Let any stuck dough dry completely, then brush it off with a soft brush or toothpick. It keeps the blades sharp and rust-free.
These small habits separate average pasta from homemade greatness. Get these down, and every pasta night will feel like an Italian restaurant experience—minus the bill.
FAQs about KitchenAid Pasta Recipe
1. Can I use whole wheat flour for homemade pasta?
Yes! Whole wheat flour adds a nutty flavor and extra fiber, but it can make the dough a bit tougher. Try a 50/50 mix with all-purpose flour to keep it tender.
2. How long does fresh pasta last in the fridge?
Fresh pasta can be stored in the refrigerator for up to 2 days in an airtight container. Be sure to lightly flour it so it doesn’t stick.
3. Can I freeze my homemade pasta?
Absolutely. Lay it flat or make nests and freeze on a tray before transferring to bags. It will keep for up to 2 months. No need to thaw—just cook from frozen.
4. Why is my pasta sticky after cutting?
This usually happens when the dough is too wet or wasn’t floured enough before cutting. Toss strands with a little semolina or flour and let them dry for 15–30 minutes before cooking or storing.
5. Can I make ravioli using KitchenAid attachments?
Yes! While the basic set doesn’t include a ravioli maker, you can use the pasta roller to create the sheets. Then fill and shape ravioli by hand, or invest in the ravioli maker attachment.
Conclusion
Making pasta from scratch using your KitchenAid isn’t just about the end product—it’s about the experience. The rhythmic hum of the roller, the feel of fresh dough in your hands, the satisfaction of hanging up strands of pasta like a pro—it’s a culinary ritual that feeds both the stomach and the soul.
With just a few simple ingredients, the right tools, and a little bit of patience, you can make restaurant-quality pasta in your own kitchen. And now that you know the step-by-step process, you’ve got the confidence to experiment—try new flavors, shapes, and styles. Pasta making is a creative journey, and your KitchenAid is your best sidekick.
So what are you waiting for? Dust off that stand mixer, grab some eggs and flour, and start rolling. Dinner’s about to get a whole lot better.

