Kimchi Bokkeumbap Recipe: If you’re craving something comforting, spicy, and packed with bold umami flavor, Kimchi Bokkeumbap—also known as Kimchi Fried Rice—is the perfect dish to satisfy your hunger.
It’s quick to make, incredibly satisfying, and an absolute staple in Korean homes. Whether you’re a beginner in Korean cooking or a die-hard K-food fan, this dish never disappoints.
Plus, it’s a genius way to use up that leftover rice and fermented kimchi sitting in your fridge!
What is Kimchi Bokkeumbap?
Kimchi Bokkeumbap is a Korean stir-fried rice dish made primarily with fermented kimchi and day-old rice. It’s deeply flavorful, spicy, tangy, and slightly sweet, all thanks to the magical alchemy of aged kimchi. In Korea, it’s considered a comfort food, often whipped up at the end of the week when you need something easy but tasty.
You can keep it simple or load it up with add-ins like pork belly, tofu, or cheese. The dish is commonly topped with a sunny-side-up egg, and garnished with scallions, sesame seeds, or even nori flakes. It’s not just delicious—it’s also endlessly adaptable.
Why You’ll Love This Korean Fried Rice
- Quick and Easy: 20 minutes, one pan, and done!
- Bold Flavors: Spicy, sour, savory—total umami bomb.
- Customizable: Make it vegan, add meat, or adjust spice level.
- Budget-Friendly: Use up leftovers and pantry staples.
- Satisfying: A complete meal with carbs, veggies, and protein.
Health Benefits of Kimchi Bokkeumbap
Kimchi Bokkeumbap isn’t just flavorful—it’s also surprisingly good for you. Here’s why:
- Rich in Probiotics: Thanks to fermented kimchi, it supports gut health.
- High in Fiber: With veggies and rice, you get a good dose of fiber.
- Contains Antioxidants: Garlic, onions, and kimchi offer immune-boosting benefits.
- Low Waste Meal: Great for reducing food waste by using leftovers.
When made with brown rice and minimal oil, it can be a well-rounded, nutritious dish that still feels indulgent.
List of Ingredients You’ll Need
Essential Ingredients
- Kimchi (1 cup): Use well-fermented, sour kimchi for best flavor.
- Cooked rice (2 cups): Day-old white or brown rice works best.
- Gochujang (1 tbsp): Korean chili paste adds depth and heat.
- Sesame oil (1 tbsp): For nutty aroma and flavor.
- Soy sauce (1 tbsp): Adds saltiness and umami.
- Garlic (2 cloves): Minced, for extra flavor.
- Onion (½, chopped): Adds sweetness and texture.
- Vegetable oil (1 tbsp): For sautéing.
Optional Add-Ins
- Eggs: Top with a fried egg or scramble it into the rice.
- Pork belly or bacon: For a meaty twist.
- Tofu: For a plant-based protein boost.
- Cheese: Melty cheese makes it creamy and comforting.
- Scallions or green onions: Fresh garnish.
- Sesame seeds: For crunch and visual appeal.
- Nori strips: Adds extra umami flavor.
Substitutes and Variations
- No Gochujang? Use chili flakes or sriracha.
- Vegan? Make sure your kimchi doesn’t have fish sauce.
- No rice? Try using cauliflower rice for a low-carb version.
Kitchen Tools You’ll Need
- Large non-stick skillet or wok
- Spatula
- Chopping board
- Knife
- Mixing bowl (optional)
- Frying pan (for egg)
No need for fancy gadgets—just your basics will do the trick.
Prepping Your Ingredients
Before you heat that pan, get your mise en place (prep work) ready:
- Chop the kimchi into small bite-sized pieces. It helps distribute flavor.
- Dice your onions and garlic. Keep them separate.
- Measure your sauces and oils so you’re ready to stir-fry.
- Prepare your rice. If it’s in the fridge, break it up with a fork or hands.
Trust me, having everything ready before you start cooking makes the process much smoother and faster.
Step-by-Step Guide to Making Kimchi Bokkeumbap
Step 1: Prep the Rice
Use day-old rice that’s been chilled in the fridge. Freshly cooked rice tends to be too moist and clumpy, making it hard to fry. If you’re in a pinch and using fresh rice, spread it out on a plate and let it cool for 10-15 minutes to dry out a bit.
You can use short grain, medium grain, or even jasmine rice—but medium grain is ideal for that chewy, sticky texture typical in Korean dishes.
Step 2: Chop Kimchi and Vegetables
Take your fermented kimchi out of the jar and give it a rough chop. The older and sourer, the better—it adds a deep, pungent kick that makes the dish shine.
Dice the onion and mince your garlic. If you’re adding other vegetables like carrots or zucchini, chop them finely so they cook quickly and blend well into the rice.
Step 3: Sauté Kimchi and Aromatics
Heat about 1 tablespoon of vegetable oil in a large pan over medium heat. Toss in the garlic and onion first, sautéing until they become soft and fragrant.
Now, add your chopped kimchi and stir-fry for about 3-4 minutes until it’s sizzling and slightly caramelized. This step deepens the flavor and cooks off some of the moisture.
Add a splash of kimchi juice (about 1-2 tablespoons) for an extra flavor boost.
Step 4: Add Rice and Mix Well
Push the kimchi mix to the side of the pan and add your rice. Stir it in thoroughly, breaking apart any clumps and ensuring every grain gets coated in kimchi goodness.
This is where everything comes together. Keep stirring for 3-5 minutes until the rice is heated through and slightly crispy at the bottom—those crispy bits are gold!
Step 5: Season and Customize
Now’s the time to adjust your flavors:
- Add gochujang for heat and depth.
- Drizzle in soy sauce for saltiness.
- Pour sesame oil for that signature nuttiness.
Taste and tweak it. If you like it spicier, add more gochujang or a sprinkle of Korean chili flakes (gochugaru).
Step 6: Top with a Fried Egg
In a separate pan, fry an egg sunny-side-up. The runny yolk over the spicy fried rice is a total game-changer. It mellows the heat and adds a rich, creamy element that ties everything together.
Slide it right on top of the finished rice.
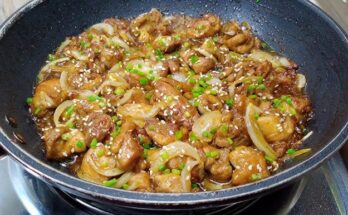
Step 7: Garnish and Serve
Finish with a handful of chopped scallions, a sprinkle of sesame seeds, and if you have them, some crushed nori strips or furikake.
Boom—you’ve got restaurant-quality Kimchi Bokkeumbap right in your kitchen!
Tips for the Best Kimchi Fried Rice
Making good Kimchi Bokkeumbap is simple, but making great Kimchi Bokkeumbap? That takes a few tricks up your sleeve. Here are some expert tips to elevate your fried rice game:
- Use well-fermented kimchi: The funkier and sourer, the better. Fresh kimchi won’t bring the same depth of flavor.
- Don’t skip the kimchi juice: A spoonful or two adds moisture and amps up the flavor. It’s like liquid gold.
- Cold rice is king: Day-old rice that’s been chilled holds its shape better and gives you those irresistible crispy bits.
- Customize to your taste: Want it meatier? Toss in chopped bacon or ground pork. Going vegan? Stick with tofu and skip any fish-based ingredients.
- Don’t overcrowd the pan: If you’re making a large batch, cook in batches to avoid soggy, steamed rice.
- Use a wok or large skillet: It gives you enough room to stir-fry properly and build that classic smoky flavor.
- Finish with sesame oil, not earlier: This keeps the nutty aroma intact instead of burning it off during high-heat frying.
With these tips, you’ll turn a humble rice dish into a knockout meal every single time.
How to Store and Reheat Leftovers
One of the best things about Kimchi Bokkeumbap is that it stores like a dream. If you made a big batch (smart move!), here’s how to keep it fresh:
Storage:
- Let the fried rice cool to room temperature.
- Transfer it to an airtight container.
- Store in the fridge for up to 3–4 days.
Reheating:
- Microwave: Place in a microwave-safe bowl, cover with a damp paper towel, and microwave for 1–2 minutes.
- Stovetop: Add a splash of water or sesame oil to a skillet and stir-fry over medium heat until warmed through.
Avoid freezing if possible—the texture of the rice and kimchi can get weird once thawed.
Common Mistakes to Avoid
Even though it’s easy to make, some small missteps can ruin your fried rice. Here are the most common ones—and how to steer clear:
- Using fresh rice: Hot, moist rice turns mushy fast. Always use cold, day-old rice if possible.
- Overloading the pan: Too much rice at once prevents even cooking and browning.
- Not cooking kimchi long enough: You want it to caramelize and deepen in flavor, not just heat through.
- Skipping seasoning checks: Always taste and adjust—kimchi can vary wildly in saltiness and spice.
- Adding sesame oil too early: High heat will burn off the flavor; add it at the end for best results.
Avoid these mistakes and you’re well on your way to becoming a kimchi fried rice master.
Serving Suggestions
Wondering what to eat with your delicious bowl of Kimchi Bokkeumbap? Here are some killer pairings:
- Miso Soup or Doenjang Jjigae: A warm soup balances the spice of the rice.
- Korean-style cucumber salad (Oi Muchim): Crisp, tangy, and refreshing.
- Korean BBQ meats: Bulgogi or spicy pork pairs beautifully.
- Pickled radish (Danmuji): The crunch and sweetness provide a great contrast.
- Kim (Roasted seaweed): Wrap bites of rice with it for a fun twist.
Or just enjoy it on its own—it’s satisfying enough to be the star of your meal.
Spice Level: How to Adjust It
Love it mild? Prefer it fiery? Kimchi Bokkeumbap can be tweaked to suit your spice tolerance easily:
Less Spicy:
- Use mild kimchi (some brands offer “white” kimchi with no chili).
- Reduce or skip the gochujang.
- Add sugar or honey to balance heat.
- Top with more egg or cheese to mellow the spice.
More Spicy:
- Add extra gochujang or gochugaru.
- Splash in hot sauce like sriracha or Korean chili oil.
- Stir in sliced fresh chilies during cooking.
Make it your own—you’re the boss in the kitchen!
Vegan or Vegetarian Kimchi Bokkeumbap Options
Traditional kimchi often contains fish sauce or shrimp paste, but don’t worry—there are plenty of vegan-friendly versions out there.
Here’s how to make this dish 100% plant-based:
- Use vegan kimchi: Check labels or make your own at home.
- Skip animal products: No egg, meat, or fish sauce.
- Add tofu or tempeh: Cube and fry them before mixing into the rice.
- Nutritional yeast or vegan cheese: For a cheesy umami hit without dairy.
- Use soy sauce or tamari for seasoning.
Vegan Kimchi Bokkeumbap still packs a serious flavor punch—and is just as comforting as the original.
FAQs about Kimchi Bokkeumbap Recipe
1. Can I make Kimchi Bokkeumbap without gochujang?
Yes! Gochujang adds depth and spice, but you can replace it with a mix of soy sauce and chili flakes or just omit it entirely for a milder version.
2. What kind of rice is best for Kimchi Fried Rice?
Day-old short or medium grain white rice works best. It’s less sticky and fries up nicely without getting mushy.
3. How do I make this dish less sour?
Use fresher kimchi or balance the sourness with a little sugar or honey during cooking.
4. Is Kimchi Bokkeumbap healthy?
Yes! It’s high in probiotics, fiber, and antioxidants. Just go easy on oil and add lots of veggies or plant-based proteins for a healthier version.
5. Can I freeze leftovers?
It’s better to avoid freezing as the rice texture and kimchi flavor may change. Stick to refrigerating and eating within 3–4 days.
Conclusion
Kimchi Bokkeumbap is one of those magical dishes that hits every note—spicy, savory, tangy, and comforting all in one. It’s an excellent way to use up leftovers, super quick to make, and endlessly customizable. Whether you’re cooking solo or for a crowd, this Korean classic never disappoints.
So grab that jar of kimchi, fire up the stove, and whip up a bowl of fried rice that’ll knock your socks off. Once you make it, you’ll wonder how you ever lived without it.