Katsu Recipe: Katsu, short for “katsuretsu,” is a beloved Japanese dish that’s all about that juicy, tender meat covered in a golden, crispy breadcrumb coating. Imagine biting into a piece of heaven that’s both crunchy and savory—it’s basically comfort food at its finest.
Whether it’s chicken, pork, or even tofu, the magic of Katsu lies in the perfect contrast between the crunchy outside and juicy inside.
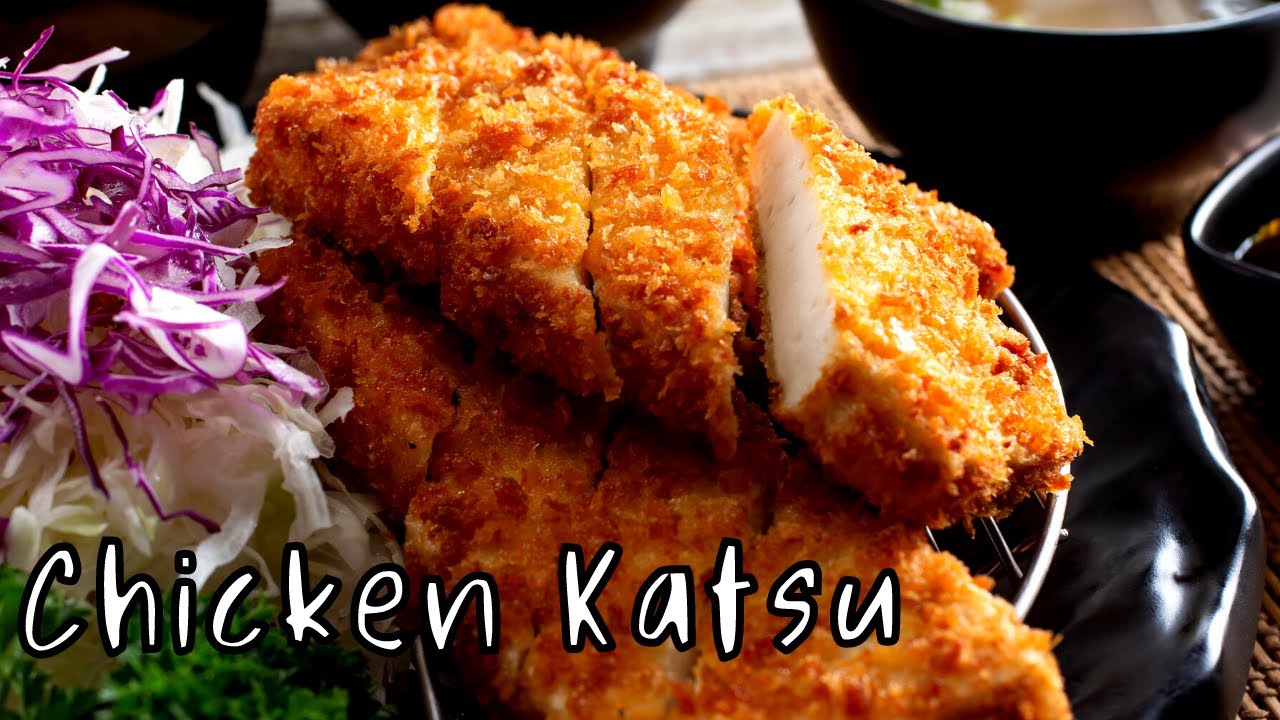
Plus, it’s usually served with a side of shredded cabbage, rice, and a delicious drizzle of tonkatsu sauce. Honestly, it’s pure happiness on a plate!
A Brief History of Katsu
Katsu actually traces its roots back to the late 19th century when Japan started embracing Western cuisine during the Meiji era. It was inspired by European-style breaded and fried cutlets, especially Austrian schnitzels. Over time, the Japanese put their own spin on it, using lighter, flakier panko breadcrumbs and pairing it with rice and special sauces. Today, Katsu is a staple in Japanese households and restaurants alike, loved by kids and adults all around the world.
Essential Ingredients for Katsu
Key Ingredients You’ll Need
Before diving into the kitchen, let’s get our grocery list sorted out. For a classic pork (tonkatsu) or chicken (chicken katsu) recipe, you’ll need:
- Pork loin or chicken breast (boneless)
- All-purpose flour
- Eggs
- Panko breadcrumbs (Japanese-style breadcrumbs)
- Salt and pepper
- Vegetable oil (for deep frying)
- Tonkatsu sauce (store-bought or homemade)
- Shredded cabbage (optional, but highly recommended)
The panko breadcrumbs are the real MVP here. Unlike regular breadcrumbs, panko is lighter and airier, making your katsu super crispy without being too greasy. Trust me, don’t skip it!
Optional Add-ons for Extra Flavor
Want to get a little fancy? Try these add-ons:
- A splash of soy sauce in your egg wash for extra umami.
- Garlic powder in the flour for a subtle kick.
- Dijon mustard spread lightly on the meat before breading for a flavor bomb.
These little tweaks can elevate your Katsu from “yummy” to “OMG, where has this been all my life?”
Tools and Equipment Needed
Must-Have Kitchen Tools
You don’t need a Michelin-starred kitchen to whip up some killer Katsu, but a few basics are essential:
- Sharp knife
- Cutting board
- Mixing bowls
- Meat mallet (optional, for tenderizing)
- Tongs
- Frying pan or deep fryer
- Wire rack and tray (for draining)
Having the right tools not only makes the process smoother but also ensures that your Katsu cooks evenly and stays crisp.
Helpful Extras to Make Cooking Easier
- Food thermometer (to check oil temperature)
- Splatter screen (to keep your stovetop clean)
- Paper towels (for blotting excess oil)
These extras might not be musts, but they’ll definitely make your life easier and your cleanup faster. Because let’s be real—no one likes a greasy kitchen.
Step-by-Step Katsu Recipe
Step 1: Preparing the Meat
Start by selecting your protein—pork loin or chicken breast work best. If your cuts are thick, use a meat mallet or the back of your knife to gently pound them to about ½ inch thickness. This helps them cook evenly and stay tender.
Next, season both sides generously with salt and pepper. Some folks like to marinate the meat briefly in a little sake or soy sauce for an extra layer of flavor, but it’s totally optional.
Step 2: Seasoning and Breading
Now comes the fun part: the breading station!
- Set up three bowls: one with flour, one with beaten eggs, and one with panko breadcrumbs.
- Dredge the meat lightly in flour, tapping off any excess.
- Dip it into the beaten eggs, making sure it’s fully coated.
- Press it into the panko breadcrumbs, patting down to ensure a nice, even coating.
Pro Tip: Double-dipping (egg and panko twice) makes your Katsu extra thick and crispy. Highly recommend if you like a big crunch!
Step 3: Frying to Perfection
Heat up about 1 inch of vegetable oil in a frying pan to 340°F (170°C). If you don’t have a thermometer, just drop a breadcrumb into the oil—if it sizzles immediately, you’re good to go.
Gently place your breaded meat into the oil. Fry until golden brown and crispy, about 3-5 minutes per side depending on thickness. Don’t overcrowd the pan—work in batches if you need to.
Once done, transfer the Katsu to a wire rack to drain any excess oil. Avoid stacking them on paper towels; it can make the crust soggy.
Tips for the Perfect Katsu
Choosing the Right Cut of Meat
Picking the right cut is half the battle won. For pork katsu, pork loin or pork tenderloin are your best friends. They’re tender, juicy, and have just the right amount of fat to keep things flavorful without being greasy. If you’re making chicken katsu, go for boneless chicken breasts or thighs. Thighs will give you a richer, juicier bite, while breasts offer a leaner option.
Pro Tip: If you’re feeling adventurous, try using shrimp, tofu, or even eggplant for a vegetarian twist. Just adjust the cooking time as needed!
Always make sure to trim any excess fat or sinew, and don’t forget to pound the meat to an even thickness. This ensures quick, uniform cooking, preventing the dreaded “burnt outside, raw inside” situation.
Getting the Crispiest Coating
Want that shatteringly crisp katsu? Here’s how to nail it every single time:
- Use panko breadcrumbs: Regular breadcrumbs just don’t cut it. Panko gives you that light, airy crunch that’s essential.
- Keep your oil hot enough: Too cool and the katsu will absorb oil and turn soggy. Aim for around 340°F (170°C) consistently.
- Don’t overcrowd the pan: Frying too many pieces at once drops the oil temperature, leading to sad, greasy katsu.
- Drain on a wire rack: Letting it sit on a wire rack instead of paper towels keeps the bottom from steaming and losing its crunch.
Bonus Tip: Some people swear by chilling the breaded cutlets in the fridge for 15-20 minutes before frying. It helps the coating adhere better and crisps up like a dream.
Serving Suggestions
Traditional Side Dishes
Katsu is fantastic on its own, but it becomes a full meal when you serve it with the right sides. Here’s the classic setup:
- Shredded cabbage: Crisp, cool cabbage balances the rich, fried katsu beautifully. A light drizzle of sesame dressing or a simple squeeze of lemon can take it to the next level.
- Steamed rice: Fluffy, plain white rice acts as the perfect canvas to soak up all the delicious juices and sauces.
- Miso soup: A warm bowl of miso soup is often served alongside katsu in Japanese restaurants. It adds a comforting, savory touch to your meal.
And don’t forget the tonkatsu sauce! It’s a thick, sweet, and tangy sauce that’s absolutely essential. You can buy it pre-made, or mix ketchup, Worcestershire sauce, soy sauce, and sugar together for a quick homemade version.
Modern Twists to Try
Feeling a little playful? Here are some modern katsu ideas:
- Katsu sandwiches (Katsu Sando): Soft white bread + crispy katsu + tonkatsu sauce = mind-blowing.
- Katsu curry: Pour a generous ladle of Japanese curry over your katsu for a rich, hearty meal.
- Katsu tacos: Use small tortillas, katsu slices, cabbage slaw, and a spicy mayo for a fusion masterpiece.
- Katsu bowls: Layer rice, sliced katsu, pickled veggies, and a runny fried egg for a delicious rice bowl.
You can even go gluten-free by using gluten-free panko and flour substitutes. Katsu is incredibly versatile—don’t be afraid to experiment and make it your own!
FAQs about Katsu Recipe
What is Katsu?
Katsu is a popular Japanese dish featuring breaded and deep-fried cutlets, usually made from pork (Tonkatsu) or chicken (Chicken Katsu). It’s crispy on the outside, juicy on the inside, and often served with shredded cabbage and a savory sauce.
What’s the difference between Tonkatsu and Chicken Katsu?
Tonkatsu uses pork cutlets, while Chicken Katsu uses chicken breast or thigh. Both are prepared similarly — coated in flour, egg, and panko breadcrumbs before deep-frying to golden perfection.
Can I bake Katsu instead of frying it?
Yes! While traditional Katsu is deep-fried, you can bake it for a healthier version. Simply spray the breaded cutlets with oil and bake at 400°F (200°C) for about 20 minutes, flipping halfway through.
What is Katsu sauce made of?
Katsu sauce is a sweet and tangy condiment made from a mix of Worcestershire sauce, ketchup, soy sauce, and sometimes a dash of sugar or Dijon mustard. You can also find bottled versions in Asian grocery stores.
What’s the best cut of meat for making Katsu?
For Tonkatsu, pork loin or pork tenderloin works best. For Chicken Katsu, use boneless, skinless chicken breasts or thighs, depending on whether you prefer lean or juicy meat.
Can I make Katsu gluten-free?
Absolutely! Simply use gluten-free flour and gluten-free panko breadcrumbs. Also, check that your soy sauce is gluten-free or swap it for tamari.
How do I store and reheat leftover Katsu?
Store leftover Katsu in an airtight container in the refrigerator for up to 3 days. Reheat in an oven or air fryer at 350°F (175°C) for 5–7 minutes to keep it crispy.
Can I freeze Katsu?
Yes! After breading, freeze the raw cutlets on a baking sheet, then transfer them to a freezer bag. When ready to cook, fry directly from frozen — just add a couple of extra minutes to the cooking time.
What sides go well with Katsu?
Classic sides include shredded cabbage, miso soup, steamed rice, and pickled vegetables. A drizzle of Katsu sauce ties everything together beautifully.
Conclusion
Making katsu at home isn’t just about frying meat—it’s about bringing a little taste of Japan’s comfort food culture right into your kitchen. With just a few ingredients, some basic tools, and a little love, you can whip up a meal that’s crispy, juicy, and absolutely irresistible.
Whether you stick to the classic pork katsu or jazz things up with a katsu sandwich or curry, there’s really no wrong way to enjoy it. Plus, once you’ve nailed the basics, you’ll find endless ways to tweak and customize your katsu to suit your tastes.
So go ahead, give this katsu recipe a try. Gather your friends and family, serve it up with some shredded cabbage and rice, and get ready to watch everyone fight over the last crispy bite. Happy cooking!


