Karaage Chicken Recipe: Karaage (pronounced kah-rah-ah-geh) is a classic Japanese fried chicken dish that has won hearts all over the world. It’s not your average fried chicken — it’s lighter, crispier, and packed with savory, umami-rich flavor. Karaage involves marinating small pieces of chicken in a soy-based mixture, then coating them lightly in potato starch and deep-frying them until golden brown and irresistibly crispy.
This dish is incredibly popular in Japanese households, izakayas (Japanese pubs), and bento boxes. It’s delicious as an appetizer, a lunchbox filler, or even a main course for dinner. What makes it even better? It’s super easy to make at home — and once you master it, you’ll be making it over and over again.
Why Karaage is Different from Regular Fried Chicken
You might be wondering, “Isn’t it just fried chicken?” Not quite.
Karaage stands out because of:
- The Marinade: A flavorful combo of soy sauce, ginger, garlic, and mirin that seeps deep into the meat.
- The Coating: Instead of using flour or breadcrumbs, karaage is coated in potato starch or cornstarch. This gives it a light, crisp texture that doesn’t feel heavy or greasy.
- Double Frying: This traditional method helps lock in juiciness while ensuring that each bite is crunchier than the last.
It’s not just chicken — it’s a whole experience.
Ingredients You’ll Need
Let’s break down everything you need for perfect karaage chicken.
Main Ingredients
- 1.5 lbs (700g) boneless chicken thighs (skin-on for extra flavor)
- Salt and pepper (to taste)
Marinade Ingredients
- 3 tbsp soy sauce
- 2 tbsp sake (optional, for authentic flavor)
- 1 tbsp mirin (Japanese sweet rice wine)
- 1 tbsp grated fresh ginger
- 2 cloves garlic, grated
- 1 tsp sugar (optional for balance)
For Frying
- ½ to 1 cup potato starch or cornstarch
- Neutral oil (canola, vegetable, or peanut oil for frying)
- Lemon wedges (for garnish, optional)
You can find most of these ingredients at any well-stocked supermarket or Asian grocery store.
Choosing the Right Cut of Chicken
If you’re aiming for authentic and juicy karaage, go with boneless chicken thighs. The dark meat is more flavorful, juicy, and holds up well to deep frying. Skin-on pieces give you that extra layer of crispy goodness, but you can remove the skin if you prefer it leaner.
While chicken breast is also an option, it’s prone to drying out, especially during the double-frying process. If you do use breasts, marinate a bit longer and be very cautious with frying time.
How to Prepare the Chicken for Karaage
Before you even think about frying, proper prep is key.
- Trim Excess Fat: If you’re using skin-on thighs, trim the extra fat but leave enough skin for crispiness.
- Cut into Bite-Sized Pieces: Think roughly 1.5 to 2-inch chunks. Not too small, not too big — just right for chopsticks or dipping.
- Pat Dry: Use a paper towel to remove excess moisture from the chicken. This helps the marinade cling better and reduces oil splatter when frying.
Proper preparation ensures every bite is flavorful and juicy. Rushing this step can lead to uneven marination and frying.
Secrets Behind a Flavorful Marinade
The marinade is the heart of karaage. It infuses the chicken with deep umami flavors, and a little goes a long way.
- Soy Sauce: The salt and umami backbone.
- Sake: Tenderizes the chicken while adding subtle depth.
- Mirin: Sweetness balances the saltiness and sharpness.
- Garlic & Ginger: The aromatic duo that elevates flavor complexity.
Marinate the chicken for at least 30 minutes. For deeper flavor, go for 2–4 hours, but avoid overnight — the salt can break down the meat too much, making it mushy.
Step-by-Step Guide to Making Karaage Chicken
Let’s get into the fun part — frying up golden bites of happiness.
Step 1: Preparing the Chicken
After cutting and patting the chicken dry, place the pieces in a large bowl. Season lightly with salt and pepper. This step enhances the base flavor before adding the marinade.
Step 2: Making the Marinade
In a separate bowl, whisk together the soy sauce, sake, mirin, grated garlic, grated ginger, and sugar. Pour this mixture over the chicken, ensuring every piece is coated. Mix well with your hands or tongs.
Cover the bowl with plastic wrap and refrigerate for at least 30 minutes. For best results, give it about 2 hours.
Step 3: Marinating the Chicken
Let the chicken soak up those incredible flavors. Stir it occasionally to ensure even marination. You’ll notice the meat slightly darken as it absorbs the marinade.
Step 4: Coating the Chicken
Once marinated, take each piece out and shake off the excess liquid.
Pour potato starch into a shallow dish. Dredge each piece of chicken until fully coated. The starch gives karaage its unique crispiness. Don’t skimp here — the more even the coating, the better the crunch.
Place coated chicken on a wire rack or plate while you heat the oil.
Step 5: Heating the Oil
Pour neutral oil into a deep frying pan or pot — about 2 inches deep. Heat it to 325°F (165°C).
Use a thermometer for accuracy. Too cold, and your chicken gets soggy; too hot, and it burns on the outside before cooking through.
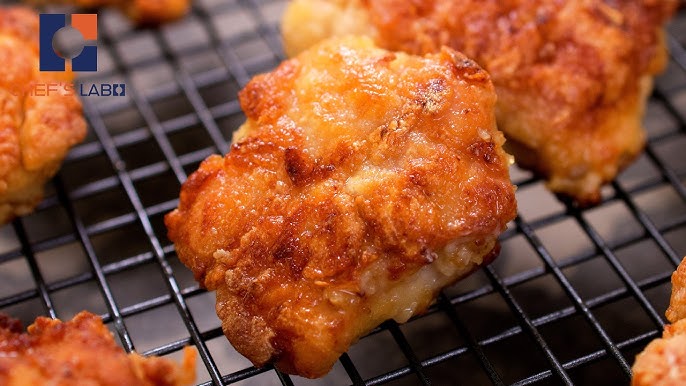
Step 6: Frying the Chicken (First Fry)
Fry the chicken in small batches to avoid overcrowding.
- Fry each batch for 2–3 minutes until light golden.
- Remove and place on a wire rack to rest.
The goal here isn’t full crispiness yet — that comes with the second fry.
Step 7: Rest and Refry (Double Fry Method)
Let the fried chicken rest for 5 minutes. Meanwhile, increase the oil temperature to 375°F (190°C).
Refry the rested chicken for 1–2 minutes until it turns deep golden brown and incredibly crispy.
This step seals in juices and gives karaage its signature crunch.
Step 8: Draining and Serving
Drain the double-fried chicken on a wire rack or paper towels.
Serve hot with lemon wedges and maybe a sprinkle of Japanese mayo or spicy dipping sauce.
Boom — restaurant-style karaage at home.
Best Oils for Deep Frying Karaage
The type of oil you use plays a big role in the final taste and texture of your karaage. You want an oil with a high smoke point and neutral flavor, so it doesn’t overpower the marinade’s delicate notes.
Here are the best oils for frying karaage:
- Canola Oil: Affordable, clean-tasting, and commonly used for deep frying.
- Vegetable Oil: Another neutral choice, widely available and works well.
- Peanut Oil: Slightly more expensive but gives a light nutty aroma and crisps beautifully.
- Sunflower Oil: A healthier option with a neutral taste and high smoke point.
Avoid using olive oil or butter — they have low smoke points and will burn quickly, which can ruin the texture and taste.
To save on waste, you can reuse frying oil up to two or three times. Just strain it through a fine mesh to remove crumbs and store it in a sealed container in a cool, dark place.
Tips for Getting the Crispiest Karaage
Everyone loves that shatteringly crisp bite — so here are the tried-and-true tips to make sure your karaage delivers:
- Use Potato Starch: This gives a crunchier, lighter texture than all-purpose flour. Cornstarch works too, but potato starch is ideal.
- Double Fry for Extra Crunch: Fry once to cook, rest, then fry again at a higher temp to crisp up the skin.
- Do Not Crowd the Pan: Overcrowding drops the oil temperature and causes soggy chicken.
- Dry the Chicken Before Marinating: This allows better absorption of the marinade and prevents oil splatter.
- Rest the Chicken Before Frying: After dredging in starch, let the pieces sit for 5 minutes so the starch sticks better.
- Use a Thermometer: It ensures the oil is at the right temperature — consistent heat = consistent crisp.
Bonus tip? Eat it hot and fresh. Karaage tastes best within minutes of frying!
What to Serve with Karaage Chicken
Karaage is versatile. It’s delicious on its own, but pairing it with the right sides can take it to the next level.
Here are some perfect pairings:
- Japanese Mayo (Kewpie): Creamy, tangy, and slightly sweet — a perfect dipping sauce.
- Steamed White Rice: The simplicity of rice balances the bold flavors of karaage.
- Shredded Cabbage Salad: Adds crunch and freshness to your plate.
- Miso Soup: A classic Japanese side that rounds out the meal.
- Pickled Veggies: Think pickled ginger, radish, or cucumber — they add acidity and brightness.
- Lemon Wedges: A squeeze of lemon cuts through the oil and enhances flavor.
You can even turn karaage into a donburi (rice bowl) by serving it over rice with a drizzle of sauce and a soft-boiled egg.
Storing and Reheating Karaage Chicken
Got leftovers? Here’s how to store and reheat your karaage without losing that crispy texture.
To Store:
- Let the karaage cool completely.
- Place in an airtight container with a paper towel to absorb moisture.
- Refrigerate for up to 3 days.
To Freeze:
- Lay pieces on a tray and freeze individually before transferring to a freezer bag.
- Keeps well for up to 1 month.
To Reheat:
- Oven/Toaster Oven: Bake at 375°F (190°C) for 10–15 minutes.
- Air Fryer: Reheat at 360°F (180°C) for 6–8 minutes.
- Avoid the Microwave: It makes the coating soggy — the enemy of crispy!
Common Mistakes to Avoid
Even seasoned cooks can slip up. Here are common karaage mistakes and how to avoid them:
- Skipping the Marinade: This isn’t fast food — the flavor is in the soak.
- Using Too Much Marinade: Excess liquid prevents starch from sticking and causes oil splatter.
- Overcrowding the Fryer: Crowding drops the oil temperature and gives soggy, greasy results.
- Using Low-Heat Oil: You’ll end up with undercooked or greasy chicken.
- Not Double Frying: One fry won’t give you that signature karaage crunch.
Stick to the process, and you’ll avoid soggy disappointments.
Karaage Variations to Try
Once you master the classic version, why not have fun with it?
Here are some creative spins on traditional karaage:
- Spicy Karaage: Add chili flakes or a dash of sriracha to the marinade.
- Yuzu Karaage: Replace lemon with yuzu citrus juice for a floral, citrusy twist.
- Sweet & Sour Karaage: Toss freshly fried chicken in a tangy glaze.
- Karaage Tacos: Wrap in tortillas with slaw and Japanese mayo.
- Karaage Bento: Pack it with rice, tamagoyaki, and pickles for a lunchbox win.
Get creative — the base is solid, and the possibilities are endless.
Nutritional Information (Approximate)
Here’s a rough nutritional breakdown for one serving (about 5–6 pieces):
| Nutrient | Amount |
|---|---|
| Calories | 380–450 kcal |
| Protein | 25–30g |
| Fat | 20–25g |
| Carbohydrates | 15–20g |
| Sodium | 800–1000mg |
Note: These values vary depending on the oil used and size of your portions.
FAQs about Karaage Chicken Recipe
1. Can I bake karaage instead of frying it?
Yes, you can bake it at 400°F (200°C) for about 25 minutes, flipping halfway through. It won’t be as crispy, but it’s a healthier alternative.
2. Can I make karaage with chicken breast?
You can, but it’s less juicy than thighs. Marinate it longer and don’t overcook to avoid dryness.
3. What’s the difference between karaage and katsu?
Karaage is marinated and coated in starch, while katsu is breaded with panko and not usually marinated.
4. Can I reuse the oil after frying?
Yes, up to two or three times. Strain it after cooling and store it properly in a dark, sealed container.
5. How do I know when the oil is hot enough?
Use a thermometer or test with a small piece of bread — it should bubble immediately and float to the top in a few seconds.
Conclusion
Karaage chicken isn’t just a meal — it’s a celebration of flavor and crunch. Whether you’re cooking for yourself, your family, or a gathering, this dish never fails to impress. It’s simple to make, absolutely delicious, and incredibly satisfying.
With the step-by-step guide above, you’re now ready to bring Japanese street food straight into your kitchen. Just remember: marinate, coat well, and double fry. And don’t forget the lemon wedge at the end — it’s a game-changer.
Happy frying!