Kaiser Roll Recipe: Kaiser rolls are the gold standard when it comes to sandwich buns. Fluffy inside, crisp on the outside, and beautifully swirled with a crown-like shape, these rolls are more than just bread—they’re a culinary tradition. But what makes these rolls so popular? Why are they called Kaiser rolls in the first place?
Let’s dig into it.
These rolls originated in Austria over 250 years ago, and the name “Kaiser” comes from the German word for “emperor.” They were reportedly named in honor of Emperor Franz Joseph I of Austria. With their elegant shape resembling a crown and their versatility in meals, it’s no wonder these rolls have stood the test of time.
From delis in New York to street carts in Berlin, Kaiser rolls are everywhere—and for good reason. Once you learn to bake them yourself, you’ll understand why.
What Makes a Kaiser Roll Special?
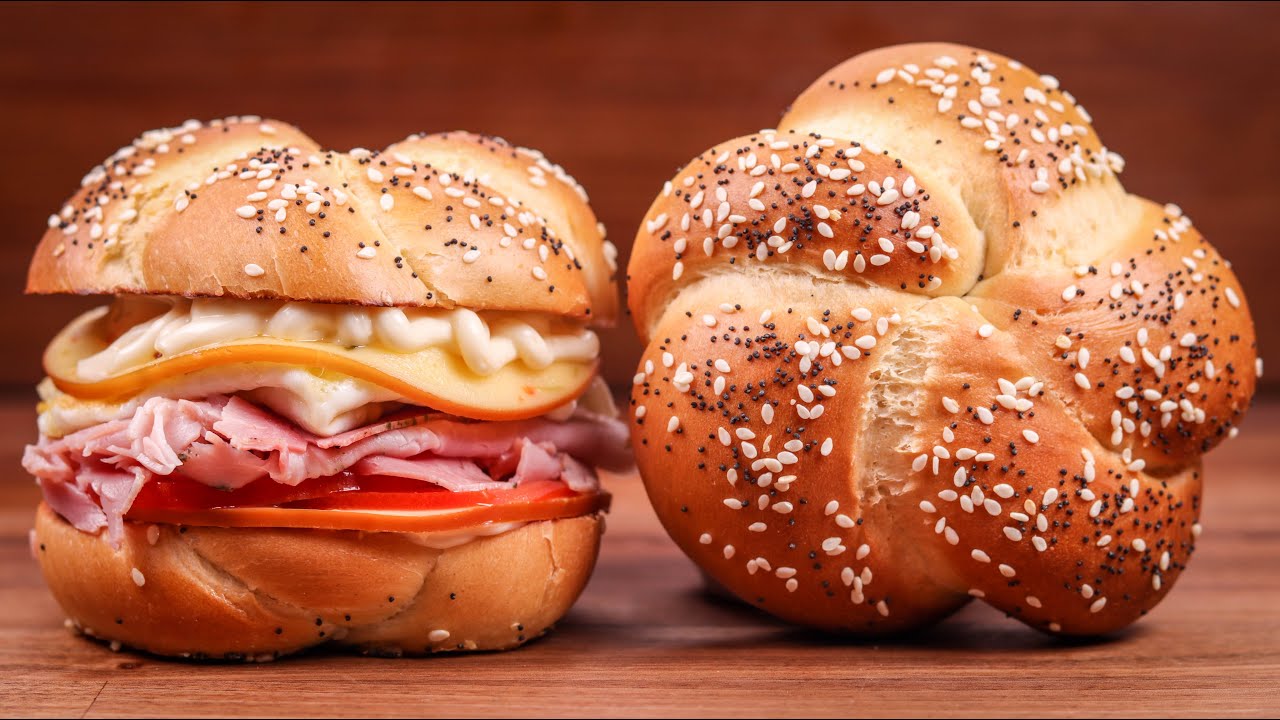
If you’ve ever bitten into a Kaiser roll, you know it’s not your average bun. It’s got a bit of chew, a slightly crispy crust, and a soft, pillowy interior. The swirl pattern on top isn’t just decorative—it helps the roll bake evenly, holding its structure even when loaded with meats, cheeses, or eggs.
Unlike standard hamburger buns or dinner rolls, Kaiser rolls are made with a lean dough, meaning no butter or milk in the base recipe. This gives them a firm crust and that iconic bread aroma we all love. And because they’re not too sweet or too savory, you can use them with just about anything.
Still wondering what sets them apart?
- That swirl pattern. Made using a Kaiser stamp or by hand-twisting.
- Texture balance. Crispy shell, fluffy core.
- Flavor profile. Slightly nutty, mildly yeasty, with a touch of salt.
Perfect for breakfast, lunch, or dinner—this roll does it all.
Ingredients You’ll Need
Let’s get into the heart of this recipe: the ingredients. Everything listed below can be found in most pantries or local supermarkets. For best results, try to use high-quality, fresh ingredients.
Dry Ingredients:
- 4 cups (480g) bread flour (plus extra for kneading)
- 2 tsp (10g) salt
- 2 ¼ tsp (7g) instant yeast (or one packet)
Wet Ingredients:
- 1 ½ cups (360ml) warm water (110°F/43°C)
- 1 tbsp (15ml) olive oil
- 1 tbsp (13g) sugar
Optional Toppings:
- Sesame seeds
- Poppy seeds
- Coarse sea salt
- Egg wash (1 egg + 1 tbsp water, beaten)
These ingredients will yield 8–10 rolls depending on size. Feel free to double or halve the recipe as needed.
Kitchen Tools You’ll Need
Before we get our hands floury, let’s talk gear. Here’s what you’ll need:
- Large mixing bowl or stand mixer
- Dough hook (if using stand mixer)
- Measuring cups and spoons
- Clean kitchen towel or plastic wrap
- Baking sheet
- Parchment paper
- Sharp knife or dough cutter
- Kaiser roll stamp (optional)
- Pastry brush (for egg wash)
Step-by-Step Guide to Making Kaiser Rolls
1. Making the Dough
In a large bowl or stand mixer, combine warm water, sugar, and yeast. Let it sit for 5 minutes until foamy—this is called blooming the yeast. Once it’s active, add in the flour, salt, and olive oil.
Mix until a rough dough forms, then knead for about 8–10 minutes (or 6 minutes on medium with a stand mixer). The dough should be smooth, elastic, and slightly tacky—not sticky.
If it’s too sticky, add a tablespoon of flour at a time. Too dry? Add a splash of water.
Once you’re happy with the dough’s texture, form it into a ball.
2. First Rise
Place the dough in a lightly greased bowl and cover with a damp towel or plastic wrap. Let it rise in a warm spot for 1 to 1.5 hours, or until doubled in size.
You’ll know it’s ready if you gently press your finger into the dough and it springs back slowly.
This is where the flavor builds—so be patient.
3. Shaping the Rolls
After the dough has risen, punch it down to release air. Divide it into 8–10 equal pieces. Use a kitchen scale for precision if you like, or just eyeball it.
Roll each piece into a ball and cover with a towel for 5–10 minutes to relax the gluten. This makes shaping easier.
4. The Signature Kaiser Roll Twist
Now for the fun part.
If you have a Kaiser roll stamp, press it firmly into the center of each dough ball, being careful not to cut all the way through.
If you’re shaping by hand:
- Roll each ball into a long rope.
- Tie a loose knot in the middle.
- Tuck one end under and the other over the top.
Place the shaped rolls onto a parchment-lined baking sheet, leaving space between them.
5. Second Proof
Cover the rolls and let them rise for 30–45 minutes. They should puff up nicely.
Don’t overproof—this can cause them to collapse in the oven. You want them airy, not balloon-like.
6. Topping the Rolls
Right before baking, brush each roll with egg wash for a golden color. Sprinkle with your favorite toppings: sesame, poppy seeds, or coarse salt all work great.
7. Baking the Rolls
Preheat your oven to 425°F (220°C).
Place a pan of hot water on the bottom rack—this creates steam, which helps develop that crusty exterior.
Bake rolls for 15–18 minutes until golden brown. You’ll know they’re done when they sound hollow when tapped on the bottom.
Let cool on a wire rack before slicing.
Tips for Perfect Kaiser Rolls
Baking great Kaiser rolls isn’t just about following a recipe—it’s about technique, timing, and a little bit of intuition. If your rolls have come out too dense, pale, or flat before, don’t worry. With these expert tips, you’ll be well on your way to bakery-quality results every single time.
- Use Bread Flour: Bread flour has a higher protein content than all-purpose flour, which helps create the strong gluten structure needed for a chewy roll with good height.
- Don’t Rush the Rise: Time is flavor. Give the dough ample time to rise. If your kitchen is cold, place the dough near a warm oven or use the “proof” setting if your oven has one.
- Get the Right Dough Texture: Your dough should feel like a soft pillow. It shouldn’t stick to your hands like glue, but it also shouldn’t be too dry or cracking.
- Use Steam While Baking: That pan of hot water in the oven? It’s not optional if you want that classic crust. Steam prevents the crust from forming too early, allowing the rolls to expand fully.
- Egg Wash is Key: For a beautiful golden brown finish, don’t skip the egg wash. It also helps your seeds or toppings stick.
Baking is both art and science—so trust the process and don’t be afraid to make adjustments based on what you see and feel.
Common Mistakes to Avoid
Even the most seasoned home bakers make mistakes, but when it comes to Kaiser rolls, some slip-ups can completely change the texture or taste. Let’s go over the common blunders and how to sidestep them.
- Using Cold Water with Yeast: Yeast needs warmth to activate. Water that’s too cold won’t wake it up. Aim for about 110°F (warm but not hot to the touch).
- Skipping the Second Proof: That final rest before baking isn’t a suggestion—it’s a necessity. It gives the dough one last puff, resulting in lighter rolls.
- Overkneading the Dough: Yes, you want a good gluten structure, but too much kneading can make the rolls tough and overly chewy.
- Incorrect Shaping: If your shaping is too tight or too loose, it can affect the rise and the final look. Watch a video if needed—it really helps to see the process.
- Oven Not Hot Enough: A low oven temp will give you pale, undercooked rolls. Preheat fully and use an oven thermometer if necessary.
Avoiding these mistakes will level up your baking game big time.
How to Store Your Kaiser Rolls
So you’ve baked a beautiful batch of Kaiser rolls. Now what? Let’s talk about keeping them fresh and tasty.
Room Temperature Storage:
- Once cooled completely, place rolls in a paper bag or a bread box to maintain their crust.
- Avoid plastic bags unless you prefer a softer crust. Plastic traps moisture, softening the exterior.
- Rolls will stay fresh for up to 3 days at room temperature.
Freezing Instructions:
- Let the rolls cool entirely.
- Wrap each roll tightly in plastic wrap or aluminum foil.
- Place them in a freezer-safe bag or container.
- Freeze for up to 2 months.
To use, just thaw at room temperature and reheat (more on that next). Freezing is a great way to always have fresh bread on hand!
How to Reheat Kaiser Rolls
Reheating your rolls the right way can bring them back to life—crispy crust, soft inside, just like fresh-baked.
- From Room Temperature: Place in a preheated oven at 350°F (175°C) for 5–7 minutes.
- From Frozen: No need to thaw. Bake at 350°F for 12–15 minutes straight from the freezer.
- Microwave (Not Recommended for Crispness): Use only if you’re in a rush. Wrap the roll in a damp paper towel and microwave for 15–20 seconds.
Want that fresh-baked feel? Always choose the oven over the microwave.
Serving Suggestions
The Kaiser roll’s versatility is what makes it a household favorite. You can serve them in so many ways, and they adapt beautifully to different meals and cuisines.
Breakfast Sandwiches:
- Egg, cheese, and bacon
- Avocado and scrambled egg
- Sausage patties with spicy mayo
Burger Buns:
- Perfectly sturdy for beef burgers, veggie patties, or pulled pork
- Toast them for a crisp edge
- Top with cheese, lettuce, tomato, and your favorite sauces
With Soups and Stews:
- Tear and dip into hearty beef stew or chicken noodle soup
- Serve with chili or thick vegetable soup for a comforting meal
- Great as a replacement for garlic bread
These rolls are your bread MVP. Whether you’re building a gourmet burger or mopping up soup, Kaiser rolls hold up and shine every time.
Nutritional Information (Per Roll)
Here’s a breakdown of what you’re eating when you bite into one of these golden beauties. Keep in mind, this is for a basic Kaiser roll without toppings.
| Nutrient | Amount |
|---|---|
| Calories | 200–220 |
| Protein | 6g |
| Carbohydrates | 38g |
| Sugars | 2g |
| Fiber | 2g |
| Fat | 2.5g |
| Saturated Fat | 0.4g |
| Sodium | 300mg |
Values can vary depending on ingredients and portion size. If you’re watching your macros, consider smaller portions or whole wheat versions.
Variations and Flavors
Want to spice things up a little? You can tweak the classic Kaiser roll to suit your taste buds or dietary preferences.
Whole Wheat Kaiser Rolls:
- Replace half (or all) of the bread flour with whole wheat flour
- Add a touch more water if dough feels stiff
- Nutty, hearty, and full of fiber
Everything Kaiser Rolls:
- After brushing with egg wash, sprinkle with “everything bagel” seasoning
- A great flavor punch for breakfast sandwiches
Sweet Kaiser Rolls:
- Add 1–2 tbsp of honey or sugar to the dough
- Top with pearl sugar or cinnamon sugar
- Perfect for a sweeter breakfast roll
Don’t be afraid to experiment. That’s the beauty of homemade bread—you get to make it exactly how you like it.
Troubleshooting Guide
Got issues? No problem. Here’s a quick fix for the most common Kaiser roll problems:
| Problem | Possible Cause | Solution |
|---|---|---|
| Rolls too dense | Under-proofed or over-floured | Let dough rise fully; measure flour properly |
| Flat rolls | Weak gluten structure | Use bread flour; knead longer |
| Pale color | Oven too cool or no egg wash | Preheat oven fully; use egg wash |
| Tough crust | Overbaked or too little steam | Reduce bake time; add steam to oven |
| No swirl after baking | Poor shaping or flattening during proof | Practice shaping and avoid deflating rolls |
FAQs about Kaiser Roll Recipe
1. Can I make Kaiser rolls without a stand mixer?
Yes, absolutely. You can knead the dough by hand—it might take a bit more time (about 10–12 minutes), but it’s entirely doable. Just keep kneading until the dough is smooth and elastic. It’s also a good arm workout!
2. Why do my rolls turn out dense instead of fluffy?
Dense rolls usually result from not enough rising time or using old yeast. Make sure your yeast is fresh and that your dough doubles in size during the first rise. Also, avoid adding too much flour—it can stiffen the dough.
3. Can I freeze Kaiser roll dough for later use?
Yes! After shaping the rolls but before the second rise, place them on a tray and freeze until solid. Then, transfer them to a freezer-safe bag. When ready to bake, thaw, let them proof, and bake as usual.
4. What flour is best for fluffy Kaiser rolls?
Bread flour is ideal. It has a higher protein content than all-purpose flour, which helps develop more gluten for a chewy texture and better rise. If you only have all-purpose, it’ll still work, but the rolls may be slightly softer and less structured.
5. How do I get the crust to be crispy like bakery rolls?
Steam is the secret! Place a pan of hot water in the oven while baking to create a humid environment. This prevents the crust from forming too early and lets the roll expand fully before crisping up. Don’t forget to use egg wash for color and shine.
Conclusion
There’s something incredibly satisfying about baking your own bread—especially when it’s a batch of beautiful, golden Kaiser rolls. From the rich history rooted in Austrian tradition to the crunchy crust and soft interior that make them so beloved today, these rolls are far more than just sandwich buns. They’re an experience.
Whether you’re baking for Sunday brunch, a weeknight burger night, or simply because you love the smell of fresh bread in your kitchen, mastering this recipe gives you a reliable go-to that everyone will appreciate. Plus, now that you know how to shape them, store them, and even flavor them differently, you’re equipped to make Kaiser rolls your own signature creation.
The next time someone asks where you bought those delicious rolls, you’ll get to proudly say, “I made them myself.”
Now go preheat that oven. You’ve got some baking to do.


