Juicy Turkey Recipe: When it comes to Thanksgiving or Christmas dinner, nothing quite captures the spotlight like a beautifully roasted turkey. Yet, many home cooks often face the dreaded challenge of a dry and flavorless bird.
The good news? Cooking a juicy turkey isn’t as complicated as it seems—it just takes the right preparation, ingredients, and techniques.
In this step-by-step guide, I’ll walk you through everything you need to know to roast the perfect turkey that’s golden, flavorful, and juicy every single time.
Introduction
There’s a reason turkey holds such an important place during holiday gatherings—it’s more than just food; it’s tradition. The aroma of roasted turkey fills the house with warmth and instantly signals celebration. Unfortunately, it’s also a dish with a reputation for turning out dry. But let’s bust that myth right away: a juicy turkey is entirely achievable if you understand a few key principles.
Think of it this way: turkey is like a blank canvas. With the right herbs, seasonings, and cooking method, you can transform it into a masterpiece. Whether you’re hosting Thanksgiving, Christmas, or simply cooking for a special family dinner, learning how to master a turkey will make you the hero of the table.
The secret lies in preparation. From thawing correctly to brining, seasoning, and controlling oven temperatures, each step matters. By the end of this guide, you’ll not only know how to roast a turkey—you’ll know how to roast the best turkey you’ve ever tasted.
Ingredients You’ll Need
Before diving into the cooking process, let’s get the ingredients lined up. Think of this as your toolkit for success. The better your tools, the better your results.
Main Ingredients for the Turkey
- 1 whole turkey (12–14 pounds is ideal for most family gatherings)
- 1 cup unsalted butter (softened) or olive oil
- 1 onion, quartered
- 1 lemon, halved
- 4 garlic cloves, smashed
Herbs and Spices for Flavor
- Fresh rosemary (3–4 sprigs)
- Fresh thyme (3–4 sprigs)
- Fresh sage (a handful of leaves)
- 2 teaspoons paprika
- 2 teaspoons garlic powder
- 1 teaspoon black pepper
- 2 teaspoons salt (or to taste)
Optional Add-Ons for Extra Juiciness
- Chicken or turkey broth (for basting or roasting pan)
- Apple or orange slices (for stuffing cavity)
- Celery and carrots (to roast under the turkey for extra flavor)
Why these ingredients? Butter or oil helps lock in moisture while herbs like rosemary and sage infuse the turkey with deep, savory notes. Citrus and aromatics inside the cavity add steam and fragrance, ensuring every bite bursts with flavor.
Preparing the Turkey Before Cooking
You can’t just pull a frozen turkey from the freezer, throw it in the oven, and expect it to turn out juicy. The preparation stage is where the magic begins.
Thawing the Turkey the Right Way
A frozen turkey needs proper thawing, and rushing this step often leads to uneven cooking. The safest method is refrigerator thawing: allow 24 hours of thawing for every 4–5 pounds of turkey. For example, a 12-pound turkey will need at least 3 full days in the fridge.
If you’re short on time, you can use the cold water method. Submerge the turkey (still in its sealed packaging) in a sink full of cold water, changing the water every 30 minutes. This method takes about 30 minutes per pound.
Cleaning and Patting Dry
Once thawed, remove the turkey from its packaging, discard the giblets (or save them for gravy), and rinse the bird under cold water. Pat it completely dry with paper towels. This step is essential because dry skin equals crispy golden brown results once roasted.
Importance of Brining (Wet vs. Dry Brine)
Brining is a game-changer for juicy turkey. A wet brine involves soaking the bird in a saltwater solution for 12–24 hours. This helps the meat absorb moisture, preventing dryness during cooking. A dry brine, on the other hand, means rubbing the turkey generously with salt (and sometimes sugar) and letting it rest uncovered in the fridge overnight.
Both methods work, but dry brining is less messy and gives the skin an extra crisp finish. If you’ve never tried brining before, this might be the year to start—you’ll never go back once you taste the difference.
Step-by-Step Guide to Cooking Juicy Turkey
Now comes the exciting part—bringing everything together. Cooking a turkey is really just about following the right sequence.
Step 1 – Preparing the Brine or Marinade
If you’re wet brining, prepare a large pot of salted water with herbs, garlic, and citrus. Submerge the turkey and refrigerate for at least 12 hours. For dry brining, rub salt and spices directly on the turkey skin and inside the cavity, then let it rest uncovered in the fridge overnight.
Step 2 – Seasoning the Turkey Inside and Out
Before roasting, rub softened butter or olive oil all over the turkey, including under the skin (use your fingers gently to separate the skin from the meat). This ensures maximum juiciness and flavor penetration. Don’t forget to season the cavity—adding aromatics like garlic, lemon, and fresh herbs enhances the fragrance while roasting.
Step 3 – Stuffing vs. No Stuffing
Many people love the idea of stuffing, but it can actually slow down cooking and sometimes make the bird dry. If you want traditional stuffing, cook it separately in a casserole dish. Instead, stuff your turkey cavity with aromatics like citrus, herbs, and onions. They’ll steam from within, keeping the meat moist without interfering with cooking times.
Step 4 – Preheating the Oven and Temperature Control
Preheat your oven to 325°F (165°C). Starting low and slow helps the turkey cook evenly. Some chefs like to blast the bird at 450°F for the first 30 minutes to crisp up the skin, then lower the heat to 325°F for the rest of the cook. Either way, consistency is key.
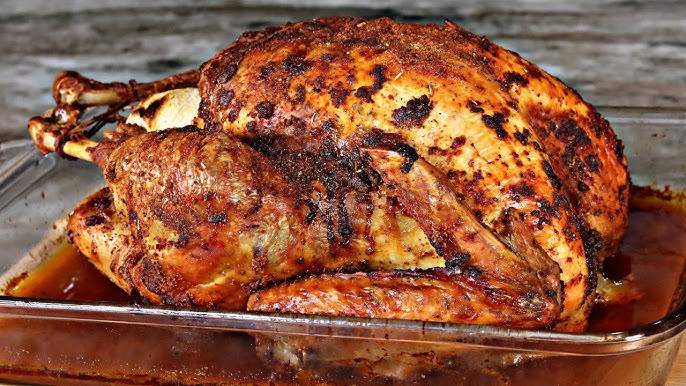
Step 5 – Roasting the Turkey to Perfection
Place your turkey breast-side up on a roasting rack inside a large pan. Add a cup of broth or water to the bottom of the pan to prevent drippings from burning. Roast according to weight—about 15 minutes per pound at 325°F. For example, a 12-pound turkey will take roughly 3 hours.
Halfway through, you can tent the breast with foil to prevent over-browning. When the internal temperature of the thickest part of the breast reaches 165°F (74°C), your turkey is done.
Tips for Keeping Turkey Moist During Cooking
Even if you’ve brined and seasoned your turkey, the roasting process is where moisture can be lost if you’re not careful. Thankfully, there are a few tried-and-true techniques that guarantee your bird comes out juicy.
The Role of Butter and Olive Oil
Fat is a turkey’s best friend. Butter and olive oil act like a moisture shield, sealing in juices and preventing the meat from drying out. Before roasting, slather your turkey generously with softened butter or brush it with olive oil. Some chefs like to make a herb butter by mixing fresh rosemary, thyme, and garlic into the butter and spreading it under the skin. Not only does this keep the turkey moist, but it also infuses the meat with flavor as it cooks.
If you’re worried about the breast meat drying out before the legs are done, try a trick: drape strips of bacon over the breast during roasting. The bacon fat drips down into the meat, keeping it tender and flavorful. Plus, you get crispy bacon to enjoy on the side!
Using Foil Tenting and Basting
Covering the turkey with foil during the first half of roasting traps steam inside, helping it cook evenly. Once you’re halfway through cooking, remove the foil to let the skin crisp up to a golden brown.
Basting—the act of spooning pan drippings over the bird—is another way to lock in flavor and moisture. But here’s the catch: opening the oven too often can drop the temperature and extend your cooking time. A good rule of thumb is to baste only every 45 minutes. If you’ve added broth to the pan, you’ll have plenty of flavorful liquid to spoon over the turkey.
Checking Internal Temperature with a Meat Thermometer
The number one secret to juicy turkey is knowing when to stop cooking. Overcooking is the biggest culprit of dry meat. A digital meat thermometer is your best tool in the kitchen. Insert it into the thickest part of the breast and thigh (without touching the bone).
The target temperatures are:
- Breast: 165°F (74°C)
- Thighs and legs: 175°F (80°C)
Once your turkey hits these numbers, remove it from the oven. Remember, it will continue cooking slightly while resting, so don’t wait for it to climb higher—otherwise, you’ll end up with dry meat.
Carving the Turkey Like a Pro
You’ve worked hard to roast a perfect bird, but if you hack into it without resting or technique, all that juiciness will spill out onto the cutting board instead of staying in the meat.
Resting Time Before Carving
As tempting as it is to cut into the turkey right away, patience is key. After removing it from the oven, tent it loosely with foil and let it rest for at least 20–30 minutes. This allows the juices to redistribute throughout the meat, ensuring every slice is moist. Skipping this step is the fastest way to dry out your turkey, no matter how well you cooked it.
How to Slice Breast, Legs, and Thighs
Carving doesn’t have to be intimidating. Start with a sharp carving knife or chef’s knife. Here’s the step-by-step approach:
- Remove the legs and thighs first. Slice through the skin that connects the drumstick to the breast, then pull the leg away from the body until the joint pops. Cut through the joint to separate. Repeat for the other side.
- Separate the drumsticks and thighs. Cut through the joint between them. Drumsticks can be served whole, while thighs can be sliced into smaller pieces.
- Carve the breast meat. Place the knife parallel to the breastbone and slice downward, following the natural curve of the bone. Once removed, slice the breast meat across the grain into thin, juicy slices.
- Don’t forget the wings. Cut them off and serve as-is, or save them for making stock.
Arrange everything neatly on a platter, garnish with fresh herbs or citrus slices, and you’ve got a showstopping centerpiece ready to impress your guests.
Serving Suggestions
A turkey may be the star of the show, but let’s be honest—the sides, sauces, and accompaniments make the meal unforgettable. Pairing your juicy turkey with the right dishes takes the entire dinner to the next level.
Side Dishes That Pair Perfectly
Here are some must-have sides that complement turkey beautifully:
- Mashed potatoes – Creamy, buttery, and the perfect base for turkey gravy.
- Stuffing (or dressing) – Whether baked inside the bird or separately, it’s a holiday classic.
- Cranberry sauce – Adds a tangy-sweet contrast to the savory turkey.
- Roasted vegetables – Carrots, Brussels sprouts, and green beans add color and crunch.
- Sweet potato casserole – A sweet and savory favorite topped with marshmallows or pecans.
The key is balance. Pair hearty sides with something refreshing, like a crisp green salad or roasted asparagus, to keep the meal from feeling too heavy.
Sauces and Gravies for Extra Flavor
No turkey is complete without a rich, flavorful sauce. Use the pan drippings from your roasted turkey to make a classic gravy. Simply whisk the drippings with flour and broth until smooth and thickened.
If you want something different, try:
- Herb-infused gravy with rosemary and sage
- Garlic butter sauce drizzled over the slices
- Spiced cranberry glaze for a festive twist
With the right sauce, even leftover turkey tastes like a fresh feast.
Common Mistakes to Avoid
Cooking turkey is simple once you know the rules, but there are a few mistakes that can turn a potential masterpiece into a dry disappointment. Let’s go over what not to do.
Overcooking the Turkey
This is the number one mistake most people make. They fear undercooked poultry, so they leave it in the oven “just a little longer.” Unfortunately, those extra minutes are enough to dry out the breast meat. Always use a thermometer instead of guessing.
Skipping the Resting Step
Cutting into a turkey fresh out of the oven is like cutting into a balloon filled with water—the juices spill out instantly. Resting allows the fibers of the meat to relax and reabsorb the juices. Skipping this step guarantees dryness.
Using Too Much Stuffing
Stuffing the cavity with bread-based mixtures absorbs moisture and slows down cooking, often leaving you with undercooked stuffing or overcooked turkey. Instead, cook stuffing separately in a casserole dish and stuff the bird with aromatics only.
Other mistakes to avoid include forgetting to season the cavity, skipping brining, and not adding broth to the roasting pan. Each of these small missteps can make the difference between a turkey that’s just okay and one that’s unforgettable.
Storage and Reheating Leftover Turkey
One of the best things about roasting a big turkey is the leftovers. They make for delicious sandwiches, soups, casseroles, and more. But if you don’t store and reheat them properly, you’ll end up with dry, rubbery meat. Here’s how to keep that juicy goodness intact.
Refrigeration and Freezing Tips
After your holiday feast, don’t leave the turkey sitting out for more than 2 hours. Bacteria grows quickly at room temperature, and you don’t want to risk food poisoning.
- Refrigeration: Slice the turkey meat off the bone before storing. Place it in airtight containers or wrap tightly with foil and refrigerate. It will stay fresh for 3–4 days.
- Freezing: For longer storage, freeze the meat. Wrap portions tightly in plastic wrap and then in foil, or use freezer-safe bags. Properly stored, turkey can last up to 3 months in the freezer without losing much quality.
Pro tip: Freeze the turkey in smaller portions. That way, you can thaw only what you need without defrosting the whole batch.
Best Ways to Reheat Without Drying Out
Reheating turkey is tricky because it tends to dry out quickly. Here’s how to do it right:
- Oven method: Preheat the oven to 300°F (150°C). Place turkey slices in a baking dish, splash with a little broth or gravy, cover with foil, and heat for 20–30 minutes.
- Stovetop method: Warm turkey gently in a skillet with a bit of butter or gravy over low heat.
- Microwave method (last resort): Cover slices with a damp paper towel to prevent them from drying out. Use short intervals and check frequently.
If you have leftover gravy, always reheat the turkey with it—it acts like a moisture blanket and brings the meat back to life.
FAQs about Juicy Turkey Recipe
1. How long should I cook a turkey per pound?
At 325°F (165°C), plan for about 15 minutes per pound. For example, a 12-pound turkey will take around 3 hours. Always rely on a meat thermometer rather than just time.
2. Do I need to brine the turkey overnight?
Brining isn’t mandatory, but it makes a huge difference in juiciness. A dry brine overnight is simple and effective, while a wet brine takes a bit more effort but delivers great results.
3. Can I cook turkey without stuffing?
Absolutely! In fact, it’s recommended to cook stuffing separately to avoid dryness or uneven cooking. Use aromatics like lemon, herbs, and garlic in the cavity instead.
4. What’s the best internal temperature for juicy turkey?
The breast should reach 165°F (74°C), and the thighs/legs should be around 175°F (80°C). Remove it from the oven once it hits these numbers.
5. How can I keep turkey moist when reheating?
Always add moisture when reheating—use broth, gravy, or even a drizzle of melted butter. Cover the meat to trap steam, whether you’re reheating in the oven, skillet, or microwave.
Conclusion
Cooking a juicy turkey isn’t about luck—it’s about technique. From proper thawing and brining to seasoning, roasting, and resting, every step plays a role in keeping your bird moist and flavorful. The right combination of butter, herbs, foil tenting, and precise temperature control transforms turkey from dry and disappointing to tender and unforgettable.
And let’s not forget—presentation matters. Carving your turkey with confidence and serving it alongside classic sides and flavorful sauces makes the entire meal feel like a true feast. Even leftovers can be a treat if you store and reheat them correctly.
So the next time you’re in charge of the holiday bird, don’t stress. With this step-by-step guide, you’ll not only roast a turkey—you’ll roast the kind of turkey that has everyone at the table asking for seconds.