Jello Cake Recipe: Jello cake is a delightful dessert that brings together the light, fluffy texture of cake with the fruity, refreshing flavor of gelatin. It’s a fun, colorful treat that’s both visually appealing and incredibly delicious. At its core, it’s a simple sheet cake—typically made with white or yellow cake mix—that’s poked with holes and filled with liquid Jello, which then sets inside the cake. The result is a vibrant, marbled dessert that’s moist, sweet, and perfect for any occasion.
This dessert has been a staple at summer barbecues, birthday parties, and family gatherings for decades. What makes it special is how versatile it is. You can experiment with different cake and Jello combinations—like lemon cake with raspberry Jello or chocolate cake with cherry Jello—to suit your tastes or the theme of your event. Plus, it’s super easy to prepare, making it ideal for beginner bakers and busy parents alike.
The beauty of Jello cake lies in its layers: a soft cake foundation, the bright, fruity Jello infusion, and a creamy topping—usually Cool Whip or whipped cream. You can get as creative as you like with toppings, from fresh fruit and sprinkles to chocolate shavings or coconut flakes. Each slice is a burst of color and flavor, sure to bring smiles to everyone around the table.
Why This Recipe is a Crowd-Pleaser
Why do people love Jello cake so much? Well, aside from how cool it looks when you slice into it (those vibrant Jello stripes are so satisfying!), it’s got the perfect texture and flavor balance. The Jello keeps the cake moist, so you don’t have to worry about dry crumbs or needing extra syrup. The whipped topping gives it a light finish that complements the dense, fruity middle layer beautifully.
It’s also customizable to fit any holiday or party theme. Red and green for Christmas, red and blue for the Fourth of July, pastel tones for Easter—you name it. You can even do a rainbow effect using multiple Jello flavors. Plus, it’s budget-friendly. Most of the ingredients are pantry staples or cost just a couple of bucks at the grocery store.
Another big win? It’s a make-ahead dessert. That means you can prepare it the night before your big event and let it chill overnight, saving you from any last-minute stress. Whether you’re hosting a casual dinner or a kids’ birthday bash, this Jello cake recipe is bound to become your go-to dessert. Let’s dive into what you’ll need to make it happen!
Ingredients Needed
Essential Cake Ingredients
To make a perfect Jello cake, you’ll first need a solid cake base. You can either go the easy route with a boxed cake mix or make one from scratch if you’re feeling fancy. Here’s what you need:
For a box mix option:
- 1 box of white or yellow cake mix
- Eggs (as specified on the box)
- Oil or melted butter
- Water
For a homemade cake (classic vanilla):
- 2 cups all-purpose flour
- 1½ cups granulated sugar
- ½ cup unsalted butter, softened
- 1 cup whole milk
- 3 eggs
- 2 tsp baking powder
- 1 tsp vanilla extract
- Pinch of salt
If you’re short on time, the box mix totally works and still gives you that delicious, moist texture we’re after. Just follow the package instructions for baking, and you’re good to go. However, if you want a richer flavor or control over the ingredients (for dietary reasons), making it from scratch adds a nice personal touch.
Jello Flavors and Options
Here’s where the fun begins—picking your Jello flavor. This is what gives the cake its fruity punch and signature look. The most popular choices are:
- Strawberry
- Raspberry
- Cherry
- Lime
- Orange
- Blueberry
You’ll need one (3 oz) box of flavored Jello (or more if you want to layer flavors). Avoid sugar-free Jello if you want a firmer set and brighter colors—regular Jello works best.
If you want to get creative, you can mix and match. For example, you can split your cake into sections and pour different colors of Jello into each one. Or go tropical with mango or pineapple-flavored gelatin. Just make sure the Jello is completely dissolved before pouring it over the cake.
Optional Toppings and Add-Ons
Toppings take your Jello cake from “yum” to “OMG.” Here are a few add-on ideas to jazz up your dessert:
- Cool Whip or whipped cream: The classic topping for that light, fluffy finish.
- Fresh fruits: Think strawberries, blueberries, raspberries, or kiwi for a fresh and colorful touch.
- Sprinkles: Great for birthdays or festive occasions.
- Coconut flakes: Add a tropical twist and extra texture.
- Crushed nuts: Walnuts or pecans work well for a crunchy contrast.
You can also layer the whipped topping with fruit slices for a more decorative look or pipe it into rosettes for a fancy finish.
Tools and Equipment Required
Basic Kitchen Tools
You don’t need a professional kitchen setup to make a great Jello cake. Here’s a list of basic tools you’ll want to have on hand:
- Mixing bowls
- Hand or stand mixer (or a whisk if doing it manually)
- Measuring cups and spoons
- Whisk or spatula
- Toothpick or skewer (for poking holes)
A large spoon or ladle is helpful for pouring the Jello evenly over the cake. If you have a fine mesh sieve, you can use it to strain the Jello mixture for a smoother finish (especially if you’re mixing in fresh fruit bits).
Recommended Baking Pans
The standard Jello cake is made in a 9×13-inch rectangular baking pan. Glass pans work best because you can see the colorful layers from the side, making for a more appealing presentation.
You can also experiment with:
- Bundt pans: For a fancier, molded cake shape
- Cupcake tins: For individual servings
- Springform pans: If you plan to layer with mousse or additional elements
Just make sure whatever pan you use is deep enough to hold the cake and the Jello without spilling over.
Preparing the Cake Base
Choosing the Right Cake Mix or Making from Scratch
Now that we’ve got our ingredients and tools ready, it’s time to whip up that cake base. If you’re using a boxed mix, follow the instructions on the package carefully. Preheat your oven (usually to 350°F or 175°C), and grease your baking dish to prevent sticking.
If you’re making it from scratch, start by creaming the butter and sugar together until light and fluffy. Add the eggs one at a time, then mix in the vanilla. In a separate bowl, combine the flour, baking powder, and salt. Slowly add the dry mixture to the wet, alternating with milk until everything is incorporated. Pour the batter into your prepared pan and bake for 30-35 minutes or until a toothpick inserted in the center comes out clean.
The goal here is to create a firm but soft cake that can absorb the Jello without falling apart. Once baked, let it cool in the pan for 15-20 minutes. Don’t try to flip it out—it needs to stay in the pan for the next steps.
Making the Jello Mixture
Tips for Mixing Jello Properly
This is the step that gives your Jello cake its name and signature look. Making the Jello mixture correctly is key to ensuring your cake soaks up all that fruity goodness. First, choose your flavor. For this recipe, we’ll use one standard (3 oz) box of flavored gelatin.
Here’s how to prepare it:
- Boil 1 cup of water.
- Pour the Jello powder into a mixing bowl.
- Add the boiling water and stir continuously for 2 full minutes to make sure the powder dissolves completely.
- Add 1 cup of cold water and stir to combine.
This standard 1:1 ratio (hot to cold water) is crucial. Some recipes will tell you to use slightly less cold water for a more intense flavor and quicker setting time—and that works too, especially if you want a bolder taste.
Pro Tip: Always ensure the Jello is completely dissolved before pouring it onto the cake. Undissolved powder will result in gritty textures and uneven flavors. If you’re using multiple Jello flavors, prepare them in separate bowls and apply them to different areas of the cake.
Avoid adding fruit pieces to the Jello mixture at this stage. If you’re using fruit, it’s better to add them on top after the cake has set, to avoid disrupting the smooth absorption process.
Getting the Right Consistency
Jello consistency matters, especially when you’re pouring it into a cake. You don’t want it to be partially set when you pour—it needs to be in liquid form to seep into the cake properly. However, don’t let it cool too long, or it’ll start to gel in the bowl. As soon as it reaches room temperature, you’re good to go.
Some bakers prefer to chill the mixture slightly—about 10–15 minutes in the fridge—just to cool it down before pouring. This can help it set faster once it hits the cold cake. But don’t let it get syrupy or thick. The goal is to strike that perfect moment where it’s just cool enough not to damage the cake, yet fully liquid to absorb nicely.
Also, avoid stirring the Jello too vigorously once the cold water is added. Gentle mixing is key to maintaining a smooth texture and preventing foamy bubbles, which can disrupt the look of your cake.
Combining Jello and Cake
How to Poke the Cake
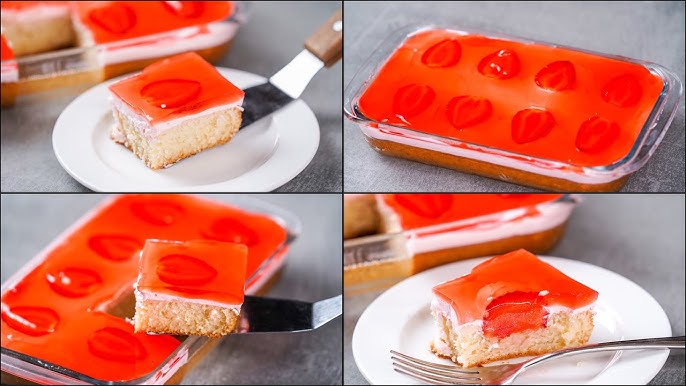
Here’s the fun (and oddly satisfying) part: poking holes into your cooled cake. This isn’t just for aesthetics—it’s how the Jello gets inside the cake to create those beautiful, flavorful streaks.
Let your cake cool for at least 30 minutes, ideally longer, until it’s no longer warm to the touch. Using a skewer, fork, chopstick, or even the back of a wooden spoon (depending on how large you want your streaks), poke holes every ½ to 1 inch across the surface of the cake. Go deep—but not all the way to the bottom. You want the Jello to soak through the cake, not leak under it.
Here are some hole-making tips:
- Keep your spacing uniform so the Jello distributes evenly.
- Wipe your tool clean every few pokes to avoid tearing the cake.
- Don’t poke too close to the edge; the Jello may spill over.
If you’re going for a rainbow or multi-color Jello cake, section the cake into zones and use separate tools or rinse between flavors to avoid mixing colors.
Pouring the Jello for Even Soak
Once your cake is poked and ready, it’s time to pour the Jello. Do it slowly and evenly, using a spoon or ladle to control the flow. Don’t dump it all in one spot; distribute it gradually across the holes, allowing it to seep in. Tilt the pan gently if needed to help it settle evenly.
Make sure every hole gets filled. The cake will begin absorbing the liquid immediately, and you’ll see it start to soak down into the layers. The goal is not to drench the entire cake but to infuse it with fruity streaks in every bite.
You might have a little Jello liquid left over—that’s okay. Don’t force it all into the cake, or you risk turning it into a soggy mess. Just cover the surface enough that the flavor is well spread without creating puddles.
Let the cake sit at room temperature for about 15 minutes after pouring the Jello to allow the mixture to settle. Then, it’s ready for the next crucial step: chilling.
Chilling the Cake
How Long Should You Chill It?
Chilling is not optional—it’s mandatory. This is when the magic happens. The Jello mixture sets inside the cake, creating that cool, fruity surprise in every bite. After pouring the Jello, cover your cake pan with plastic wrap and pop it into the refrigerator.
Let it chill for at least 3 to 4 hours, but overnight is best. The longer it chills, the more the flavors meld and the better the texture gets. If you try to frost or serve it too soon, the Jello won’t be fully set, and you’ll end up with a leaky mess.
If you’re in a rush, place it in the coldest part of the fridge and avoid opening the door frequently. Still, resist the temptation to check on it too soon. Give it ample time to fully firm up before adding any toppings or decorations.
Why Chilling Enhances Flavor
Aside from helping the Jello set, chilling also enhances the overall taste. The flavors have time to infuse deeply into the cake, giving you that soft, juicy bite every time. Cold desserts are generally more refreshing and palate-cleansing, especially when paired with fruit and whipped topping.
It also allows the cake to firm up slightly, making slicing and serving way easier. No crumbling or falling apart—just clean, gorgeous slices with vivid colors inside.
This step transforms your dessert from “pretty good” to “unforgettable.” So don’t rush it. A properly chilled Jello cake is worth every second of wait time.
Frosting and Topping the Cake
Cool Whip vs. Homemade Frosting
The final touch that turns your chilled Jello cake into a complete masterpiece is the frosting. Most traditional Jello cake recipes use Cool Whip because it’s light, fluffy, and perfectly balances the moist, fruity texture of the cake. It also spreads easily over the chilled surface and holds up well in the fridge.
But if you’re not a fan of store-bought whipped topping or simply prefer making things from scratch, you’ve got options. Here’s a quick recipe for homemade whipped frosting:
Homemade Whipped Frosting:
- 1 cup heavy whipping cream
- 2 tbsp powdered sugar (adjust to taste)
- 1 tsp vanilla extract
Whip the cream until soft peaks form, then add the sugar and vanilla. Continue whipping until stiff peaks appear. Be careful not to overbeat—it can turn into butter if you’re not paying attention!
Whether you go with Cool Whip or homemade frosting, apply it generously over the surface of the chilled cake. Use a spatula to spread it evenly, covering the entire top. If you’re feeling fancy, use a piping bag to make swirls, borders, or rosettes for added flair.
Adding Fruits and Decorations
Now that your cake is frosted, it’s time for the real fun—decorating! This is where you can personalize the look of your cake to match any occasion. Here are a few creative topping ideas:
- Fresh Fruits: Strawberries, blueberries, raspberries, kiwi slices, and mandarin oranges are colorful and complement the fruity Jello flavors perfectly.
- Sprinkles or Edible Glitter: Great for birthdays, holidays, or themed parties. Go crazy with color!
- Crushed Candy or Cookies: Try Oreo crumbles, M&Ms, or even a crushed graham cracker crust on top.
- Shredded Coconut or Mini Marshmallows: Adds texture and a tropical vibe.
- Chocolate Drizzle or Caramel Sauce: A surprising but delightful addition, especially if you’re using cherry or raspberry Jello.
If you’ve used multiple Jello flavors inside the cake, use fruit or decorations that reflect those colors for a stunning visual cue. You can even cut fruits into fun shapes using cookie cutters to create stars, hearts, or flowers.
Remember, less is sometimes more. Don’t overload the cake to the point where it collapses or becomes difficult to slice. Keep it balanced, colorful, and fun.
Serving Suggestions
Presentation Tips
You’ve made a gorgeous cake—now it’s time to show it off! Presentation makes a big difference, especially if you’re serving at a party or special event. Here’s how to wow your guests with a few simple tricks:
- Use a Clear Glass Baking Dish: This lets the beautiful streaks of Jello show through the sides.
- Slice with a Warm Knife: Dip your knife in hot water and wipe dry between slices for clean, mess-free cuts.
- Add a Garnish to Each Slice: A dollop of whipped cream, a fresh fruit slice, or a mint leaf on each plate adds that final professional touch.
If you’re taking it to a gathering, store it in a lidded container or use a cake carrier. You can even make individual portions in small jars or cups for easy grab-and-go desserts—perfect for outdoor events or potlucks.
Best Occasions for Jello Cake
Jello cake is one of those versatile desserts that fits just about any occasion. Here are some perfect events to serve it:
- Birthday Parties: Kids and adults love the colorful surprise inside.
- Summer BBQs and Picnics: It’s cool, light, and refreshing—ideal for hot weather.
- Holidays: Use red and green Jello for Christmas, pastel colors for Easter, or red and blue for Independence Day.
- Baby Showers or Gender Reveals: Use pink or blue Jello inside for a fun reveal when you slice the cake.
- Family Dinners or Potlucks: It’s easy to make in bulk, serve, and store.
Because it can be made in advance and looks impressive without a ton of effort, it’s the ultimate stress-free dessert that still gets all the compliments.
Storing Leftover Jello Cake
How to Store Properly
If you’ve got leftovers (lucky you!), you’ll want to store your Jello cake properly to maintain that amazing flavor and texture. Since it contains gelatin and whipped topping, refrigeration is absolutely essential.
Here’s how to store it:
- Cover the cake tightly with plastic wrap or transfer it to an airtight container.
- Keep it in the refrigerator at all times when not serving.
- Avoid letting it sit out for more than 30 minutes, especially in warmer environments.
You can store it in the same pan you baked it in, making cleanup and serving even easier the next day.
How Long Does It Last?
Properly stored in the fridge, your Jello cake should stay fresh for 3 to 5 days. After that, the texture of the cake may start to change—becoming overly soggy or the frosting separating slightly.
Here are a few tips to extend its life:
- Store it in a cold part of the fridge, not in the door where temperatures fluctuate.
- Avoid freezing Jello cake. While technically possible, freezing tends to ruin the texture of both the Jello and the whipped topping.
If you’re planning to make it ahead of time, the best approach is to bake and chill the cake one day, add the frosting and toppings the next, and serve immediately after for the freshest results.
Variations of Jello Cake
Using Different Cake Flavors
One of the best things about Jello cake is how versatile it is. You’re not limited to a white or yellow cake base—there’s a whole world of flavors you can explore. Depending on the occasion, your mood, or just what you have in the pantry, mixing up the cake flavor can totally transform the dessert.
Here are a few fun combos to try:
- Lemon Cake + Raspberry Jello: Bright, zesty, and fruity.
- Chocolate Cake + Cherry Jello: Like a chocolate-covered cherry—rich and indulgent.
- Strawberry Cake + Lime Jello: A summery, punchy twist.
- Vanilla Cake + Orange Jello: Creamsicle vibes with a creamy topping.
For themed parties, you can match the colors and flavors to the event. Want to go patriotic? Try white cake with alternating stripes of cherry and blueberry Jello. Want a tropical theme? Coconut cake with pineapple or mango Jello will hit the spot.
You can also add flavored extracts to your cake batter (like almond, lemon, or coconut) to subtly enhance the taste and make your Jello cake stand out even more.
Sugar-Free or Keto-Friendly Options
Looking to make your Jello cake a little healthier or diet-friendly? No problem! With a few smart swaps, you can make a version that’s low in sugar or even keto-compliant.
Here’s how:
- Use sugar-free Jello, available in most stores in a variety of flavors.
- Replace the boxed cake mix with a sugar-free or keto cake mix, or make one from scratch using almond flour, coconut flour, or a blend.
- Substitute sugar with erythritol, stevia, or monk fruit sweetener.
- For frosting, use sugar-free whipped cream or make your own using heavy cream and a sugar-free sweetener.
Keep in mind that texture may vary slightly with low-carb ingredients, but the overall experience will still be delightful—and guilt-free! This makes Jello cake an awesome option for diabetic-friendly gatherings, keto diets, or just lightening up your dessert table.
Troubleshooting Common Issues
Why Did My Jello Sink?
One of the most common issues with Jello cake is that the gelatin sinks to the bottom instead of distributing through the cake. Don’t worry—this is totally fixable once you understand why it happens.
Here are the most likely causes:
- The cake was too warm when you added the Jello. Always let the cake cool completely before pouring.
- You poured too much Jello too fast. This floods the top layer and causes it to push downward.
- The holes were too large or too close together. This can cause pooling at the bottom.
To avoid sinking Jello:
- Poke uniform holes—not too deep, not too wide.
- Use a spoon or ladle to pour slowly and evenly.
- Let the Jello cool to room temp before pouring (not warm, not chilled).
A little Jello pooling at the bottom isn’t a disaster—some people love that extra-fruity bite at the base—but ideally, it should be evenly distributed for that signature marbled effect.
Fixing Texture Problems
Sometimes your cake might turn out too soggy, too dry, or just “off.” Here’s how to troubleshoot:
Too soggy?
- You might’ve used too much Jello.
- The cake may have been overbaked and cracked, allowing too much liquid to absorb.
Too dry?
- You may have under-poured the Jello or baked the cake too long.
- Try adding a light syrup layer or an extra topping to moisten it before serving.
Jello didn’t set properly?
- Double-check your hot/cold water ratios.
- Ensure the Jello had enough chill time—at least 4 hours, preferably overnight.
If your frosting looks separated or runny, it’s likely the cake wasn’t fully chilled. Always let everything cool before frosting and decorate only when the Jello is set.
Nutritional Information
Calories Per Slice
A classic slice of Jello cake with Cool Whip topping is relatively light compared to many frosted layer cakes. On average, you’re looking at:
| Component | Calories (approx.) |
|---|---|
| White cake base | 200–220 per slice |
| Jello (3 oz box) | 80–100 total |
| Cool Whip topping | 50–60 per serving |
| Total per slice | 250–300 calories |
These numbers are based on a 9×13 pan cut into 12 pieces. Calories can vary depending on the cake mix used, Jello flavor, and amount of topping.
Healthier Substitutions
If you’re watching your sugar, fat, or calorie intake, there are easy tweaks you can make:
- Use sugar-free Jello to cut about 80 calories.
- Swap Cool Whip for light whipped topping or Greek yogurt.
- Use unsweetened applesauce in the cake mix to replace oil.
- Bake with whole wheat flour for more fiber if making from scratch.
- Add fresh fruit on top for natural sweetness without adding processed sugar.
These changes let you enjoy a slice of Jello cake without throwing off your diet—perfect for health-conscious dessert lovers!
FAQs about Jello Cake Recipe
What is Jello cake?
Jello cake, also known as jelly cake or poke cake, is a popular dessert that combines the moist texture of cake with the fruity flavor and vibrant color of gelatin. The process involves baking a standard cake, poking holes in it once cooled, and then pouring flavored gelatin over the cake to seep into the holes.
How do I make the holes for the Jello?
After your cake has cooled, you can use the round handle of a wooden spoon or a similar object to poke holes evenly across the cake. Make sure the holes are big enough for the Jello to seep into but not so large that the cake falls apart.
Can I use any type of cake mix?
Yes, any standard cake mix works well for a Jello cake. White and yellow cake mixes are commonly used because they showcase the Jello’s color vividly, but you can also use chocolate or any other flavor you prefer.
What types of Jello flavors work best?
The beauty of Jello cake is its versatility! Popular choices include strawberry, raspberry, lime, and orange, but feel free to experiment with any flavor that complements your cake.
How long should the Jello set before serving?
After pouring the Jello over the cake and letting it soak in, refrigerate the cake for at least 3-4 hours. This allows the gelatin to set properly. For best results, refrigerate overnight.
Can I add toppings to my Jello cake?
Absolutely! Whipped cream, fresh fruits, and sprinkles make excellent toppings that can enhance both the flavor and appearance of your Jello cake.
Is Jello cake suitable for vegetarians?
Traditional Jello contains gelatin, which is derived from animal collagen, and may not be suitable for vegetarians. However, there are vegetarian and vegan gelatin substitutes available that work just as well for this recipe.
Conclusion
Jello cake is more than just a nostalgic dessert—it’s a fun, fruity, and colorful treat that brings joy to every gathering. Whether you’re whipping it up for a birthday party, summer BBQ, or just a midweek family dessert, it’s the perfect balance of sweet, moist, and refreshing.
With endless flavor combos, easy prep, and a gorgeous presentation, it’s no surprise this dessert has stood the test of time. Plus, the simplicity of it makes it accessible to both beginner bakers and seasoned dessert pros.
Give it a try with your favorite Jello flavor, experiment with fun toppings, and don’t be afraid to make it your own. One slice in, and you’ll see why this cheerful cake is a go-to favorite for so many.