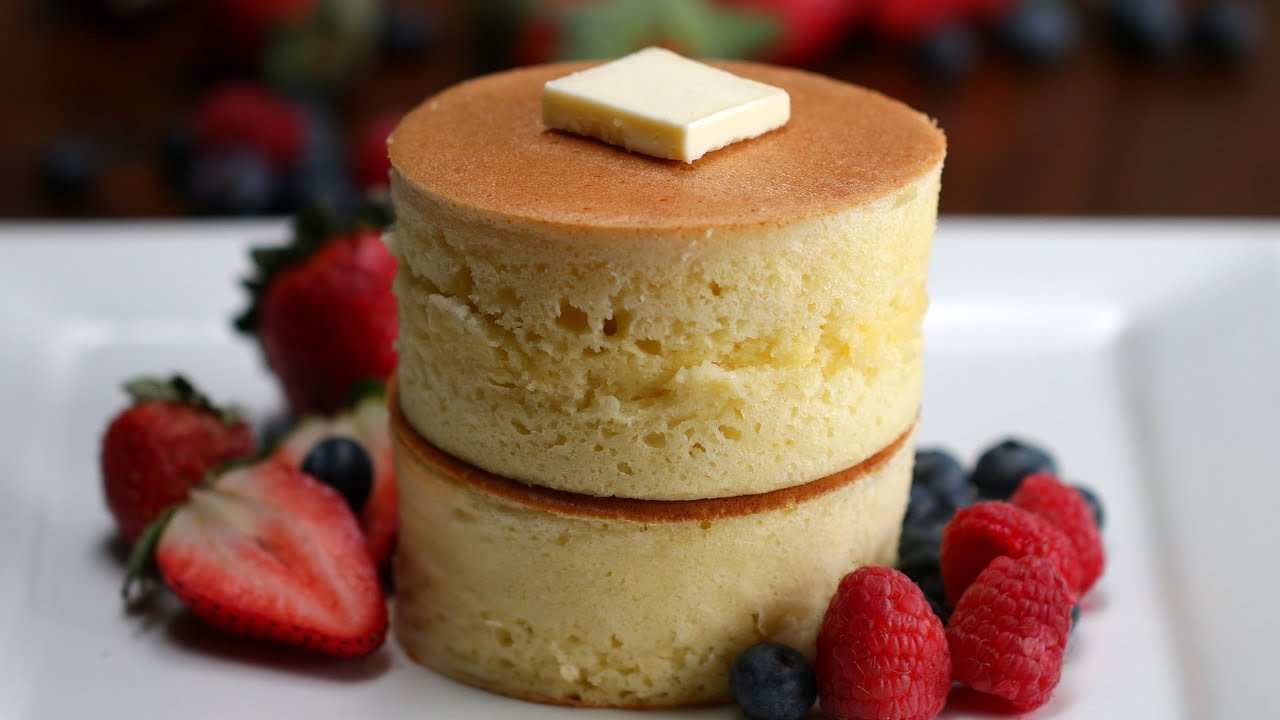
Japanese Pancake Recipe: Imagine biting into a cloud — that’s exactly what eating a Japanese pancake feels like. Unlike traditional American pancakes, which are flat and sometimes dense, Japanese pancakes are ultra-fluffy, thick, and jiggly. They’re often referred to as “soufflé pancakes” because of their light, airy texture. What makes them stand out is the use of beaten egg whites folded into the batter, which gives them that dreamy, melt-in-your-mouth feel. These pancakes are a fun twist on a breakfast classic and can easily impress at a brunch table or be a delightful dessert treat.
Not only do Japanese pancakes look impressive with their sky-high rise and golden brown edges, but they also offer a subtle sweetness that pairs perfectly with syrups, fresh fruits, and even a dollop of whipped cream. They’ve become Instagram darlings for their wobbly charm — and once you make them at home, you’ll understand why.
Whether you’re craving something new for your Sunday morning routine or planning to wow your guests, these pancakes deliver both flavor and flair. The best part? You don’t need to be a pro chef to get it right — just a bit of patience, the right technique, and this guide by your side.
A Brief History and Origin
While pancakes have existed in various forms around the globe for centuries, Japanese pancakes only recently burst into the spotlight. Their rise to fame began in trendy cafés in Tokyo like Gram Café and A Happy Pancake. These eateries became known for their towering, jiggly pancakes that customers would line up for — sometimes for hours. Social media played a huge role in spreading their popularity worldwide. Videos of pancakes bouncing and jiggling like soft pillows took the internet by storm.
But their culinary roots trace back to Japanese soufflés and castella sponge cakes. Inspired by Western-style baking, Japanese chefs combined the delicate texture of French soufflés with the comforting appeal of pancakes. The result? A pancake that’s as much about technique as it is about taste.
In recent years, these pancakes have become a staple in Japanese cafés and restaurants, and now, they’re making their way into home kitchens across the globe. And with this step-by-step guide, you can master them, too.
Ingredients You’ll Need
Essential Ingredients for the Fluffy Pancake Base
Making Japanese pancakes is all about simplicity and precision. You don’t need a long list of fancy items — just a few high-quality, everyday ingredients:
- 2 large eggs (separated into yolks and whites)
- 2 tablespoons milk (whole milk preferred)
- ¼ teaspoon vanilla extract (for added aroma)
- 3 tablespoons all-purpose flour (sifted)
- ½ teaspoon baking powder
- 2 tablespoons sugar (granulated)
- A pinch of salt
- 1 teaspoon lemon juice or cream of tartar (to stabilize egg whites)
- Vegetable oil or butter (for greasing the pan)
- Water (for steaming while cooking)
Each ingredient has a role in achieving that soufflé-like texture. Egg whites are the star here — when whipped to stiff peaks, they act like a natural leavening agent. The sugar is beaten into the whites to stabilize them and create structure. The milk and yolk mixture gives the pancake richness, while the flour and baking powder provide the body.
Quality matters, especially when the ingredient list is short. Use fresh eggs, sift your flour to avoid lumps, and don’t skip the lemon juice — it makes a huge difference in achieving stable, fluffy peaks.
Optional Add-Ons and Flavor Enhancers
Now comes the fun part: customizing your pancakes! Once you’ve got the base down, there are endless possibilities to suit your taste:
- Matcha powder – for a green tea twist
- Cocoa powder or chocolate chips – for a chocolatey vibe
- Cinnamon or nutmeg – for a warm, spiced flavor
- Fresh fruits – blueberries, sliced bananas, or strawberries mixed into the batter or served on top
- Whipped cream and maple syrup – classic toppings that never fail
- Honey or fruit preserves – for natural sweetness
- Ice cream scoops – if you’re turning this into a dessert plate
You can even go savory by omitting the sugar and adding herbs, cheese, or smoked salmon for a brunch version. The beauty of Japanese pancakes lies in their versatility — you can dress them up or keep them simple depending on your mood.
Tools and Equipment Required
Kitchen Tools for Precision and Perfection
While you don’t need fancy gadgets, having the right tools can seriously elevate your pancake game:
- Electric hand mixer or stand mixer – for whipping egg whites to stiff peaks
- Mixing bowls – preferably stainless steel or glass (avoid plastic for egg whites)
- Fine mesh strainer or flour sifter – for lump-free batter
- Non-stick frying pan or skillet with lid – essential for even cooking
- Round pancake molds or ring molds – to help the pancakes hold their height
- Rubber spatula – for gently folding batter
- Measuring spoons and cups – to maintain the perfect ratio
- Timer – to avoid overcooking or undercooking
- Spoon or piping bag – to fill the molds cleanly
Having pancake molds is a game-changer. They help the batter rise vertically, resulting in that signature thick and fluffy shape. And using a lid on the pan traps steam, helping cook the pancakes evenly inside and out.
Substitutes If You Don’t Have the Proper Equipment
Don’t worry if you don’t have all the tools — there are clever workarounds:
- No pancake mold? Use a cleaned tuna can with both ends removed or create molds with folded aluminum foil.
- No hand mixer? Whip those egg whites by hand with a balloon whisk. It’s an arm workout but doable!
- No sifter? Just use a fine mesh strainer to shake the flour into the bowl.
- No lid for your pan? Use a heat-safe plate or cover the pan with foil — just ensure the steam stays in.
Getting creative in the kitchen is part of the fun. The key is to maintain control over your ingredients and cooking temperature for best results.
Prepping for Pancake Perfection
Tips Before You Start Mixing
Before you dive in, here are some tips to set you up for success:
- Room Temperature Ingredients: Let your eggs and milk sit out for 10–15 minutes before using. Room-temp eggs whip better and give you fluffier pancakes.
- Separate Eggs Carefully: Make sure there’s no yolk in your whites — even a little fat can prevent them from whipping up.
- Dry, Clean Bowls: Especially for the egg whites — any grease or moisture will sabotage your peaks.
- Preheat Your Pan Slowly: Keep the heat low and let your pan warm up gradually while you prep.
- Have Water Ready: Steaming helps cook the inside without burning the outside. You’ll need a splash of water in the pan before covering it.
Taking time to prep makes all the difference. Trust us — these pancakes are a little high-maintenance, but totally worth it.
Getting the Perfect Batter Consistency
The secret to flawless Japanese pancakes is the fold. Here’s how to get the batter just right:
- Step 1: Mix egg yolks, milk, and vanilla until smooth.
- Step 2: Sift in flour and baking powder. Mix until just combined.
- Step 3: In a separate bowl, whip egg whites with lemon juice until foamy. Gradually add sugar and beat until stiff peaks form.
- Step 4: Fold one-third of the egg whites into the yolk batter to lighten it. Then gently fold in the rest using a rubber spatula, being careful not to deflate the air.
Your batter should be thick, glossy, and airy — almost like mousse. Don’t overmix or stir vigorously, or you’ll lose that precious fluff.
Step-by-Step Cooking Instructions
How to Make the Pancake Batter
Alright, now that your ingredients are prepped and tools are ready, it’s go time. Making the perfect Japanese pancake batter is a delicate balance of technique and timing. Here’s how to do it step-by-step:
- Separate the Eggs: Start by separating your eggs while they’re cold, as yolks and whites are easier to divide this way. Place the whites in a clean, dry bowl for whipping later.
- Mix the Wet Ingredients: In another bowl, combine the egg yolks, milk, and vanilla extract. Whisk until the mixture is smooth and pale yellow.
- Sift and Mix the Dry Ingredients: Sift the flour and baking powder into the egg yolk mixture. This helps prevent lumps and creates a smooth texture. Whisk gently until combined — do not overmix.
- Beat the Egg Whites: Add lemon juice or cream of tartar to the egg whites. Start whisking on low speed until foamy. Then, gradually add the sugar while increasing the speed. Continue beating until you achieve stiff peaks — the egg whites should hold their shape and form a peak that stands straight up when you lift the whisk.
- Fold Gently: Take a third of the whipped egg whites and gently fold them into the yolk batter. This lightens the mixture and prepares it for the remaining whites. Add the rest of the whites and fold gently using a rubber spatula, scraping from the bottom and cutting through the center. Your goal is to maintain as much air as possible in the batter.
- Final Batter Check: The finished batter should be thick, fluffy, and slightly glossy. Avoid overmixing — if the batter starts looking runny or flat, it means the air has deflated and the pancakes may not rise properly.
Take your time with this process. The key to cloud-like pancakes is in how gently and carefully you fold the batter. Think of it like handling a newborn kitten — soft, slow, and with love.
Cooking the Pancakes Just Right
You’ve made it to the exciting part: cooking! This step requires patience, but the reward is totally worth it. Follow these directions closely:
- Heat the Pan: Place your non-stick skillet over the lowest possible heat. Let it warm up slowly for 5–7 minutes while you prepare the batter. Don’t rush this part — high heat will burn the outside before the inside cooks.
- Grease and Place Molds: Lightly oil the pan and the inside of your ring molds. Place the molds on the skillet and spoon or pipe the batter into them. Fill about ¾ of the way full — the batter will rise.
- Add Water for Steaming: Here’s the trick: Add a tablespoon or two of water to the pan (outside the molds), then cover it with a lid. The steam helps cook the inside of the pancakes evenly and keeps them moist.
- Cook Low and Slow: Let the pancakes cook for about 4–5 minutes on one side. You’ll know they’re ready to flip when the sides have set and bubbles start forming on the surface.
- Flip Carefully: Using a spatula, gently flip the entire mold with the pancake inside. Cook the other side for another 4–5 minutes, adding more water and covering again. The pancakes should be golden brown on each side and puffed up like clouds.
- Check for Doneness: Gently press the tops — they should spring back. You can also insert a toothpick to check if the center is cooked (it should come out clean).
- Remove and Serve: Let the pancakes rest for a minute in the molds, then slide a knife around the edges to release them. Plate them up and add your favorite toppings.
Tips for Cooking Evenly
- Use the Right Heat: Low and steady wins the race. If the pan gets too hot, your pancakes will brown too quickly and stay raw inside.
- Keep the Steam In: Don’t keep lifting the lid. Trapping steam is key to a soft, pillowy interior.
- Don’t Overcrowd the Pan: Give each pancake enough space to breathe and rise properly.
- Pre-Grease Everything: Especially the molds — nothing ruins the moment like a stuck pancake.
Common Mistakes to Avoid
- Deflating the Egg Whites: This happens when you fold too aggressively. Always fold gently with a spatula.
- Overmixing the Batter: Mix until just combined. Overmixing can lead to dense, rubbery pancakes.
- Cooking on High Heat: This is a common trap. Patience is essential. High heat leads to burnt outsides and raw insides.
- Using Cold Ingredients: Cold eggs and milk can prevent your batter from whipping up properly. Room temperature is key.
- Flipping Too Soon: Wait until the pancakes have firmed up around the edges and are halfway cooked before flipping. Rushing this step can cause them to collapse.
With practice, you’ll be able to nail the timing and achieve perfectly golden, jiggly, sky-high pancakes every time.
Perfect Toppings and Presentation Ideas
Classic Toppings to Elevate Your Pancakes
Once your fluffy pancakes are ready, it’s time to dress them up like the stars they are. Toppings can enhance both the flavor and visual appeal of your pancakes. Here are some timeless classics that never miss:
- Maple Syrup – A drizzle of warm, golden syrup soaking into the pillowy surface? Yes, please.
- Whipped Cream – Soft peaks of sweet whipped cream complement the airy texture.
- Fresh Berries – Strawberries, blueberries, and raspberries add a tart, juicy burst.
- Powdered Sugar – A light dusting creates that “café-quality” look.
- Butter – A pat of butter melting over the warm pancake adds richness and that nostalgic pancake flavor.
For a balanced taste, mix something sweet, creamy, and fruity. For example, stack your pancakes with whipped cream, top with strawberries, and drizzle with maple syrup — that’s heaven on a plate.
Presentation tip: stack two or three pancakes, place toppings in layers between them, and garnish with mint leaves or edible flowers. Make it look as good as it tastes.
Creative and Modern Plating Ideas
If you’re looking to impress, try these visually stunning, modern takes:
- Matcha Fantasy – Dust with matcha powder and serve with sweetened red bean paste and whipped cream.
- Tiramisu Style – Layer the pancakes with mascarpone, a light coffee drizzle, and cocoa powder.
- Tropical Island – Top with mango chunks, coconut flakes, and a squeeze of lime.
- S’mores Inspired – Add mini marshmallows, melted chocolate, and crushed graham crackers.
- Caramel Banana Dream – Use caramel sauce, banana slices, and a sprinkle of crushed nuts.
Use wide plates and play with height, color contrast, and symmetry. Pancakes should be more than food — they should be a visual feast.
Adding a few dots of sauce or a streak of puree on the plate gives it a professional touch, turning your kitchen into a five-star pancake bar.
Storage and Reheating Tips
Can You Store Japanese Pancakes?
Yes, but — and it’s a big but — they’re best enjoyed fresh. These soufflé-style pancakes are delicate and don’t keep their fluff for long. That said, if you must store leftovers:
- Cool Them Completely: Let the pancakes cool to room temperature before wrapping.
- Wrap Individually: Use plastic wrap or place them in an airtight container to prevent them from drying out.
- Refrigeration: Store in the fridge for up to 2 days.
- Freezing: You can freeze them, but expect some texture loss. Wrap tightly and store for up to 2 weeks.
Keep in mind that the longer they sit, the more they’ll deflate. The charm of Japanese pancakes lies in their fresh-out-of-the-pan jiggle.
Best Ways to Reheat Without Ruining the Texture
Reheating is tricky — you want them warm without drying out or turning rubbery. Here are the best methods:
- Microwave: Wrap in a damp paper towel and heat for 20–30 seconds. This helps restore a bit of moisture.
- Steaming: Place on a plate over simmering water with a lid for a gentle reheat that mimics the original cooking method.
- Pan Reheat: Use very low heat with a lid to steam and warm them slowly.
Avoid the toaster or oven — they’ll dry out quickly. And don’t reheat more than once, or the pancakes will lose all their charm.
Making It Vegan or Gluten-Free
Vegan Japanese Pancakes: A Plant-Based Twist
Want to enjoy Japanese pancakes without the eggs and dairy? You’re in luck. With a few swaps, you can still achieve fluffiness with a plant-based version.
Ingredients You’ll Need:
- ¾ cup plant-based milk (soy or almond)
- 1 tablespoon apple cider vinegar (or lemon juice)
- 1 cup all-purpose flour
- 2 tablespoons sugar
- 1 tablespoon baking powder
- ¼ teaspoon salt
- 2 tablespoons aquafaba (chickpea brine) or flaxseed egg (1 tbsp flaxseed + 3 tbsp water)
Instructions:
- Mix plant milk and vinegar — let sit for 5 minutes to curdle (creates vegan buttermilk).
- Whisk in sugar, aquafaba or flax egg.
- Add sifted flour, baking powder, and salt.
- Stir until just combined, and let the batter rest for 5–10 minutes.
- Cook just like the regular pancakes: low and slow in greased molds with a lid.
They won’t rise as high as the egg-based ones, but with aquafaba, you’ll still get impressive fluff.
Gluten-Free Fluffy Pancakes
For gluten-sensitive pancake lovers, here’s how to tweak the recipe:
- Substitute Flour: Use a gluten-free all-purpose blend (with xanthan gum if possible).
- Check Your Baking Powder: Make sure it’s certified gluten-free.
- Follow the Original Steps: The egg whites still give the rise and structure.
Gluten-free batters tend to be a bit more delicate, so be extra gentle when folding and flipping. Let the batter sit for 10–15 minutes before cooking to hydrate the flour blend properly.
Troubleshooting and Pro Tips
Why Didn’t My Pancakes Rise?
It happens to the best of us. If your pancakes turned out flat, here’s what might’ve gone wrong:
- Egg Whites Not Whipped Enough: You need stiff peaks that stand on their own.
- Overmixed Batter: Too much mixing = loss of air = flat pancakes.
- Flipped Too Soon: Let one side cook fully before flipping.
- Wrong Heat: Too high, and they burn; too low, and they stay gooey inside.
- Old Baking Powder: If it’s expired, it won’t help with the rise.
Pro Tips for Pancake Perfection Every Time
- Use fresh eggs for better meringue volume.
- Preheat your pan low and slow.
- Invest in pancake molds for consistent shape and height.
- Practice gentle folding — don’t stir!
- Keep steam in by not peeking under the lid too often.
- Remember: mastering Japanese pancakes is a bit like learning to ride a bike — wobbly at first, but so satisfying once you get the hang of it.
Serving Suggestions and Pairings
What to Serve with Japanese Pancakes
While these pancakes can absolutely steal the show on their own, pairing them with complementary sides or drinks takes the whole experience to another level. Whether you’re serving them as breakfast, brunch, or dessert, here are a few delicious combinations:
- Coffee or Matcha Latte: A hot drink balances the sweetness of the pancakes and enhances the overall café-style feel.
- Scrambled Eggs or Omelet (Savory Brunch Option): Balance the sweet with some protein-rich savory sides.
- Fruit Salad or Compote: Adds freshness and acidity to cut through the fluff.
- Yogurt Parfait: Creamy and slightly tangy, it pairs well with fruit-topped pancakes.
- Mimosa or Fresh Juice: For those boujee brunch vibes.
Creating a complete spread around your Japanese pancakes gives them a restaurant-level upgrade. Consider setting the table with small bowls of berries, nuts, honey, and whipped cream so everyone can customize their stack. It’s interactive and perfect for gatherings.
When’s the Best Time to Serve Them?
Japanese pancakes are versatile. Here’s how you can slot them into your meal plans:
- Breakfast or Brunch: The most obvious and popular choice.
- Dessert: Stack two, top with ice cream, drizzle chocolate sauce — dessert heaven.
- Tea Time Treat: Pair with a warm cup of green tea for a cozy mid-afternoon snack.
- Special Occasions: Birthdays, anniversaries, or even holiday brunches — they’re festive and feel extra special.
You can even serve mini versions for party bites — just use smaller molds and adjust the cooking time. It’s a guaranteed crowd-pleaser no matter the setting.
Nutritional Breakdown and Health Tips
What’s in a Japanese Pancake (Nutritionally Speaking)?
Here’s a basic nutritional estimate per pancake (depending on size and toppings):
| Nutrient | Amount (Approx.) |
|---|---|
| Calories | 120–180 kcal |
| Carbs | 18–22 g |
| Protein | 4–6 g |
| Fat | 4–7 g |
| Sugar | 6–10 g |
| Fiber | 0.5–1 g |
Keep in mind this is for the pancake alone — toppings will increase these values, especially if you go heavy on syrup, butter, or whipped cream.
Making Healthier Versions
Want to indulge without the guilt? Here are a few easy tweaks:
- Swap Sugar with Honey or Stevia – Reduces processed sugar intake.
- Use Whole Wheat Flour or Oat Flour – Adds fiber and nutrients.
- Cut Back on Butter and Cream – Use Greek yogurt or coconut cream for lighter options.
- Add Fruits Inside – Bananas or berries folded into the batter boost nutrition.
- Go Dairy-Free – Use almond, soy, or oat milk.
Remember, balance is key. Enjoy the indulgence, but don’t hesitate to make it your own version of healthy.
FAQs about Japanese Pancake Recipe
What are Japanese pancakes?
Japanese pancakes, also known as “fluffy pancakes” or “soufflé pancakes,” are thicker and airier than traditional Western pancakes. They are known for their jiggly, soufflé-like texture, achieved through the use of whipped egg whites incorporated into the batter.
What ingredients do I need for Japanese pancakes?
The basic ingredients include eggs, flour, sugar, milk, and baking powder. The key to their fluffiness lies in separating the egg whites from the yolks and beating them into a meringue before folding into the rest of the batter.
How do I make my Japanese pancakes fluffy?
To achieve the iconic fluffiness, whisk the egg whites until stiff peaks form, and gently fold them into the rest of the batter. Avoid overmixing, as this can deflate the egg whites and affect the rise of your pancakes.
Can I make Japanese pancakes without a special pan?
Yes, you can use a regular non-stick skillet, but it’s important to keep the heat low so the pancakes can cook through without burning. Using ring molds can help maintain their shape and thickness.
How long does it take to cook Japanese pancakes?
Japanese pancakes cook slower than regular pancakes due to their thickness. Typically, they need about 5 minutes per side on low heat. Cover the pan with a lid to ensure they cook evenly and rise properly.
Are Japanese pancakes suitable for special diets?
While traditional recipes include wheat flour and dairy, there are variations that can accommodate gluten-free and dairy-free diets. Substitute the flour with a gluten-free blend and use almond or oat milk instead of dairy milk.
Where can I find more creative recipes for Japanese pancakes?
Many cooking blogs and websites offer inventive takes on Japanese pancakes, incorporating ingredients like matcha, chocolate, and fruits. Exploring these sites can provide additional inspiration and variations to try at home.
Conclusion
These pancakes are more than just a trendy treat; they’re a testament to what a little care and creativity can produce. Whether you’re treating yourself on a lazy Sunday, impressing friends at brunch, or just indulging in some fluffy goodness, Japanese pancakes offer a delicious escape from the ordinary.
The best part? You don’t need to travel to Tokyo or visit a fancy café to enjoy them. Just follow this guide, get your ingredients ready, and fluff it up! Trust me, once you get that perfect jiggle on your pancake stack, you’ll be hooked.