Italian Sub Sandwich Recipe: The Italian Sub—also known as the Italian Hoagie or Hero—is the kind of sandwich that makes mouths water just by thinking about it. Layered with savory cold cuts, crisp vegetables, creamy cheese, and topped off with zesty dressings, it’s a handheld meal that delivers big flavor. Originating from Italian-American communities in the Northeast U.S., this sandwich combines classic deli ingredients with a Mediterranean twist that screams deliciousness.
It’s not just about the ingredients—it’s about the perfect balance. The Italian sub manages to bring together salty, tangy, spicy, and crunchy all in one glorious bite. The meats are usually cured and bursting with bold flavors, the cheese smooth and creamy, the bread crispy yet soft inside, and the veggies provide that much-needed freshness and crunch.
Why Everyone Loves It
There’s a reason this sandwich is found on almost every deli menu across the country. First off, it’s customizable. Don’t like salami? Swap it for turkey. Not into olives? Skip them. The Italian sub is like a blank canvas that still comes with an artistic outline. Whether it’s served cold or toasted, stacked with meats or made vegetarian, this sandwich fits nearly every craving.
It’s also super filling. Packed with protein, fiber, and fats, a full Italian sub can be a hearty lunch or dinner. It’s also portable and easy to make, making it a great option for picnics, work lunches, or game-day snacks. Plus, the variety of textures and flavors in one bite is simply unmatched.
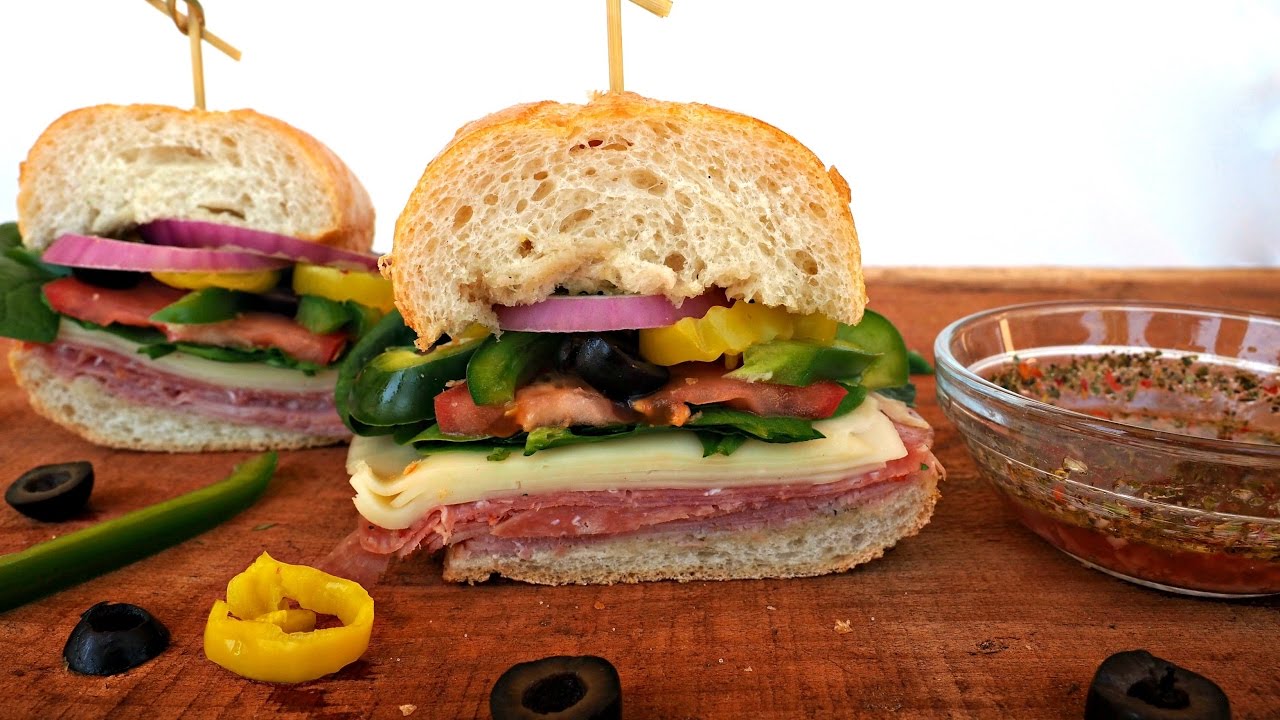
Ingredients You’ll Need
Meats and Cheeses
The core of every great Italian sub lies in its deli meats and cheeses. Traditional options include:
- Genoa Salami: Slightly spicy and robust, a must-have.
- Capicola (or Coppa): Cured pork shoulder, adds depth and a bit of heat.
- Ham: Adds a touch of sweetness and bulk.
- Pepperoni or Mortadella (optional): For extra flavor and authenticity.
For cheeses:
- Provolone: Sharp and perfectly melty if toasted.
- Mozzarella (optional): For a milder, gooey texture.
These choices provide a beautiful symphony of salty, spicy, and creamy that defines a true Italian sub. Don’t shy away from good-quality meats. They’re the heart of the sandwich.
Bread and Condiments
The bread you choose can make or break your sandwich. Classic Italian or hoagie rolls work best. Here’s what to look for:
- Italian Sub Roll or Hoagie Roll: Crusty on the outside, soft inside, and sturdy enough to hold everything.
- Ciabatta or Baguette (optional): If you want to get fancy or need an extra crunch.
Condiments include:
- Mayonnaise (optional)
- Italian Dressing or Oil & Vinegar: Adds moisture and a tangy kick.
- Spicy Mustard or Deli Mustard (optional): For heat and depth.
- Salt, Pepper, Oregano: Must-have finishing touches.
Fresh Veggies and Extras
These fresh elements cut through the richness of the meats and cheeses:
- Lettuce: Iceberg or romaine, shredded finely.
- Tomatoes: Thinly sliced, juicy, and fresh.
- Red Onions: Add sharpness and color.
- Pickles or Banana Peppers: For crunch and tang.
- Olives (optional): For a briny burst.
- Jalapeños (optional): If you like it spicy.
Use the freshest ingredients possible for the best flavor and crunch. Prepping the veggies ahead of time makes the sandwich assembly super easy.
Choosing the Right Bread
Best Types of Bread for Italian Subs
Not all bread is created equal, especially when it comes to an Italian sub. You want bread that has structure but won’t hurt your jaw. Here are the top choices:
- Italian Hoagie Rolls – The classic option, wide enough to pack all ingredients and sturdy enough to avoid sogginess.
- French Baguette – Crunchy and elegant, great for a fancier version.
- Ciabatta Rolls – Airy inside, crispy outside—great texture contrast.
- Submarine Rolls – Widely available, soft and easy to bite into.
Make sure your bread is fresh. A stale roll can ruin the entire experience. If you’re going for that authentic deli feel, stick to hoagie rolls found in the bakery section of your grocery store or at a local Italian deli.
Tips for Toasting Your Bread
Toasting isn’t a must, but it’s a game-changer. Here’s how to do it right:
- Use a Panini Press or Oven: Lightly brush the inside of the bread with olive oil or butter, then toast until golden.
- Don’t Overdo It: You want it crispy on the outside but still chewy inside.
- Add Cheese Before Toasting (Optional): Melts into the bread for added flavor and texture.
Toasting enhances the aroma and flavor of the bread while giving the sub a crunchy base that holds up to all the wet toppings. It also helps melt the cheese just enough to get that dreamy, gooey texture.
Step-by-Step Guide to Making the Perfect Italian Sub
Step 1: Slice Your Bread
Start by slicing your roll horizontally, but don’t cut all the way through. Leave a hinge to help keep everything in place while you load it up. If your bread is particularly thick or airy, consider hollowing out a bit of the inside to make room for fillings.
- Pro tip: Use a serrated knife for a clean cut.
- Optional: Lightly toast the inside for a crispy bite.
Step 2: Layer the Meats
Lay down the salami, ham, and capicola in even layers. Don’t just stack them—fold them for volume and texture. Folding also keeps the meats from sliding out when you take a bite.
- Order matters: Start with the salami at the bottom, then ham, then capicola.
- Layer smartly: Make sure every bite will have a bit of each meat.
Now, the sub is already starting to take shape. The meats create a savory, salty foundation that sets the tone.
Step 3: Add the Cheese
Next up—cheese. Provolone is the classic choice here. Its firm texture and mild, slightly tangy flavor balance out the saltiness of the meats perfectly. If you want a richer mouthfeel, add a few slices of mozzarella or even a sprinkle of shredded parmesan for a bold kick.
- Tip: If you’re toasting the sandwich, place the cheese directly on the meats so it melts slightly and binds everything together.
- Pro tip: Use room temperature cheese—it blends better with other layers.
Don’t go overboard with the cheese; you want it to complement, not overpower. Three to four thin slices of provolone are usually perfect.
Step 4: Load Up the Veggies
Here comes the freshness! Pile on the lettuce first—shredded iceberg is the go-to, but romaine or even arugula can add a nice peppery bite. Then layer on thinly sliced tomatoes, onions, and any extras like banana peppers or pickles.
- Lettuce: Shred it finely for an authentic deli look.
- Tomatoes: Make sure they’re not too wet—blot them with a paper towel if necessary.
- Onions: Go easy unless you love a strong onion punch.
Don’t skip the veggies—they provide texture and acidity, which cut through the richness of the meat and cheese.
Step 5: Drizzle with Dressing
This is the secret weapon. A good Italian sub is never dry. You can go with a classic oil and vinegar combo (equal parts red wine vinegar and olive oil), or use a tangy Italian dressing.
Here’s a basic dressing recipe:
- 2 tbsp olive oil
- 2 tbsp red wine vinegar
- 1 tsp oregano
- Pinch of salt and pepper
- Optional: A squeeze of lemon juice or a bit of Dijon mustard
Drizzle generously but not excessively—you want every bite to have flavor, not sogginess.
- Optional Kick: Add crushed red pepper flakes for heat.
- Optional Creaminess: A light smear of mayo or mustard under the meats.
Step 6: Toast or Press (Optional)
Toasting or pressing your sub brings everything together. If you’re going the hot sub route, place your sandwich in a panini press or wrap it in foil and bake it at 375°F (190°C) for 5-8 minutes.
- Pro Tip: Don’t press too hard—you want to warm and crisp, not flatten.
- What Happens When You Toast: The cheese melts, the bread crisps up, and the flavors meld like magic.
Cold subs are just as tasty, especially in the summer. So, it’s totally up to your preference.
Step 7: Cut and Serve
Use a sharp knife to cut your sub at an angle—it makes for a better bite and a prettier presentation. If your sub is stuffed to the brim, consider wrapping it tightly in parchment paper or foil and slicing it through the wrap to keep it all intact.
Serve with chips, pickles, or even a cold pasta salad for the full deli experience.
Variations and Customizations
Making It Spicy
Want some fire? Try these spicy additions:
- Spicy capicola or soppressata
- Jalapeños or pepperoncini peppers
- Spicy mustard or sriracha mayo
- Crushed red pepper in the dressing
You can also mix hot sauce into your oil and vinegar for a flavorful kick that doesn’t overpower.
Healthier Options
Watching calories? Here’s how to lighten it up:
- Use whole wheat or low-carb bread
- Swap out full-fat cheese for reduced-fat options
- Skip the mayo and go light on the oil
- Load up on extra veggies
- Use leaner meats like turkey or chicken breast
It still tastes amazing—you’ll barely notice the difference!
Vegetarian Twist
No meat? No problem! Try these delicious swaps:
- Grilled eggplant or zucchini
- Roasted red peppers
- Fresh mozzarella or provolone
- Hummus or pesto for spread
You still get that hearty, satisfying texture—without any meat. Perfect for Meatless Mondays or feeding veggie-loving friends.
Storing and Reheating Tips
How to Store Leftovers
If you made a giant sub and can’t finish it—no worries. Wrap it tightly in foil or plastic wrap and store it in the fridge. It’ll keep well for about 24 hours before it starts to get soggy.
- Don’t dress it if you’re planning to eat later—keep oil and vinegar separate.
- Veggies like lettuce and tomatoes are best added fresh before eating.
Best Ways to Reheat
To enjoy a leftover sub warm:
- Preheat oven to 350°F (175°C)
- Wrap the sub in foil and heat for 10-12 minutes
- For extra crisp, unwrap for the last 2 minutes
Microwaving is a last resort—it makes the bread rubbery and the veggies soggy. Stick with the oven or toaster oven when possible.
FAQs about Italian Sub Sandwich Recipe
What meats are best for an Italian Sub?
Traditional choices include Genoa salami, capicola, ham, and sometimes mortadella or pepperoni. Use a mix for bold, balanced flavor.
Can I make this sandwich ahead of time?
Yes! Just avoid adding the dressing or juicy toppings like tomatoes until you’re ready to eat, so the bread doesn’t get soggy.
What’s the best cheese to use?
Provolone is the most common choice, but mozzarella and parmesan also work great depending on your flavor preference.
Is this sandwich healthy?
It can be, especially if you opt for whole grain bread, lean meats, and pile on the veggies. Watch the portion size and dressing to keep it light.
Can I make it gluten-free?
Absolutely. Just use gluten-free rolls or wraps and ensure your meats and condiments are certified gluten-free.
Conclusion
Making an Italian sub at home isn’t just easy—it’s deeply satisfying. You get full control over every ingredient, from the choice of meats and cheeses to the freshest toppings and perfect condiments. Whether you like yours cold, hot, spicy, or mild, there’s a version of this classic sandwich for every palate. And once you make it yourself, you’ll probably never go back to deli-made again.
So next time you’re craving something hearty, flavorful, and fun to make—grab your ingredients and get stacking. Your perfect Italian sub awaits.