Italian Pizza Dough Recipe: Pizza lovers, gather around! If you’ve ever bitten into a slice of pizza in Naples, you know there’s something magical about authentic Italian pizza dough. It’s soft, chewy, slightly crispy, and full of flavor. Unlike the heavy, greasy versions often found elsewhere, true Italian dough is all about simplicity and technique. No shortcuts. No unnecessary extras. Just pure, delicious tradition.
The beauty of traditional Italian pizza dough lies in its minimalism. With just a handful of ingredients and some patience, you can achieve that perfect balance of texture and flavor. But why does the dough matter so much? Because it’s the heart and soul of the pizza! A good dough provides the perfect base for your favorite toppings without stealing the show.
Learning the art of Italian pizza dough is like unlocking a secret family recipe — one that you’ll want to pass down for generations. Ready to get your hands a little floury? Let’s dive in!
Essential Ingredients for Italian Pizza Dough
When it comes to pizza dough, less is more — but that “less” needs to be top-notch. Italian pizza dough relies on the quality of each ingredient to shine. You don’t need anything fancy, but you should aim for the best version of each component you can find.
Ingredient List:
- Flour: Look for Tipo “00” flour if possible. It’s ultra-refined and perfect for pizza. If you can’t find it, all-purpose flour will do.
- Water: Use filtered or bottled water to avoid chlorine, which can interfere with the yeast.
- Yeast: Active dry yeast or fresh yeast will work.
- Salt: Fine sea salt enhances the flavor beautifully.
- Olive Oil (optional): Some regions add a little for extra elasticity and flavor.
- Sugar (optional): Just a pinch to feed the yeast, especially if you’re using dry yeast.
Notice there’s no milk, butter, or complicated ingredients? Italian pizza keeps it real, and that’s why it tastes so unforgettable.
Equipment You’ll Need
Making authentic pizza dough doesn’t require a commercial kitchen setup, but having the right tools definitely makes the process smoother.
Must-Have Tools:
- Mixing Bowl: Big enough to allow the dough to rise comfortably.
- Measuring Cups and Spoons: Precision matters.
- Kitchen Scale: For accuracy (especially with flour).
- Dough Scraper: Helps with kneading and shaping.
Optional Tools:
- Stand Mixer with Dough Hook: Saves you from some elbow grease.
- Proofing Container with Lid: Makes it easy to track dough growth.
- Pizza Stone or Steel: For that amazing crispy bottom.
- Peel: Helps transfer the pizza to and from the oven.
You could start with just a bowl and your hands — and many Italians still do — but a few smart tools can make a big difference.
Step-by-Step Instructions for Making Italian Pizza Dough
Alright, it’s time to get into the good stuff — making that incredible dough from scratch. Follow these steps carefully, and you’ll feel like a pizzaiolo in no time!
Step 1: Preparing the Yeast
First things first: wake up your yeast.
- Warm up about 1/4 cup of water until it’s just slightly warm (around 100°F/38°C — think bathwater temperature).
- Dissolve a small amount of sugar into the water.
- Sprinkle your yeast over the top and let it sit for 5-10 minutes until it becomes frothy.
If your yeast doesn’t foam, toss it and start over. Dead yeast = sad pizza.
Step 2: Mixing the Dough
In a large bowl (or stand mixer), combine:
- 3 ½ cups of Tipo “00” flour
- 1 ½ teaspoons of sea salt
- The activated yeast mixture
- About 1 cup of water (add slowly as needed)
Mix until a shaggy dough forms. If the dough is too sticky, sprinkle in a little more flour. If it’s too dry, add a splash of water. Trust your hands — they’ll tell you what’s right.
Step 3: Kneading by Hand
Here’s where the magic happens.
- Turn the dough onto a floured surface.
- Knead it by hand for about 10 minutes. Push it away from you, fold it back, and give it a quarter turn.
- You’re looking for a smooth, elastic dough that springs back when poked.
Don’t rush it! Think of kneading as giving your dough a good workout.
Step 4: The First Proofing
Place your kneaded dough into a lightly oiled bowl. Cover it with a damp towel or plastic wrap.
- Let it rise at room temperature for 1 to 2 hours, or until it doubles in size.
This is where patience pays off. While your dough rises, the gluten relaxes, and those tiny air bubbles start forming — making your pizza light and airy instead of dense and chewy.
Shaping and Stretching Your Pizza Dough
Once your dough has beautifully doubled in size, it’s time to shape it. Now, this part can feel a bit intimidating if you’re new, but trust me — it’s easier (and way more fun) than it seems!
How to Properly Shape the Dough
- Start by turning your dough onto a floured surface.
- Gently press it down to release some of the gas bubbles, but don’t flatten it entirely.
- Divide your dough into individual portions if you’re making more than one pizza.
- Lightly flour your hands and use your fingers to stretch the dough outward from the center, leaving a slightly thicker edge for the crust.
- Let gravity do some of the work — pick it up and let it dangle a little as you rotate it.
Remember, no rolling pins allowed! Rolling pins can crush those precious air bubbles you worked so hard to create. Stretch it by hand for a soft, airy texture and those classic Italian-style bubbles in the crust.
Common Mistakes to Avoid
- Overstretching: If the dough tears, it’s likely overstretched. Let it rest for a few minutes and try again.
- Underproofing: If the dough resists stretching, it may need more time to rest.
- Overflouring: Too much flour can dry out your dough and make it stiff.
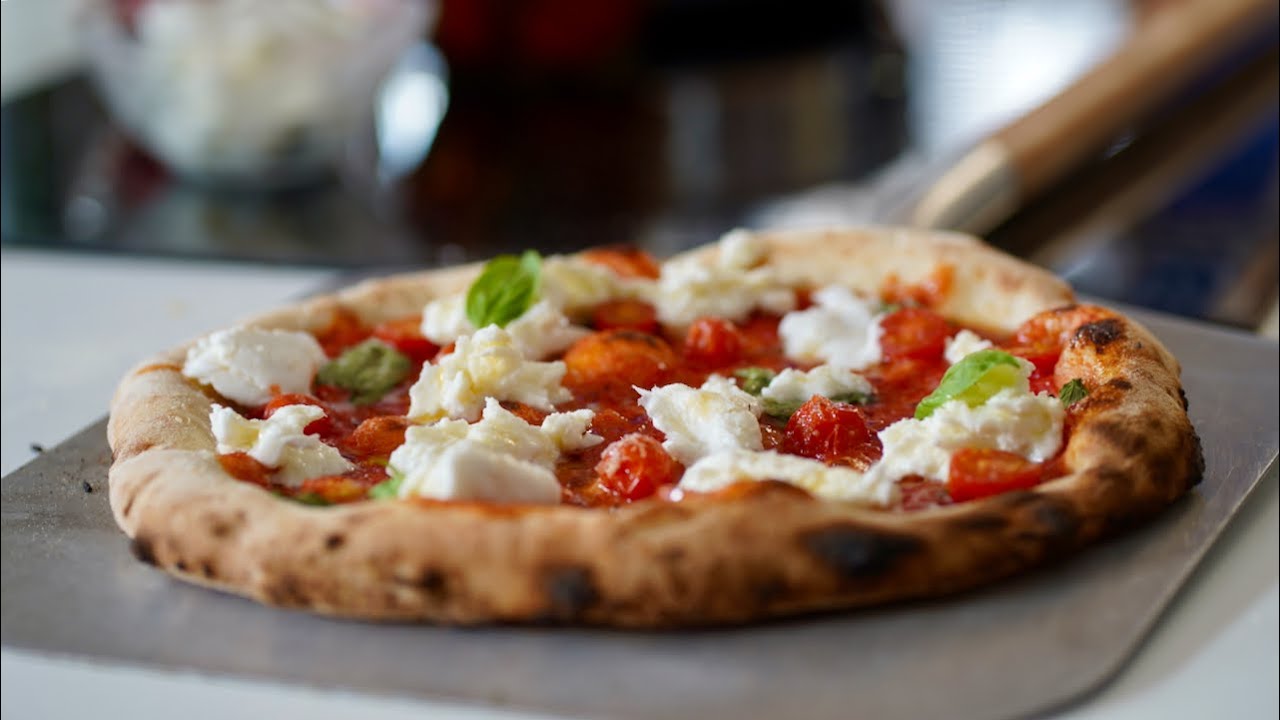
The goal is a round (or somewhat round!) shape about 10-12 inches in diameter with a puffy outer rim. Even if it’s not perfect, homemade pizzas always taste better with a little rustic character.
How to Ferment Dough for Extra Flavor
Want to take your pizza from great to mind-blowingly delicious? Let’s talk fermentation — the secret weapon of pizza masters.
Cold Fermentation Method
Instead of rushing the rise at room temperature, pop your dough into the fridge.
- Place the dough in a covered container or zip-lock bag.
- Let it rest in the fridge for 24 to 72 hours.
The cool temperature slows down the yeast, allowing complex flavors to develop over time. It also improves the texture, making the crust lighter, chewier, and more flavorful.
When you’re ready to bake, just take the dough out and let it come back to room temperature (about 2 hours) before shaping.
Benefits of Long Fermentation
- Enhanced Flavor: Cold fermentation gives the dough a slightly tangy, rich flavor — almost like sourdough.
- Better Texture: You’ll get those glorious, airy holes in the crust.
- Ease of Use: Fermented dough is more relaxed and easier to shape.
In Italy, many pizzaiolos swear by long fermentation — it’s part of what makes their pies so memorable!
Tips for Baking the Perfect Pizza
Alright, you’ve shaped and fermented like a pro. Now, let’s make sure your pizza bakes up to its full glorious potential.
Oven Temperatures
The secret to pizza’s signature crispy-yet-tender texture is an insanely hot oven.
- Preheat your oven to the highest temperature possible — usually 500°F (260°C) or more.
- If you’re lucky enough to have a pizza oven, heat it to around 800°F (425°C).
High heat gives you that crispy bottom and beautiful leopard-spotted crust without drying everything out.
Using a Pizza Stone or Steel
Investing in a pizza stone or steel is a game-changer.
- Place your stone or steel in the oven during preheating.
- Launch your pizza onto the hot surface to mimic a traditional brick oven.
No stone? No problem! You can use an inverted baking sheet, though it won’t hold heat as efficiently.
Bonus tip: sprinkle a little semolina flour or cornmeal on your peel or tray before launching to prevent sticking.
Common Mistakes and How to Avoid Them
Even seasoned home cooks sometimes stumble on the path to pizza perfection. Here’s how to dodge the biggest landmines:
Overworking vs. Underworking the Dough
- Overworked Dough: Becomes tough and chewy. If you knead too much, let it rest longer before shaping.
- Underworked Dough: Tears easily and lacks structure. Make sure you knead it enough to develop gluten.
Misjudging Proofing Times
- Dough that’s under-proofed will shrink back when you try to stretch it.
- Dough that’s over-proofed may collapse or become too sticky.
The perfect dough is springy yet pliable, with tiny bubbles just beneath the surface.
FAQs about Italian Pizza Dough Recipe
1. What is the secret to authentic Italian pizza dough?
The secret lies in using high-quality ingredients like Tipo 00 flour, allowing a long fermentation time, and kneading the dough until it’s silky smooth. Patience is key!
2. Can I use all-purpose flour instead of Tipo 00 flour?
Yes, you can substitute all-purpose flour, but Tipo 00 flour gives a lighter, softer, and more authentic Italian texture.
3. How long should I let the pizza dough rise?
For the best flavor and texture, let your dough rise for at least 8 to 24 hours in the refrigerator. A slow, cold fermentation develops the best taste.
4. Can I freeze homemade pizza dough?
Absolutely! After the first rise, portion the dough, wrap it tightly, and freeze. It will stay fresh for up to 3 months.
5. Why is my pizza dough not stretching properly?
If your dough resists stretching, it likely needs more rest. Cover it and let it sit at room temperature for 15–30 minutes to relax the gluten.
6. Should I use a pizza stone or a baking sheet?
A pizza stone or steel is ideal for achieving a crispy, restaurant-quality crust. However, a well-preheated baking sheet can also work in a pinch.
Conclusion
Making authentic Italian pizza dough at home isn’t just about cooking — it’s about connecting to a centuries-old tradition of love, family, and community. With just a few simple ingredients and a little practice, you can create pizzas that rival those of a true Neapolitan pizzeria. Remember: good pizza isn’t about perfection — it’s about passion.
Your homemade pizza might not look exactly like the ones in Italy on your first try, but every pie you make is a delicious step closer. Flour your counter, roll up your sleeves, and enjoy the beautiful, messy, joyful journey of mastering pizza dough. Buon appetito!