Italian Cream Cake Recipe: Despite what its name suggests, the Italian Cream Cake is actually a Southern U.S. creation rather than an Italian dessert. It’s a cherished staple at Southern celebrations, from birthdays and anniversaries to holidays like Thanksgiving and Christmas. With its dense yet moist texture, hints of coconut and pecans, and rich cream cheese frosting, it delivers a decadent bite with every forkful.
The cake’s origin story isn’t completely clear, but food historians suggest that the “Italian” name comes from its inclusion of coconut, which was once considered an exotic ingredient, and the technique of using buttermilk in the batter—a Southern classic. The marriage of textures and flavors has stood the test of time, becoming a passed-down favorite across generations.
You’ll often find it as a centerpiece dessert on a Sunday dinner table in the South or even as a wedding cake in rustic-themed receptions. Its classic appeal and show-stopping presence make it a timeless delight.
Why It’s a Crowd Favorite
Italian Cream Cake ticks all the boxes for a show-stopping dessert. It’s fluffy but rich, sweet but not overpowering, and the cream cheese frosting ties everything together in a silky, tangy ribbon of goodness. What really sets it apart is its unique blend of shredded coconut and chopped pecans inside the layers, adding delightful texture to every bite.
Here’s why people can’t get enough:
- It’s got layers—literally. Multiple moist cake layers with frosting in between.
- That irresistible frosting: sweet, tangy, creamy.
- A perfect contrast between soft cake and crunchy nuts.
- It looks fancy but is totally doable in a home kitchen.
Whether you’re baking for family, a party, or just because—this cake wins hearts every time.
Key Ingredients and Tools
Essential Ingredients for the Cake Batter
The foundation of a great Italian Cream Cake lies in its batter. You’ll need the right blend of ingredients to get the perfect balance of moisture, flavor, and structure.
Here’s what you’ll need:
- All-purpose flour – Provides structure.
- Granulated sugar – Sweetens the batter.
- Butter – Adds richness.
- Vegetable oil – Contributes to the moist texture.
- Eggs – Provide lift and binding.
- Buttermilk – The acid reacts with baking soda to make the cake tender.
- Baking soda – Helps the cake rise.
- Shredded sweetened coconut – Adds flavor and moisture.
- Chopped pecans – Provide crunch and a nutty note.
- Vanilla extract – Rounds out the flavor.
Use high-quality ingredients—especially fresh eggs, real butter, and pure vanilla extract—for the best results. Avoid skimping on the buttermilk; its acidity is key for a tender crumb.
Ingredients for the Cream Cheese Frosting
This frosting is a huge part of what makes Italian Cream Cake iconic. It should be creamy, slightly tangy, and sweet without being cloying.
What you’ll need:
- Cream cheese (full-fat, softened) – The base of the frosting.
- Unsalted butter (softened) – Adds creaminess.
- Powdered sugar – Sweetens and thickens.
- Vanilla extract – Adds depth.
- A pinch of salt – Balances the sweetness.
Optional:
- Heavy cream or milk – For thinning the frosting if needed.
Make sure both cream cheese and butter are at room temperature before mixing to avoid lumps. Beat the frosting until it’s light and fluffy—this gives it that luxurious texture everyone loves.
Tools and Equipment You’ll Need
Having the right tools makes baking smoother and more enjoyable. Here’s what you should have on hand:
- Stand mixer or hand mixer – For mixing batter and frosting.
- Three 9-inch round cake pans – To create those beautiful layers.
- Parchment paper – To line the pans and prevent sticking.
- Cooling racks – For proper air circulation as cakes cool.
- Offset spatula – For easy frosting application.
- Mixing bowls – Several, for dry and wet ingredients.
- Rubber spatula – For scraping down the bowl.
- Measuring cups and spoons – For accuracy.
- Serrated knife – Optional, for leveling the cake layers.
Now that we’ve got our tools and ingredients ready, let’s move on to prepping your space and understanding a few tricks that’ll make this bake a breeze.
Preparation Tips Before You Begin
Room Temperature Ingredients Matter
You might be tempted to pull your ingredients straight from the fridge and jump into mixing, but here’s a pro tip: don’t skip letting them come to room temperature. Why? Because room temp ingredients mix more evenly, trap more air during beating (especially eggs and butter), and give you a fluffier, more uniform cake texture. Cold eggs can cause the batter to seize or curdle, while cold butter doesn’t cream properly with sugar—resulting in a dense, heavy crumb.
Here’s what you should bring to room temperature before you begin:
- Butter
- Cream cheese
- Eggs
- Buttermilk
Take them out of the fridge at least 30–45 minutes before you start. If you’re in a rush, place your eggs in warm (not hot!) water for 5–10 minutes or cut butter into small chunks to speed things up. For buttermilk, a quick microwave zap (about 10 seconds) can help.
Trust me, this simple step makes a massive difference in your final cake’s texture and flavor.
Prepping Your Baking Tools and Space
Now that your ingredients are set, let’s talk about the environment. Having a clutter-free, well-organized space can turn baking from stressful to joyful.
Here’s a quick checklist before diving into mixing and baking:
- Preheat the oven to 350°F (175°C). You want that perfect heat ready for an even bake.
- Grease and flour your cake pans. Or use parchment rounds on the bottom with nonstick spray on the sides.
- Chop your pecans and measure out your coconut. It saves time mid-mix.
- Sift the dry ingredients (flour, baking soda). This prevents clumps and gives you a lighter cake.
- Set out your tools in the order you’ll need them.
Don’t forget to clean as you go. Having a clean counter to place hot cake pans or finished frosting keeps your rhythm going. And yes, setting out your cooling racks before you need them? Total lifesaver.
Getting the setup right means less mess and less stress—so when it’s time to frost and serve, you’re cool, calm, and ready to shine.
Step-by-Step Instructions for the Cake Layers
Mixing the Perfect Batter
Okay, time to get into the action. Here’s the key: you want a smooth, thick batter that holds all that delicious texture from the coconut and pecans without being overly heavy. Follow these steps:
- Cream butter, oil, and sugar – Beat the softened butter, oil, and granulated sugar together on medium speed until light and fluffy—about 4-5 minutes. This step helps incorporate air for that dreamy texture.
- Add eggs one at a time – Mixing well after each addition. Scrape the sides to keep it all consistent.
- Add vanilla extract – Stir in that rich, warm aroma.
- Alternate flour and buttermilk – Begin with a third of the dry ingredients, then add half the buttermilk. Repeat, ending with flour. This prevents overmixing and keeps the batter silky.
- Fold in coconut and pecans – Gently stir them in with a spatula. You want even distribution without deflating the batter.
Don’t overmix. Once the flour disappears, stop. Overworking the batter can lead to a tough cake, and we’re going for tender and moist.
Your batter should be thick but pourable, with visible shreds of coconut and pecan pieces throughout. If it’s too stiff, a splash more buttermilk can help. If it’s too runny, double-check your flour measurements.
Baking the Cake to Perfection
Time to transform batter into beautiful golden layers. Pour the batter evenly into your prepared cake pans. Give each pan a little tap on the counter to eliminate air bubbles. Here’s what to do next:
- Bake at 350°F (175°C) for about 25–30 minutes. Check doneness with a toothpick inserted in the center—it should come out clean or with just a few moist crumbs.
- Rotate pans halfway through for an even bake if your oven has hot spots.
- The tops should be lightly golden, slightly springy, and pulling away from the edges of the pan.
Pro tip: don’t open the oven door too early. Wait until at least 20 minutes have passed. Opening too soon can cause the cakes to sink.
Cooling and Handling the Cake Layers
Once baked, let the layers cool in the pans for about 10 minutes. Then gently run a knife around the edges and turn them out onto wire racks. Let them cool completely before frosting.
Resist the urge to frost a warm cake—it’ll melt your beautiful frosting and make a mess. Want cleaner layers? Wrap the cooled layers in plastic wrap and refrigerate for an hour before assembling.
If needed, level the tops with a serrated knife so you get a flat surface for stacking. Don’t throw away the trimmings—taste-testing is a baker’s right!
Making the Cream Cheese Frosting
Achieving a Smooth and Creamy Texture
This frosting is pure magic. Tangy cream cheese meets buttery richness and just the right amount of sweetness. The key? Beat it well—but not too well. Here’s how:
- Beat softened cream cheese and butter together on medium speed until fully blended and smooth (about 3–5 minutes). No lumps allowed!
- Gradually add powdered sugar – One cup at a time, beating slowly to avoid sugar clouds. Scrape the bowl as you go.
- Add vanilla and a pinch of salt – These balance the flavor.
- Optional: Add a splash of cream or milk – For a slightly softer consistency if needed.
The final frosting should be creamy, thick enough to spread but soft enough to glide. If it feels runny, chill it for 15–20 minutes.
Avoid overbeating once sugar is added—it can make the frosting too airy or cause it to lose structure. And always taste as you go!
Tips for Sweetness and Consistency
- Want it less sweet? Start with less powdered sugar and taste after each addition.
- Need it stiffer? Add more powdered sugar, one tablespoon at a time.
- Too thick to spread? Add a splash of milk or cream.
Store leftover frosting in the fridge for up to a week—just rewhip it before using again. This frosting also doubles as a dip for fruit, graham crackers, or, let’s be honest… a spoon.
Assembling and Decorating the Cake
Layering and Filling with Frosting
Now that your cake layers are baked, cooled, and your frosting is ready, it’s time for the fun part—assembling your masterpiece. This is where your Italian Cream Cake transforms from tasty to stunning.
Here’s a step-by-step guide to build a perfect layer cake:
- Start with a cake board or serving plate. Place a dollop of frosting in the center to anchor the bottom layer.
- Place your first cake layer. Make sure it’s level. If needed, use a serrated knife to trim the top.
- Spread a thick, even layer of cream cheese frosting over the first layer using an offset spatula. Aim for about ¾ cup of frosting, spread to the edges.
- Repeat with the second layer. Carefully stack it, frost again.
- Top it off with the third layer. Press gently to settle the layers evenly.
- Apply a thin crumb coat. This is a very light layer of frosting that seals in crumbs and makes final decorating easier. Chill the cake for 20 minutes afterward.
- Finish with a final layer of frosting. Cover the top and sides smoothly. Don’t worry about perfection—it’s homemade charm!
Use a bench scraper or offset spatula to smooth out the sides. If you want texture, swirl the frosting for a rustic look.
At this point, your cake is ready to serve—but why stop here? Let’s dress it up.
Decorating Tips and Techniques
Decorating is where you can get creative. Whether you want to keep it classic or go all out, here are a few fun and simple ways to elevate your cake:
Classic Finish:
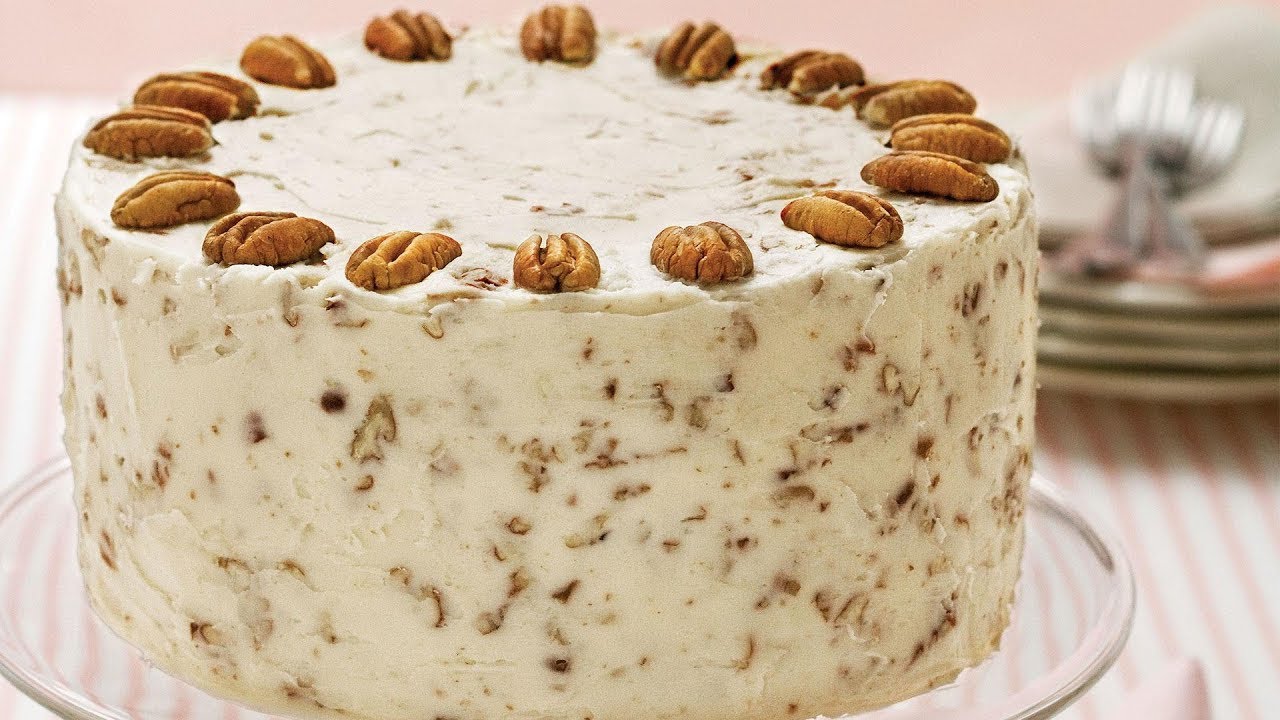
- Press chopped pecans onto the sides for that signature Italian Cream Cake look.
- Add a simple swirl or rosette pattern on top with a piping bag.
- Garnish the top with toasted coconut or whole pecans arranged in a circle.
Fancier Touches:
- Use a rotating cake turntable for smoother frosting and decoration.
- Add a drizzle of caramel or white chocolate for a gourmet touch.
- Fresh edible flowers or gold leaf can make it celebration-ready.
Rustic Vibe:
- Skip the piping and go for a smooth or swirled finish with an offset spatula.
- Sprinkle the top with crushed pecans and coconut for a “naked” cake style.
Decorating doesn’t have to be complicated—just have fun with it! The most important part? It should look delicious and make you proud to serve it.
Serving Suggestions and Storage Tips
Best Ways to Slice and Serve
Presentation counts, and cutting your Italian Cream Cake cleanly ensures every slice looks as good as it tastes. Here’s how to do it:
- Chill the cake for 30 minutes before slicing. This firms up the frosting for cleaner cuts.
- Use a long, serrated knife. Dip it in hot water and wipe clean between slices.
- Cut with confidence. Start by slicing straight down into the center, then work your way out in wedges.
You can serve each slice with:
- A dollop of whipped cream
- Fresh berries for a tart contrast
- A scoop of vanilla ice cream if you’re feeling indulgent
Want to wow your guests? Serve on a pretty dessert plate with a drizzle of chocolate or berry coulis on the side.
How to Store for Freshness
Italian Cream Cake stores beautifully if done right. Here’s how to keep it fresh and fabulous:
- At room temperature: If it’s not too warm (under 70°F/21°C), it can sit out for up to 6 hours covered with a cake dome.
- In the fridge: Store it in an airtight container or wrap it tightly with plastic wrap. It’ll stay fresh for 4–5 days.
- In the freezer: Yes, you can freeze it! Wrap individual slices or the entire cake tightly in plastic and foil. Freeze for up to 2 months. Thaw overnight in the fridge.
Pro tip: If freezing the cake unfrosted, wrap the layers well and frost after thawing for a just-baked feel.
Proper storage not only keeps the cake tasting amazing but also helps maintain that beautiful texture. So even if you’re baking ahead for a party or holiday, you’ll still wow your crowd when it’s time to serve.
Variations and Substitutes
Gluten-Free and Vegan Alternatives
Love Italian Cream Cake but have dietary restrictions? No worries. Here’s how to tweak the recipe while keeping it delicious.
For Gluten-Free Cakes:
- Use a high-quality gluten-free 1:1 flour blend (with xanthan gum if not already included).
- Double-check that your baking powder and other ingredients are certified gluten-free.
For Vegan Cakes:
- Replace eggs with a mixture of applesauce (¼ cup per egg) or flaxseed eggs (1 tbsp flaxseed meal + 3 tbsp water per egg).
- Use plant-based butter and vegan cream cheese for the frosting.
- Swap buttermilk with non-dairy milk + 1 tbsp vinegar or lemon juice.
Even with these changes, you’ll get a rich, moist, flavorful cake—perfect for everyone at the table.
Flavor Enhancements and Add-ins
Want to give your cake a unique spin? Try these simple tweaks:
- Add crushed pineapple for a tropical twist.
- Swap pecans for walnuts or almonds for a new flavor profile.
- Use brown butter in the frosting to add depth and nutty richness.
- Sprinkle a little cinnamon or nutmeg into the batter for cozy warmth.
You can also turn this cake into:
- Cupcakes – Adjust the baking time to 18–20 minutes.
- Sheet cake – Use a 9×13 pan and bake for 35–40 minutes.
- Mini cakes – Great for parties or gifting.
With the right creativity, this recipe becomes the perfect base for your next signature dessert.
Common Mistakes to Avoid
Overmixing and Overbaking
Even seasoned bakers sometimes fall into these two common traps: overmixing the batter and overbaking the cake. Both can seriously affect the texture and flavor of your Italian Cream Cake.
Overmixing: When you beat your batter too much—especially after adding the flour—you develop excess gluten. This results in a dense, chewy cake instead of the light and tender crumb you’re aiming for.
To avoid overmixing:
- Mix just until the flour disappears into the wet ingredients.
- Fold in the coconut and pecans gently by hand with a spatula.
- Avoid using high speeds on your mixer once the dry ingredients are added.
Overbaking: An overbaked Italian Cream Cake is dry, crumbly, and just not as enjoyable. Remember, ovens vary, so bake times are estimates.
To prevent overbaking:
- Always preheat your oven.
- Check the cake at the minimum suggested baking time.
- Use a toothpick test: a few moist crumbs are fine, but no wet batter.
- Don’t rely solely on time—watch for visual cues like golden edges and a springy top.
Set a timer and keep an eye on your layers. Precision here makes the difference between good and amazing.
Incorrect Frosting Application
The cream cheese frosting is the star, so handling it properly is key. One of the most common mistakes? Frosting a warm or uneven cake.
Here’s how to get it right:
- Cool completely: If the cake is even slightly warm, the frosting will melt, slide off, or soak into the cake.
- Apply a crumb coat first: This thin initial layer locks in crumbs and gives you a smoother final finish.
- Use the right tools: An offset spatula gives better control and helps spread frosting evenly.
- Chill between layers: After applying the crumb coat or between layers, chill the cake briefly to firm everything up.
And don’t overload the frosting. Rich as it is, too much can overpower the cake itself. A generous but balanced layer will do the trick.
With these pitfalls in mind, your cake will not only taste divine—it’ll look like it came from a bakery.
Nutritional Information and Caloric Breakdown
Calories per Slice
Let’s be real: Italian Cream Cake isn’t a “light” dessert—but hey, it’s worth every bite. That said, if you’re curious or keeping track, here’s a general idea of what you’re getting per slice (based on 12 servings from a 9-inch triple-layer cake).
- Calories: ~650–750
- Total fat: 40–45g
- Saturated fat: 20–25g
- Carbohydrates: 70–80g
- Sugars: 55–65g
- Protein: 6–8g
The calorie count can vary depending on portion size and how much frosting is used. Reducing sugar in the frosting or using light cream cheese can shave off a few calories without sacrificing too much flavor.
Macronutrient Content
Here’s a rough macronutrient breakdown for a standard slice:
| Nutrient | Approximate Amount |
|---|---|
| Carbohydrates | 75g |
| Sugars | 60g |
| Fats | 42g |
| Saturated Fats | 23g |
| Proteins | 7g |
| Fiber | 2g |
| Sodium | 300–400mg |
This isn’t a low-carb or diet food, but it’s a beautiful indulgence for special occasions. And if you use it as a celebratory treat rather than an everyday snack, it fits just fine in a balanced lifestyle.
You can also lighten it up:
- Use Greek yogurt instead of butter in the batter.
- Try a whipped cream cheese frosting instead of the classic.
- Swap out sugar for a lower-calorie sweetener (be careful with ratios).
Whatever your choice, the key is to enjoy each bite—mindfully and with joy.
FAQs about Italian Cream Cake Recipe
1. What are the key ingredients in an Italian Cream Cake?
Italian Cream Cake typically includes flour, sugar, eggs, baking soda, buttermilk, butter, coconut, and pecans. The frosting is usually made from cream cheese, butter, powdered sugar, and vanilla extract.
2. How do you ensure the cake is moist and fluffy?
To keep the cake moist and fluffy, make sure your ingredients like butter and eggs are at room temperature before mixing. Also, gently fold in the dry ingredients to maintain air in the batter, and don’t overmix.
3. Can I make Italian Cream Cake in advance?
Yes, you can bake the cake layers a day in advance. Wrap them well in plastic wrap and store at room temperature. Frost the cake on the day you plan to serve it to keep it fresh and creamy.
4. Are there any common substitutions that work well in this recipe?
You can substitute walnuts for pecans, or use half-and-half instead of buttermilk. For a lighter frosting, some prefer using mascarpone instead of cream cheese.
5. How should I store the leftover cake?
Store any leftover cake in an airtight container in the refrigerator. It will keep for up to a week. Allow the cake to come to room temperature before serving for the best flavor.
6. Is Italian Cream Cake suitable for nut allergies?
Since this cake traditionally includes pecans, it’s not suitable for those with nut allergies. However, you can omit the nuts or use a nut-free alternative like seeds for a similar texture.
Conclusion
It might seem intimidating with all the steps, but once you try it, you’ll see how manageable—and satisfying—it really is. With a little prep, patience, and creativity, you can turn out a cake that’s both beautiful and delicious.
So whether you’re baking it for a special occasion, gifting it to a friend, or just treating yourself because you deserve it—Italian Cream Cake will always deliver that “wow” factor.
Give it a try, share it with loved ones, and don’t forget to enjoy the process as much as the result. Happy baking!