Hot Fudge Recipe: Let’s be honest, there’s something magical about warm, rich hot fudge slowly drizzling over a scoop of vanilla ice cream. But if you’ve only ever tried store-bought versions, you’ve only scratched the surface. Making hot fudge from scratch transforms a simple treat into a gourmet experience. Homemade hot fudge is creamier, richer, and more customizable. It doesn’t have that artificial aftertaste you sometimes get from bottled sauces—and there’s no long list of unpronounceable preservatives.
When you make hot fudge at home, you control everything: the sweetness, the texture, the type of chocolate. Prefer dark chocolate over milk chocolate? Want to use coconut cream instead of heavy cream? Go for it. The freedom to tweak the recipe makes all the difference, and you’ll end up with a sauce that matches your taste perfectly.
Also, there’s something heartwarming about crafting a recipe from scratch. It brings that “made with love” element to every dessert. And honestly, once you try your own batch of rich, velvety hot fudge, you’ll never want to go back to the store-bought stuff.
A Brief History of Hot Fudge
Believe it or not, hot fudge sauce has a story. This decadent dessert topping made its first appearance in American ice cream parlors around the early 1900s. Ice cream sundaes were already wildly popular, and adding warm chocolate sauce took the indulgence to a whole new level.
The original recipes were relatively simple: a mix of chocolate, cream, sugar, and butter—much like what we’ll be making in this guide. Over the decades, hot fudge became a staple in diners and dessert shops, especially when poured generously over a “hot fudge sundae.”
Interestingly, it became a symbol of Americana—served during celebrations, parties, and even as comfort food. Today, it remains a nostalgic treat for many, and making it yourself is like stepping back into a simpler, sweeter time.
Ingredients Needed for Classic Hot Fudge
High-Quality Chocolate Choices
The star of this show is, without a doubt, the chocolate. And trust me, not all chocolate is created equal. For the best hot fudge, go for high-quality chocolate bars or chips with a cocoa content of at least 60% if you like a deeper, more complex flavor. Semi-sweet or dark chocolate gives a nice balance between bitter and sweet, but if you’ve got a sweeter tooth, you can blend in a bit of milk chocolate too.
Avoid cheap chocolate with waxy fillers or additives. You’ll taste the difference instantly. Brands like Ghirardelli, Lindt, or even baking chocolate from Trader Joe’s are excellent picks. If you’re a true chocolate snob, a high-end couverture chocolate will give you that luxurious, glossy finish that clings to ice cream just right.
Want to make it fun? Mix two kinds of chocolate: a dark bar for richness and a bit of milk chocolate to smooth it out. The complexity of flavor will blow your mind.
Other Essential Pantry Staples
Besides chocolate, the ingredients are super simple and probably already in your pantry:
- Unsalted butter: Adds a rich, silky texture and helps bind the sauce.
- Heavy cream: Gives it that luscious, velvety thickness. Don’t skimp with milk.
- Granulated sugar: Sweetens and balances the bitterness of the chocolate.
- Unsweetened cocoa powder: Intensifies the chocolate flavor and adds depth.
- Vanilla extract: Enhances the overall flavor and adds a comforting aroma.
- Salt: Just a pinch helps round out the flavors and balance the sweetness.
These basic ingredients, when handled right, turn into something magical. And yes, substitutions are possible—but more on that later!
Tools You’ll Need
Kitchen Equipment Checklist
Good news: you don’t need any fancy gadgets to whip up hot fudge. A few basic kitchen tools will do just fine:
- Medium saucepan: For melting and mixing your ingredients over gentle heat.
- Whisk or silicone spatula: For stirring continuously and avoiding lumps.
- Measuring cups and spoons: Accuracy is key for balance in flavor and consistency.
- Heat-resistant spoon or ladle: To transfer the hot fudge when it’s done.
If you’ve got these, you’re already halfway there.
Optional Tools for Extra Precision
Want to get extra precise or professional? These tools are optional but handy:
- Candy thermometer: Helps if you’re a perfectionist who wants to reach the ideal temperature without overcooking.
- Glass jar or airtight container: For storing your leftover hot fudge (if you have any).
- Fine mesh sieve: In case you want an ultra-smooth sauce by straining it before cooling.
Having the right tools makes the process smoother (pun intended), but don’t worry—this recipe is totally doable even with just the basics.
Preparing Before You Start
Measuring and Organizing Ingredients
Here’s a hot tip (literally): prep everything before you turn on the stove. This simple step—called “mise en place” in chef lingo—saves a ton of stress later. Measure out your chocolate, slice your butter, pour your cream, and have your vanilla and salt ready to go.
Why? Because once things start heating up, you’ll need to act fast. You don’t want to be fumbling with measuring spoons while your chocolate scorches. Plus, having everything in little bowls or containers just makes you feel like a pro.
Also, check your chocolate—if it’s in large chunks, chop it up so it melts evenly. Big chunks = slow melt = uneven sauce.
Safety Tips in the Kitchen
Even though this is a fun and relatively easy recipe, safety first, always:
- Don’t walk away: Hot fudge can go from smooth to scorched in a heartbeat.
- Keep your stove on medium heat: High heat will ruin your chocolate and create a gritty texture.
- Use oven mitts when handling hot pans or transferring the sauce into jars.
- Clean spills immediately: Chocolate sauce can be sneaky and slippery.
A calm, organized kitchen is a happy kitchen—especially when chocolate’s involved.
How to Make Hot Fudge – Step by Step Guide
Step 1 – Melting the Butter and Chocolate
Let’s get cooking! Start by placing your saucepan over medium-low heat. Add the butter and chopped chocolate. Stir gently but constantly until the chocolate is fully melted and smooth. This is your base, so take your time and make sure it doesn’t scorch.
The key here is gentle heat. Too hot, and your chocolate will seize or burn. Stir with love, and don’t rush it. Once it’s smooth and shiny, you’re ready for the next step.
Step 2 – Mixing in the Sugar and Cocoa Powder
Once your chocolate and butter are silky smooth, it’s time to layer in more flavor. Add the granulated sugar and cocoa powder gradually, stirring as you go. This step thickens the mixture and enhances the deep chocolate flavor. Don’t just dump it in all at once—sprinkle slowly to avoid lumps.
As you mix, the sugar will start to dissolve, creating that glossy texture we all love. Keep your heat steady and moderate. If it gets too hot, your mixture can become gritty. A little patience here pays off in creamy gold.
Also, using a fine cocoa powder makes a huge difference. Dutch-processed cocoa is especially good because it has a smoother, mellow flavor. This stage gives your hot fudge its body—thicker than syrup, thinner than ganache. Just right.
Pro tip: If the mixture starts looking grainy, add a splash of cream early to help it blend smoothly. But don’t worry—we’re adding more of that in the next step!
Step 3 – Adding Cream and Simmering
Now comes the magic touch: heavy cream. Pour it in slowly while stirring continuously. The mixture will instantly begin to loosen up, turning from a thick paste into a rich, glossy sauce. Bring it to a gentle simmer—don’t boil!
Simmering for about 4–5 minutes allows everything to meld beautifully. It’s also what gives hot fudge its signature texture: thick, luscious, and pourable. If you want it thicker, simmer for an extra minute or two. For thinner fudge, add a splash more cream.
Stir constantly during this step. This keeps the sauce smooth and prevents scorching. You’ll notice the sauce becoming glossier and thicker as it heats.
Optional twist? Try infusing your cream beforehand with a cinnamon stick or orange zest for a unique spin. Just strain it before adding to the pot.
And yes, this is the point where your kitchen starts smelling like heaven.
Step 4 – Stirring in Vanilla and Salt
The final flavor lift comes from two tiny—but mighty—ingredients: vanilla and salt. As soon as you remove the saucepan from heat, stir in your vanilla extract and a pinch of salt.
Why wait until the end? Vanilla is delicate and can lose its flavor if cooked too long. Salt, on the other hand, enhances the chocolate’s richness and balances the sweetness.
Don’t skip the salt, even if you’re tempted. It’s the unsung hero of this recipe, rounding out the flavors and taking your hot fudge from good to great.
This is also the moment to taste and tweak. Want more sweetness? A touch of honey or maple syrup can do wonders. Want it more bitter? Stir in an extra tablespoon of cocoa.
Once everything is mixed in and tasting heavenly, let it sit for a minute before serving—or cool slightly for a thicker drizzle.
Step 5 – Final Touches and Cooling
Before you start pouring your masterpiece over everything in sight, let’s talk final touches. If you want your hot fudge ultra-smooth, you can strain it through a fine mesh sieve. Totally optional—but worth it if you’re going for that glossy, restaurant-level finish.
Let it cool slightly before serving. As it cools, the sauce will thicken a bit. This makes it perfect for spooning over ice cream or swirling into milkshakes.
Want it pourable again later? Just reheat gently. A quick zap in the microwave or a slow warm-up on the stove with a splash of cream will bring it back to life.
You can store any leftovers (if there are any!) in a sealed jar in the fridge for up to 2 weeks. It also makes an amazing edible gift—pour it into a mason jar, add a cute label, and boom: instant crowd-pleaser.
Texture and Flavor Tips
How to Get the Perfect Thickness
Texture can make or break your hot fudge game. If it’s too runny, it slides off your dessert. Too thick, and it turns into a chocolate blob. The perfect texture? A silky, slow-moving ribbon of fudge that holds its shape slightly when poured.
Getting that balance starts with the cream-to-chocolate ratio. More cream = thinner sauce. More chocolate and cocoa = thicker fudge. Want to tweak it? Add cream little by little until you hit that sweet spot.
Simmering is also key. A longer simmer evaporates water, which thickens your sauce. But don’t go overboard—if you simmer too long, it can turn dense and chewy.
Another trick? Corn syrup. Just a teaspoon can improve texture without adding flavor. It prevents sugar crystallization, keeping your sauce smooth and glossy. It’s optional, but a nice hack if you’re making a large batch or want professional-level shine.
And here’s a fun tip: if your hot fudge feels grainy, it may be the sugar or cocoa powder not fully dissolving. Use fine sugar, sift your cocoa, and stir like you mean it!
Adjusting Sweetness and Flavor
Not everyone has the same sweet tooth. Maybe you love super-rich chocolate, or maybe you’re more of a “mild and milky” fan. The beauty of homemade hot fudge is that you’re the boss.
Too sweet? Balance it with a little espresso powder or extra cocoa. Too bitter? Stir in some brown sugar or even a dab of honey. You can also balance richness with a splash of citrus zest, almond extract, or peppermint oil for a seasonal twist.
Want to kick it up a notch? Add a pinch of cayenne or chili powder. The heat pairs surprisingly well with dark chocolate. Or for adults-only fudge, try a splash of bourbon, rum, or coffee liqueur. Just remember, a little goes a long way.
Bottom line: taste as you go and adjust to your liking. Hot fudge is personal. Make it yours.
Serving Suggestions
Classic Ways to Serve Hot Fudge
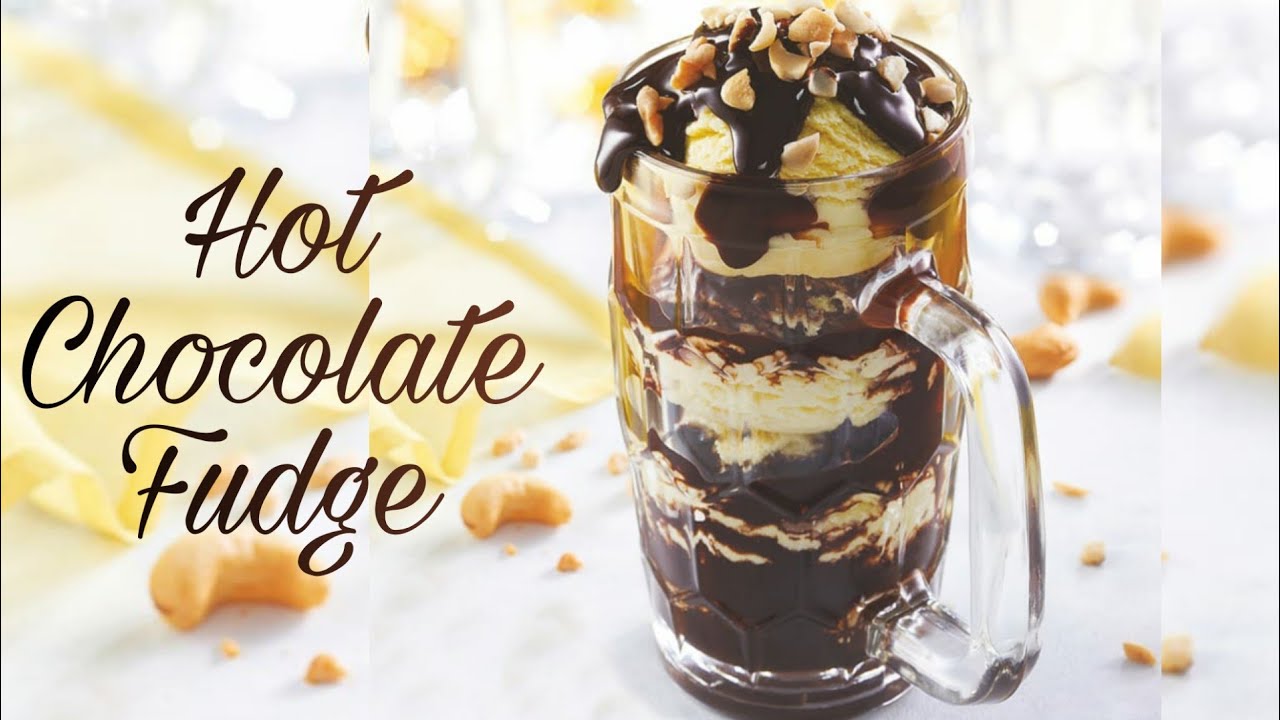
Let’s be real—there’s no wrong way to enjoy hot fudge. But some classics are iconic for a reason. First up: the hot fudge sundae. Scoop vanilla ice cream, pour warm fudge over the top, add whipped cream, crushed nuts, and a cherry. Heaven in a bowl.
Next, banana splits. Layer banana slices, scoops of your favorite ice creams, and hot fudge for a nostalgic treat that’s both retro and irresistible.
Ever tried hot fudge on brownies? Oh man. A warm brownie, a scoop of vanilla ice cream, and a generous drizzle of fudge = pure indulgence. Or keep it simple and pour it over pancakes or waffles for a decadent brunch.
Another fave? Dipping strawberries, bananas, or marshmallows in warm fudge. Set up a DIY dessert fondue station for your next party. It’s always a hit.
Creative Dessert Pairings
If you’re feeling adventurous, hot fudge can jazz up more than just ice cream. How about a hot fudge milkshake? Blend it into your favorite ice cream and milk for a rich, chocolatey drink.
Or make a hot fudge lava cake by pouring some into cupcake molds, freezing it, then baking inside cake batter for a gooey surprise center.
Pair it with cheesecake, bread pudding, or even Greek yogurt for contrast. And if you’re into salty-sweet, drizzle it over a bowl of popcorn or pretzels. Seriously—don’t knock it ‘til you try it.
Hot fudge is basically chocolate’s version of liquid gold. Whatever you put it on instantly becomes ten times better.
Storing and Reheating Hot Fudge
Best Storage Practices
Once you’ve whipped up a glorious batch of hot fudge, the next question is: how do you keep it tasting fresh and luscious? Good news—it stores like a dream if you do it right.
Let the fudge cool completely before storing. Pour it into an airtight container or a glass mason jar with a tight-fitting lid. Keep it in the refrigerator, and it will last up to 2 weeks without losing flavor or texture.
Make sure the container is clean and dry before pouring in the fudge. Moisture can mess with the texture and lead to crystallization. A quick wipe-down of your jar can make all the difference.
Also, try not to double-dip with your spoon. Each time you dip, you’re potentially adding bacteria, which shortens shelf life. Instead, spoon out what you need into a smaller dish before serving.
Label the container with the date it was made—especially if you’re making multiple batches or gifting some. Trust me, two weeks fly by when you have hot fudge calling your name from the fridge.
How to Reheat Without Ruining the Texture
Reheating hot fudge is super easy, but there’s a right way and a wrong way. The goal is to warm it just enough to get it back to that perfect pourable consistency without burning or separating it.
Here are your best options:
- Microwave Method: Spoon some into a microwave-safe bowl and heat in 10-15 second bursts, stirring in between until smooth. Don’t overdo it—chocolate burns fast in the microwave.
- Stovetop Method: Place the jar (or a portion) in a saucepan filled with warm water, like a DIY double boiler. Stir gently until it’s warmed through.
- Direct Heat: You can also reheat it directly in a small saucepan on low heat. Stir constantly and add a splash of cream if needed to loosen it up.
Avoid boiling it or overheating—this will change the texture and might cause it to seize or turn grainy. Keep it gentle and patient, just like when you first made it.
Common Mistakes to Avoid
Overcooking or Burning
One of the easiest ways to mess up hot fudge is by letting it cook too long or on too high heat. Chocolate is a diva—it needs love and low heat. Burn it, and you’ll end up with a scorched, bitter mess that no amount of sugar or cream can fix.
Watch your pot like a hawk. If you start seeing brown bits on the bottom, it’s too hot. Take it off the heat immediately. Using a heavy-bottomed saucepan helps distribute heat more evenly and prevents hot spots.
Another pro tip: if your fudge is bubbling aggressively, turn the heat down. It should simmer gently, not boil like pasta water.
And don’t forget the sugar. Add it gradually and stir constantly to prevent it from crystallizing or clumping. Lumpy sugar = grainy fudge.
Improper Mixing Techniques
Hot fudge is all about smoothness, and how you mix makes a big difference. Stir slowly and steadily with a whisk or silicone spatula to ensure all ingredients combine seamlessly.
Don’t rush through adding ingredients—give each addition a moment to melt and blend. Dumping everything in at once can cause uneven melting and result in gritty texture or lumps.
Always add vanilla and salt after removing from heat to keep their flavors intact. Stir them in well to distribute evenly throughout the sauce.
If you’re using cocoa powder, sift it before adding to avoid those annoying dry clumps that just won’t dissolve no matter how much you stir.
In short, treat your hot fudge like a delicate sauce—not a stew. It rewards patience with decadence.
Variations of Hot Fudge
Vegan Hot Fudge
Yes, even if you’re dairy-free or vegan, you can still enjoy a ridiculously good hot fudge. Swap out the butter and cream with plant-based alternatives, and you’re golden.
Here’s how:
- Butter Substitute: Use coconut oil, vegan butter, or margarine.
- Cream Substitute: Full-fat canned coconut milk or oat cream works great.
- Chocolate: Use dairy-free chocolate chips or dark chocolate that’s vegan-friendly.
The texture will still be smooth and luscious, and depending on the coconut milk, you might even get a hint of tropical flavor (which is delicious with banana-based desserts).
Add a dash of vanilla and a pinch of salt just like in the original version. You can also toss in a spoonful of peanut butter for a nutty twist.
The result? A plant-powered fudge sauce that tastes so indulgent, you’ll forget it’s dairy-free.
Spicy or Boozy Twists
Looking to spice things up a bit—literally or figuratively? Hot fudge is a blank canvas that you can infuse with all kinds of adventurous flavors.
Here are some wild but wonderful ideas:
- Spicy Kick: Add a pinch of cayenne pepper, chili powder, or even a touch of hot sauce for a sweet-heat combo that’s surprisingly addictive.
- Boozy Fudge: A splash of Kahlúa, bourbon, or Grand Marnier adds depth and sophistication. Add after cooking to preserve the flavor and alcohol.
- Mint Chocolate: A few drops of peppermint extract turn it into a winter wonder.
- Espresso Love: Stir in some instant espresso powder for a mocha vibe.
These variations are fantastic for holidays, adult dessert parties, or when you’re just feeling extra. You do you!
Nutritional Information
Calorie Count per Serving
Alright, let’s talk numbers. Hot fudge isn’t exactly a low-cal treat, but hey—it’s dessert. A typical two-tablespoon serving of homemade hot fudge comes in around 150 to 180 calories, depending on the exact ingredients.
Here’s a basic breakdown:
- Fat: ~10–12g (thanks to butter and cream)
- Sugar: ~12–18g
- Carbs: ~20g
- Protein: ~1g
If you use dark chocolate or low-sugar alternatives, you can shave off some sugar. Vegan options with coconut cream may have more fat but less processed sugar.
Bottom line: enjoy in moderation. Hot fudge is about indulgence, not diet food—and that’s totally okay.
Substitutions for a Healthier Option
If you’re trying to make a “healthified” version, here are some solid swaps:
- Butter → Coconut oil or avocado oil
- Sugar → Maple syrup, honey, or stevia (though this affects texture)
- Cream → Coconut cream or almond milk with a thickener
- Chocolate → Unsweetened chocolate + natural sweeteners
You can also experiment with adding ingredients like chia seeds or nut butters to boost nutrition and fiber.
Will it taste exactly the same? Not quite. But with the right balance, you’ll get a guilt-free version that still hits the spot.
Making Hot Fudge in Bulk
Doubling or Tripling the Recipe
Got a party or need gifts? This recipe scales beautifully. Just double or triple the ingredients and follow the same cooking process—just use a bigger pot and stir more often.
Be cautious with the heat. Larger quantities can heat unevenly, so use medium-low and stir constantly. Simmering times might need a slight extension, but don’t go overboard.
Make sure your containers are ready to go before you start cooking. Hot fudge thickens as it cools, and transferring it into jars while it’s warm ensures a smooth pour.
Packaging for Gifts or Parties
Homemade hot fudge makes an epic edible gift. Pour it into small mason jars, screw on the lids, and decorate with ribbons or labels. Add a little gift tag with reheating instructions, and you’re set.
It’s also awesome for dessert bars at parties. Keep it warm in a mini slow cooker or a fondue pot and let guests drizzle to their heart’s content.
Whether you’re gifting or serving, homemade hot fudge adds a sweet, personal touch that store-bought just can’t match.
Kids-Friendly Hot Fudge Activities
Safe Cooking Tips for Kids
Want to turn your hot fudge adventure into a family activity? Great idea! Kids love chocolate, and getting them involved in the kitchen is a fun (and tasty) way to build skills and create memories. That said, safety is everything.
Here’s how to keep things kid-friendly:
- Let young helpers measure ingredients instead of using the stove.
- Pre-melt the chocolate and butter so kids can safely stir once it’s off the heat.
- Use a whisk instead of a spatula—it’s easier for small hands and better for mixing.
- Assign roles: one kid adds ingredients, another stirs, another preps containers.
Supervise closely when dealing with heat. For older kids, with your guidance, they can try stirring on low heat. For younger ones, keep them away from the stove but involve them in pouring, stirring cooled sauce, or decorating jars.
Kids love seeing simple ingredients turn into something delicious—it’s like edible science. And bonus: they’re more likely to eat something they helped make.
Fun Recipe Variations for Kids
Want to keep it playful? Here are some kid-approved twists on the classic hot fudge:
- Peanut Butter Fudge: Stir in a couple tablespoons of creamy peanut butter for a nutty flavor.
- S’mores Fudge: Pour over graham crackers and top with marshmallows.
- Unicorn Fudge: Use white chocolate and a drop of pink food coloring. Add rainbow sprinkles for magic.
- Cookie Crumble: Mix in crushed Oreos or chocolate chip cookies before serving.
These fun variations make it more exciting, especially during birthday parties, school events, or just a rainy afternoon project. Hot fudge fun is always in style.
Troubleshooting Guide
Fixing Grainy or Too Thin Fudge
Sometimes, even your best hot fudge intentions go sideways. Don’t panic—most problems are totally fixable.
Grainy Texture? That’s usually due to undissolved sugar or overheated chocolate. Here’s how to fix it:
- Stir in a tablespoon of hot cream and whisk vigorously.
- Strain it through a fine sieve to remove clumps.
- Reheat gently and stir constantly until smooth.
Too Thin? If your sauce is runnier than you’d like:
- Simmer it a bit longer to evaporate excess moisture.
- Add more chopped chocolate or a teaspoon of cocoa powder to thicken it up.
Too Thick? You may have simmered too long or added too much cocoa. Add warm cream, one tablespoon at a time, until the consistency is just right.
Separation Issues? If the butter or chocolate separates, remove from heat immediately and stir vigorously. A tablespoon of hot water or cream can help re-emulsify the mix.
Always remember: chocolate is forgiving when handled with care. A little patience and tweaking will bring your fudge back to its glossy glory.
Saving Separated Mixtures
If your hot fudge sauce splits and you see oil separating from the chocolate, don’t toss it yet—it can usually be saved.
Here’s how:
- Take it off the heat.
- Add a tablespoon of hot water or cream.
- Stir vigorously and steadily.
You can also blend it with an immersion blender for a quick save. Just a few pulses, and it should come back together.
Prevention tip: keep your heat low and avoid rapid temperature changes. Chocolate loves calm, gentle heat and constant stirring.
FAQs about Hot Fudge Recipe
What ingredients do I need for a hot fudge recipe?
To make hot fudge, you typically need unsweetened cocoa powder, sugar, heavy cream, butter, and vanilla extract. Some recipes might also include a pinch of salt to balance the sweetness.
How long does it take to make hot fudge?
Preparing hot fudge usually takes about 10-15 minutes. You’ll spend most of this time stirring the mixture on the stove to ensure it achieves the right consistency and doesn’t burn.
Can I make hot fudge without dairy?
Yes, you can make dairy-free hot fudge by substituting the heavy cream with coconut cream or almond milk, and using a plant-based butter. Ensure all your ingredients are suitable for a vegan diet if necessary.
How do I store leftover hot fudge?
Store any leftover hot fudge in an airtight container in the refrigerator. It will typically last for up to two weeks. Reheat gently in a microwave or on the stove when ready to use again.
Is hot fudge gluten-free?
Hot fudge is naturally gluten-free as it does not contain any wheat products. However, always check the labels of your specific ingredients to make sure they haven’t been processed in a facility that handles gluten-containing products.
Can I freeze hot fudge?
Yes, hot fudge can be frozen. Pour it into an airtight container and it should keep well for up to three months. Thaw in the refrigerator overnight before reheating.
What’s the best way to serve hot fudge?
Hot fudge is most commonly served warm over ice cream. It’s also delicious over cakes, brownies, or paired with fresh fruit like strawberries or bananas for a decadent treat.
Conclusion
There you have it—the ultimate, step-by-step guide to making rich, velvety, lip-smacking homemade hot fudge. Whether you’re drizzling it over ice cream, stirring it into milkshakes, or sneaking spoonfuls straight from the jar (no judgment), this is one recipe every dessert lover should have in their back pocket.
What’s the secret? Quality ingredients, low heat, and a little bit of love. And once you master the basics, the sky’s the limit with variations and creative add-ins.
So go ahead, turn up the stove, melt that chocolate, and create some sweet magic in your kitchen. Your future sundaes will thank you.