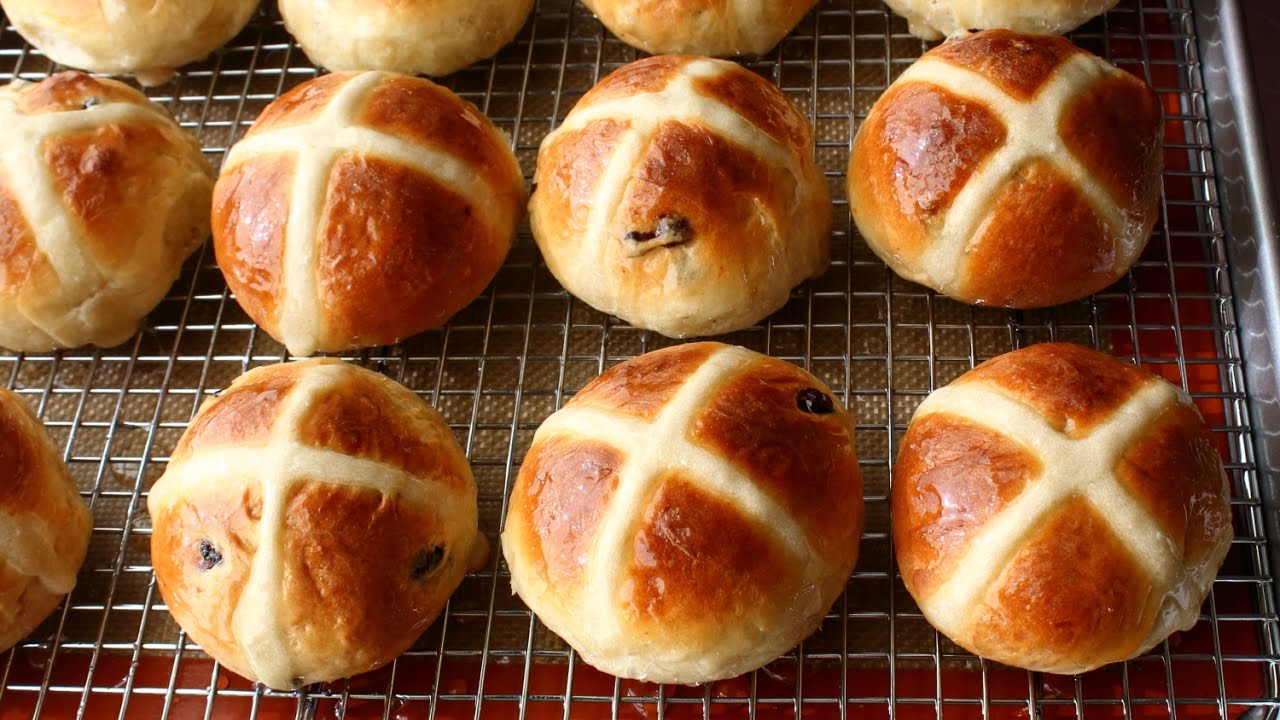
Hot Cross Buns Recipe: Hot Cross Buns are soft, spiced sweet buns typically marked with a white cross on top, traditionally eaten on Good Friday but now enjoyed year-round. These delicious buns are packed with warm spices like cinnamon and nutmeg, dotted with dried fruits such as currants or raisins, and topped with a flour paste cross that symbolizes the crucifixion in Christian tradition. But even outside of religious significance, Hot Cross Buns are a beloved bakery item for their rich flavor and pillowy texture.
The buns are usually lightly glazed, giving them a glossy finish and a touch of extra sweetness. Though they originate from England, their popularity has spread globally. From Australia to South Africa, many households and bakeries bake them fresh every spring. And while the classic version holds a special place in hearts, today’s variations range from chocolate chip to even savory takes.
Hot Cross Buns combine the comfort of homemade bread with the joy of sweet treats, making them a go-to bake whether you’re celebrating Easter or simply craving something special. With a touch of spice, a bit of sweetness, and that satisfying pull-apart texture, they’re the perfect companion to a hot cup of tea or coffee.
A Brief History of Hot Cross Buns
The story of Hot Cross Buns dates back centuries, filled with rich symbolism and tradition. These buns are believed to have originated in England during the 12th century when an Anglican monk marked the buns with a cross in honor of Good Friday. As the tradition spread, these buns became more than a religious symbol—they turned into a culinary staple.
During Elizabethan times, the sale of these buns was restricted by law, except on specific holidays like Good Friday, Christmas, and funerals. People believed that the buns carried medicinal or magical properties. Some even hung them in their kitchens to ward off evil spirits and ensure successful baking throughout the year.
In modern times, Hot Cross Buns are associated with Easter celebrations around the world. However, commercial bakeries have adopted and tweaked the recipe for year-round availability. Each country, and sometimes each family, adds their unique spin—some use orange zest, others use cranberries or chocolate chips. But the essence remains the same: a slightly sweet, warmly spiced bun with a symbolic cross on top.
Understanding the history of Hot Cross Buns not only connects us to the past but adds a meaningful layer to the joy of baking and sharing them. It’s more than a recipe—it’s a cultural tradition passed down through generations.
Ingredients Needed for Traditional Hot Cross Buns
Core Ingredients for the Dough
Making authentic Hot Cross Buns starts with getting the dough just right. It’s a soft, enriched dough that combines the heartiness of bread with the tenderness of a sweet roll. Here are the essential ingredients you’ll need:
- All-purpose flour (or bread flour): Gives the buns structure.
- Instant yeast (or active dry yeast): The rising agent that makes the buns fluffy.
- Milk (preferably whole): Adds moisture and richness.
- Unsalted butter: Makes the dough soft and tender.
- Sugar: Sweetens the dough just enough.
- Salt: Enhances all the other flavors.
- Ground spices (cinnamon, nutmeg, allspice): Provide the classic warm flavor.
- Eggs: Help bind the dough and enrich it.
- Dried fruits (raisins, currants, or sultanas): Add bursts of sweetness in every bite.
These ingredients come together to create a dough that’s soft, rich, and slightly spiced. The combination of milk, eggs, and butter makes it an “enriched dough,” much like brioche. This means the final product is moist, flavorful, and tender—perfect for breakfast or a sweet snack.
You can always customize the fruit according to taste, but sticking to the basics ensures an authentic taste that’s familiar and comforting.
Ingredients for the Cross Paste and Glaze
The iconic cross on top of each bun is more than just decoration—it’s a key feature of Hot Cross Buns. And the glaze? It’s the finishing touch that gives them their shiny, bakery-style look. Here’s what you’ll need:
For the Cross Paste:
- All-purpose flour
- Water
The paste should be thick enough to pipe but still smooth. It’s traditionally made using just flour and water, piped on top before baking.
For the Glaze:
- Sugar
- Water (or orange juice)
- Optional: Honey or apricot jam
The glaze is brushed on right after baking while the buns are still hot. This gives them that irresistible, glossy finish and a little extra sweetness.
This simple glaze contrasts beautifully with the slightly spiced, bready interior and helps preserve moisture, keeping your buns fresher for longer. Don’t skip it—it’s the cherry on top (or rather, the glaze on the bun)!
Optional Add-ins and Flavor Variations
One of the best things about Hot Cross Buns is how versatile they are. While the traditional version is always a hit, there’s plenty of room to make the recipe your own. Here are some fun and tasty twists:
- Orange or lemon zest: Adds a citrusy brightness.
- Chopped dried apricots or cranberries: For a tangy twist.
- Chocolate chips: A modern favorite, especially with kids.
- Spiced apple chunks: Bring a comforting, pie-like flavor.
- Cardamom or ginger: For a unique spice profile.
You can also experiment with different glazes—maple syrup glaze, a powdered sugar icing cross instead of the flour paste, or even a cinnamon glaze for extra indulgence.
Whether you’re baking for Easter or just because, these flavor boosts can help you personalize the experience. Think of the traditional recipe as your base canvas—and feel free to paint it with whatever flavors you love!
Essential Tools and Equipment
Baking Tools You’ll Need
Baking Hot Cross Buns doesn’t require a commercial kitchen or fancy gadgets, but having the right tools can make your process smoother and your results more consistent. Here’s a handy list:
- Mixing bowls (at least two): One for dry ingredients and one for wet.
- Measuring cups and spoons: Accuracy is key in baking.
- Digital kitchen scale: Highly recommended for precision.
- Stand mixer with dough hook (optional): Great for kneading, but hand kneading works too.
- Spatula or dough scraper: Helps handle sticky dough.
- Piping bag (or zip-top bag): For piping the cross on top.
- Baking sheet or rectangular baking dish: Where the buns rise and bake.
- Pastry brush: For applying the glaze.
- Cooling rack: To cool the buns evenly after baking.
These tools are often already in most kitchens, and if not, they’re affordable and easy to find. They don’t just help with making Hot Cross Buns—they’ll come in handy for other baking projects too.
Substitutes for Common Kitchen Items
Don’t have a mixer? No problem. Don’t own a piping bag? Easy fix. Here are some creative workarounds:
- No stand mixer? Knead the dough by hand on a lightly floured surface. It just takes a little elbow grease.
- No piping bag? Use a plastic sandwich bag, cut a small hole in the corner, and you’re set.
- No pastry brush? Use the back of a spoon or even clean fingers to spread the glaze.
- No digital scale? Stick with standard measuring cups and spoons, but be extra careful to level off dry ingredients properly.
The goal is to make these buns accessible to everyone, regardless of your kitchen setup. At the end of the day, it’s the love and care you put into baking that makes Hot Cross Buns truly special.
Preparing Your Workspace and Ingredients
Tips for Prepping Like a Pro
Before diving into mixing and kneading, it’s worth taking a few minutes to prep your workspace. A clutter-free, organized kitchen is not only safer—it makes baking more enjoyable and efficient.
Here’s how to prep like a pro:
- Clear the counters: Make space for kneading and shaping the dough.
- Set out all tools and bowls: Having everything within reach prevents messy hands searching drawers mid-process.
- Grease or flour surfaces: Prepping your kneading surface avoids unnecessary sticking.
- Preheat the oven in advance: Get your oven hot and ready before the buns are proofed.
Little steps like these save time and stress, especially when you’re working with rising dough that’s sensitive to time and temperature. Treat it like a mini bakery operation—you’re the head baker today!
Measuring and Organizing Ingredients
Before you even turn on the mixer or start kneading by hand, take the time to measure out each ingredient precisely. This is one of the most crucial steps for successful baking. Why?
Because baking is science.
Here’s a step-by-step checklist:
- Weigh dry ingredients like flour and sugar accurately.
- Crack eggs into a separate bowl to avoid shell mishaps.
- Warm the milk slightly (but don’t boil it)—just enough to activate the yeast.
- Soak dried fruits in warm water or tea for 10–15 minutes if they’re too hard, then pat them dry.
- Cut butter into small cubes so it softens faster and mixes in evenly.
Having everything measured and organized not only reduces stress but makes the entire process flow smoothly. And when you’re not scrambling for ingredients mid-bake, you can focus on what matters most—creating soft, sweet, fragrant buns from scratch.
Step-by-Step Instructions for Making Hot Cross Buns
Step 1 – Activating the Yeast
Getting your yeast active is the first and one of the most crucial steps in baking fluffy Hot Cross Buns. If the yeast isn’t properly activated, your dough won’t rise, and your buns will turn out dense and underwhelming.
Here’s how to do it right:
- Warm the milk: Gently heat the milk until it’s lukewarm—around 100°F (38°C). You should be able to comfortably dip your finger in without burning.
- Add sugar and yeast: Stir in a tablespoon of sugar and sprinkle the yeast over the milk. Let it sit undisturbed for 5–10 minutes.
- Wait for the foam: If the mixture becomes frothy and bubbly, your yeast is alive and active. If not, toss it and start again with fresh yeast.
This blooming process is a quick way to check that your yeast is alive before mixing it into the dough. Using dead yeast will result in flat, heavy buns—and no one wants that.
Also, avoid overheating the milk; anything above 115°F (46°C) can kill the yeast. Think of it like baby bath water: warm, not hot. Get this step right, and you’re already halfway to beautifully risen buns.
Step 2 – Making the Dough
Now that your yeast is alive and kicking, it’s time to bring the dough together. This is the heart of the Hot Cross Buns, and getting the texture right is key to achieving that pillowy softness.
Here’s how to make perfect dough:
Combine Wet Ingredients:
- In a large bowl or stand mixer, add your activated yeast mixture, eggs, and softened butter. Mix lightly until combined.
Mix the Dry Ingredients:
- In a separate bowl, whisk together flour, sugar, salt, and spices. Slowly add this to the wet ingredients.
Add Dried Fruits:
- Once the dough starts coming together, gently knead in the raisins, currants, or any dried fruits you’re using.
Kneading Time:
- If using a stand mixer: Use the dough hook on medium speed for about 8–10 minutes.
- If kneading by hand: Turn the dough onto a floured surface and knead for 10–15 minutes until it becomes smooth and elastic.
The dough should be slightly sticky but manageable. If it’s too wet, add a tablespoon of flour at a time. If it’s too dry, add a little warm milk.
This enriched dough will feel softer than regular bread dough due to the eggs and butter. Once it passes the “windowpane test” (you can stretch it thin without tearing), it’s ready to rise.
Step 3 – First Rise and Resting Time
With your dough perfectly kneaded, it’s now time to let it rise and develop flavor and texture. This step is often referred to as “proofing,” and patience here pays off with soft, fluffy buns.
Here’s how to get that first rise just right:
- Grease a large bowl with a bit of oil or butter and place the dough inside. Turn it once so it’s lightly coated to prevent sticking.
- Cover the bowl with a clean kitchen towel or plastic wrap.
- Let it rest in a warm spot for about 1 to 1.5 hours, or until doubled in size.
Ideal proofing temperature is around 75–80°F (24–27°C). If your kitchen is cold, try placing the bowl in an oven with just the light on, or near a sunny window.
Don’t rush this part. The yeast needs time to feed on the sugars and produce gases that help the dough rise. You’ll know it’s ready when you press a finger into the dough and the indentation slowly springs back.
This resting period also allows the spices to infuse and the gluten to relax, setting the stage for light, airy buns. Pour yourself a cup of tea and enjoy the aroma—your kitchen’s about to smell amazing.
Step 4 – Shaping the Buns
After the first rise, it’s time to transform your dough into neat little buns. This is where it all starts to look and feel like a bakery creation.
Follow these shaping tips for uniform, beautiful buns:
- Punch down the dough to release any trapped air bubbles.
- Turn it out onto a lightly floured surface and knead it gently for a minute.
- Divide the dough evenly: Use a kitchen scale to divide the dough into 12–15 equal pieces for consistent baking.
- Shape each piece into a ball: Tuck the edges under, pinching at the bottom to create tension on top, then roll between your palms.
Arrange on a baking tray:
- Place each bun on a greased or parchment-lined baking sheet, leaving a bit of space in between.
- Alternatively, use a 9×13-inch baking dish for pull-apart style buns.
The buns should look smooth and round. Cover them again with a towel and let them rest for the second rise. They’ll puff up and fill out the tray nicely—don’t worry if they touch each other a bit; they’ll pull apart beautifully after baking.
Taking time to shape your buns well ensures they bake evenly and look gorgeous once glazed.
Step 5 – Second Rise and Final Proofing
This final proof is the last stage before baking and is essential to get that soft, light texture we all crave in Hot Cross Buns.
Here’s how to do it:
- Cover the shaped buns loosely with a clean towel or plastic wrap.
- Let them rise again in a warm, draft-free place for 30–45 minutes, or until noticeably puffy and nearly doubled in size.
You’ll notice the buns begin to gently touch one another as they rise—that’s totally fine. When they bake, they’ll rise further and create that beautiful, bakery-style pull-apart look.
Check the dough with a gentle poke test. If the dough springs back slowly and leaves a slight indent, it’s ready to bake. If it deflates or sticks to your finger, it may be over-proofed.
Timing here is crucial—under-proofed buns will be tight and dense, while over-proofed ones might collapse in the oven. Aim for just the right amount of rise to get perfect buns every time.
Step 6 – Piping the Cross
Now comes the part that gives Hot Cross Buns their iconic look—the cross. This simple flour paste topping is piped onto the buns just before baking and adds a subtle texture contrast.
Here’s how to do it:
Make the Paste:
- In a small bowl, mix ½ cup of all-purpose flour with 5 tablespoons of water (adjust as needed) until you get a thick, smooth, and pipeable consistency. It should be similar to pancake batter—thick but still squeezable.
Prepare Your Piping Bag:
- Pour the paste into a piping bag or a plastic sandwich bag with the tip cut off. A piping nozzle isn’t necessary—just a small hole will do the trick.
Pipe the Crosses:
- Pipe a straight line horizontally across all the buns in the row, then go back and pipe vertical lines to create the crosses.
- Be steady but quick—precision helps, but a little wobble gives them that homemade charm.
This step doesn’t just add symbolism; it also provides a rustic, slightly chewy contrast to the soft bun underneath. If you’re going for a non-traditional route, some bakers skip the paste and use icing after baking—but flour paste is the classic and most authentic way.
Once piped, the buns are ready for the oven. And trust me, your kitchen is about to smell like a bakery in heaven.
Step 7 – Baking the Buns
This is the moment where all your hard work pays off—time to bake these beauties to golden perfection. A perfectly baked Hot Cross Bun is golden brown on top, soft and fluffy inside, and bursting with flavor.
Preheat Your Oven:
- Set it to 375°F (190°C) and make sure it’s fully heated before putting in the buns.
Baking Time:
- Place the tray in the center rack of your oven.
- Bake for 20–25 minutes, or until the tops are golden brown and the buns sound hollow when tapped on the bottom.
If your oven has hot spots, rotate the tray halfway through baking for even color.
Check for Doneness:
- A food thermometer inserted into the center of a bun should read around 190°F (88°C).
- If you’re going by eye, look for a rich, golden crust and a slightly firm feel when pressed.
Don’t overbake—too long and they’ll dry out, too short and they’ll be doughy in the center. Watch them closely in the final minutes for best results.
Once done, transfer the buns immediately to a wire rack to prevent soggy bottoms. And now comes the magic touch: the glaze.
Step 8 – Applying the Sweet Glaze
The glaze is the crowning glory of Hot Cross Buns—it gives them that irresistible glossy sheen and a final touch of sweetness. It also helps seal in moisture, keeping them fresh longer.
Here’s how to make the glaze:
Simple Sugar Glaze:
- In a small saucepan, combine 2 tablespoons of sugar and 2 tablespoons of water.
- Heat over low heat until the sugar dissolves completely—do not let it boil.
- Optional: Add a few drops of vanilla extract, orange juice, or a touch of honey for extra flavor.
Brush It On:
- While the buns are still warm, use a pastry brush to generously coat the tops with glaze.
- Let them cool completely on the wire rack before serving.
This quick and easy glaze gives the buns that fresh-from-the-bakery look. If you prefer, you can also use apricot jam (thinned with a little hot water) for a fruity, sticky finish.
Resist the urge to dig in right away—letting them cool helps the structure set and flavors meld beautifully. But hey, no judgment if one mysteriously disappears before they hit the plate!
Serving and Storing Hot Cross Buns
Best Ways to Serve Hot Cross Buns
You’ve put in the effort—now it’s time to enjoy your Hot Cross Buns in all their warm, spiced glory. These buns are incredibly versatile, and there’s no wrong way to serve them.
Here are some delicious ways to enjoy them:
- Fresh and warm: Nothing beats a freshly baked bun served warm with a generous smear of butter.
- Toasted: Split in half and toasted until golden, then slathered with butter or jam.
- With a hot beverage: Pair with tea, coffee, or warm milk for the ultimate cozy treat.
- With cheese: A slice of sharp cheddar or brie complements the sweet, spiced flavors beautifully.
Feeling indulgent? Use them to make Hot Cross Bun Bread Pudding or even French toast—especially if you’ve got leftovers.
Whether eaten at breakfast, brunch, or an afternoon snack, these buns are comforting, festive, and oh-so-satisfying. Share them with friends and family, or hoard them for yourself (we won’t tell).
Storage Tips to Keep Them Fresh
Hot Cross Buns are best enjoyed fresh, but with the right storage, you can keep them soft and delicious for days. Here’s how:
Short-Term Storage:
- Store buns in an airtight container or zip-top bag at room temperature for up to 3 days.
- Add a slice of bread or a damp paper towel in the container to retain moisture.
Long-Term Storage:
- Freeze them! Wrap individual buns in plastic wrap, then place them in a freezer bag.
- Freeze for up to 3 months.
- Reheat by thawing at room temperature or microwaving for 30 seconds.
Avoid refrigerating—this can make them dry out faster. If they do start to go stale, slice and toast them to bring back their magic.
With proper storage, you can stretch your batch across the week—or enjoy an Easter treat well into spring.
Troubleshooting Common Issues
Why Didn’t My Dough Rise?
If your dough isn’t rising as expected, don’t panic—it happens to the best of us. But understanding the cause can help you fix it next time.
Here are the most common culprits:
- Inactive yeast – If your yeast didn’t bubble during activation, it’s likely expired or dead. Always check the expiration date and store it in a cool, dry place.
- Milk too hot – Yeast dies above 115°F (46°C). Use lukewarm milk—warm to the touch but not hot.
- Too cold environment – Yeast needs a warm, draft-free space to rise. If your kitchen is cold, use the oven with just the light on, or sit the bowl on a warm appliance.
- Dough too dry – Dry dough has trouble rising. If it feels stiff or crumbly, add a little more milk or water.
Pro tip: If after 90 minutes your dough hasn’t budged, consider starting over with a fresh batch of yeast. It’s frustrating, yes—but totally worth it when you get those beautifully puffed buns.
Buns Too Dense or Dry?
Hot Cross Buns should be light and tender, not tough and dry. If yours came out a little heavy, here’s what might’ve gone wrong:
- Overkneading or underkneading – Too much kneading can develop too much gluten, making the buns chewy instead of soft. Too little, and the structure won’t hold. Aim for that smooth, elastic feel.
- Too much flour – Adding too much flour during kneading can make the dough dense. Try kneading with slightly oiled hands instead of flour-covered hands to keep the dough soft.
- Overbaking – This is the #1 cause of dryness. Always check for doneness a few minutes early and pull them out when just golden.
To revive dry buns: wrap them in foil, sprinkle with a bit of water, and reheat in the oven for 5–10 minutes. Good as new!
Nutritional Information
Calories and Macronutrients
Hot Cross Buns aren’t exactly health food—but they’re also not the worst indulgence. On average, one traditional bun contains:
| Nutrient | Per Bun (approx.) |
|---|---|
| Calories | 180–220 kcal |
| Carbohydrates | 35–40 g |
| Sugar | 8–12 g |
| Protein | 5–7 g |
| Fat | 3–5 g |
| Fiber | 1–2 g |
The values depend on the size of the bun and what ingredients you use. Add-ins like chocolate chips or sugar-heavy glazes will naturally increase the numbers.
They do provide a small boost of energy from the carbs, and the dried fruit adds a bit of natural sugar and fiber. So while they’re not diet food, they’re perfect for a seasonal treat enjoyed in moderation.
Healthier Alternatives
Want to enjoy Hot Cross Buns without the sugar spike? Try these swaps:
- Use whole wheat flour for added fiber.
- Reduce sugar in the dough and skip the glaze.
- Add chia or flax seeds for a nutrition boost.
- Replace butter with coconut oil or olive oil.
- Use plant-based milk and egg substitutes for a vegan version.
These swaps keep the spirit of the buns while making them a little more waistline-friendly. You can also bake mini buns for portion control—same great taste, fewer calories.
Creative Variations of Hot Cross Buns
Chocolate Chip Hot Cross Buns
For a kid-friendly, dessert-worthy spin, swap the dried fruit for chocolate chips. Here’s how to tweak the recipe:
- Omit the mixed spices for a milder base (or keep them for a mocha-style flavor).
- Use semi-sweet or milk chocolate chips—about 1 cup.
- You can even add orange zest or a hint of espresso powder for depth.
These buns are a massive hit at brunch tables and bake sales. Want to go all in? Drizzle with a simple chocolate glaze after baking. Pure indulgence.
Savory Hot Cross Buns
Yes, you read that right—Hot Cross Buns don’t always have to be sweet! A savory version is a creative twist for those who prefer cheese over chocolate.
Try this variation:
- Skip the sugar and dried fruits.
- Add shredded cheese (cheddar or parmesan), herbs (rosemary, thyme), and chopped olives or sun-dried tomatoes.
- Pipe the cross using a simple cheese paste or leave it off.
These make a killer side dish with soups, stews, or even Easter ham. Think of them like fancy dinner rolls with a twist.
Tips for Perfect Hot Cross Buns Every Time
Temperature, Timing, and Texture
Getting Hot Cross Buns just right is all about mastering a few key baking principles:
- Watch your yeast: Always test it first and keep your liquids lukewarm.
- Don’t rush the rise: Time is flavor. Letting dough proof properly gives you that light, fluffy crumb.
- Be gentle: Especially when shaping and handling dough—treat it with love.
- Keep consistent sizes: Weighing the dough helps the buns bake evenly.
- Steam it up: Place a pan of water in the oven for extra moist buns and a glossy finish.
Secrets from Pro Bakers
Want bakery-style results at home? Here are a few pro tips:
- Soak the fruit in orange juice or tea before adding—it plumps them up and adds extra flavor.
- Add zest to the dough for a citrusy brightness.
- Brush twice with glaze—once warm for shine, once cooled for a second layer of flavor.
- Use a thermometer for foolproof baking—perfect doneness every time.
And most of all—practice! The more you bake, the more instinctive it becomes. You’ll soon find your rhythm and maybe even invent your signature Hot Cross Bun.
FAQs about Hot Cross Buns Recipe
1. What are hot cross buns?
Hot cross buns are a type of sweet, spiced bun traditionally made with raisins or currants and marked with a cross on the top. They are commonly enjoyed during the Easter season.
2. What ingredients do I need for hot cross buns?
Typical ingredients for hot cross buns include flour, sugar, yeast, milk, eggs, butter, raisins or currants, and spices like cinnamon and nutmeg. Some recipes might also include orange zest or apple for added flavor.
3. How do I make the dough for hot cross buns?
To make the dough, combine warm milk with yeast and sugar to activate the yeast. Mix in flour, spices, and salt, then knead in softened butter and dried fruit until the dough is smooth. Let it rise until doubled in size.
4. How do I shape hot cross buns?
After the first rise, divide the dough into equal portions and roll them into smooth balls. Place them on a baking sheet close together and let them rise again until they are puffy.
5. What is the best way to make the crosses on hot cross buns?
The crosses can be made by piping a flour and water paste over the buns before baking. Alternatively, some prefer to cut into the buns with a sharp knife or use icing to make the crosses after baking.
6. How long do hot cross buns take to bake?
Hot cross buns typically bake for about 20 to 25 minutes at 375 degrees Fahrenheit (190 degrees Celsius) until they are golden brown.
7. Can I make hot cross buns ahead of time?
Yes, you can prepare the dough and shape the buns a day ahead. Keep them refrigerated covered with plastic wrap, then let them rise at room temperature before baking. Alternatively, baked buns can be frozen and reheated.
8. Are there any variations to traditional hot cross buns?
Yes, there are many variations. You can add chocolate chips, swap raisins for other dried fruits like cranberries, or use different spices like cardamom or allspice for a unique twist.
Conclusion
Hot Cross Buns are more than just bread—they’re a celebration of tradition, flavor, and homemade goodness. Whether you stick to the classic recipe or explore creative twists, baking them at home brings warmth and joy to your kitchen.
From the rich history to the soft crumb and shiny glaze, each bun tells a story. They’re perfect for sharing during the Easter season, or anytime you want a comforting, nostalgic treat.
So, roll up your sleeves, gather your ingredients, and get baking. Once you taste your own batch fresh out of the oven, you’ll never look at store-bought buns the same way again.

