Honey Wheat Bread Recipe: There’s something magical about the aroma of freshly baked bread filling your kitchen. Now imagine that bread having the natural sweetness of honey combined with the wholesome goodness of wheat.
That’s exactly what honey wheat bread delivers! It’s not just a healthier alternative to store-bought white bread, but it’s also softer, more flavorful, and made with love right in your own kitchen.
In this guide, I’ll take you step by step through making the perfect honey wheat bread. Whether you’re new to baking or already experienced, this recipe will help you achieve a bakery-style loaf at home.
Why Choose Honey Wheat Bread Over White Bread
Most store-bought white bread is heavily processed, stripping away the bran and germ from wheat. This makes it soft and fluffy but also nutrient-deficient. Honey wheat bread, on the other hand, uses whole wheat flour, which retains fiber, vitamins, and minerals. Honey acts as a natural sweetener and also helps keep the bread moist for longer.
Think of it this way: white bread is like fast food—quick and easy but not very nourishing. Honey wheat bread is more like a home-cooked meal—wholesome, satisfying, and packed with benefits for your body. Once you taste homemade honey wheat bread, you’ll realize just how much better it is than store-bought loaves.
Health Benefits of Using Whole Wheat Flour and Honey
Whole wheat flour provides essential nutrients such as fiber, protein, B vitamins, and antioxidants. This means it supports digestion, keeps you full for longer, and helps regulate blood sugar. Honey, besides adding natural sweetness, also brings antibacterial properties and antioxidants. When combined, they make bread that is not only flavorful but also beneficial for overall health.
So, if you’ve been looking for a bread recipe that combines taste with nutrition, honey wheat bread is the way to go. It’s perfect for sandwiches, toast, or simply enjoyed with a pat of butter.
Ingredients You’ll Need
Before diving into the process, let’s gather all the essentials. Baking bread requires precision, so having everything ready will make your baking journey much smoother.
Essential Ingredients for Honey Wheat Bread
Here’s a breakdown of the main ingredients:
- Whole wheat flour – the base of the bread, giving it its nutty flavor and hearty texture.
- All-purpose flour – balances the density of wheat flour and makes the bread softer.
- Honey – natural sweetener that adds flavor and moisture.
- Warm water – helps activate the yeast.
- Active dry yeast – the key to making the bread rise.
- Salt – enhances flavor.
- Butter or oil – adds richness and softness to the loaf.
These ingredients form the backbone of honey wheat bread. Without them, the bread won’t have the same taste or texture.
Optional Add-Ons for Extra Flavor
If you love experimenting, you can customize your honey wheat bread with a few extras:
- Seeds like flaxseed, sesame, or sunflower seeds for crunch.
- Nuts such as walnuts or almonds for added richness.
- Rolled oats sprinkled on top for a rustic look.
- Cinnamon or nutmeg for a hint of spice.
These add-ons can transform a simple loaf into something gourmet, perfect for impressing guests or enjoying a special treat.
Tools and Equipment Required
You don’t need fancy equipment to make bread, but having the right tools makes it easier:
- Large mixing bowl
- Measuring cups and spoons
- Wooden spoon or dough hook (if using a stand mixer)
- Clean kitchen towel
- Loaf pan
- Oven thermometer (optional but helpful)
With these in hand, you’re ready to begin the fun part: baking!
Step-by-Step Guide to Making Honey Wheat Bread
Baking bread may sound intimidating, but when broken into steps, it becomes a very approachable process. Here’s a detailed breakdown:
Step 1 – Preparing the Ingredients
Start by measuring everything precisely. Bread baking is a science, so even a little extra flour or liquid can change the outcome. Make sure your water is warm but not hot—around 110°F (43°C). If it’s too hot, it will kill the yeast, and your bread won’t rise.
In a small bowl, mix the warm water with honey and yeast. Let it sit for about 5–10 minutes until it becomes frothy. This process is called “proofing the yeast,” and it ensures that your yeast is active and ready to work.
Meanwhile, in a large bowl, combine the whole wheat flour, all-purpose flour, and salt. Once the yeast mixture is ready, pour it into the dry ingredients along with melted butter or oil.
This step is about setting the foundation. Think of it like laying the bricks before building a house—everything needs to be measured and prepared correctly for the final result to turn out perfect.
Step 2 – Mixing and Kneading the Dough
Once all your ingredients are combined, the next step is to transform that sticky mixture into a smooth, elastic dough. Mixing is straightforward—you simply stir everything together until it forms a rough, shaggy ball. But kneading? That’s where the magic happens.
Kneading develops the gluten in the flour, giving your bread its chewy texture and structure. Without proper kneading, your loaf will turn out flat and dense. If you’re kneading by hand, place the dough on a lightly floured surface. Using the heel of your hand, push the dough away from you, fold it back, rotate it slightly, and repeat. This push–fold–turn motion should continue for 8–10 minutes. You’ll know the dough is ready when it feels smooth, elastic, and springs back when pressed with a fingertip.
If you have a stand mixer, you can save some arm workout time by using the dough hook attachment. Let it knead on medium speed for about 5–7 minutes. Be careful not to over-knead, though, because that can make the bread tough instead of soft.
Pro tip: If the dough feels too sticky, add flour a tablespoon at a time. If it’s too dry, add a teaspoon of water. Remember, dough should feel slightly tacky but not unmanageable. By the end of this stage, you’ll have a soft, smooth dough that’s ready to rise.
Step 3 – First Rise and Proofing Tips
After kneading, place the dough in a greased bowl and cover it with a clean kitchen towel. Set it in a warm, draft-free place for the first rise, also known as “bulk fermentation.” This stage allows the yeast to produce carbon dioxide, which makes the dough expand and develop flavor.
On average, this rise takes about 1 to 1.5 hours, or until the dough has doubled in size. Don’t rush this process—the longer the rise, the better the texture and flavor of the bread. If your kitchen is on the cooler side, place the bowl in the oven with just the light turned on (not the heat). This creates a cozy, warm environment for the yeast to work.
Here’s a quick trick to test if your dough has risen enough: Gently poke it with your finger. If the indentation stays, it’s ready for the next step. If it springs back immediately, give it more time.
During this rise, the yeast is essentially “eating” the sugars from the flour and honey, producing both flavor and structure. Think of it like the dough taking a nap—it’s resting, growing, and preparing itself for the oven.
Step 4 – Shaping the Dough for Baking
Once your dough has doubled in size, it’s time to shape it into a loaf. First, punch down the dough gently to release excess gas bubbles. Don’t be too rough—just a light press is enough. Then, turn it out onto a lightly floured surface.
Flatten the dough into a rectangle, about the same width as your loaf pan. Fold the edges inward and roll it tightly from one end to the other, like rolling up a yoga mat. Pinch the seam closed at the bottom, tuck in the ends, and place the shaped dough seam-side down in a greased loaf pan.
Shaping matters because it determines how your bread will look once baked. A tightly rolled loaf ensures an even rise and prevents large air pockets. If you prefer round loaves, you can shape the dough into a ball and bake it on a baking sheet instead of a pan.
Optional: For an artisan look, brush the top with a little water or milk and sprinkle oats, seeds, or flour. This not only makes the loaf visually appealing but also adds extra flavor and crunch.
Step 5 – Final Rise and Baking Process
Now that the dough is shaped, it needs one last rise before hitting the oven. Cover the loaf with a towel and let it rise again for about 30–45 minutes, or until it has puffed up nicely. This step is known as the “proofing stage.”
During this time, preheat your oven to 375°F (190°C). Always preheat your oven because bread needs that initial blast of heat to rise properly in the first few minutes of baking—this is called “oven spring.”
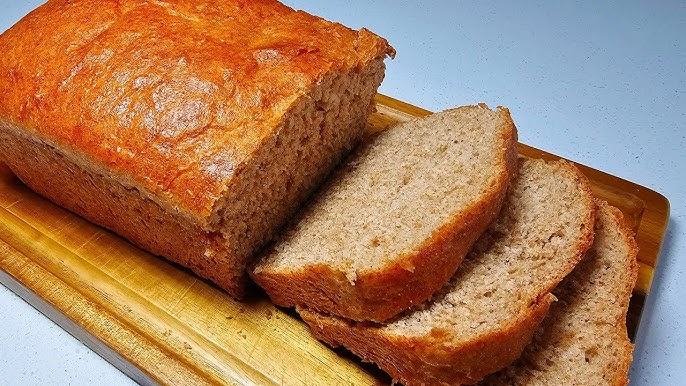
Once the dough is ready, place it in the oven and bake for 30–35 minutes. The bread should turn a deep golden brown, and the kitchen will smell absolutely heavenly. To check for doneness, tap the bottom of the loaf—it should sound hollow. Another way is to use a food thermometer; bread is fully baked when the internal temperature reaches 190–200°F (88–93°C).
After baking, remove the bread from the pan and let it cool completely on a wire rack. This is crucial because cutting too soon can make the bread gummy inside. Patience pays off here!
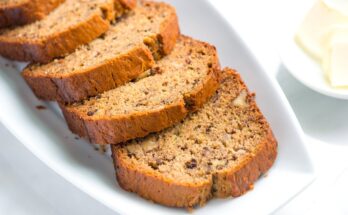
By the end of this stage, you’ll have a beautifully golden loaf of honey wheat bread, ready to slice and enjoy.
Tips for Perfect Honey Wheat Bread
Even though the process sounds simple, bread baking can sometimes be tricky. Here are some tried-and-true tips to ensure your honey wheat bread turns out perfect every single time.
Common Mistakes to Avoid
- Using water that’s too hot – kills the yeast instantly.
- Skipping the kneading process – results in dense, flat bread.
- Not letting the dough rise enough – creates a heavy, underdeveloped loaf.
- Cutting the bread too soon – makes the inside sticky and doughy.
How to Achieve a Soft and Fluffy Texture
- Add a tablespoon of milk powder for extra softness.
- Don’t over-flour the dough; keep it slightly sticky.
- Brush the loaf with butter right after baking to give it a soft crust.
Storing and Preserving Homemade Bread
Homemade bread has no preservatives, so it doesn’t last as long as store-bought. Store it in an airtight container or bread box for up to 3 days at room temperature. For longer storage, wrap it tightly and freeze for up to 2 months. Simply thaw and reheat when needed.
Variations of Honey Wheat Bread
One of the best things about baking bread at home is the flexibility to make it your own. While the classic honey wheat bread is already a winner, you can get creative with flavors, textures, and shapes. Let’s explore a few variations that can elevate your homemade bread.
Adding Nuts and Seeds
Nuts and seeds not only add crunch but also increase the nutritional value of your bread. Imagine biting into a slice that’s studded with sunflower seeds or walnuts—each bite brings a delightful texture and earthy flavor. Some popular additions include:
- Sunflower seeds – mild and nutty, perfect for everyday loaves.
- Pumpkin seeds – great for fall-inspired bread.
- Chia or flaxseeds – rich in omega-3 fatty acids.
- Walnuts or pecans – add a deep, nutty flavor that pairs beautifully with honey.
To add them, simply fold the seeds or chopped nuts into the dough after kneading. For extra crunch, sprinkle some on top before baking. This version makes an excellent base for sandwiches or hearty breakfast toast.
Making Honey Wheat Dinner Rolls
Instead of shaping your dough into a loaf, why not try dinner rolls? They’re soft, pillowy, and perfect for holiday meals or weeknight dinners. After the first rise, divide the dough into equal portions, roll into balls, and place them close together on a greased baking sheet. Let them rise again, then bake until golden brown.
Dinner rolls bake faster than loaves—about 18–20 minutes at 375°F (190°C). For extra flavor, brush them with melted butter and a drizzle of honey right after baking. These rolls are so irresistible that they often disappear from the table before the main dish is even served.
Gluten-Free Alternatives
If you’re gluten-intolerant but still crave homemade bread, there’s hope. While traditional honey wheat bread relies on wheat flour for structure, you can use a gluten-free flour blend combined with xanthan gum (a binding agent) to mimic the elasticity of gluten.
The texture will be slightly different—more tender and less chewy—but the flavor from honey remains comforting. Just remember that gluten-free doughs are usually wetter and require less kneading. You might even find the process easier, and the results just as satisfying.
Nutritional Value of Honey Wheat Bread
Bread often gets a bad reputation, but when made with whole wheat flour and natural ingredients, it can be a healthy part of your diet. Let’s break down the nutritional value of honey wheat bread.
Calorie Breakdown
On average, one slice (about 40g) of homemade honey wheat bread contains:
- Calories: 90–110
- Carbohydrates: 18–20g
- Protein: 3–4g
- Fat: 1–2g
- Fiber: 2–3g
- Sugar (from honey): 3–5g
Compared to white bread, honey wheat bread is higher in fiber and nutrients while being naturally sweetened, making it a smarter choice for daily consumption.
Vitamins and Minerals Present
Thanks to whole wheat flour and honey, this bread contains:
- B vitamins (thiamine, niacin, riboflavin) – essential for energy metabolism.
- Iron – supports oxygen transport in the blood.
- Magnesium – helps with muscle and nerve function.
- Antioxidants from honey – boost the immune system.
Eating honey wheat bread regularly not only satisfies hunger but also contributes to a more balanced diet. Pair it with healthy toppings like avocado, nut butter, or lean meats, and you’ve got a powerhouse meal.
Serving Suggestions
Honey wheat bread is incredibly versatile. You can enjoy it in countless ways, from breakfast to dinner. Here are some creative serving ideas to inspire you.
Best Pairings with Honey Wheat Bread
- Classic toast with butter – simple, timeless, and delicious.
- Avocado toast – mash ripe avocado, add salt, pepper, and a sprinkle of chili flakes.
- Peanut butter and honey – double the honey goodness in one bite.
- Grilled cheese sandwich – the nutty flavor of wheat pairs beautifully with sharp cheddar.
Breakfast, Lunch, and Dinner Ideas
- Breakfast: Use it for French toast, top with fresh fruit, and drizzle with honey.
- Lunch: Make a hearty turkey and cheese sandwich on toasted slices.
- Dinner: Serve thick slices alongside soups, stews, or pasta dishes.
- Snack: Spread almond butter and banana slices for a quick, energy-packed bite.
The beauty of honey wheat bread is its adaptability. Whether sweet or savory, it complements almost everything you can think of.
FAQs about Honey Wheat Bread Recipe
1. Can I make honey wheat bread without yeast?
Yes, you can use baking soda or baking powder with an acidic ingredient like buttermilk, but the texture will be more like quick bread than traditional yeast bread.
2. How long does homemade honey wheat bread last?
Stored at room temperature, it stays fresh for 2–3 days. In the freezer, it can last up to 2 months.
3. Can I use only whole wheat flour?
Yes, but the bread will be denser. Mixing with all-purpose flour gives a softer texture.
4. Why is my bread too dense?
This usually happens if the dough wasn’t kneaded enough or didn’t rise properly. Make sure to allow enough proofing time.
5. Can I make this recipe with a bread machine?
Absolutely! Just add the ingredients in the order recommended by your machine’s manual and select the whole wheat setting.
Conclusion
Making honey wheat bread at home is a rewarding experience that brings together flavor, health, and comfort. From gathering simple ingredients to kneading, rising, and finally baking, each step is a journey that results in a warm, golden loaf bursting with natural sweetness. Not only is this bread healthier than store-bought options, but it’s also customizable, allowing you to experiment with seeds, nuts, and even gluten-free versions.
So, the next time you’re craving fresh bread, skip the grocery store aisle and try this recipe. Your kitchen will smell amazing, your taste buds will thank you, and your family might just crown you the best baker in the house.