Honey Garlic Chicken Recipe: Ever bitten into something so good it makes your eyes roll back a little? That’s honey garlic chicken for you. It’s the perfect harmony of sweet and savory with a hint of garlic zing that clings to your taste buds long after the meal’s done. This dish isn’t just popular in home kitchens—it’s a global favorite. Why? Because it’s ridiculously easy to make, yet it tastes like something straight out of a fancy restaurant.
Think juicy chicken thighs or breasts, coated in a sticky glaze that’s both glossy and golden, with just the right balance of sugar and spice. Whether you’re cooking for your family, hosting a dinner, or just want something easy after a long day, this dish checks all the boxes. No wonder it’s a go-to comfort food!
And let’s not ignore how versatile it is. Serve it with rice, noodles, veggies, or even wrap it in a taco—whatever floats your boat. Plus, it’s a great intro dish if you’re just starting your cooking journey. No fancy techniques needed, just real, simple, drool-worthy food.
A Brief History of the Dish
While honey garlic chicken doesn’t belong to any one traditional cuisine, it draws heavy inspiration from Asian flavors—particularly Chinese and Korean kitchens where soy sauce, garlic, and honey are staples. Over time, Western kitchens embraced and modified it, giving birth to hundreds of interpretations. From crispy fried versions to slow-cooked renditions, each culture adds its twist.
But the essence remains the same: sweet, garlicky, and finger-licking good. It has evolved from a simple stir-fry to a restaurant menu favorite, with versions ranging from fast food chains to gourmet plating. The best part? You can bring that magic right into your kitchen.
Ingredients You’ll Need
Main Ingredients Breakdown
Before we dive into the cooking, let’s talk ingredients. You don’t need a long grocery list, but you do need a few staples that make the magic happen:
- Chicken: Boneless thighs are juicy and flavorful, but breasts work just as well.
- Garlic: Fresh is best—minced for maximum aroma and taste.
- Honey: The star of the show. It adds sweetness and that sticky texture.
- Soy Sauce: Brings the salty umami that balances the sweet honey.
- Vinegar (optional): A splash of apple cider or rice vinegar can add a tangy kick.
- Cornstarch (optional): For thickening the sauce and making it extra clingy.
- Olive Oil or Butter: For cooking the chicken and giving it that golden finish.
These are your base ingredients. Most kitchens already have these on hand, so you won’t have to make a grocery store run.
Optional Add-ons for Extra Flavor
Wanna get fancy or boost the flavor? Toss in a few extras:
- Ginger: Freshly grated adds a warm bite.
- Chili flakes: For some heat.
- Sesame oil: A little goes a long way in adding depth.
- Green onions: For garnish and crunch.
- Toasted sesame seeds: Adds texture and presentation points.
Having these optional ingredients on standby can elevate the dish from simple to sensational in minutes.
Kitchen Tools & Prep Setup
Must-Have Kitchen Tools
Before you start cooking, make sure your kitchen’s ready. Here’s what you’ll need:
- Cutting board and sharp knife – For chopping the chicken and garlic.
- Non-stick skillet or frying pan – Your best friend in cooking evenly.
- Mixing bowls – To prep and marinate if needed.
- Measuring spoons/cups – To get the balance just right.
- Spatula or tongs – For flipping and coating the chicken.
- Whisk – To blend the sauce into a smooth mix.
You don’t need a fully decked-out kitchen—just these basics, and you’re good to go.
Prepping Your Station
Mise en place. That’s the fancy French phrase chefs love to use—and for good reason. It means “everything in its place,” and it makes a world of difference in the kitchen.
- Chop everything beforehand—don’t wait till the garlic’s burning to slice the green onions.
- Measure out the sauce ingredients and keep them in small bowls.
- Pat your chicken dry with paper towels—this helps it brown better.
- Preheat your pan while you prep, so it’s ready to go.
Trust me, a little prep goes a long way in making your cooking smoother and less stressful.
How to Honey Garlic Chicken – Step by Step Guide
Step 1: Prepping the Chicken
Here’s where the action begins. Choose boneless, skinless chicken thighs or breasts. Thighs are generally juicier and more forgiving (you can slightly overcook them and they’ll still taste great), but breasts are leaner if you’re going for a healthier version.
- Cut your chicken into bite-sized chunks or strips. Uniform size = even cooking.
- Pat the pieces dry with a paper towel. Moisture is the enemy of a good sear.
- Season lightly with salt and pepper—or even a dash of garlic powder for a little extra flavor.
Optional but recommended: Toss the chicken in a tablespoon of cornstarch. It creates a crispy outer layer once cooked and helps the sauce stick better.
Now your chicken’s ready to sizzle.
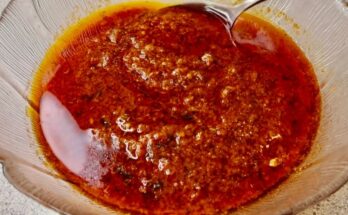
Step 2: Making the Honey Garlic Sauce
Now comes the flavor bomb—the sauce. This is where the sweet meets the savory and a touch of tang creates that lip-smacking balance.
To make the perfect honey garlic sauce, gather these:
- 4 tbsp honey
- 3 tbsp soy sauce
- 1 tbsp vinegar (rice vinegar or apple cider vinegar)
- 4 cloves garlic, minced
- Optional: ½ tsp chili flakes, 1 tsp grated ginger
In a bowl, mix honey, soy sauce, vinegar, garlic, and any extras you’re using. Whisk it until the honey dissolves into a smooth, amber-colored liquid. This mixture should taste slightly sweet, salty, and garlicky—like a sneak preview of what’s to come.
Tip: If you’re going for a thicker sauce, add a teaspoon of cornstarch mixed with a little water to the mix before cooking. It’ll thicken as it heats up, giving you that beautiful glossy texture that coats the chicken perfectly.
You can even make this sauce in advance and keep it in the fridge for a few days. It works great as a stir-fry base too!
Step 3: Cooking the Chicken to Perfection
Time to bring out the skillet. You want the chicken golden brown with slightly crisp edges.
- Heat 2 tbsp of oil or butter over medium-high heat.
- Once hot, add the chicken pieces. Let them sear undisturbed for a few minutes to get a nice crust.
- Flip the chicken and cook until golden brown on all sides. This usually takes around 6–8 minutes depending on the size of the pieces.
- Make sure the internal temperature hits 165°F (75°C) if using a meat thermometer.
Don’t overcrowd the pan. Cook in batches if needed. Overcrowding drops the temperature and steams the chicken instead of giving it that mouthwatering sear.
Once all your chicken is cooked and looking golden and delicious, move to the next step—the sauce bath.
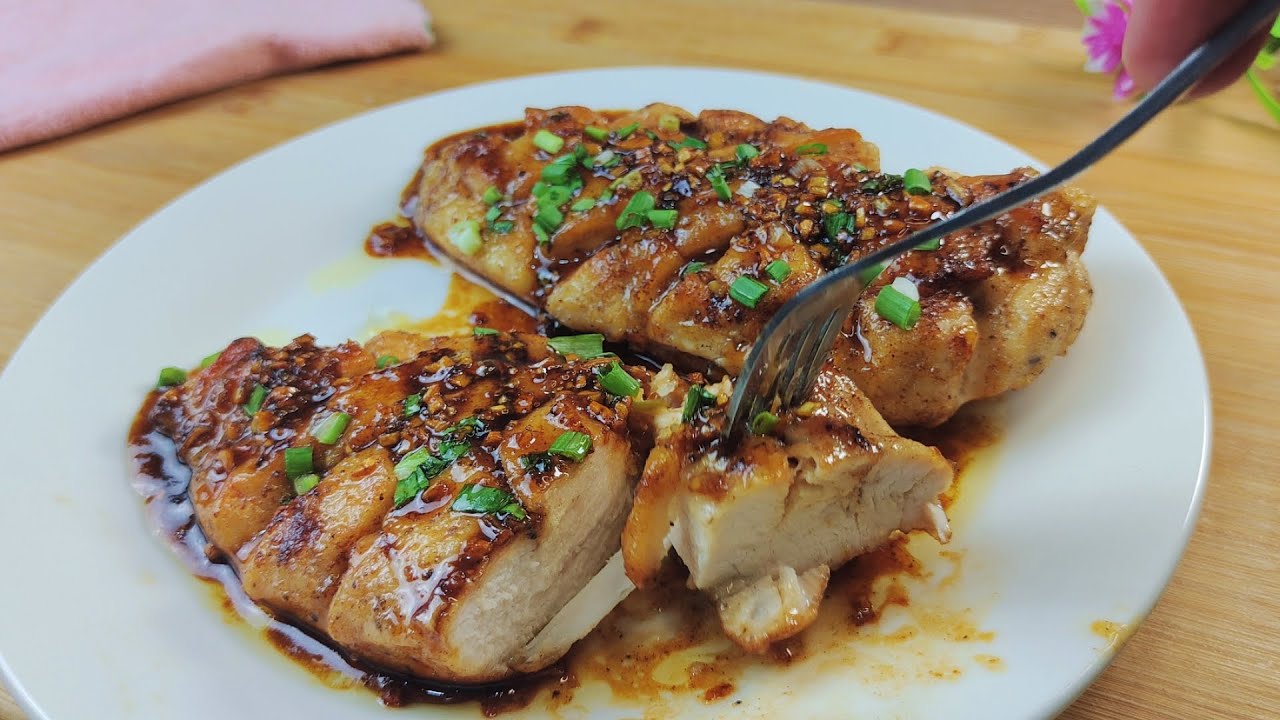
Step 4: Glazing with the Sauce
Here’s where the magic truly happens. Time to take that beautiful sauce you prepped earlier and let it coat the chicken in a sticky, shiny glaze.
- Lower the heat to medium.
- Pour the sauce into the pan over the cooked chicken.
- Stir continuously, making sure every piece is coated.
As it simmers, you’ll see the sauce bubble and thicken. The aroma? Unbelievable. That rich garlic scent mixed with the sweetness of honey is a game changer.
Let the sauce simmer for about 2–3 minutes. If you added cornstarch, it should become thick and glossy at this point. Stir constantly to prevent burning.
Tip: Use a spatula to scrape the flavorful bits stuck to the bottom of the pan—those are golden.
Once your chicken is coated and the sauce is thick enough to stick to a spoon, remove it from heat. It’s showtime.
Step 5: Garnishing and Serving
Presentation makes a difference—even if it’s just you and your Netflix show tonight.
Garnish Ideas:
- Sprinkle sliced green onions on top for color and crunch.
- Add toasted sesame seeds for a nutty touch.
- A few sprigs of fresh parsley or cilantro give it a restaurant-style finish.
Now, plate it up:
- Over a bed of steamed jasmine rice or fluffy quinoa.
- Alongside a bowl of stir-fried veggies or steamed broccoli.
- Or tuck the chicken inside lettuce cups or wraps for a fun twist.
Drizzle any leftover sauce from the pan on top—don’t waste a drop. Grab your fork (or chopsticks) and dig in. You’ve earned it.
Tips & Tricks for Perfect Honey Garlic Chicken
Common Mistakes to Avoid
Even simple dishes can go sideways if you’re not careful. Here are the top pitfalls and how to steer clear:
- Using wet chicken: If you skip patting it dry, your chicken will steam, not sear.
- Burning the garlic: Garlic burns fast, especially in honey. Add it with the sauce, not before.
- Overcrowding the pan: This drops the heat and turns your golden brown into pale and soggy.
- Overcooking the chicken: Dry, rubbery chicken is a tragedy. Use a meat thermometer if you’re unsure.
- Over-sweetening the sauce: Honey is powerful. Start with less—you can always add more.
Pro Chef Secrets You’ll Love
Let’s take it up a notch:
- Marinate the chicken for 30 minutes in soy sauce, garlic, and a pinch of sugar before cooking. It deepens the flavor.
- Deglaze the pan with a splash of chicken broth before adding the sauce to lift all the browned bits.
- Use dark soy sauce for a richer color and deeper umami.
- Add a pinch of baking soda to the marinade for extra tenderness (just a pinch!).
- Try double-cooking: Sear the chicken first, then bake it in the sauce for 10 minutes. Adds depth.
Every little tweak adds layers of flavor. Experiment until you find your signature version!
Different Ways to Cook Honey Garlic Chicken
Pan-Fried Version
The classic and most popular method—pan-frying is where that beautiful caramelization happens. This method is quick, efficient, and delivers restaurant-quality flavor with minimal effort.
Here’s how to nail it every time:
- Use a large non-stick skillet or cast iron pan. You want plenty of room for the chicken to sear, not steam.
- Preheat the pan over medium-high heat and add oil.
- Add chicken pieces in batches, giving them space to brown evenly.
- Once cooked, pour the sauce directly into the pan and toss to coat.
The biggest advantage of pan-frying? Control. You can see, hear, and smell everything happening in real-time, so adjustments are a breeze. It’s ideal for weeknight dinners when time is tight but flavor is non-negotiable.
Want a crustier bite? Coat the chicken lightly in flour or cornstarch before frying. It creates a golden crust that soaks up the sauce like a sponge.
Baked Version
Want to make a bigger batch or free up stove space? Baking is your best friend. It gives the chicken a slightly roasted finish and locks in moisture.
Here’s your step-by-step:
- Preheat your oven to 400°F (200°C).
- Line a baking dish with foil or parchment paper for easy cleanup.
- Arrange seasoned chicken in a single layer.
- Bake for 20–25 minutes, or until fully cooked.
- In the last 5 minutes, pour the sauce over the chicken and return to the oven.
The sauce will bubble, thicken, and glaze the chicken perfectly. If you want extra caramelization, switch to broil mode for the final 2 minutes—but keep a close eye on it!
This method is great for meal prep too. Bake a large tray, portion it out, and store for the week.
Air Fryer Option
Got an air fryer? You’re in luck. It’s the perfect tool for making honey garlic chicken that’s crispy outside and juicy inside—without all the oil.
Here’s how:
- Preheat your air fryer to 375°F (190°C).
- Lightly coat the chicken pieces in cornstarch for crispiness.
- Arrange them in a single layer in the basket—don’t overcrowd.
- Air fry for 12–15 minutes, flipping halfway through.
- While they cook, simmer the sauce in a pan.
- Toss the cooked chicken in the hot sauce and serve immediately.
Bonus: It’s healthier, faster, and cleanup is a breeze. You’ll still get that golden-brown edge without sacrificing flavor.
Best Side Dishes to Serve With It
Rice and Grains
Nothing soaks up that savory-sweet sauce like a bed of fluffy grains. These are tried-and-true sidekicks to honey garlic chicken:
- Steamed jasmine rice – soft and slightly fragrant, perfect with saucy chicken.
- Brown rice or wild rice – adds a nutty texture and is more nutritious.
- Quinoa – light and protein-packed.
- Fried rice – level up by turning it into a full-on feast with eggs and veggies.
Want a flavor boost? Cook your rice in chicken broth or add a knob of butter and a pinch of garlic powder.
Veggies and Salads
Balance out the richness with something fresh and green. Some great choices:
- Steamed broccoli or green beans – toss with sesame oil for an Asian twist.
- Stir-fried mixed vegetables – think bell peppers, carrots, snow peas.
- Cucumber salad – cool and crisp, it cuts through the richness beautifully.
- Asian slaw – crunchy cabbage, carrots, and a tangy vinaigrette.
These sides add color, nutrition, and texture to your plate, making the whole meal more satisfying.
Bread and Noodles
Feeling indulgent? These carb options take things up a notch:
- Garlic naan or pita – soak up the sauce like a sponge.
- Lo mein or ramen noodles – stir-fried with a dash of soy sauce and sesame oil.
- Dinner rolls or crusty baguette – for mopping up every last drop of that golden sauce.
Mix and match depending on your mood. You really can’t go wrong.
Nutritional Value & Health Tips
Calorie Count and Macronutrients
Let’s break it down for an average serving (about 1 cup of honey garlic chicken):
- Calories: ~350–400
- Protein: ~30g (thanks to the chicken)
- Carbohydrates: ~20–30g (from honey and sauce)
- Fats: ~10–15g (depending on cooking oil)
The calorie content can vary depending on how much honey you use and the type of chicken (thighs vs. breasts). Chicken breast will lower the fat content, while thighs keep things juicier.
The sugar from honey makes this a slightly sweet dish, so it’s best enjoyed in moderation if you’re watching your sugar intake.
Making It Healthier
Here’s how to lighten things up without sacrificing flavor:
- Use chicken breast instead of thighs.
- Reduce the honey by 1 tablespoon or swap it with a natural sweetener like monk fruit.
- Use low-sodium soy sauce to cut down salt.
- Bake or air fry instead of pan-frying to reduce oil.
- Add more veggies to stretch the meal without extra calories.
You can even serve it over zoodles (zucchini noodles) or cauliflower rice to make it low-carb. It’s a flexible dish, so feel free to customize based on your goals.
Storing and Reheating Leftovers
Fridge and Freezer Storage Tips
So, you’ve cooked a big batch or have leftovers—no problem. Honey garlic chicken stores beautifully and tastes just as good (if not better) the next day.
Here’s how to store it like a pro:
- Refrigerator: Place leftover chicken in an airtight container. It’ll keep fresh for 3 to 4 days.
- Freezer: Want to save it longer? Let the chicken cool completely, then freeze it in a sealed container or ziplock bag for up to 3 months. Be sure to label it with the date.
For best results, store the chicken and sauce together so it remains juicy. If you have extra sauce, freeze it separately in small portions—great for quick weeknight meals or stir-fries.
Pro tip: Divide into individual portions before freezing for easy grab-and-go lunches or dinners.
Best Ways to Reheat Without Losing Flavor
Reheating can be tricky—you don’t want to dry it out or turn that sticky sauce into a burnt mess.
Here are the best ways:
- Stovetop: Place chicken and sauce in a pan over medium-low heat. Add a splash of water or broth and stir occasionally until warmed through.
- Microwave: Use a microwave-safe container, cover loosely with a lid or wrap, and heat in 30-second bursts. Stir between each burst to avoid cold spots.
- Oven: Preheat to 350°F (175°C), place chicken in a baking dish, cover with foil, and heat for about 10–15 minutes.
Avoid high heat, which can make the sauce burn and the chicken rubbery. Keep it gentle, and your leftovers will be just as mouthwatering as day one.
Variations to Try Next Time
Spicy Honey Garlic Chicken
Want to turn up the heat? Just tweak the sauce.
Add these to your original honey garlic mix:
- 1–2 teaspoons of chili flakes
- 1 tablespoon of sriracha or hot sauce
- Optional: Fresh chopped red chilies
The spice balances out the sweet honey beautifully and adds a bold kick that spice lovers will adore. Serve it with cooling sides like cucumber salad or yogurt dip for balance.
Crispy Breaded Version
Craving crunch? Make it crispy!
How to:
- Coat chicken in flour, then egg, then breadcrumbs or panko.
- Fry or air fry until golden and crunchy.
- Toss in the sauce right before serving (not too early or the crust will get soggy).
This version feels like takeout but tastes even better. It’s especially great for serving with fries or inside a sandwich.
Vegan or Vegetarian Adaptations
Don’t eat meat? No worries—this dish is super adaptable.
Swap the chicken with:
- Tofu: Press and cube it, then pan-fry or air fry until golden before adding the sauce.
- Cauliflower: Cut into florets, roast or fry, then glaze.
- Plant-based chicken alternatives: Available in most grocery stores and works great.
Use maple syrup or agave nectar instead of honey if you’re strictly vegan. The result? Same sticky, garlicky goodness without any animal products.
FAQs about Honey Garlic Chicken Recipe
What type of chicken is best for making honey garlic chicken?
Boneless, skinless chicken breasts or thighs are ideal for honey garlic chicken as they absorb the sauce well and cook quickly.
Can I use frozen chicken for this recipe?
Yes, you can use frozen chicken. However, ensure it is fully thawed and patted dry before cooking to help the sauce adhere better and to achieve a nice sear.
What can I serve with honey garlic chicken?
This dish pairs wonderfully with steamed rice, noodles, or vegetables like broccoli, carrots, and bell peppers to create a balanced meal.
Is honey garlic chicken spicy?
The recipe typically isn’t spicy, focusing on the sweet and savory flavors of honey and garlic. However, you can add chili flakes or hot sauce to introduce some heat.
How can I thicken the honey garlic sauce?
To thicken the sauce, you can mix a tablespoon of cornstarch with an equal amount of water and stir it into the sauce towards the end of cooking. Simmer until it reaches your desired consistency.
Can I make this dish ahead of time?
Yes, honey garlic chicken reheats well. Store it in an airtight container in the refrigerator and gently reheat on the stove or in the microwave when ready to serve.
Is honey garlic chicken gluten-free?
This dish can be made gluten-free by using tamari or a gluten-free soy sauce alternative.
Final Thoughts
Honey garlic chicken is one of those recipes that hits all the right notes—sweet, savory, garlicky, and deeply satisfying. It’s beginner-friendly but versatile enough for seasoned cooks to play with. Whether you pan-fry, bake, or air fry, it delivers on flavor every time.
What makes it even better? The ingredients are simple, the steps are easy to follow, and the end result feels like a restaurant meal made right in your kitchen. You can serve it with rice, veggies, noodles, or wrap it in a tortilla—the possibilities are endless.
So next time you’re craving comfort food with a flavorful twist, give this honey garlic chicken recipe a shot. Your taste buds will thank you—and so will everyone you share it with.