Homemade Mayonnaise Recipe: Mayonnaise is one of those condiments that sneaks its way into so many dishes—whether you’re layering it onto a juicy sandwich, blending it into a creamy salad dressing, or using it as the base of a flavorful dip. But here’s the kicker: store-bought mayo often comes packed with preservatives, sugar, and mystery ingredients. That’s why more and more people are discovering the joy of making mayonnaise at home. It’s fresher, healthier, customizable, and surprisingly easy once you get the hang of it.
Why Make Mayonnaise at Home?
Let’s face it—homemade always tastes better. When you whip up your own mayo, you’re in complete control. No unnecessary additives, no hidden sugars, and definitely no unpronounceable preservatives. It’s just real ingredients, mixed with care.
Plus, there’s something deeply satisfying about creating a silky-smooth, creamy emulsion from scratch. Homemade mayo has a richness that the store-bought kind can’t touch. It’s lighter on the tongue, yet bolder in flavor. And let’s not forget the flexibility—it’s your mayo, so make it your way. Want it tangy? Add more lemon juice. Craving something garlicky? Toss in minced garlic. The sky’s the limit.
Healthier and Tastier Alternative
Health-wise, homemade mayonnaise shines. You’re using fresh, raw egg yolks and oils that you trust. That means you can avoid those inflammatory vegetable oils and opt for heart-healthy alternatives like avocado oil or olive oil.
From a flavor standpoint, nothing beats homemade. It has that fresh, buttery taste with a slight tang from vinegar or lemon juice, and you can tweak it until it’s just right for your palate. Whether you’re keeping it classic or adding your own twist, your homemade mayo will elevate everything it touches.
Essential Ingredients for Homemade Mayonnaise
Basic Ingredients Breakdown
Making mayonnaise doesn’t require a trip to a gourmet store. In fact, you probably already have everything you need in your kitchen:
- 1 large egg yolk – This is the foundation of your emulsion.
- 1 cup neutral oil (canola, grapeseed, or avocado oil) – This builds the body.
- 1–2 tablespoons lemon juice or vinegar – Provides acidity and helps with emulsification.
- 1 teaspoon mustard (Dijon or yellow) – Adds flavor and helps stabilize the mixture.
- Salt to taste – Enhances all the flavors.
Each of these ingredients plays a crucial role. The egg yolk is your emulsifier—it binds the oil and water together. The mustard helps with that too, while also giving a slight tang. The acid (lemon juice or vinegar) balances the fat, brightening the overall taste. And the oil? That’s what gives mayo its signature creaminess.
Optional Add-ins for Flavor Variations
This is where things get exciting. Once you’ve nailed the base recipe, you can jazz it up with fun additions like:
- Minced garlic or roasted garlic – for an aioli vibe
- Smoked paprika or cayenne pepper – adds a smoky or spicy kick
- Fresh herbs like basil, parsley, or dill – for a garden-fresh touch
- Honey or maple syrup – just a touch for a sweet contrast
- Chopped pickles or relish – hello, tartar sauce!
Play around and create your signature spread!
Tools and Equipment Needed
Manual vs. Electric Tools
You don’t need fancy gadgets to make great mayo, but having the right tools can make the process smoother—literally.
Manual method:
- A balloon whisk
- A large mixing bowl
- Lots of elbow grease
Electric method:
- An immersion blender
- A food processor
- A stand mixer
The manual method gives you control and a bit of a workout, while electric tools speed things up and help ensure a consistent emulsion.
Recommended Kitchen Gear
Here’s a checklist of tools to make your mayo-making session a breeze:
- Measuring cups and spoons – accuracy matters!
- A clean glass jar or airtight container – for storing your finished mayo
- A rubber spatula – to scrape down every last bit
- A towel or mat – to stabilize your bowl if mixing by hand
Electric tools can cut the time in half, especially if you’re new to emulsifying. An immersion blender, in particular, is a game-changer—just place everything in a jar, blend, and boom: perfect mayo in seconds.
Preparing Your Workspace
Cleanliness is Key
Homemade mayo is made with raw egg yolks, which means cleanliness isn’t just a suggestion—it’s essential. Before you start:
- Wash your hands thoroughly.
- Sanitize your tools and mixing bowl.
- Use fresh, high-quality eggs (pasteurized if you’re concerned about raw egg).
Keeping everything clean helps ensure your mayo is safe and delicious.
Room Temperature Ingredients Matter
Here’s a pro tip: make sure all your ingredients are at room temperature before you begin. Cold eggs or oil can cause your emulsion to break or fail to thicken properly.
So, take the egg and lemon juice out about 30 minutes ahead. You want everything cozy and ready to blend harmoniously. It may seem minor, but temperature can make or break your mayo.
Step-by-Step Guide to Making Homemade Mayonnaise
Step 1: Gather All Ingredients
Before you dive in, make sure you have everything prepped and within arm’s reach. Nothing throws off the mayo mojo like realizing you’re out of lemon juice halfway through.
Step 2: Separate the Egg Yolk
Carefully separate the egg yolk from the white. You only need the yolk for mayonnaise. Save the white for a meringue or omelet later!
Place the yolk in your mixing bowl or blender cup.
Step 3: Begin Mixing – Slow and Steady Wins the Race
Start by whisking or blending the yolk with your mustard and lemon juice. This lays the groundwork for a stable emulsion.
Now comes the most crucial part…
Step 4: Gradually Add Oil
With your whisk in motion or your blender running, slowly—like really slowly—drizzle in the oil. Start with just a few drops at a time. Once it begins to thicken, you can add the oil in a slow, steady stream.
This step is make-or-break. Go too fast and the mixture won’t emulsify, leaving you with a soupy mess. Patience pays off here.
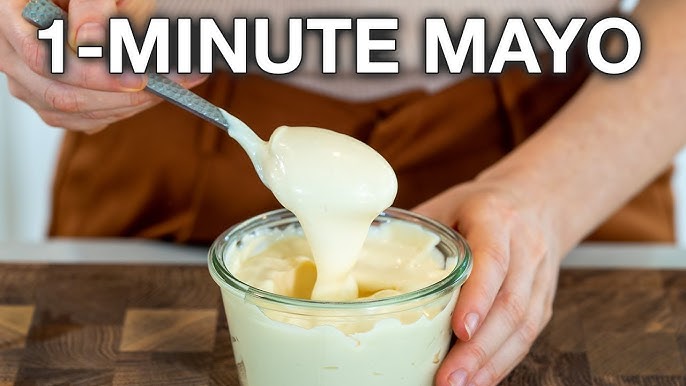
Step 5: Season to Taste and Store Properly
Once it’s thick and creamy, taste it. Add salt, more lemon juice, or mustard if needed. You can also mix in your flavor variations here.
Transfer your finished mayo into a clean jar, seal tightly, and store in the fridge.
Common Mistakes and How to Avoid Them
Mayonnaise Too Runny?
Ever made mayo that turned out more like salad dressing than a creamy spread? Yeah, it happens. A runny texture usually means the emulsion didn’t form properly. The likely culprits? Adding the oil too fast, ingredients being too cold, or not enough agitation in the mixing process.
Here’s how to fix it:
- Start fresh with a new egg yolk in a clean bowl.
- Slowly whisk your runny mayo into the new yolk.
- The new yolk acts like a reset button—it helps the emulsion reform.
If you’re using a blender, do the same: blend a yolk with a bit of mustard, then slowly drizzle in your “broken” mayo. Watch the magic happen as it thickens up beautifully. Patience and steady pouring are the real heroes here.
Curdled or Split Mixture?
A split mayo looks clumpy or oily, and it’s not pleasant. This happens when the oil separates from the water and yolk instead of emulsifying with it. Again, the fix is to start a new base and gradually mix in the broken batch.
To prevent splitting:
- Keep ingredients at the same temperature.
- Whisk or blend continuously—don’t stop midway.
- Add oil slowly, especially at the start.
With these simple tweaks, you’ll never have to toss out a batch of “almost mayo” again.
Tips for Perfect Mayonnaise Every Time
Ingredient Temperature Tips
Let’s get nerdy for a sec—temperature matters more than you think. Cold ingredients resist blending. When your egg yolk is cold and your oil is room temp (or vice versa), they won’t combine smoothly. Room temp is the sweet spot.
Here’s a trick: if you forget to bring your egg to room temp, place it in a bowl of warm (not hot!) water for about 5 minutes. That’ll warm it up just enough to play nice with the oil.
Emulsion Science Basics
Emulsion is a fancy word for mixing two things that don’t naturally mix—like oil and water. Egg yolks contain lecithin, a natural emulsifier, which is why they’re key to mayo. But it only works if you treat it gently.
Think of it like building a relationship. You can’t just throw everything together and expect harmony. Start slow, give it time, and be consistent. Mix at a steady pace, don’t rush the oil, and you’ll be rewarded with mayo so smooth, it could star in a skincare ad.
Creative Variations of Homemade Mayonnaise
Garlic Aioli
Once you’ve got your basic mayo recipe down, garlic aioli is an easy—and wildly delicious—upgrade. Just add:
- 2 cloves of minced garlic (or roasted garlic for a milder flavor)
- A squeeze of extra lemon juice
- A pinch of salt
Whisk or blend these into your mayo for a bold, garlicky punch that pairs beautifully with fries, grilled veggies, or a steak sandwich.
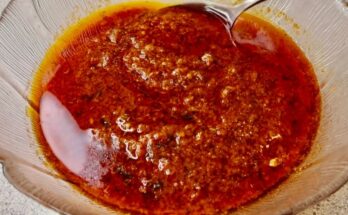
Spicy Sriracha Mayo
Feeling bold? Kick things up a notch with spicy sriracha mayo. Add the following to your basic batch:
- 1–2 tablespoons sriracha (adjust to taste)
- 1 teaspoon lime juice
- Optional: a pinch of sugar or honey for balance
This spicy spread is perfect for burgers, sushi rolls, or even as a dip for crispy chicken tenders.
Herb-Infused Mayo
Want something fresh and fragrant? Toss in some herbs:
- Finely chopped parsley, dill, basil, or chives
- A dash of lemon zest
- A bit of cracked pepper
This herby twist works wonders on grilled chicken, fish, or even a turkey sandwich. It’s like springtime in a spoon.
Nutritional Value and Health Benefits
Comparing Store-Bought vs. Homemade
Let’s do a little side-by-side comparison, shall we?
| Feature | Store-Bought Mayo | Homemade Mayo |
|---|---|---|
| Ingredients | Often loaded with preservatives, sugar, stabilizers | Simple, real food (eggs, oil, lemon) |
| Oil Type | Usually soybean or vegetable oil | You choose: olive, avocado, etc. |
| Taste | Neutral, processed | Rich, fresh, customizable |
| Nutrition Control | Hard to manage | Full control of macros and quality |
With homemade mayo, you ditch the chemicals and keep the flavor. Plus, if you’re on a keto, paleo, or Whole30 plan, you can tweak the recipe to match your dietary needs.
Control Over Ingredients and Additives
Homemade mayo gives you the power to choose:
- The type of oil (avocado, extra virgin olive oil, etc.)
- The level of salt or sugar
- Additives? None—unless you want them
This is a big deal for folks with food sensitivities or allergies. You get a delicious condiment without the stress of label reading.
Storage Tips and Shelf Life
How Long Does It Last?
Here’s the deal: homemade mayo doesn’t last as long as the commercial stuff. But that’s a good thing—no preservatives!
- Shelf life: Typically 5 to 7 days in the fridge.
- Storage: Keep it in an airtight container, like a glass jar with a lid.
- Label it: Write the date on the jar so you don’t forget.
If you used super fresh, pasteurized eggs and clean tools, some people stretch it up to 10 days—but always trust your nose and eyes.
Signs of Spoilage to Watch For
You’ll know it’s time to toss your mayo if:
- It smells sour or off
- The texture changes drastically (watery, separated)
- There’s mold (obviously!)
When in doubt, throw it out. Better safe than sorry, especially when dealing with raw eggs.
Homemade Mayonnaise in Different Cuisines
French Cuisine Inspiration
The French have long mastered the art of sauces, and mayonnaise is no exception. In classic French cuisine, mayonnaise serves as the foundation for a number of “mother sauces” like aioli, remoulade, and gribiche. These rich, flavorful additions are essential elements in many French dishes.
For example:
- Aioli: A garlic-infused mayo perfect for seafood platters or vegetable crudités.
- Remoulade: A herbed, tangy mayo with mustard and capers, often paired with cold meats or fried fish.
- Sauce Gribiche: A mayo-based sauce made with chopped boiled egg, pickles, capers, and herbs.
In French kitchens, mayonnaise isn’t just a spread; it’s a culinary building block. Whether served as a dip or used in more elaborate sauces, its presence elevates the flavor profile of virtually any dish.
Asian Fusion Twists
Asian cuisines bring a bold, umami-packed twist to mayonnaise. Japanese-style mayo, like Kewpie, is known for its extra tangy, slightly sweet flavor. You can recreate it at home with a few tweaks:
- Use rice vinegar instead of lemon juice.
- Add a touch of dashi or MSG for umami.
- Incorporate a pinch of sugar.
You can also blend your homemade mayo with:
- Sriracha or gochujang for a spicy Korean flair.
- Soy sauce and wasabi for a sushi-friendly dip.
- Sesame oil and grated ginger for a bold, nutty version.
These fusion versions are amazing on sushi rolls, rice bowls, tempura, and even Asian-style tacos. Homemade mayo adapts beautifully to global tastes.
Pairing Suggestions for Your Mayonnaise
Best Foods to Enjoy With Homemade Mayo
Homemade mayo’s creamy texture and balanced flavor make it a universal condiment. Here are some top-tier pairings:
- Sandwiches and Burgers: Add a generous smear for instant creaminess and moisture.
- French Fries and Potato Wedges: Forget ketchup—dip those spuds in a garlicky aioli.
- Coleslaw and Potato Salad: Use it as the base for creamy dressings.
- Deviled Eggs: Elevate your egg game with rich homemade mayo.
- Wraps and Tortillas: Spread it inside for extra flavor and binding power.
The real magic of homemade mayo is its versatility. It can dress up a humble sandwich or act as the creamy star in a gourmet dish.
Cooking Uses Beyond Spreads
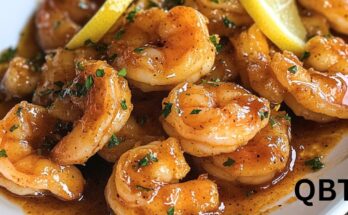
Think mayo is only for cold dishes? Think again. It’s a secret weapon in the kitchen:
- Grilling: Brush mayo on corn or chicken before grilling for a charred, flavorful crust.
- Baking: Use it in cake batters for extra moisture—it’s an old-school baking trick.
- Crusts and Breading: Coat fish or chicken in mayo before breading to help it stick and crisp up.
- Sauce Base: Blend mayo with herbs, citrus, or spices for a quick dressing or dipping sauce.
You’ll be amazed at how often you start reaching for that jar of homemade mayo—not just for sandwiches, but as a go-to kitchen staple.
FAQs about Homemade Mayonnaise Recipe
1. What ingredients do I need for homemade mayonnaise?
To make homemade mayonnaise, you need simple ingredients: egg yolks, oil (like vegetable or olive oil), lemon juice or vinegar, mustard, and a pinch of salt.
2. Is it safe to use raw eggs in mayonnaise?
Using raw eggs can pose a risk of salmonella. To minimize this risk, use pasteurized eggs or eggs from a trusted source. Ensure that all utensils and surfaces are clean to prevent contamination.
3. Can I make mayonnaise without a blender?
Yes, you can make mayonnaise by hand using a whisk or even a fork. The key is to add the oil very slowly and whisk vigorously to create an emulsion. It takes more effort but is entirely doable.
4. How long can I store homemade mayonnaise?
Homemade mayonnaise can be stored in the refrigerator in an airtight container for up to one week. Always use clean utensils to scoop it out to avoid contamination.
5. Why did my mayonnaise turn out runny?
Runny mayonnaise usually results from the oil being added too quickly or not being whisked vigorously enough. To fix it, you can try whisking in another egg yolk or slowly adding a bit more oil while continuously whisking.
6. Can I add other flavors to my mayonnaise?
Absolutely! Feel free to experiment by adding garlic, herbs, spices, or even a splash of hot sauce to tailor the flavor to your liking.
7. What are the best uses for homemade mayonnaise?
Homemade mayonnaise is versatile and can be used in sandwiches, salads, as a base for dressings or dips, or as a condiment for grilled meats and vegetables.
Conclusion
Homemade mayonnaise isn’t just a recipe—it’s a revelation. Once you realize how easy it is to make and how much better it tastes, there’s no going back to the store-bought stuff. Whether you’re looking for a healthier alternative, a base for gourmet sauces, or just a flavorful dip to elevate your fries, homemade mayo has got your back.
Remember: start slow, keep your ingredients at room temp, and don’t be afraid to experiment with flavors. From garlic-infused aioli to spicy sriracha blends and herb-packed spreads, the variations are endless—and all yours to create.
So next time you’re craving something creamy, skip the jar and grab your whisk. Your taste buds will thank you.