Homemade Laundry Detergent Recipe: Ever wondered if there’s a smarter, cheaper, and healthier way to do your laundry? Let’s talk about homemade laundry detergent. Not only is it incredibly easy to make, but it also slashes your laundry costs, cuts down on harmful chemicals, and gives you the satisfaction of a DIY win every time you load the washer.
You might be surprised at how many people are switching to DIY detergent—and for good reasons. For one, commercial detergents often contain synthetic fragrances, dyes, and harsh chemicals that can irritate sensitive skin and pollute waterways. Making your own gives you full control over what touches your clothes and skin.
Then there’s the savings. A batch of homemade detergent can cost just a few cents per load compared to commercial brands, which may cost 10 to 30 cents per load. Multiply that by hundreds of loads per year, and you’re talking serious money saved.
Lastly, it’s about sustainability. Homemade detergents often use biodegradable ingredients, and you can avoid all those bulky plastic containers that clutter landfills. In short, it’s eco-friendly, budget-friendly, and surprisingly simple.
So, ready to give it a shot? Let’s walk through the ingredients and tools you’ll need.
Ingredients and Tools You’ll Need
Making your own laundry detergent is almost as easy as making a sandwich—if your sandwich needed just three or four ingredients. The basic recipe keeps it simple, but you can customize it to your liking with optional boosters or scents.
Key Ingredients Explained
- Washing Soda: Also known as sodium carbonate, this powerhouse removes grease, softens water, and helps lift dirt from fabric. It’s not the same as baking soda, though many confuse the two.
- Borax: A natural mineral compound that boosts cleaning power. It’s been a laundry room staple for over a century, thanks to its ability to eliminate odors and break down acidic stains.
- Bar Soap: This is where things get a bit customizable. You can use anything from old-school Fels-Naptha to eco-friendly Castile soap. This is the main cleaning agent, so choose wisely based on your needs.
Optional Additives
- Essential Oils: Add 10–20 drops for fragrance. Lavender, lemon, and eucalyptus are popular choices.
- OxiClean (non-chlorine bleach): For extra stain-fighting power.
- Baking Soda: Can enhance cleaning and help deodorize clothes.
Tools and Supplies Required
- Cheese grater or food processor (for bar soap)
- Mixing bowl or large container
- Measuring cups
- Airtight container for storage (jar, bin, or plastic container)
- A scoop or spoon for easy use
Now that you’ve got your ingredients and tools lined up, it’s time to pick the right soap for your recipe.
Choosing the Right Soap
Soap isn’t just soap when it comes to laundry. The kind you choose can make a difference in how effective—and pleasant—your detergent is. So let’s break it down.
Best Bar Soaps for DIY Detergent
- Fels-Naptha: A long-trusted brand known for its stain-fighting abilities.
- Zote: A softer soap that’s easy to grate and has a mild scent.
- Dr. Bronner’s Castile Soap: Great for sensitive skin, vegan-friendly, and comes in various scents.
- Kirk’s Original Coco Castile: A pure coconut oil soap that lathers well and works gently on clothes.
Fragrance-Free vs Scented Soaps
If you or your family have sensitive skin, go for fragrance-free options. They’re just as effective but won’t trigger allergies or skin irritation. If you love a fresh scent, you can always add essential oils after mixing your ingredients.
Grating and Prepping Soap Bars
This might be the most “work” involved. Use a regular cheese grater or food processor to shred the bar soap into small pieces. The finer the grate, the easier it dissolves in water—especially for liquid detergent.
Once you’ve prepped your ingredients, you’re ready to create your detergent, starting with the powdered version.
Step-by-Step Guide to Making Powdered Laundry Detergent
Powdered detergent is easy to make, easy to store, and works great in both standard and high-efficiency washers. Let’s get to it.
Step 1: Grate the Soap
Start by grating one bar of soap using your grater or food processor. You should end up with about 1 to 1.5 cups of fine soap shavings. If you’re using a softer soap like Zote, pop it in the microwave for a few seconds to harden it up—it grates better that way.
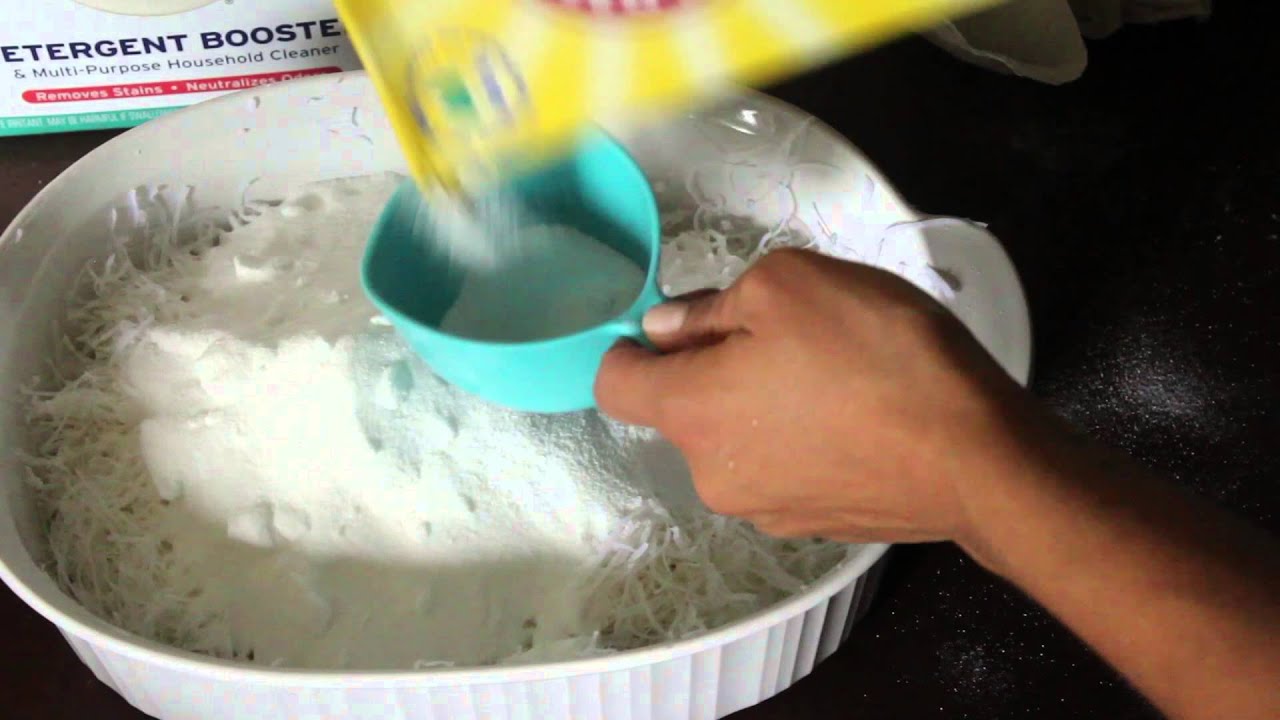
Step 2: Mix Ingredients
In a large mixing bowl or container, combine:
- 1 cup washing soda
- 1 cup borax
- The grated soap
If you want to add baking soda or OxiClean, toss in 1/2 cup of each. Mix everything thoroughly so the powders are evenly distributed. If desired, drop in 10–20 drops of essential oil and stir again.
Step 3: Storage Tips
Transfer your mixture into an airtight container. A repurposed mason jar, old coffee canister, or even a plastic cereal container works great. Store in a cool, dry place.
Use 1–2 tablespoons per load, depending on the size and how dirty the clothes are.
Step-by-Step Guide to Making Liquid Laundry Detergent
If powdered detergent isn’t your thing or you prefer something that dissolves instantly in cold water, liquid laundry detergent might be a better choice. It’s just as effective and only takes a bit more time and patience to make.
Step 1: Dissolve Grated Soap
Start by grating one full bar of soap (about 4-5 oz). In a large pot, add 4 cups of hot water and stir in the grated soap. Keep the heat medium-low and stir continuously until the soap fully dissolves into a smooth, creamy mixture. This step is crucial—don’t let it boil, or it might foam up and overflow.
Once dissolved, remove the pot from the heat.
Step 2: Mix in Other Ingredients
Next, pour in:
- 1 cup of borax
- 1 cup of washing soda
Stir thoroughly until both powders are fully dissolved. You’ll notice the mixture thickens up a bit—this is what helps the detergent do its job.
Now, get a large bucket (at least 2 gallons in capacity). Pour the soapy mixture into the bucket, then add 1 gallon of hot tap water. Stir again until everything blends well.
If you’re a fan of scented laundry, now’s your chance: add 10–20 drops of essential oil.
Step 3: Cool and Store Properly
Let the mixture sit overnight or for at least 8–10 hours. It will thicken to a gel-like consistency—this is perfectly normal. Before using it, stir or shake it well each time. Because it tends to separate, you may want to store it in smaller bottles for easier handling and mixing.
Pour the mixture into empty detergent bottles or clean milk jugs using a funnel. Shake well before each use.
For each load, use about 1/2 cup of liquid detergent. For heavily soiled clothes or larger loads, bump it up to 3/4 cup.
Tips for Using Homemade Detergent Effectively
Making your own detergent is just half the battle. To really get the best results, it helps to know how to use it properly and make adjustments depending on your laundry needs.
Use the Right Amount
- Powdered detergent: 1–2 tablespoons per load
- Liquid detergent: 1/2 to 3/4 cup per load
Using too much won’t get your clothes any cleaner—it might actually leave residue. Less is often more.
Hot vs Cold Water
While homemade detergent dissolves well in hot water, cold water can be tricky—especially for powdered versions. If you wash mostly in cold water, consider making the liquid version or dissolving the powder in a cup of warm water before adding it to the machine.
Front Loader or Top Loader?
Both types work! Just be sure to use the correct amount. For high-efficiency (HE) machines, use half the recommended amount since these washers use less water.
Storing Your Homemade Detergent Safely
You’ve put in the effort—now protect your creation. Here’s how to store your detergent safely and ensure it lasts:
- Airtight Containers: For powder, moisture is the enemy. Use jars, tins, or anything with a tight seal.
- Cool, Dry Place: Keep your detergent in a laundry room cabinet or any shaded area. Avoid bathrooms or garages where humidity can mess with your mix.
- Label Clearly: Mark containers with “Laundry Detergent” and the date you made it. Add instructions if you plan to share with friends or family.
Troubleshooting Common Issues
Even with the simplest recipes, hiccups happen. Let’s troubleshoot a few:
- Powder Clumps: Your container may not be sealed properly. Try using a silica packet inside to absorb moisture.
- Residue on Clothes: Cut back the amount you’re using or dissolve the powder in warm water first.
- Gel Too Thick (Liquid): Stir or blend before each use. Add a bit of warm water and remix if needed.
Benefits of Homemade Laundry Detergent
Switching to homemade laundry detergent isn’t just about saving money—it brings a whole suite of perks that can make you wonder why you didn’t do it sooner.
Cost-Effective
One of the biggest reasons people go DIY is the incredible savings. A typical store-bought detergent can cost $10–$20 per container. In contrast, you can make a large batch of homemade detergent for under $5, and it will last just as long—if not longer. Over a year, that could easily save you $100 or more, especially for larger households.
Customizable
You control the ingredients. Want to avoid synthetic fragrances? No problem. Prefer stronger stain-fighting power? Add some OxiClean or baking soda. You can tweak the formula to suit your laundry needs, preferences, and even allergies or sensitivities.
Eco-Friendly
No plastic jugs. No harsh chemicals going down the drain. No artificial additives polluting the water supply. Homemade detergent is a great step toward reducing your environmental footprint.
Gentler on Skin
Many commercial detergents contain dyes, fragrances, and preservatives that can irritate sensitive skin. DIY detergent gives you peace of mind by using natural, skin-friendly ingredients that are much less likely to cause allergic reactions or rashes.
Things to Avoid When Making Homemade Detergent
Let’s keep it real: DIY detergent is awesome, but a few rookie mistakes can spoil the experience. Here’s what to watch out for:
Skipping Proper Mixing
Make sure everything is thoroughly combined—especially for the powder version. If borax or washing soda clumps together, you won’t get a consistent clean.
Using Too Much Soap
More isn’t always better. Adding more soap than needed can leave a residue on your clothes, especially if your washing machine doesn’t rinse thoroughly.
Storing in Open Containers
Exposure to air and moisture can cause powder detergent to clump and spoil. Always store in airtight containers and keep them away from damp areas.
Ignoring Washing Machine Type
High-efficiency washers require less detergent and don’t handle excessive suds well. Be cautious with the amount you use and consider the type of washer before adding your DIY formula.
Homemade Detergent and Sensitive Skin
If you or your loved ones have eczema, allergies, or generally sensitive skin, homemade detergent can be a total game-changer.
Gentle Ingredients
You can skip the borax if needed and just use washing soda and pure soap for an ultra-mild formula. Go fragrance-free or use soothing essential oils like chamomile or calendula.
Avoid Commercial Additives
Store-bought detergents often include brighteners, enzymes, and sulfates—ingredients that can cause skin irritation. Homemade versions let you cut all that out and go with the basics.
Test in Small Batches
If you’re trying a new soap or ingredient, start with a small batch and wash a few towels or older clothes first. It’s the safest way to test for any reactions without ruining an entire wardrobe.
Can Homemade Laundry Detergent Be Used for Baby Clothes?
Yes, but with some caution. Baby skin is extra sensitive, and their clothing should be cleaned with gentle care. Homemade detergent is often a better option than commercial baby formulas filled with chemicals—so long as it’s made correctly.
- Use only fragrance-free and dye-free soap
- Skip borax for newborns and infants
- Wash a small test load first and observe any skin reaction
Pro tip: Dr. Bronner’s baby-mild Castile soap is a fan favorite among parents making DIY detergent.
FAQs about Laundry Detergent Recipe
1. Does homemade laundry detergent really work as well as store-bought?
Yes, when used properly. While it may not have the same commercial-grade enzymes, it’s effective for everyday laundry, especially when combined with natural boosters like vinegar or baking soda.
2. Can I use homemade detergent in a high-efficiency washer?
Absolutely! Just use less—about half the regular amount—to avoid over-sudsing and buildup.
3. How long does homemade detergent last?
A batch can last for several months depending on usage. Powdered detergent can last indefinitely if stored dry, while liquid versions are best used within 6 months.
4. Will it remove tough stains?
It handles most stains well. For tough spots, pre-treat using a bit of grated soap directly on the stain or use natural stain removers like hydrogen peroxide.
5. Is it safe for septic systems?
Yes! Homemade detergent is generally septic-safe since it lacks phosphates, chlorine, and non-biodegradable ingredients.
Conclusion
Making your own homemade laundry detergent isn’t just a smart financial move—it’s a lifestyle upgrade. Whether you’re going for powder or liquid, this DIY approach puts the power in your hands. You decide what goes into your detergent, how strong it should be, and what it smells like. It’s flexible, safe, eco-friendly, and surprisingly simple.
There’s a certain satisfaction that comes with knowing exactly what’s cleaning your clothes—and that it’s something you made yourself. Once you try it, don’t be surprised if you never go back to store-bought brands again.