Homemade Cinnamon Rolls Recipe: Let’s be honest—store-bought cinnamon rolls are convenient, but nothing beats the fresh-out-of-the-oven aroma and melt-in-your-mouth texture of homemade cinnamon rolls. There’s just something incredibly heartwarming about preparing your own batch from scratch. Not only do you get to control the quality of ingredients, but you also get to adjust the sweetness, spiciness, and gooeyness to your liking. Homemade cinnamon rolls let you skip all those artificial preservatives and additives often found in pre-packaged versions.
Making cinnamon rolls at home might seem intimidating at first glance, but once you walk through the steps, you’ll realize it’s a lot easier than it looks. You don’t need to be a professional baker—just someone who enjoys creating magic in the kitchen. Plus, the results are far more rewarding. The texture is softer, the filling richer, and the frosting creamier when it’s all homemade.
The Joy of Baking at Home
There’s a special kind of joy that comes with baking. Whether it’s the gentle mixing of flour and sugar, the smell of rising yeast, or the moment you pull golden rolls from the oven, it’s a whole experience. Baking connects us to tradition. Think of all the memories you can make—baking with your kids, sharing rolls with your partner over morning coffee, or simply enjoying one in solitude with your favorite book.
Cinnamon rolls especially have that cozy, nostalgic feel. They’re the kind of treat you want on slow Sunday mornings or during holiday brunches. And once you’ve mastered this recipe, you can start experimenting with fun twists—apple-cinnamon filling, maple glaze, or even a pumpkin spice variation in the fall. But first, let’s get the basics down.
Ingredients You’ll Need
Before diving into the actual steps, let’s gather all the ingredients. You want to have everything measured and prepped—this makes the process smooth and stress-free.
For the Dough
To make a soft and fluffy dough that rises beautifully, you’ll need:
- 1 cup warm milk (about 110°F)
- 2¼ teaspoons active dry yeast (1 packet)
- ½ cup granulated sugar
- 2 large eggs
- ⅓ cup unsalted butter, melted
- 1 teaspoon salt
- 4 cups all-purpose flour (plus more for dusting)
The milk activates the yeast, giving rise to those pillowy-soft layers, while the eggs and butter add richness and moisture. Make sure your milk isn’t too hot—otherwise, it can kill the yeast.
For the Cinnamon Filling
The filling is where all the flavor lives:
- ¾ cup brown sugar (packed)
- 2 tablespoons ground cinnamon
- ⅓ cup unsalted butter, softened
Brown sugar gives that deep, caramel-like sweetness, while cinnamon brings the spice. Don’t skimp on the butter—it helps the filling melt into every swirl.
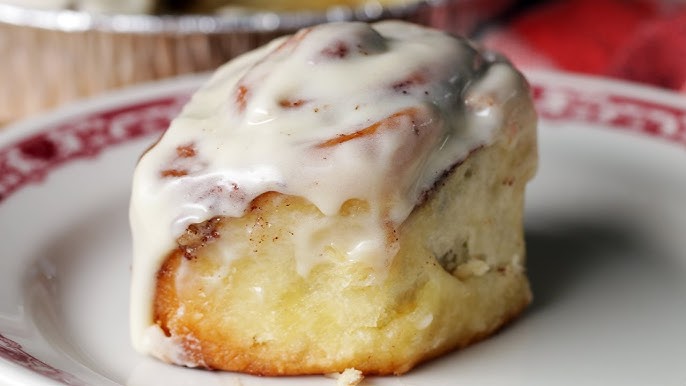
For the Cream Cheese Frosting
What’s a cinnamon roll without that luscious, creamy topping?
- 4 oz cream cheese, softened
- ¼ cup unsalted butter, softened
- 1 cup powdered sugar
- ½ teaspoon vanilla extract
- A pinch of salt
The cream cheese gives it that signature tang, while the vanilla rounds out the flavor. You can also adjust the sugar if you like it less sweet.
Tools and Equipment Required
You don’t need fancy gear, but having the right tools can really streamline the process.
Basic Kitchen Tools for This Recipe
- Mixing bowls (large and medium)
- Measuring cups and spoons
- Wooden spoon or spatula
- Rolling pin
- Sharp knife or dental floss (for cutting rolls)
- 9×13 inch baking pan
- Stand mixer with dough hook (optional but helpful)
- Plastic wrap or clean towel for covering dough
A sturdy rolling pin and sharp knife are particularly important when you’re working with dough and cutting perfect rolls.
Optional Tools That Make It Easier
- Stand mixer: Saves a lot of arm workout during kneading.
- Pastry brush: Helpful for spreading melted butter evenly.
- Instant-read thermometer: Ensures your milk is at the right temperature.
- Silicone baking mat: Great for rolling out dough without sticking.
These aren’t must-haves, but they do make the whole process smoother and a bit more enjoyable.
Preparing the Dough from Scratch
This is the foundation of your cinnamon rolls, so don’t rush it. Good dough is soft, elastic, and slightly sticky—but not so wet it’s hard to handle.
Activating the Yeast Properly
First, warm up your milk until it’s around 105°F to 110°F. Pour it into a mixing bowl and sprinkle the yeast over it. Let it sit for 5–10 minutes until it looks foamy. This “proofing” step confirms your yeast is alive and active.
If you don’t see foam, start over with fresh yeast—otherwise, your dough won’t rise properly. Once it’s foamy, stir in the sugar, melted butter, eggs, and salt until well combined.
Mixing and Kneading the Dough
Gradually add in the flour, one cup at a time, stirring with a wooden spoon or mixing on low speed if using a stand mixer. Once it forms a shaggy dough, transfer it to a lightly floured surface and knead for about 8–10 minutes. The dough should be smooth and elastic but still slightly tacky.
If it’s sticking too much, add a little more flour—but don’t overdo it. Too much flour makes the rolls dense instead of soft.
Letting the Dough Rise to Perfection
Place the kneaded dough in a greased bowl, cover it with plastic wrap or a clean towel, and let it rise in a warm place for 1–1.5 hours, or until doubled in size. This is a great time to relax or prepare your filling and frosting.
The key to a good rise is warmth—if your kitchen is chilly, place the bowl near a warm oven or on top of your fridge.
Rolling, Filling, and Shaping the Rolls
Once your dough has risen and doubled in size, it’s time for the most satisfying part—rolling it out and adding that rich cinnamon filling. This step is where your cinnamon rolls really start to take shape—literally and figuratively.
Rolling Out the Dough Evenly
Start by lightly flouring your countertop or rolling surface. Gently punch down the risen dough to release the air bubbles—don’t worry, this is all part of the magic. Then transfer the dough onto the floured surface and use a rolling pin to shape it into a rectangle about 16 x 12 inches. Try to make the thickness even throughout; about ¼ inch thick works best.
If your dough springs back as you roll, let it rest for a few minutes to relax the gluten. Don’t rush this part. A well-rolled dough ensures every roll gets just the right amount of filling and bakes evenly.
Spreading the Filling the Right Way
Next comes the gooey cinnamon filling. Start by spreading the softened butter evenly across the surface of the dough. Use a spatula or the back of a spoon to get a nice, even layer, reaching right up to the edges.
In a small bowl, mix the brown sugar and cinnamon together until well combined. Sprinkle this mixture evenly over the buttered dough. Be generous—this is what gives your rolls their signature sweet and spicy swirls.
Want to get fancy? Add chopped pecans or raisins at this stage for a fun twist. But even without extras, that buttery cinnamon-sugar combo is pure bliss.
Cutting and Arranging Your Rolls
Once you’ve covered the dough with filling, it’s time to roll it up. Starting from the long edge, roll the dough tightly into a log. Go slow and steady to make sure the roll stays even. Once it’s rolled, pinch the seam closed to seal it.
Use a sharp knife or unflavored dental floss to cut the log into 12 even pieces. If using a knife, saw gently—pressing down too hard can squash your rolls. If using floss, slide it under the log, cross the ends over the top, and pull—this creates clean cuts with no squishing.
Arrange the rolls in a greased 9×13-inch baking pan, leaving a little space between each one to allow for rising. Cover them again and let them rise for another 30–45 minutes until they’re puffy and touching.
Baking to Golden Perfection
After all the rolling and rising, it’s finally time to bake your beautiful cinnamon rolls. Preheat your oven to 350°F (175°C) while the rolls finish their second rise.
Oven Temperature and Timing Tips
Place the pan on the center rack and bake for 20–25 minutes, or until the tops are golden brown. If you like gooier rolls, lean toward the shorter end of the baking time. If you prefer a firmer texture, let them go the full 25 minutes.
You’ll know they’re done when the tops are slightly golden, and a toothpick inserted into the middle roll comes out clean (not wet with dough). The kitchen will smell incredible—that’s a bonus.
Keep an eye on them during the last few minutes. Every oven is different, and you don’t want to overbake and lose that soft, melt-in-your-mouth texture.
Letting the Rolls Cool Slightly
Once baked, remove the pan from the oven and let the rolls cool for about 10–15 minutes. This gives the centers time to set slightly while still staying warm and gooey.
Don’t frost them immediately—if they’re too hot, the frosting will melt into a runny mess. But don’t wait too long either—frosting them while they’re still warm lets it melt just enough to coat every swirl beautifully.
Making and Spreading the Cream Cheese Frosting
This frosting is the final touch that takes your cinnamon rolls from great to unforgettable. It’s tangy, sweet, and just thick enough to coat the rolls without overpowering them.
Whipping Up the Perfect Frosting
In a medium bowl, beat together the softened cream cheese and butter until smooth and creamy. Add the powdered sugar a little at a time to avoid lumps, then mix in the vanilla extract and a tiny pinch of salt to balance the sweetness.
Want it fluffier? Beat it a bit longer to incorporate more air. Want it thinner? Add a splash of milk or cream. You can totally adjust this to your taste.
Applying the Frosting While Warm
Once your rolls are warm (not hot), dollop the frosting on top and spread it evenly with a spoon or spatula. It should slowly melt and ooze into every crevice—that’s the good stuff.
Some people like to frost only the tops, while others go all in and cover every inch. There’s no wrong way here. Make it your own.
Serving Suggestions and Storage Tips
Now that your cinnamon rolls are baked and frosted, it’s time to serve and savor. Whether you’re enjoying them fresh out of the oven or saving some for later, knowing how to serve and store them properly can make all the difference.
Best Ways to Serve Your Cinnamon Rolls
Cinnamon rolls are incredibly versatile when it comes to serving. They shine at breakfast and brunch but can easily steal the show as a dessert or late-night snack. Serve them warm with a mug of hot coffee or a glass of cold milk—it’s the kind of comforting combination that hits the spot every time.
Want to get fancy? Top each roll with an extra sprinkle of cinnamon, a dusting of powdered sugar, or even a drizzle of caramel sauce for that bakery-style finish. Hosting brunch? Pair your cinnamon rolls with fresh fruit, scrambled eggs, or even mimosas for a crowd-pleasing spread.
If you have guests, you might want to serve the rolls in individual ramekins or on a rustic wooden board for that cozy, Instagram-worthy presentation.
How to Store and Reheat Cinnamon Rolls
To keep leftovers fresh, cover the pan with plastic wrap or transfer the rolls to an airtight container. They’ll stay soft and delicious at room temperature for about 2 days, or in the refrigerator for up to 5 days.
To reheat, simply pop a roll in the microwave for about 15–20 seconds. Want to keep it moist? Cover it with a damp paper towel before microwaving. You can also reheat them in the oven at 300°F for about 10 minutes. They’ll come out warm and gooey, just like when you first made them.
Want to freeze some for later? Wrap each roll individually in plastic wrap and foil, then store them in a freezer bag. When you’re ready to eat, let them thaw at room temperature and then reheat. The texture holds up surprisingly well!
Troubleshooting Common Mistakes
Even experienced bakers run into hiccups, so don’t worry if your first batch isn’t picture-perfect. Here are some common problems and easy fixes.
Dough Didn’t Rise? Here’s Why
If your dough didn’t double in size, the yeast might have been the issue. Check the expiration date, and always make sure your milk isn’t too hot—anything above 115°F can kill yeast. The rising environment also matters; if your kitchen is cold, try placing the bowl in a turned-off oven with the light on for gentle warmth.
If the dough is too dry or tough, you may have added too much flour. Next time, measure carefully and knead only until the dough is smooth and elastic—not dry or stiff.
Rolls Turned Out Hard or Dry?
Cinnamon rolls should be soft, not crumbly or dry. Overbaking is often the culprit. Start checking them around the 20-minute mark and remove them once they’re golden and a toothpick comes out clean.
Too much flour in the dough or too little filling can also make them less moist. Make sure your dough is tacky, and don’t be shy with that buttery cinnamon mix.
If your frosting melted completely or slid off, the rolls were likely too hot when frosted. Let them cool a bit next time before slathering on the good stuff.
Fun Variations to Try Next Time
Once you’ve mastered the classic cinnamon roll, the possibilities are endless. Don’t be afraid to get creative and make this recipe your own.
Add-Ins and Flavor Twists
Here are some tasty spins you can try:
- Nutty Delight: Add chopped pecans or walnuts to the filling.
- Fruit Explosion: Mix in raisins, dried cranberries, or thin apple slices.
- Chocolate Lovers: Sprinkle mini chocolate chips or drizzle with chocolate glaze.
- Fall Favorite: Add pumpkin puree to the dough and a pinch of nutmeg to the filling.
- Maple Magic: Swap the cream cheese frosting for a maple glaze with powdered sugar, maple syrup, and milk.
These small changes can completely transform your cinnamon rolls and keep the recipe exciting every time you bake.
Make It Overnight for Easy Morning Baking
Don’t feel like waking up early? Prepare the rolls the night before, cover the pan tightly, and refrigerate overnight. The next morning, let them come to room temperature for about 30–45 minutes, then bake as usual.
This trick is perfect for holidays, brunch parties, or just lazy weekends when you want fresh rolls without the early prep.
FAQs about Homemade Cinnamon Rolls Recipe
Q1: Can I make cinnamon rolls ahead of time?
Yes! You can prepare the cinnamon rolls and refrigerate them overnight before baking. Simply cover the unbaked rolls with plastic wrap, then let them come to room temperature and rise slightly before baking in the morning.
Q2: Why didn’t my cinnamon rolls rise properly?
This usually happens if the yeast is expired or the dough was placed in a cool environment. Make sure your yeast is fresh and the dough is kept in a warm, draft-free place to rise effectively.
Q3: Can I freeze cinnamon rolls?
Absolutely. You can freeze them after baking by allowing them to cool completely, wrapping them tightly, and storing them in a freezer-safe container. Reheat in the oven or microwave before serving.
Q4: What type of flour is best for cinnamon rolls?
All-purpose flour works perfectly for soft and fluffy cinnamon rolls. However, if you prefer a slightly chewier texture, you can mix in a bit of bread flour.
Q5: How do I prevent the cinnamon sugar from leaking out during baking?
Make sure to roll the dough tightly and pinch the seams well. Also, avoid overfilling with too much sugar and butter, which can cause excessive leakage.
Q6: What’s the best icing for cinnamon rolls?
Cream cheese frosting is the most popular choice, giving the rolls a rich and tangy flavor. A simple powdered sugar glaze is also delicious if you prefer something lighter.
Q7: Can I make vegan cinnamon rolls?
Yes! Substitute dairy milk with almond or oat milk, use plant-based butter, and choose a flaxseed or applesauce mixture instead of eggs.
Q8: How long do homemade cinnamon rolls stay fresh?
They stay fresh for up to 2 days at room temperature when stored in an airtight container. For longer storage, refrigerate for up to 5 days or freeze for up to 2 months.
Conclusion
Making homemade cinnamon rolls might take a little time, but every minute is worth it. From the soft, pillowy dough to the warm, buttery filling and rich cream cheese frosting, every bite delivers that cozy, made-with-love flavor that no store-bought version can match.
This isn’t just a recipe—it’s an experience. Whether you’re baking for family, friends, or just treating yourself, cinnamon rolls bring people together like few other treats can. So tie on that apron, roll up your sleeves, and start baking. Once you taste that first homemade bite, you’ll never look back.


