Homemade Cinnamon Roll Recipe: There’s something magical about the smell of cinnamon rolls baking in your oven—it’s cozy, inviting, and downright irresistible. Whether it’s a lazy Sunday morning or a holiday brunch, cinnamon rolls always hit the spot. Unlike the store-bought versions that are often too dry or too sweet, homemade cinnamon rolls strike that perfect balance: soft, gooey, and just sweet enough with that signature swirl of cinnamon goodness. And the best part? You made them yourself.
Homemade cinnamon rolls aren’t just a recipe; they’re an experience. Kneading the dough, spreading the cinnamon filling, watching them rise—there’s a certain kind of joy and pride in each step. Plus, making them from scratch means you can customize everything, from how gooey you want the center to be to how thick and rich your icing is.
This guide breaks down everything you need, from mixing your dough to getting that golden-brown bake and perfect drizzle on top. Even if you’re not a baking pro, don’t worry—we’re going to walk through this step by step so you can enjoy a warm, fluffy cinnamon roll straight out of your own oven.
Essential Ingredients for Perfect Cinnamon Rolls
Before diving in, let’s gather everything you’ll need. Baking cinnamon rolls from scratch isn’t hard, but having all the right ingredients ready makes the process smoother—and way more fun.
Dough Ingredients
The dough is the heart of your cinnamon roll. You want it to be soft, pillowy, and just a little sweet.
- 4 cups all-purpose flour (plus extra for dusting)
- 2 1/4 teaspoons active dry yeast (or one packet)
- 1/2 cup granulated sugar
- 1 cup warm milk (around 110°F)
- 1/3 cup unsalted butter (melted)
- 1 teaspoon salt
- 2 large eggs
Filling Ingredients
This is where the magic happens—the swirl of cinnamon-sugar goodness.
- 1/2 cup unsalted butter (softened)
- 1 cup brown sugar (light or dark, depending on preference)
- 2 tablespoons ground cinnamon
- Optional: 1/2 teaspoon nutmeg, a pinch of salt
Icing Ingredients
No cinnamon roll is complete without that luscious drizzle on top.
- 1/4 cup cream cheese (softened)
- 2 tablespoons unsalted butter (softened)
- 1 cup powdered sugar
- 1/2 teaspoon vanilla extract
- 1–2 tablespoons milk (to adjust consistency)
Having quality ingredients makes a huge difference. Use fresh yeast, real butter, and good vanilla extract—it’ll show in the final flavor.
Kitchen Tools You’ll Need
Having the right tools at your side makes baking smoother and more enjoyable. Here’s a simple checklist to help you prep like a pro.
Tools Checklist
- Large mixing bowl (or stand mixer with dough hook)
- Measuring cups and spoons
- Rolling pin
- Sharp knife or dental floss (for cutting rolls)
- 9×13 inch baking pan
- Plastic wrap or clean kitchen towel
- Whisk and rubber spatula
- Small saucepan (if warming milk manually)
Tips for Preparation
Make sure your butter and cream cheese are softened to room temperature—it makes mixing much easier. If you’re using active dry yeast, test it by dissolving it in warm milk with a pinch of sugar. If it gets foamy in 5–10 minutes, it’s alive and ready. Also, pre-measure your ingredients before starting to keep the flow going, especially when transitioning from dough to filling.
Preparing the Dough – The Foundation of a Perfect Roll
Now we get into the good stuff: making that soft, fluffy dough that will be the base for your rolls. Don’t rush this part—it’s the foundation of your masterpiece.
Step-by-Step Dough Mixing
- Activate the Yeast: In a large bowl, combine warm milk and a teaspoon of sugar. Sprinkle the yeast on top and let it sit for 5–10 minutes until it becomes foamy.
- Add the Wet Ingredients: Stir in melted butter, the rest of the sugar, eggs, and salt until everything is well combined.
- Add the Flour: Gradually mix in flour, one cup at a time. You want a soft, slightly sticky dough. If you’re using a stand mixer, use the dough hook for 6–7 minutes. If kneading by hand, give it 10–12 minutes on a floured surface.
Kneading and Rising Tips
Knead until the dough is smooth and elastic. It should bounce back when you poke it. Place the dough in a greased bowl, cover with a towel or plastic wrap, and let it rise in a warm area for about 1 to 1.5 hours—or until it’s doubled in size. A warm oven (turned off) or a sunny windowsill works great.
The first rise is critical. It lets the gluten develop and the yeast do its work, creating that airy, soft texture that makes cinnamon rolls irresistible.
Making the Sweet Cinnamon Filling
Once your dough has risen and is ready to go, it’s time to prepare the filling—the star of the show. This is what gives your rolls that rich, spiced flavor and gooey center everyone loves.
How to Achieve the Perfect Texture
Start by mixing softened butter, brown sugar, and cinnamon in a bowl until it forms a thick paste. This will help it spread evenly over the dough. You don’t want chunks—you want a smooth, spreadable texture. You can also add a pinch of salt or nutmeg for extra depth.
Choosing the Right Cinnamon
Ceylon cinnamon is lighter and slightly citrusy, while Cassia cinnamon (what’s commonly sold in stores) is bolder and more intense. Either works, but if you want that classic punchy cinnamon roll taste, go with Cassia.
Now that you’ve got your filling ready and your dough has risen…
Rolling and Shaping the Cinnamon Rolls
Now comes the fun part—rolling and shaping! This is where you take all that pillowy dough and transform it into picture-perfect cinnamon spirals. Roll up your sleeves and let’s do this.
Rolling Out the Dough Evenly
Once your dough has doubled in size, punch it down gently to release air. Turn it out onto a floured surface and use a rolling pin to shape it into a large rectangle, roughly 16×12 inches. Keep the thickness even—about 1/4 inch thick—to ensure the rolls bake consistently.
Pro tip: If your dough resists stretching, let it rest for 5 minutes. This relaxes the gluten and makes it easier to roll out.
Spreading the Filling
Using a spatula or clean fingers, spread your prepared cinnamon-sugar mixture evenly over the entire surface of the dough. Go right up to the edges—don’t leave any boring bites! This ensures every roll gets that sweet, spicy goodness in every layer.
Cutting and Arranging
Starting from the long side, roll the dough into a tight log. Roll slowly and evenly so the filling stays inside. Once rolled, trim off the ends for even-sized pieces. Use unflavored dental floss or a very sharp knife to cut the log into 12 equal rolls. Dental floss slides under the dough and cuts cleanly without squishing it.
Place the rolls into a greased 9×13 baking pan, leaving a little space between each one. They’ll puff up during the second rise and baking.
Second Rise – Why It’s Important
After shaping, your rolls need one more rise to become soft and fluffy. This is the secret to getting those bakery-style rolls with the perfect height and texture.
Letting the Dough Rest Again
Cover the pan with a kitchen towel or plastic wrap and let the rolls rise for 30–45 minutes in a warm spot. They should nearly double in size and look puffy. If your kitchen is chilly, place the pan in the (turned-off) oven with the light on.
The second rise allows the dough to relax and expand further. It fills out the pan and ensures that you don’t end up with dense, doughy rolls.
What to Expect During This Stage
You’ll see the rolls start to touch each other in the pan. That’s a good sign—they’re getting cozy and ready for baking. If you’re prepping these the night before, cover the pan and let it rise in the fridge overnight. Just bring it to room temp before baking the next day.
Baking the Cinnamon Rolls to Perfection
Alright, it’s time to bake! This step is where your cinnamon rolls transform from doughy swirls to golden, fluffy masterpieces.
Best Oven Settings
Preheat your oven to 350°F (175°C). If you’re using a glass or ceramic baking dish, stick with this temp. For metal pans, you might increase it to 375°F for slightly crisper edges. Bake the rolls in the center of the oven for 25–30 minutes.
They should be golden brown on top and fully baked through. If the tops brown too quickly, loosely cover the pan with foil in the last 10 minutes.
How to Know When They’re Done
The best way to check is to gently pull apart the center roll. It should be baked through with no raw dough. You can also insert a thermometer into the center—it should read around 190°F.
Don’t overbake! Cinnamon rolls are best when they’re slightly gooey in the center. They’ll continue to cook a little even after you pull them out.
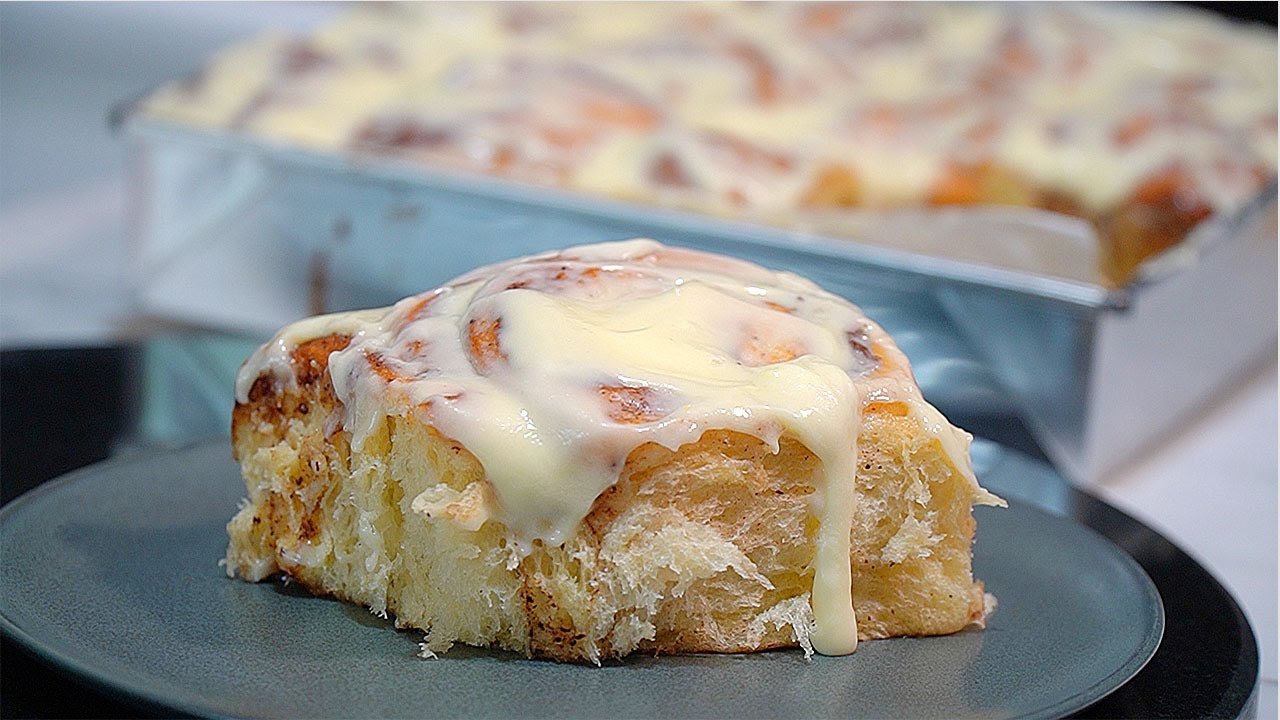
Whipping Up the Creamy Icing
No cinnamon roll is complete without icing—that sweet, creamy topping that melts into the warm rolls and creates pure magic.
Classic Vanilla Icing
In a bowl, beat together:
- 1/4 cup cream cheese (softened)
- 2 tablespoons unsalted butter (softened)
- 1 cup powdered sugar
- 1/2 teaspoon vanilla extract
- 1–2 tablespoons milk
Mix until smooth and creamy. Adjust the milk to get your desired consistency—thicker for spreadable icing, thinner for a drippy glaze.
Optional Flavors and Variations
Want to level it up? Try these twists:
- Add 1/2 tsp of orange zest for a citrus zing.
- Mix in 1–2 tbsp of maple syrup for a richer flavor.
- Swap vanilla for almond extract for a nuttier touch.
- Use browned butter for a caramel-like depth.
Whether you go classic or creative, make sure to ice the rolls while they’re still warm. This helps the icing seep into the crevices and makes each bite ooey-gooey and divine.
Assembling and Serving the Cinnamon Rolls
Now that your rolls are baked and your icing is ready, it’s time for the most satisfying part—bringing it all together and serving them up fresh and hot.
When to Frost
Timing is everything here. For a rich, melted glaze that sinks into every swirl, apply your icing while the rolls are still warm—about 5–10 minutes after they come out of the oven. If you prefer a thicker icing layer that sits on top, wait until the rolls cool a bit more before spreading.
Don’t be shy—slather it on generously. Let it drip down the sides and into the crevices. Every roll should be a glorious mess of sweetness.
Presentation Tips
Cinnamon rolls are beautiful on their own, but you can dress them up a little:
- Sprinkle chopped nuts (like pecans or walnuts) on top of the icing.
- Add a dusting of powdered sugar just before serving.
- Plate them on a rustic wooden board or a fancy platter for brunch vibes.
Serve with a hot cup of coffee, tea, or even warm milk for the coziest experience ever.
Storage and Reheating Tips
Let’s be honest—cinnamon rolls are best straight from the oven. But if you’ve got leftovers (lucky you!), here’s how to keep them soft, moist, and delicious.
Keeping Them Fresh
Store leftover rolls in an airtight container at room temperature for up to 2 days, or in the fridge for up to 5 days. Just make sure they’re fully cooled before sealing them to avoid condensation and sogginess.
To freeze, wrap individual rolls in plastic wrap and place them in a ziplock bag. You can also freeze the entire pan (pre- or post-baking) for up to 3 months. Just remember to label and date them!
Best Reheating Methods
For a just-baked feel:
- Microwave: Place a roll on a plate, cover with a damp paper towel, and microwave for 15–30 seconds. The moisture keeps it soft.
- Oven: Wrap in foil and heat at 300°F for 10–15 minutes. Great for larger batches.
Add a small pat of butter on top before reheating for an extra moist and rich result.
Creative Twists on the Classic Recipe
Classic cinnamon rolls are unbeatable, but that doesn’t mean you can’t have a little fun. Here are some tasty twists to try when you’re ready to experiment.
Nutty Versions
Add crunch and extra flavor with nuts:
- Mix chopped pecans or walnuts into the filling.
- Sprinkle toasted almonds on top of the icing.
- Try a caramel pecan glaze instead of vanilla icing.
Nuts balance the sweetness and add texture, turning a sweet roll into something spectacular.
Chocolate Lovers’ Edition
Swap out the cinnamon sugar for a chocolate-hazelnut spread (like Nutella), sprinkle with mini chocolate chips, and drizzle with chocolate ganache. Yes, it’s over-the-top—and yes, it’s amazing.
You can also mix cocoa powder with sugar for a chocolate-cinnamon fusion that keeps the classic vibe with a cocoa kick.
Savory Cinnamon Rolls
Who says cinnamon rolls have to be sweet? Replace the filling with:
- Garlic butter, herbs, and cheese
- Pesto and parmesan
- Bacon, egg, and cheddar
Skip the icing and serve warm as a savory breakfast or snack. These versions are perfect for brunches or even appetizers.
Common Mistakes and How to Avoid Them
Even seasoned bakers mess up sometimes. But here’s how to sidestep the most common cinnamon roll blunders and bake with confidence.
Troubleshooting Dough Issues
- Too dry or dense? You may have added too much flour. The dough should be slightly tacky, not stiff.
- Didn’t rise? Your yeast might’ve been old or water too hot. Always test your yeast first.
- Tough texture? Overkneading or using cold ingredients can toughen the dough.
Be gentle with your dough. Treat it like a cloud you’re shaping, not a ball of clay you’re beating up.
Preventing Over-baking
- Don’t rely only on time—check the center rolls.
- Use an oven thermometer if your oven runs hot.
- Cover loosely with foil if the tops brown too quickly.
The goal is a light golden top and soft, pull-apart layers inside. If they’re crispy or dark brown, they’re likely overdone.
Making It a Family Tradition
There’s something incredibly special about turning recipes into rituals. Cinnamon rolls are more than just breakfast—they’re memory makers.
Baking with Kids
Get the little ones involved! Kids love:
- Mixing dough
- Spreading the filling
- Rolling and slicing
- Licking the spoon, of course
Yes, it’ll get messy, but the memories you’ll make are worth every flour-covered fingerprint.
Turning It Into a Weekend Ritual
Why not make it a tradition? Whether it’s a monthly Sunday morning bake or a Christmas morning staple, cinnamon rolls bring people together. Share them with neighbors, bring them to brunches, or keep them all to yourself—we won’t judge.
Homemade cinnamon rolls have a way of slowing down the day, bringing people around the table, and reminding us that the best things in life are made from scratch.
FAQs about Homemade Cinnamon Roll Recipe
1. What ingredients do I need for homemade cinnamon rolls?
To make cinnamon rolls at home, you’ll need basic baking ingredients such as all-purpose flour, yeast, milk, sugar, butter, salt, eggs, and of course, cinnamon. Some recipes might also include vanilla extract or cream cheese for the frosting.
2. How long does it take to make cinnamon rolls?
Preparing homemade cinnamon rolls usually takes about 2 to 3 hours, including the time needed for the dough to rise. Most of the time is passive, allowing you to do other things while you wait.
3. Can I make cinnamon rolls without yeast?
Yes, you can make cinnamon rolls without yeast. Instead, use baking powder as a leavening agent to create a quicker, though slightly different textured, version.
4. How can I ensure my cinnamon rolls are fluffy and soft?
For fluffy and soft cinnamon rolls, make sure your yeast is fresh and active, and allow the dough to rise in a warm, draft-free environment. Over-kneading the dough can make the rolls tough, so knead just until the dough is smooth.
5. What is the best way to cut cinnamon rolls?
The best way to cut cinnamon rolls cleanly is to use a piece of dental floss or a sharp serrated knife. Slide the floss under the rolled dough, cross the ends over the top, and pull tightly to slice through cleanly.
6. Can cinnamon rolls be made ahead of time?
Absolutely! You can prepare cinnamon rolls up to the point of baking and then refrigerate them overnight. Simply take them out the next morning, allow them to rise for an hour or so, and bake as directed.
7. Are there any variations I can try with this recipe?
Cinnamon rolls are versatile. Consider adding chopped nuts, raisins, or apple pieces into the filling for extra flavor and texture. You can also experiment with different spices like cardamom or nutmeg for a twist.
8. How do I store leftover cinnamon rolls?
Store leftover cinnamon rolls in an airtight container at room temperature for up to 2 days or refrigerate them for up to a week. You can reheat them in the microwave or oven to restore their warm, gooey texture.
9. Can cinnamon rolls be frozen?
Yes, cinnamon rolls can be frozen either before or after baking. If frozen before baking, let them thaw overnight in the refrigerator and then allow them to rise before baking. If frozen after baking, thaw and reheat to serve.
Conclusion
You did it! From mixing the dough to applying that final swirl of icing, you’ve learned every step of making cinnamon rolls from scratch. And not just any rolls—soft, gooey, rich, bakery-worthy cinnamon rolls that your family will beg for over and over again.
Homemade cinnamon rolls aren’t just a recipe. They’re a labor of love, a comforting ritual, and a treat that brings joy with every bite. So, roll up your sleeves, dust off that rolling pin, and make a batch today. Once you’ve had one fresh from your own oven, you’ll never go back to store-bought again.