Homemade Butter Recipe: Ever tried making your own butter at home? It might sound old-fashioned or even a little daunting at first, but it’s actually one of the most satisfying and delicious kitchen projects you can take on. Not only does homemade butter taste richer and fresher than the store-bought kind, but you also get full control over the ingredients. No preservatives, no additives—just pure, creamy goodness.
Making butter at home connects you to a time-honored tradition, one that’s surprisingly easy with the right tools and a bit of patience. Whether you want to impress your guests with a rustic touch to your brunch spread or you simply love the idea of DIY foods, learning how to make butter is a fun and rewarding skill to add to your culinary toolkit.
Plus, it’s budget-friendly. Heavy cream is usually all you need, and chances are, you already have the tools in your kitchen. The process is also a great way to teach kids about food science in a hands-on way—watching cream turn into butter before their eyes is always a hit!
So, grab your apron, and let’s dive into the creamy world of homemade butter!
What You Need to Make Homemade Butter
Making butter from scratch doesn’t require fancy gadgets or exotic ingredients. In fact, you’ll be surprised at how simple it is when you gather everything you need.
Ingredients
The beauty of this recipe lies in its simplicity. You only need one primary ingredient:
- Heavy Cream (or whipping cream) – Make sure it’s fresh and preferably non-ultra-pasteurized, as ultra-pasteurized cream doesn’t churn well due to the high heat treatment.
Optional:
- Salt – If you like salted butter, you can add this later to taste.
- Cold Water – Used to rinse the butter after it’s formed.
That’s it! No preservatives, artificial coloring, or unpronounceable chemicals—just cream and maybe a little salt.
Equipment
Here’s what you’ll need from your kitchen:
- Stand mixer or hand mixer – While you can churn butter by hand (with a jar or whisk), an electric mixer makes the job much easier and quicker.
- Mixing bowl – A large one to avoid spills during churning.
- Cheesecloth or fine mesh strainer – To separate and drain the buttermilk.
- Spatula or wooden spoon – For collecting and kneading the butter.
- Cold water bowl – For rinsing the butter thoroughly.
- A jar or airtight container – To store your finished butter.
With these basics, you’re all set to begin your butter-making journey.
Step-by-Step Instructions
Now, let’s break down the process into clear, easy-to-follow steps. You’ll be amazed at how quickly cream can transform into a golden, creamy slab of butter.
Step 1: Choose Your Cream Wisely
Your butter is only as good as the cream you start with. Go for heavy cream with a fat content of at least 35-40%. The fresher, the better. If you can find cream from a local dairy or a farmer’s market, even better—it’ll be richer and more flavorful.
Avoid ultra-pasteurized cream if possible. The high heat used during ultra-pasteurization affects the cream’s structure, making it harder for the fat to separate and form butter. Stick with pasteurized or raw cream for the best results.
If you prefer organic or grass-fed dairy, this will also enhance the flavor and texture of your homemade butter.
Step 2: Let the Cream Reach Room Temperature
Before churning, let your cream sit out for about an hour or until it reaches room temperature. Why? Warmer cream churns more easily and quickly than cold cream. It helps the fat molecules loosen up and separate more efficiently when whipped.
You don’t want it warm or hot—just comfortably room temperature (around 68-72°F or 20-22°C). This step can save you precious time when you start mixing.
Step 3: Churn the Cream
Here comes the fun part—churning the cream. Pour your room-temperature cream into a mixing bowl. Use a stand mixer with a whisk attachment or a hand mixer. Start on medium speed, gradually increasing to high as the cream begins to thicken.
First, it will turn into whipped cream. If you were making dessert, this would be the stopping point—but for butter, we’re going further.
Keep whipping, and soon the whipped cream will start to clump and separate. This is where the magic happens! You’ll see yellow clumps (butterfat) start to separate from a milky liquid (buttermilk). This process usually takes 5–10 minutes, depending on your mixer’s power and the cream’s fat content.
Be patient and don’t walk away—it can go from fluffy to separated quite fast!
Step 4: Watch for the Separation
As you churn, keep an eye on the transformation. You’ll first hear the sound of the mixer change—it becomes more sloshy. That’s your cue that the butter is forming.
Once you see solid clumps of butter surrounded by a cloudy liquid, stop mixing. That cloudy liquid is fresh buttermilk, and you’ll want to save it for baking or cooking—it’s a treasure on its own.
Transfer the contents into a strainer or cheesecloth-lined bowl to begin draining.
Step 5: Drain the Buttermilk
Now it’s time to separate the butter from the buttermilk. Use a fine mesh strainer or cheesecloth to collect the butter and let the buttermilk drain into a bowl. Press down gently with a spoon or spatula to squeeze out as much liquid as possible.
The leftover buttermilk can be stored in the fridge for up to a week and used in pancakes, waffles, biscuits, or marinades. Don’t toss it—it’s full of flavor!
Once drained, your butter still has some buttermilk clinging to it, and it’s important to remove as much as possible to extend shelf life. This leads us to the next step.
Step 6: Wash the Butter
Rinse the butter under cold water—you can do this in a bowl or under running water. Use your hands or a spatula to knead and press the butter gently. This step helps release the remaining buttermilk.
Repeat the rinsing and kneading process several times until the water runs clear. This is crucial because leftover buttermilk can spoil and cause your butter to go bad quickly.
It’s a bit messy, but totally worth it. Think of it like giving your butter a refreshing cold bath!
Step 7: Add Salt (Optional)
At this point, you can choose to keep your butter unsalted, or mix in a pinch (or two) of fine sea salt for flavor. Use your spatula to fold the salt evenly into the butter.
You can even get creative and add:
- Crushed garlic
- Fresh herbs
- Lemon zest
- Honey or cinnamon (for a sweet twist)
Just remember to mix thoroughly so every bite is flavorful.
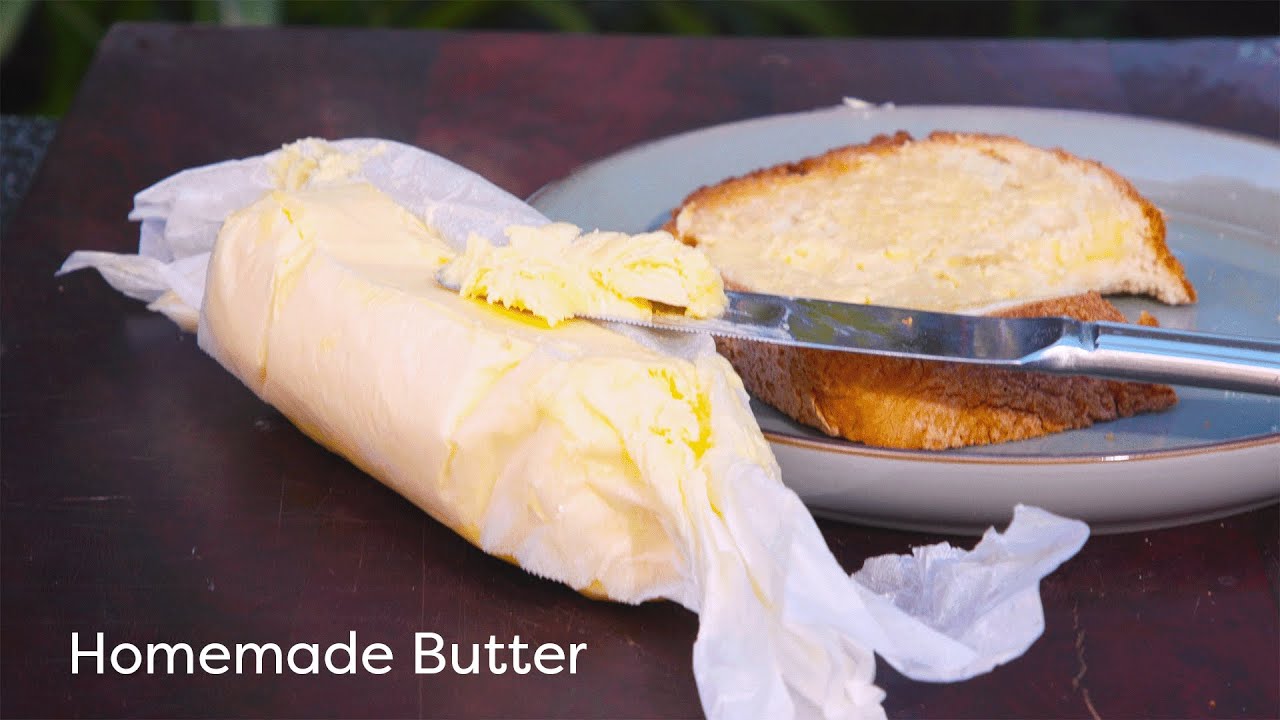
Step 8: Store Your Butter Properly
Now that you’ve got a beautiful block of golden homemade butter, it’s time to store it.
- Wrap it in parchment paper or transfer it into an airtight container.
- Keep it in the refrigerator for up to 2 weeks.
- For long-term storage, you can freeze it for up to 6 months. Just wrap tightly in plastic and place in a freezer-safe bag.
Make sure to label the date so you can keep track. If you made flavored butter, use it sooner, as fresh ingredients can reduce shelf life.
Tips for Perfect Homemade Butter
Now that you’ve nailed the basics, let’s go over a few expert tips to ensure your butter turns out perfect every time.
- Don’t skip the rinsing step. Leftover buttermilk causes spoilage and funky odors.
- Use the right cream. Always choose non-ultra-pasteurized, high-fat cream for best results.
- Chill after rinsing. Pop the butter in the fridge for 15-30 minutes before shaping to help it firm up.
- Try cultured cream. Let the cream sit with a tablespoon of yogurt overnight at room temperature. This creates a tangy, European-style butter.
- Add salt gradually. You can always add more, but you can’t take it out. Taste as you go.
Butter-making is both an art and a science. Once you get the hang of it, you’ll find ways to personalize your butter to match your taste and dishes.
Flavor Variations to Try
One of the best things about homemade butter is how easily you can customize it. Once you’ve mastered the basic recipe, it’s time to get creative. Flavored butters, also known as compound butters, add a delicious twist to your everyday spread and can elevate any dish from ordinary to extraordinary.
Herbed Butter
This is a classic, and for good reason. Herbed butter is perfect for spreading on warm bread, melting over grilled meats, or tossing with pasta and steamed vegetables.
Ingredients to try:
- Fresh chopped parsley, thyme, rosemary, or dill
- Crushed garlic or shallots
- A squeeze of lemon juice or zest for brightness
Mix your herbs into the softened butter and chill it again to let the flavors meld. Try rolling the butter into a log using parchment paper for easy slicing.
Honey Butter
Got a sweet tooth? Honey butter is a dreamy addition to breakfast. Spread it over toast, pancakes, muffins, or cornbread and taste the difference.
Add to your butter:
- 2-3 tablespoons of raw honey
- A pinch of cinnamon or nutmeg for warmth
Whip it all together until smooth and creamy. It’s so indulgent, you might start eating it by the spoonful!
Garlic Butter
This savory spread is a game-changer for garlic bread, mashed potatoes, roasted vegetables, or even steak. It’s like the secret weapon of your flavor arsenal.
Ingredients:
- 2 cloves of minced garlic (or roasted garlic for a milder taste)
- Chopped parsley or basil
- A touch of sea salt
You can also add a sprinkle of Parmesan or chili flakes for extra kick.
The possibilities are endless—try sun-dried tomatoes, blue cheese, or even crushed nuts for texture. Don’t be afraid to experiment and create your own signature butter flavor!
Common Mistakes to Avoid
Even though making butter is simple, a few missteps can trip you up. Here’s what to watch out for to make sure your butter turns out perfect every time.
Using Ultra-Pasteurized Cream
This is one of the most common mistakes. Ultra-pasteurized cream is heated to a very high temperature to extend shelf life, but that process damages the structure of the cream. This means it won’t separate properly during churning, and you may end up with a disappointing mess.
Always choose pasteurized or raw cream with high fat content.
Skipping the Rinse Step
It might be tempting to skip the rinsing stage after you’ve drained the buttermilk, but it’s crucial for keeping your butter fresh. If you don’t wash out the remaining buttermilk, your butter can spoil within just a couple of days.
Rinse under cold water and knead until the water runs clear. This removes all the leftover liquid and helps your butter last longer.
Over-churning
Believe it or not, you can over-churn your butter. If you keep mixing after the fat has separated, you risk damaging the texture and making the butter grainy or greasy.
As soon as you see the solid butter separating clearly from the liquid buttermilk, it’s time to stop.
Adding Too Much Salt
A little salt goes a long way in butter. Adding too much can overpower the delicate flavor. Always add salt gradually and taste as you go. If you’re adding herbs or other salty ingredients (like cheese), reduce the added salt accordingly.
Poor Storage
Butter is sensitive to air, light, and moisture. If you don’t store it properly, it can absorb fridge odors or develop mold. Always keep it wrapped tightly in parchment or in an airtight container. For longer shelf life, freezing is a great option.
Avoid these pitfalls and you’ll have a consistently delicious, creamy homemade butter every time.
FAQs about Butter Recipe
1. How long does homemade butter last?
Homemade butter lasts about 1-2 weeks in the fridge when stored properly in an airtight container. For longer storage, freeze it for up to 6 months.
2. Can I use a blender instead of a mixer?
Yes, you can use a blender or even a food processor. Just be careful not to over-blend. Watch closely for the moment when the butter separates from the buttermilk.
3. What can I do with the leftover buttermilk?
Don’t throw it out! Use buttermilk for pancakes, biscuits, muffins, or as a marinade for chicken. It’s full of flavor and nutrients.
4. How do I know if I over-churned the butter?
If your butter looks grainy, crumbly, or greasy, you’ve likely over-churned. It’s still usable, but the texture may be off. Try adding a little cold water and kneading it gently to restore smoothness.
5. Can I freeze homemade butter?
Absolutely! Wrap it tightly in plastic wrap or parchment paper, place in a freezer-safe bag, and freeze for up to 6 months. Thaw in the fridge when ready to use.
Conclusion
Making homemade butter isn’t just about creating something tasty—it’s about slowing down and reconnecting with your food. It brings a rustic, wholesome touch to your kitchen and gives you full control over what you’re eating. From choosing high-quality cream to adding your favorite herbs or flavors, every step is rewarding and easy to master.
Whether you’re a cooking enthusiast, a fan of old-school recipes, or just someone who wants to try something new, making butter at home is a skill that delivers on flavor and satisfaction. Once you taste your own fresh butter on warm toast, store-bought will never quite cut it again.
So the next time you see heavy cream in your fridge, you’ll know exactly what to do with it—whip it into butter and savor the magic you made with your own hands.