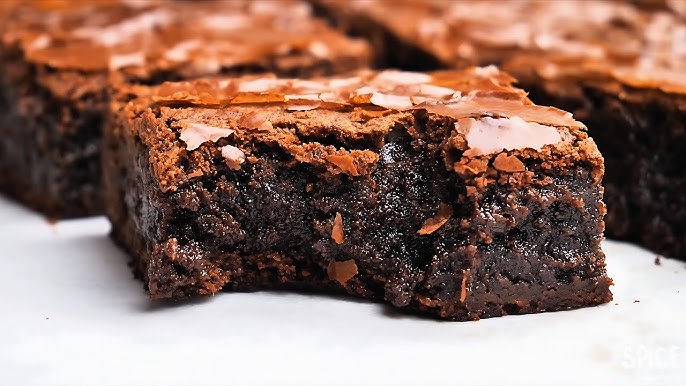
Homemade Brownies Recipe: Imagine biting into a warm, gooey brownie that melts in your mouth — pure bliss, right? That’s the magic of homemade brownies. They’re richer, more flavorful, and way fresher than anything you can grab off a supermarket shelf. Plus, when you make them yourself, you control every ingredient that goes in. No strange preservatives, no unnecessary chemicals — just pure, chocolatey goodness.
In this guide, we’re walking you through every single step to bake the best homemade brownies of your life. Whether you’re a seasoned baker or a newbie in the kitchen, you’ll be surprised how easy and satisfying it is to whip up a batch. So tie your apron, and let’s get baking!
Essential Ingredients for Homemade Brownies
Let’s be honest: the real star of any brownie recipe is the chocolate. But to create that dreamy texture and rich flavor, you’ll need a few more essential ingredients. Here’s what you should gather before diving in:
- Butter: It gives that rich, melt-in-your-mouth feel.
- Granulated Sugar: Sweetness plus a little structure.
- Brown Sugar (optional): Adds moisture and a slight caramel flavor.
- Eggs: They bind everything together and give body.
- All-Purpose Flour: Just enough to hold the brownies without making them cakey.
- Unsweetened Cocoa Powder: Extra punch of chocolate flavor.
- Salt: Trust me, a pinch makes the chocolate flavor pop.
- Vanilla Extract: Adds a deep, aromatic backdrop.
- Baking Powder (optional): If you prefer a little lift in your brownies.
Substitution Tips:
- Need a dairy-free option? Use coconut oil instead of butter.
- Want gluten-free brownies? Swap out regular flour for almond or oat flour.
Having all your ingredients at room temperature helps them blend better, giving you that silky, luscious batter you dream about.
Kitchen Tools You’ll Need
Baking brownies doesn’t require fancy gadgets, but having the right tools can make your life way easier. Here’s what you’ll need:
- Mixing bowls: Preferably one large and one medium.
- Measuring cups and spoons: Precision matters!
- Whisk: For mixing your wet and dry ingredients.
- Rubber spatula: Helps to gently fold ingredients and scrape every last bit of batter.
- 8×8-inch or 9×9-inch baking dish: Depending on whether you want thicker or thinner brownies.
- Parchment paper: For easy removal (and less cleanup).
- Oven: Of course!
Optional but nice-to-have tools:
- Hand mixer: If you want extra smooth batter without tiring your arm.
- Sifter: For lump-free dry ingredients.
Step-by-Step Instructions
Ready to get baking? Here’s the no-fail, foolproof method to make the best homemade brownies:
Step 1: Preheat and Prepare Your Baking Dish
First things first — preheat your oven to 350°F (175°C). This ensures your brownies cook evenly.
Meanwhile, grease your baking dish with butter or cooking spray. For easier removal, line it with parchment paper, letting the edges overhang slightly so you can lift the brownies right out later.
Step 2: Melt Chocolate and Butter Together
Place your chopped chocolate and butter into a microwave-safe bowl. Heat in 20-second bursts, stirring between each, until smooth and glossy. No microwave? No problem! Use a double boiler on the stove. Just make sure you don’t burn the chocolate — low and slow is the way to go.
The smell at this stage? Absolutely heavenly.
Step 3: Whisk in Sugar and Eggs
Now whisk in the granulated sugar (and brown sugar if using) while the chocolate mixture is still warm but not scorching hot. Then add the eggs, one at a time, whisking well after each addition. Stir in the vanilla extract.
The batter should be thick, shiny, and utterly irresistible already.
Step 4: Sift and Fold in Dry Ingredients
In a separate bowl, sift together the flour, cocoa powder, and salt. Then gently fold the dry ingredients into the wet mixture using your rubber spatula. Be careful not to overmix; stop as soon as you don’t see streaks of flour anymore.
Step 5: Pour, Smooth, and Bake
Pour the batter into your prepared pan and spread it into an even layer. Bake for 25-30 minutes, or until a toothpick inserted into the center comes out with moist crumbs (not wet batter).
Pro Tip: Every oven is different! Start checking at the 25-minute mark to avoid overbaking.
Tips for the Best Brownies Ever
Brownies are deceptively simple, but there are a few pro tricks to take them from good to mind-blowingly delicious. Here’s how to ensure your batch turns out absolutely perfect:
- Don’t overmix the batter: Once you add flour, mix just until combined. Overmixing activates gluten, leading to tough, dense brownies.
- Choose quality chocolate: Splurge a little! Higher-quality chocolate (at least 60% cacao) makes a massive difference in richness and depth of flavor.
- Check doneness carefully: Brownies continue to cook a bit after you pull them out of the oven. Look for a few moist crumbs on your toothpick — not raw batter, but not completely dry either.
- Let them cool before cutting: I know, it’s hard to wait! But letting your brownies cool will help them set and slice neatly instead of falling apart into a gooey mess.
Fudgy vs. Cakey Brownies
- Fudgy brownies: Less flour, more fat (butter/chocolate), and shorter baking time.
- Cakey brownies: Slightly more flour and a tad of baking powder.
Want them extra decadent? Chill them for an hour after cooling — it makes them extra chewy and rich!
Creative Add-Ins for Brownies
One of the best parts about homemade brownies? You can customize them to your heart’s content. Here are some ideas to jazz up your batter:
- Nuts: Walnuts, pecans, or almonds add crunch and balance the sweetness.
- Chocolate chips: Stir in semi-sweet, milk, or even white chocolate chips for extra gooey pockets of goodness.
- Caramel swirls: Drizzle caramel into the batter before baking for a luxurious twist.
- Peanut butter: Drop dollops of peanut butter on top and swirl with a knife.
- Dried fruits: Cherries, cranberries, or even apricots can add a surprising tangy bite.
- Oreos or candy pieces: Crush your favorite cookies or candies and mix them right into the batter.
Feel free to get creative and mix and match! Just be mindful not to add too much extra moisture or your baking time might need adjusting.
How to Cut and Store Brownies
You’ve baked the perfect brownies — now don’t ruin them with a bad cutting job! Here’s the right way:
Cutting Brownies Like a Pro
- Let the brownies cool completely. If you’re in a rush, pop them into the fridge for 20 minutes.
- Use a sharp knife and clean it with a damp cloth between cuts.
- If you want super neat slices, use a plastic knife! Weirdly enough, it works better than metal sometimes.
Storing Brownies
- Room Temperature: Store in an airtight container for up to 4 days.
- Fridge: For ultra-fudgy brownies, chill them — they can last up to a week.
- Freezer: Wrap individual brownies in plastic wrap and freeze for up to 3 months. Just thaw and enjoy whenever you need a sweet fix!
Tip: Slightly warm refrigerated brownies for about 10-15 seconds in the microwave. Heaven!
Common Mistakes to Avoid
Even a simple recipe like brownies can go sideways if you’re not careful. Here are some common pitfalls to watch out for:
- Overbaking: This is the #1 mistake. Dry, crumbly brownies are nobody’s favorite.
- Undermixing or overmixing: Stir too little and you get uneven batter; stir too much and you get rubbery brownies.
- Incorrect oven temperature: Always preheat your oven and use an oven thermometer if you can. Some ovens run hot or cold.
- Not measuring ingredients properly: Baking is a science. Level off your flour and cocoa powder with a knife for accurate amounts.
- Using low-quality ingredients: Bad butter or old chocolate = disappointing brownies. Fresh, quality ingredients matter!
Being mindful of these mistakes can make all the difference between meh and magnificent brownies.
FAQs about Homemade Brownies Recipe
1. Can I use melted butter instead of oil in brownies?
Yes, you can! Melted butter gives brownies a richer, more decadent flavor, while oil tends to make them extra moist. Either works, depending on the texture you prefer.
2. How do I make my brownies more fudgy?
For fudgier brownies, use less flour and more fat (like butter or oil). Also, avoid overbaking — take them out when the center is still slightly underdone.
3. Why are my brownies dry?
Dry brownies usually happen when they are baked too long or the oven temperature is too high. Always check a few minutes early and use a toothpick — it should come out with a few moist crumbs, not clean!
4. Can I freeze homemade brownies?
Absolutely! Once completely cooled, wrap them tightly in plastic wrap and then foil. They can be frozen for up to 3 months. Just thaw at room temperature when ready to enjoy.
5. What’s the best type of cocoa powder for brownies?
Unsweetened cocoa powder works best. You can use either natural or Dutch-processed, but natural cocoa gives a deeper, more classic brownie flavor.
6. How do I know when brownies are perfectly baked?
The edges should look set, but the center should still be a little soft. A toothpick inserted about 2 inches from the edge should come out with a few moist crumbs.
7. Can I add chocolate chips or nuts to the batter?
Of course! Stir in chocolate chips, walnuts, pecans, or even chunks of your favorite candy bars to create your own signature brownies.
8. Should I let brownies cool before cutting them?
Yes! Let them cool completely to set properly. Cutting while hot will cause them to crumble and lose their dense, chewy texture.
9. How do I make brownies gluten-free?
Simply substitute the all-purpose flour with a 1:1 gluten-free baking flour blend. Make sure all other ingredients are gluten-free too!
10. What’s the secret to shiny, crackly brownie tops?
Beating the eggs and sugar very well until light and frothy before adding the dry ingredients is the trick. It creates that gorgeous, shiny, crackly top everyone loves.
Conclusion
There you have it — your complete, foolproof guide to baking the ultimate homemade brownies! Whether you prefer them dense and fudgy or light and cakey, now you know exactly how to achieve your dream texture and flavor every time. Plus, with all those creative add-in ideas and pro tips under your belt, you’re ready to seriously impress anyone who gets a taste of your brownies.
Remember: baking is part science, part art, and all love. Don’t stress if your first batch isn’t absolutely perfect — it’s all about having fun and enjoying the sweet rewards!
Happy baking, and don’t forget to share (or not — we won’t judge if you keep them all for yourself)!