Homemade Bagel Recipe: There’s something incredibly satisfying about making bagels from scratch. You control the ingredients, the flavors, and even the texture. Plus, there’s nothing like biting into a warm, chewy bagel that you made with your own two hands. Unlike store-bought options, homemade bagels aren’t packed with preservatives or strange additives. You get a fresher, healthier, and more delicious product every time.
Think about it—how often do you find that perfect bagel at your local grocery store? Too often, they’re either too bready, too dry, or just bland. When you make your own, you can tweak the recipe to suit your exact tastes. Want more chewiness? Add more kneading. Prefer something softer? Adjust the boiling time. It’s your kitchen—your rules.
The Joy of Freshly Baked Bagels
There’s nothing quite like the smell of freshly baked bagels filling your home. It’s warm, comforting, and nostalgic. That toasty aroma tells you something amazing is coming out of the oven. And the taste? Pure heaven. Crispy on the outside, soft and chewy on the inside—exactly how a real bagel should be.
And let’s not forget the sense of accomplishment. Baking can feel intimidating, but bagels are a great project for beginner bakers and pros alike. Once you get the hang of it, you’ll be making these by the dozen. They’re perfect for breakfast, lunch sandwiches, or just a snack with a schmear of cream cheese. You’ll wonder why you didn’t start making them sooner.
Ingredients You’ll Need
Basic Ingredients List
To get started on your bagel journey, you’ll need just a few pantry staples. Bagels are surprisingly simple when you break them down:
- All-purpose flour – About 4 cups for standard yield (you can also use bread flour for extra chewiness)
- Warm water – Roughly 1 and ½ cups; this activates the yeast
- Active dry yeast – 2 and ¼ teaspoons (one packet)
- Sugar – 1 tablespoon; it helps activate the yeast and adds slight sweetness
- Salt – 1 and ½ teaspoons; flavor enhancer
- Barley malt syrup or honey (optional) – Adds traditional bagel flavor and helps with crust color
That’s it. With these ingredients, you’re already halfway to amazing homemade bagels.
Optional Toppings and Add-ins
Now comes the fun part—toppings and customizations. Want to turn your bagels into a bakery-style assortment? Consider these add-ons:
- Everything seasoning
- Sesame seeds
- Poppy seeds
- Shredded cheese (like cheddar or asiago)
- Cinnamon sugar
- Dried onions or garlic
You can even knead add-ins like blueberries, chocolate chips, or herbs into the dough before shaping. The possibilities are endless and tailored to your tastes.
Equipment Needed for Bagel Making
Kitchen Tools That Make Life Easier
You don’t need a commercial kitchen to make excellent bagels. Just a few tools will make the process smoother and more enjoyable:
- Mixing bowl – Large enough to handle your dough
- Measuring cups and spoons – Precision matters
- Stand mixer with dough hook (optional) – Saves arm strength, especially for beginners
- Clean kitchen towel or plastic wrap – For covering dough during rising
- Baking sheet – Lined with parchment or a silicone mat
- Large pot – For boiling the bagels
- Slotted spoon or skimmer – Helps lift bagels out of boiling water
- Wire rack – To cool the bagels evenly
If you’re serious about baking, a digital kitchen scale and a dough scraper are handy investments too.
Step-by-Step Instructions
Step 1: Mixing the Dough
Start by activating your yeast. In a bowl, combine warm water (around 110°F) with sugar and yeast. Let it sit for 5-10 minutes until it becomes frothy. That foam means your yeast is alive and ready to go.
Now add your flour and salt. Mix until a rough dough forms, then transfer it to a floured surface (or keep it in your stand mixer with a dough hook). Knead for 8-10 minutes by hand (or 6-7 with a mixer) until the dough is smooth and elastic. It should bounce back when you press it.
Form the dough into a ball and place it in a lightly oiled bowl. Cover it with a damp towel or plastic wrap and let it rise in a warm place for about 1 to 1.5 hours, or until doubled in size.
Step 2: Kneading and First Rise
After the dough has risen, punch it down gently and turn it onto a clean surface. Knead it just a few times to release the air bubbles. This step improves the bagel’s texture, making it dense yet chewy.
Next, divide the dough into 8 equal portions (use a scale if you want uniform bagels). Roll each portion into a smooth ball. Cover the balls with a towel and let them rest for 10 minutes. This rest period makes shaping easier.
Step 3: Shaping the Bagels
Now comes the shaping, and it’s where your bagels start looking like… well, bagels! Take each dough ball and poke your thumb through the center to create a hole. Gently stretch that hole while rotating the dough to form an even ring. Aim for about 1 to 1.5 inches wide in the center—remember, they’ll puff up during boiling and baking.
You can also roll the dough into a rope and pinch the ends together, but the thumb method is easier and more authentic. Once shaped, place them on a parchment-lined baking sheet, cover with a towel, and let them rest for 10 to 15 minutes. This short proofing lets the dough relax and rise just a bit more.
If your dough resists shaping or keeps springing back, give it another 5 minutes to relax. Don’t rush this step—getting the shape right now makes all the difference later.
Step 4: Second Rise and Boiling
Bring a large pot of water to a boil and add a tablespoon of sugar or barley malt syrup. This sweetened water helps create that shiny, chewy crust we love in classic bagels.
Drop 2–3 bagels at a time into the boiling water. Boil for about 30–60 seconds per side—less time means a softer crust, while more time gives that signature chewy bite. Use a slotted spoon to gently flip them over and then remove to a wire rack or back to your baking sheet.
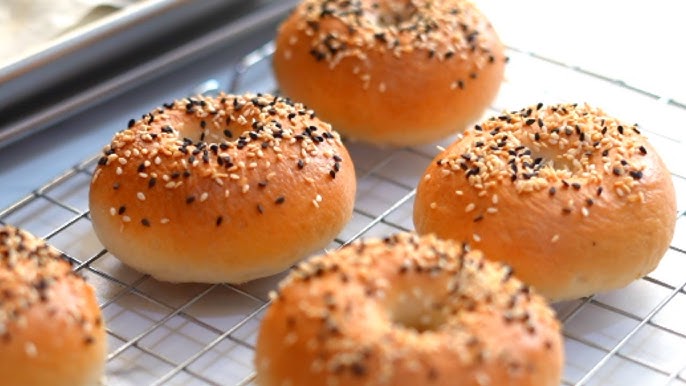
After boiling, immediately sprinkle your chosen toppings while the bagels are still wet. If you wait too long, the toppings won’t stick well. For cheese or cinnamon sugar, consider adding them during baking so they don’t dissolve in the water.
This boiling step is what separates bagels from ordinary bread. It gelatinizes the crust, locks in moisture, and gives bagels their distinct texture.
Step 5: Baking to Perfection
Preheat your oven to 425°F (220°C) and line your baking sheet with parchment or a silicone mat. Once your bagels are boiled and topped, space them evenly on the sheet.
Bake for 20–25 minutes until golden brown. Halfway through, rotate the pan to ensure even baking. They should have a firm crust and sound hollow when tapped on the bottom.
Let your bagels cool on a wire rack for at least 10 minutes before slicing. As tempting as it is to cut into them hot, allowing them to rest helps finish the baking process inside and prevents squishing that beautiful crumb structure.
The result? Bagels that rival your favorite bakery—crispy outside, chewy inside, and full of flavor. Whether you’re going classic with cream cheese or adventurous with smoked salmon and capers, your homemade bagels will be a hit.
Tips for Perfect Homemade Bagels
Common Mistakes to Avoid
- Using cold water for yeast – Yeast needs warm water to activate; too cold and it won’t rise, too hot and you’ll kill it.
- Skipping the boil – Boiling is essential for texture. Don’t skip or shorten it.
- Overproofing – Letting the dough rise too long can cause a yeasty taste and collapse during baking.
- Adding too much flour – Sticky dough is okay. Too much flour results in dense, dry bagels.
- Baking at the wrong temperature – Make sure your oven is hot enough. A weak oven makes soft, pale bagels.
Flavor Variations to Try
Once you master the basic recipe, get creative:
- Cinnamon Raisin – Add 1 tsp cinnamon and ½ cup raisins to the dough.
- Garlic Herb – Mix dried herbs and minced garlic into the dough or sprinkle on top.
- Blueberry Bagels – Gently fold in ½ cup of dried or fresh blueberries.
- Jalapeño Cheddar – Top with sliced jalapeños and shredded cheddar before baking.
- Pumpkin Spice – Use ½ cup pumpkin puree and 1 tsp pumpkin pie spice for fall vibes.
Experiment and find your signature style. Homemade bagels are like blank canvases—you’re the artist.
Storing and Reheating Bagels
After putting in all that effort, you’ll want your homemade bagels to stay fresh as long as possible. Bagels are best eaten the day they’re baked, but with proper storage, they can last several days and still taste great.
Short-term storage (up to 3 days): Place your cooled bagels in an airtight container or sealable plastic bag. Keep them at room temperature, away from sunlight and moisture. Avoid refrigerating them, as that tends to dry out the bagels and make them go stale faster.
Long-term storage (up to 3 months): To freeze, slice the bagels first so they’re easier to toast later. Wrap each bagel tightly in plastic wrap or aluminum foil, then store them in a freezer-safe zip bag. When you’re ready to eat, just pop one directly into the toaster or toaster oven—no need to thaw.
Reheating tips: If the bagels are stored at room temp, a quick 3-5 minutes in a 350°F oven will bring back the crust and warmth. For frozen bagels, go straight to the toaster for a crispy, chewy result.
For the best experience, avoid microwaving your bagels. It softens the crust and gives a rubbery texture—not what you want after all your hard work.
FAQs about Bagel Recipe
1. Can I make bagels without a stand mixer?
Absolutely. You can knead the dough by hand. It just takes a bit more elbow grease—about 10 minutes of steady kneading should do the trick.
2. Why do you boil bagels before baking?
Boiling sets the crust and gives the bagel its chewy texture. It also creates that glossy exterior that defines a real bagel.
3. How do I know if my dough has risen enough?
The dough should double in size and feel airy when gently pressed. If it springs back too quickly, it needs more time.
4. Can I use whole wheat flour instead of all-purpose?
Yes, but whole wheat flour makes denser bagels. Try using half whole wheat and half all-purpose for a balance of texture and nutrition.
5. How can I make gluten-free bagels?
Use a gluten-free flour blend specifically formulated for bread, and add a binder like xanthan gum. Keep in mind, the texture will be different but still delicious.
Conclusion
There you have it—a full, detailed, step-by-step guide to crafting perfect homemade bagels. From activating your yeast to mastering the boil and bake method, every step is a chance to improve your skills and enjoy bakery-quality results right in your kitchen.
Making bagels at home might sound intimidating at first, but once you’ve gone through the process, you’ll realize it’s not only doable—it’s deeply satisfying. The smell, the taste, the chewy bite, and the knowledge that you made them from scratch? That’s priceless.
Whether you’re making them plain or loading them with toppings, these bagels are sure to impress. They freeze well, make great gifts, and are the perfect foundation for breakfasts, sandwiches, or snacking any time of day.
So, roll up your sleeves, dust off that flour, and get baking. Your morning routine just got a whole lot tastier.