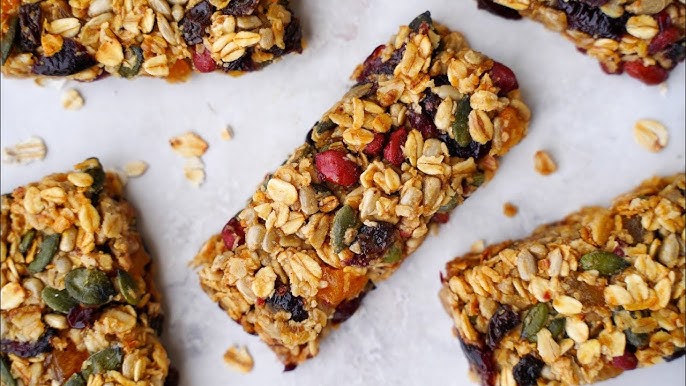
Healthy Granola Bar Recipe: Making your own granola bars at home isn’t just a healthy choice—it’s a delicious one too. We live in a time when grocery store shelves are filled with processed snacks loaded with preservatives and refined sugars. But the good news? You don’t have to settle for that. Crafting your own granola bars gives you full control over what goes into them—from natural sweeteners to nutrient-rich mix-ins. These homemade bars are perfect for a quick breakfast, an afternoon pick-me-up, or even a post-workout refuel.
Why go homemade? First, store-bought options often sneak in additives and excess sugar. Second, making granola bars at home allows you to cater to your taste, dietary preferences, and budget. Imagine biting into a chewy, flavorful bar packed with oats, nuts, honey, and your favorite extras like dark chocolate or dried berries. No mystery ingredients, just pure goodness.
Another perk? These bars are a great way to sneak healthy snacks into your kid’s lunchbox or prep a week’s worth of on-the-go fuel. With just a few simple steps and everyday ingredients, you can whip up a batch in under an hour. Ready to ditch the store-bought stuff? Let’s get started with what you’ll need.
Ingredients You’ll Need
Before diving into the recipe, it’s crucial to understand your building blocks. The beauty of granola bars lies in their flexibility. You can mix and match to suit your taste or what’s already in your pantry. Here’s what goes into a solid granola bar base:
Base Ingredients
- Rolled oats – The heart of your granola bar. Go for old-fashioned rolled oats rather than quick oats to keep the texture hearty.
- Honey or maple syrup – Acts as the natural sweetener and helps bind everything together.
- Nut butter (peanut, almond, or cashew) – Adds richness, flavor, and binding power.
- Nuts or seeds (almonds, sunflower seeds, etc.) – For crunch and protein boost.
Optional Add-Ins
Want to personalize your bars? Here’s where the fun starts:
- Dried fruits (cranberries, raisins, chopped dates)
- Dark chocolate chips or cacao nibs
- Shredded coconut
- Chia or flax seeds for extra fiber and omega-3s
- Protein powder if you’re aiming for a fitness-friendly version
Ingredient Substitution Options
- No honey? Try agave syrup or brown rice syrup for a vegan alternative.
- Nut allergy? Use sunflower seed butter instead of nut butters.
- Gluten-free? Use certified gluten-free oats.
This base gives you room to play. Whether you’re leaning into sweet, savory, or protein-packed, you’re the boss of your bar.
Tools and Equipment
While granola bars are easy to make, having the right tools can save you time and effort. Here’s what you’ll need:
- Mixing bowls – One for dry ingredients, one for wet.
- Measuring cups and spoons – Accuracy is key to the right texture.
- Spatula or wooden spoon – For easy mixing.
- 8×8 or 9×13 inch baking pan – Depending on how thick you want your bars.
- Parchment paper – Helps prevent sticking and makes cleanup a breeze.
- Knife or pizza cutter – To slice your bars evenly after baking.
Optional but helpful:
- Food processor – For chopping nuts or combining ingredients more efficiently.
- Silicone spatula – To spread and flatten your mixture into the pan smoothly.
Having these tools ready means less stress and more fun while baking. Now that you’ve got your ingredients and tools lined up, let’s walk through the actual recipe.
Step-by-Step Instructions
Let’s break this down so it’s foolproof. Even if you’ve never baked a day in your life, these steps will guide you to granola bar glory.
Step 1: Prep Your Baking Pan
Line your baking dish with parchment paper, letting it hang over the sides for easy lifting later. Lightly grease the parchment with a tiny bit of oil or butter to prevent sticking.
Step 2: Combine Dry Ingredients
In a large mixing bowl, add:
- 2 cups rolled oats
- 1/2 cup chopped nuts
- 1/2 cup seeds
- 1/4 cup dried fruit
- 2 tbsp chia or flax seeds (optional)
Mix until evenly distributed. If you’re adding chocolate chips, hold off until the end so they don’t melt too early.
Step 3: Melt and Mix Wet Ingredients
In a small saucepan over low heat, combine:
- 1/2 cup honey or maple syrup
- 1/2 cup nut butter
Stir until the mixture is smooth and well-blended. Remove from heat and let it cool for a minute or two.
Step 4: Mix Everything Together
Pour the wet mixture over the dry ingredients and stir until well combined. Work quickly, as the mix can firm up as it cools. If you’re using chocolate chips, fold them in now.
Step 5: Press into Pan and Bake
Transfer the mixture into your prepared pan. Use a spatula or your hands (covered in parchment paper) to press it down firmly and evenly.
Bake at 325°F (160°C) for 20–25 minutes if you prefer crunchy bars. For no-bake chewy bars, simply refrigerate for 1–2 hours until set.
Once set or baked, lift the parchment out of the pan and place on a cutting board. Slice into bars or squares with a sharp knife.
Tips for Perfect Granola Bars
Let’s be honest—there’s nothing worse than crumbly granola bars that fall apart the moment you pick them up. But don’t worry. With just a few simple tweaks and tricks, you can achieve the perfect consistency every time.
1. Don’t Skip the Binding Agent
The magic lies in the sticky stuff—your honey or maple syrup and nut butter combo. These are what glue your ingredients together. If you skimp on them, you risk dry, crumbly bars. Be generous, but not excessive. A sticky, evenly coated mix is your sign you’re on the right path.
2. Pack it Down Firmly
Use the back of a spoon or a flat-bottomed glass to press your mixture firmly into the pan. This step is crucial for no-bake bars. The tighter you pack it, the better they’ll hold together. Think of it like building a solid foundation—it makes all the difference.
3. Let it Cool Completely
Patience is key. Whether you’re baking or going the no-bake route, give the bars time to fully cool or chill before slicing. Cutting too soon means you’ll end up with broken, uneven pieces. For best results, chill in the fridge for at least 1 hour.
4. Add Chocolate Chips Last
If you’re including chocolate chips, let your mix cool for a couple of minutes after combining wet and dry ingredients. Otherwise, you’ll end up with melted chocolate rather than those pretty little bursts of cocoa in each bite.
5. Use a Sharp Knife
When it’s time to slice your bars, use a long, sharp knife and cut in one clean motion. Avoid sawing back and forth—it’ll only crumble the edges.
Perfecting your granola bar technique might take a little practice, but once you’ve got it, you’ll never go back to buying them again.
Storing and Preserving
Homemade granola bars not only taste great fresh but also store beautifully—if you do it right. Here’s how to make your batch last and keep that fresh-from-the-oven flavor.
Room Temperature Storage
If you like a soft, chewy texture, keep your bars in an airtight container at room temperature. Layer them between sheets of parchment paper to prevent sticking. They’ll stay fresh for up to a week—though they’re usually gone long before that!
Refrigeration
Want a firmer texture or need them to last longer? Pop them in the fridge. The cold helps the bars set even more and can extend their shelf life to about 2–3 weeks. Again, use parchment paper to separate layers, and seal them tightly to prevent moisture from sneaking in.
Freezing for Long-Term Storage
Granola bars freeze surprisingly well. Wrap each bar individually in plastic wrap or parchment paper, then store in a freezer-safe bag or container. When you’re ready to eat one, just thaw it at room temperature for about 15–20 minutes. These can last up to 3 months in the freezer, making them perfect for make-ahead snack prep.
Pro Tip: Label your containers or bags with the date you made them. That way, you always know when it’s time to whip up a fresh batch.
Proper storage means you always have a healthy snack on hand. No need to resort to vending machines or sugar-loaded options!
Flavor Variations
Let’s spice things up, shall we? One of the best parts about making granola bars at home is that you’re not stuck with just one flavor. You can switch things up any time you want. Here are some of the most popular—and delicious—variations to try:
1. Chocolate Chip Peanut Butter Bars
- Add 1/3 cup mini dark chocolate chips
- Use peanut butter as your binding nut butter
- Optional: A pinch of sea salt on top before baking
2. Tropical Coconut Delight
- Mix in dried pineapple and mango pieces
- Add shredded unsweetened coconut
- Use honey for a mild tropical sweetness
3. Apple Cinnamon Oat Bars
- Add dried apple bits and a dash of cinnamon
- Mix in some chopped walnuts or pecans
- Optional: Use a touch of maple syrup instead of honey
4. Mocha Almond Crunch
- Add instant coffee powder to the wet mixture
- Mix in sliced almonds and a handful of cacao nibs
- Optional: Drizzle with melted dark chocolate
5. Berry Nutty Mix
- Combine dried cranberries, blueberries, and strawberries
- Add slivered almonds and sunflower seeds
- A hint of vanilla extract enhances the fruity flavor
Want to go wild? Mix and match your own combos based on what you love. You could even make a different version each week to keep things fresh and exciting.
Nutritional Benefits
Granola bars can be a powerhouse of nutrition—especially when you’re in charge of what goes in. Here’s why homemade bars are a snack-time win:
1. High in Fiber
Thanks to rolled oats, seeds, and dried fruits, these bars are packed with fiber. That means better digestion, reduced hunger, and more stable blood sugar levels.
2. Protein-Packed
Nuts, seeds, and nut butters bring the protein—essential for muscle repair and keeping you full between meals. Want even more? Toss in a scoop of protein powder to take it to the next level.
3. Healthy Fats
Forget the bad kind—your granola bars are filled with heart-healthy fats from nuts and seeds. These help with brain function, energy levels, and hormone balance.
4. Antioxidants Galore
Adding dried berries, dark chocolate, and chia seeds can boost your intake of antioxidants. These protect your cells and fight off damage from everyday stressors.
5. No Nasty Additives
Unlike many store-bought options, your homemade granola bars are free of preservatives, artificial flavors, and excess sugar. You get clean energy, real nutrition, and a snack that truly nourishes.
If you’re counting calories or macros, you can adjust your recipe accordingly. Use a nutrition calculator to track everything precisely if needed.
Kid-Friendly Adaptations
Getting kids to eat healthy can sometimes feel like pulling teeth. But granola bars? They’re fun, customizable, and when made right, a total hit with little ones. Here’s how to tailor your recipe to be kid-approved without sacrificing nutrition:
1. Go Sweet — Naturally
Kids love sweet flavors, but that doesn’t mean you have to reach for refined sugar. Use honey, maple syrup, or mashed bananas as natural sweeteners. For extra flavor, toss in a few mini chocolate chips or yogurt-covered raisins. A drizzle of dark chocolate on top works wonders, too!
2. Use Fun Shapes and Sizes
Don’t just cut your bars into boring rectangles. Use cookie cutters to create stars, hearts, or animals. You can even shape the mix into little bites or balls—perfect for small hands and lunchboxes.
3. Add a Touch of Color
Colorful dried fruits like cranberries, blueberries, apricots, and golden raisins make bars visually appealing. Some rainbow sprinkles (used sparingly!) can also add fun without ruining the health factor.
4. Sneak in the Good Stuff
Add flax seeds, chia seeds, or finely chopped nuts. If your child is picky, grind these up so they’re invisible in the mix. You can also blend in a bit of shredded carrot or zucchini for extra vitamins without the fuss.
5. Let Them Help
Get your kids involved in making the bars. They’ll love measuring, mixing, and choosing their own add-ins. When they help make it, they’re more likely to eat it.
Homemade granola bars are a smart, tasty way to make snack time healthier—and when kids actually enjoy what they’re eating, it’s a win all around.
Making Granola Bars Vegan or Gluten-Free
Whether you’re making snacks for yourself or loved ones with dietary restrictions, granola bars are incredibly adaptable. With just a few thoughtful substitutions, you can easily make them vegan or gluten-free (or both!).
For Vegan Granola Bars:
- Swap honey for maple syrup, agave, or brown rice syrup.
- Use vegan chocolate chips, free from dairy.
- Make sure your nut butter is free from added milk powders (rare, but it happens).
- Avoid any mix-ins that include gelatin, like certain marshmallows or gummies.
For Gluten-Free Granola Bars:
- Use certified gluten-free oats. Regular oats are often processed in facilities with wheat, so double-check the label.
- Be cautious with add-ins like cereals or pretzels—they should also be certified gluten-free.
- Ensure your flavorings (like vanilla extract) are gluten-free—most are, but it’s worth checking.
Pro Combo: Vegan + Gluten-Free
To make bars that check both boxes, combine gluten-free oats with maple syrup, vegan nut butter, and plant-based add-ins. The taste? Still amazing. The nutrition? Solid. The satisfaction? Total.
Going plant-based or gluten-free doesn’t mean giving up flavor. In fact, it might just lead you to your new favorite recipe combo.
Cost Comparison: Homemade vs Store-Bought
You might be wondering: is making your own granola bars actually worth it from a financial standpoint? Spoiler alert—it is. Let’s break it down.
Store-Bought Bars
- Average price: $4–$6 for a box of 5–6 bars
- Cost per bar: $0.80–$1.20
- Includes processing, packaging, and sometimes unnecessary additives
Homemade Granola Bars
- Cost per batch (approx. 12 bars): $6–$8 depending on ingredients
- Cost per bar: $0.50–$0.65
- You control the quality, flavor, and quantity
Verdict: Homemade bars can save you around 30–40% per bar, and that’s using high-quality ingredients. If you buy ingredients in bulk or use what’s already in your pantry, the savings increase even more.
Plus, think of the added value—no preservatives, customized flavors, and that unbeatable feeling of making something nutritious with your own hands.
FAQs about Granola Bar Recipe
1. Can I use quick oats instead of rolled oats?
Yes, but the texture will be softer and less chewy. Rolled oats hold up better in both baked and no-bake bars.
2. Why do my granola bars fall apart?
This usually happens when there’s not enough binding agent (like honey or nut butter) or if the bars weren’t packed tightly enough into the pan. Also, be sure to let them cool before slicing.
3. Can I make these bars without baking?
Absolutely! Simply mix, press into a lined pan, and chill in the fridge for at least 2 hours. They’ll set nicely and remain chewy.
4. How long can I store homemade granola bars?
At room temperature, they last about 5–7 days. In the fridge, up to 3 weeks. In the freezer, they’ll keep for 2–3 months.
5. Can I add protein powder to the recipe?
Definitely! Just be sure to adjust the dry-to-wet ratio slightly so the bars aren’t too dry. Start by reducing the oats slightly when adding protein powder.
Conclusion
Homemade granola bars are one of the easiest, healthiest, and most satisfying snacks you can make in your own kitchen. They’re endlessly customizable, budget-friendly, and loaded with real, whole ingredients. Whether you’re after something vegan, gluten-free, kid-approved, or just plain tasty, this recipe gives you the tools to whip up bars that beat store-bought every time.
From breakfast to post-gym snacks to school lunches, these granola bars are the ultimate homemade solution. Once you try making them, you’ll never go back.
So grab your oats, heat up that nut butter, and start creating your own perfect batch today!