Hawaiian Rolls Recipe: Soft, sweet, and delightfully fluffy — that’s what Hawaiian rolls are all about. These golden beauties are a staple at holiday dinners, backyard barbecues, and everyday meals. Unlike your average dinner roll, Hawaiian rolls have a slight sweetness that sets them apart, thanks to ingredients like pineapple juice, honey, and a touch of sugar. It’s like a little tropical vacation with every bite!
The magic behind Hawaiian rolls is their rich, tender crumb and lightly caramelized crust. They strike the perfect balance between savory and sweet, making them incredibly versatile. Whether you’re making sliders, dipping them into soups, or simply enjoying them with a pat of butter, Hawaiian rolls can elevate any meal.
History Behind Hawaiian Rolls
Hawaiian rolls first gained popularity thanks to King’s Hawaiian, a brand that originated in Hilo, Hawaii, in the 1950s. Robert Taira, the founder, crafted a unique recipe inspired by Portuguese sweet bread but infused it with island flavors. The rolls quickly became a beloved item across the U.S., and today, they are a bakery staple found in nearly every grocery store.
What made Taira’s creation stand out was the distinct taste and texture — slightly sweet, super soft, and utterly irresistible. Over the years, countless home bakers have tried to recreate that iconic flavor at home, leading to dozens of delicious variations.
Ingredients Needed for Hawaiian Rolls
Essential Ingredients
To make authentic-tasting Hawaiian rolls, you’ll need some simple yet important ingredients:
- All-purpose flour: Gives the rolls their structure.
- Pineapple juice: Adds the signature sweetness and slight tang.
- Milk: Provides moisture and softness.
- Butter: For richness and that melt-in-your-mouth feel.
- Honey: Enhances the natural sweetness.
- Sugar: Adds to the tender crumb.
- Yeast: Makes the dough rise and become airy.
- Eggs: Contribute to a rich, tender dough.
- Salt: Balances the sweetness and enhances flavor.
Each ingredient plays a crucial role in creating that distinct Hawaiian roll experience. It’s not just about sweetness; it’s about achieving the right balance and texture.
Optional Add-Ons for Extra Flavor
Want to jazz up your Hawaiian rolls even more? Here are a few optional extras:
- Vanilla extract: Adds depth to the flavor.
- Orange zest: For a citrusy twist.
- Extra honey glaze: Brush it on top after baking for extra shine and sweetness.
Experimenting with these add-ons can make your homemade rolls even more personalized and delicious.
Tools and Equipment Required
Kitchen Essentials
Before diving in, gather your essential tools:
- Mixing bowls
- Measuring cups and spoons
- Whisk
- Rubber spatula
- Baking sheet or 9×13-inch pan
- Pastry brush (for glazing)
Having the right tools ready makes the baking process smoother and more enjoyable.
Special Tools for Perfect Rolls
While not absolutely necessary, these tools can make a big difference:
- Stand mixer with dough hook attachment: Saves you tons of time and effort while kneading.
- Digital kitchen scale: Ensures accurate ingredient measurements.
- Instant-read thermometer: Helps check if the rolls are perfectly baked inside.
If you bake regularly, investing in these gadgets can seriously up your baking game.
Preparing the Dough
Mixing the Ingredients
Start by warming your pineapple juice and milk slightly — not hot, just warm to the touch (around 110°F). Combine them with yeast and a bit of sugar to activate the yeast. You’ll know it’s ready when the mixture becomes frothy.
Next, beat together your eggs, honey, melted butter, and the rest of the sugar. Add the yeast mixture and slowly start adding the flour and salt, mixing until a sticky dough forms. If you’re using a stand mixer, use the dough hook on medium speed.
The dough should be slightly tacky but not overly sticky. If it’s too wet, add a tablespoon of flour at a time until you reach the right consistency.
Tips for Kneading Perfect Dough
Kneading develops the gluten, which gives the rolls their structure. If kneading by hand, lightly flour your surface and use the heel of your hand to stretch and fold the dough repeatedly for about 8-10 minutes.
With a stand mixer, let the dough hook work for about 6-8 minutes until the dough is smooth and elastic. A good test: Press the dough gently with your finger — it should spring back slightly.
Perfectly kneaded dough is key to rolls that rise well and have that soft, fluffy interior everyone loves.
Proofing the Dough
First Proof
Once your dough is beautifully kneaded, it’s time for the first proof. Place the dough in a lightly greased bowl, cover it with a clean kitchen towel or plastic wrap, and set it in a warm, draft-free place.
The dough needs to double in size, which usually takes about 1 to 2 hours depending on the warmth of your kitchen. A good trick? Preheat your oven for just a minute or two, then turn it off and let your dough rise inside. The gentle heat helps speed things up without overheating.
Patience is key here. This first rise allows the yeast to create all those little air pockets that will make your Hawaiian rolls light and fluffy. If you rush it, you’ll end up with dense, sad rolls — and nobody wants that!
Second Proof and Why It’s Important
After the first proof, punch down the dough gently to release excess air. Then, divide the dough into equal portions and shape them into balls. Arrange the balls in a greased 9×13-inch baking pan, leaving a little space between each one to allow room for the second rise.
Cover again and let them proof a second time for about 45 minutes to 1 hour. This second proof is crucial because it gives the rolls their final puffy shape and ensures a tender crumb.
Skipping the second proof might lead to rolls that bake unevenly or are too dense inside. Trust the process — your patience will be rewarded with pillowy perfection.
Shaping and Baking the Rolls
How to Shape the Rolls
Shaping might sound intimidating, but it’s actually fun! After dividing your dough, take each piece and tuck the edges underneath to create a smooth, tight ball. Pinch the seams at the bottom to seal.
Aim for uniform size so the rolls bake evenly. If you’re feeling fancy, you can weigh each piece (around 2 ounces each) to get perfectly matching rolls.
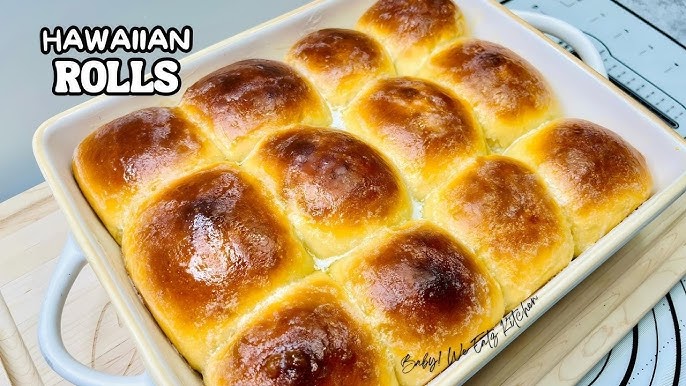
Arrange them in rows in your baking dish. As they bake and rise, they’ll snuggle up against each other, creating those irresistible pull-apart sides that make Hawaiian rolls so charming.
Baking Tips for Golden Perfection
Before baking, preheat your oven to 350°F (175°C). Just before placing them in the oven, brush the tops with melted butter. This adds flavor and helps create that gorgeous golden crust.
Bake for 20-25 minutes, or until the tops are beautifully golden brown and an instant-read thermometer inserted into the center reads 190°F. If the rolls are browning too quickly, you can loosely tent them with aluminum foil halfway through baking.
As soon as they come out of the oven, give them another generous brush of butter. This final touch adds shine, flavor, and that irresistible “can’t-eat-just-one” vibe.
Common Mistakes to Avoid
Overproofing the Dough
Overproofing is when the dough rises too much, and it can cause the rolls to collapse during baking. If you let your dough proof for too long, the yeast will overwork itself, and the dough structure will weaken.
The solution? Keep an eye on your dough. It should roughly double in size during proofing, not triple. Use the “poke test”: gently press your finger into the dough — if the indentation springs back slowly but remains slightly visible, it’s ready.
Baking Temperature Errors
Baking at the wrong temperature can make or break your Hawaiian rolls. Too hot, and they’ll brown too quickly on the outside while staying raw inside. Too cool, and you’ll end up with pale, dry rolls.
Always preheat your oven and use an oven thermometer if possible — many home ovens run a little hotter or cooler than the dial says. Consistent, correct heat ensures an even bake and perfectly fluffy centers.
Serving Suggestions
Best Ways to Enjoy Hawaiian Rolls
Hawaiian rolls are incredibly versatile and can be enjoyed in so many ways that you’ll never get bored. One of the simplest (and most delicious) ways is to eat them warm with a generous pat of butter melting into all the fluffy goodness. They also make fantastic dinner companions—perfect for soaking up gravies, soups, or even rich sauces from your main dish.
Another favorite? Sliders! Slice the rolls horizontally, layer in ham, cheese, turkey, pulled pork, or even chicken salad, then bake the assembled sliders until gooey and warm. The sweetness of the roll contrasts beautifully with savory fillings, creating a flavor bomb with every bite.
And if you’re into breakfast magic, use your Hawaiian rolls to make French toast. The rolls soak up the egg mixture wonderfully, staying soft on the inside while getting crispy on the outside. Hawaiian roll French toast is chef’s kiss perfection!
Pairing Ideas for Meals
If you’re wondering what dishes pair well with Hawaiian rolls, here are some ideas:
- BBQ Pulled Pork: The slight sweetness of the rolls is a perfect match for smoky, savory pork.
- Fried Chicken: Crunchy fried chicken tucked into a fluffy Hawaiian roll? Yes, please.
- Chili or Stews: Rolls make the ideal bread for sopping up hearty, flavorful stews.
- Holiday Feasts: Hawaiian rolls shine at Thanksgiving or Christmas dinners alongside turkey, ham, and all the fixings.
- Cheeseburger Sliders: Turn your backyard BBQ into a gourmet affair by using Hawaiian rolls for mini burgers.
Get creative—these rolls can elevate just about any meal into something truly memorable.
Storing and Freezing Tips
How to Store for Freshness
Fresh Hawaiian rolls are a joy, but if you have leftovers (lucky you!), proper storage is key. Store them in an airtight container or a resealable plastic bag at room temperature. They’ll stay soft and delicious for about 3–4 days.
Avoid refrigerating them, as the cold temperature can dry them out faster. If you want to refresh slightly stale rolls, pop them into a 300°F oven for about 5 minutes. They’ll perk right back up, warm and toasty.
Freezing Instructions
Want to make a big batch and save some for later? Hawaiian rolls freeze beautifully! After baking and cooling completely, place the rolls in a freezer-safe bag or container. Make sure to remove as much air as possible to prevent freezer burn.
When you’re ready to enjoy them, thaw the rolls at room temperature, then warm them in the oven for a few minutes. They’ll taste nearly as good as fresh. For best results, use frozen rolls within 2–3 months.
If you plan to freeze the dough before baking, shape the rolls after the first rise, freeze them on a tray until solid, then transfer to a bag. When you’re ready to bake, let them thaw and rise again before popping them in the oven.
FAQs about Hawaiian Rolls Recipe
What makes Hawaiian rolls different from regular dinner rolls?
Hawaiian rolls are uniquely soft, fluffy, and slightly sweet. The secret lies in ingredients like pineapple juice, honey, and sometimes brown sugar, which give the rolls their signature tropical flavor and tender texture.
Can I use canned pineapple juice for Hawaiian rolls?
Yes! Canned pineapple juice works perfectly for Hawaiian rolls. Just make sure it’s 100% pure juice without added sugars or artificial flavors for the best result.
Why are my Hawaiian rolls dense instead of fluffy?
Dense rolls often happen if the dough wasn’t kneaded enough or if the yeast didn’t activate properly. Make sure your yeast is fresh, and knead the dough until it’s smooth and elastic.
How long should I let the dough rise?
Typically, you should let the dough rise until it doubles in size, which can take 1 to 2 hours depending on the warmth of your kitchen. Patience is key for that airy, light texture!
Can I make Hawaiian rolls ahead of time?
Absolutely! You can make the dough ahead and refrigerate it overnight. The next day, bring it to room temperature, shape the rolls, let them rise again, and bake fresh.
How should I store leftover Hawaiian rolls?
Store leftover rolls in an airtight container at room temperature for up to 3 days. For longer storage, you can freeze them for up to 2 months—just thaw and warm before serving.
Can I use whole wheat flour instead of all-purpose flour?
You can substitute part of the all-purpose flour with whole wheat flour, but the texture might be a bit denser. For the fluffiest rolls, it’s best to stick mostly to all-purpose flour.
Do I have to use eggs in the dough?
Eggs help make the rolls rich, soft, and golden. If you have an egg allergy or prefer not to use eggs, you can try using an egg substitute, but expect a slight change in texture.
Can I add toppings to my Hawaiian rolls?
Definitely! Before baking, you can brush the tops with melted butter and sprinkle sesame seeds, poppy seeds, or even a little flaky salt for extra flavor and crunch.
Why are my rolls not golden brown on top?
If your rolls aren’t browning properly, try brushing them with a little butter or egg wash before baking. Also, make sure your oven is fully preheated and at the right temperature.
Conclusion
Making Hawaiian rolls at home is a little labor of love that pays off in a huge way. Sure, it takes a bit of time between mixing, kneading, proofing, and baking, but the end result is so worth it—soft, fluffy, slightly sweet rolls that you made yourself!
Once you nail the basic recipe, you’ll find endless ways to customize and enjoy them. Plus, your house will smell incredible while they bake—seriously, it’s like bottling up sunshine.
So next time you’re looking for a baking project that’s both rewarding and absolutely delicious, Hawaiian rolls are your answer. Grab your ingredients, get your hands a little sticky, and create some homemade magic. Your taste buds will thank you!